Use and Care Guide
Page 2
.... Solutions to common problems 36=37 Sears Service (I=SOO-4=MY-HOME back cover Kenmore Appliance Warranty One Year Limited Warranty When installed, operated and maintained according to all...product. 9. Disclaimer of Contents Appliance Warranty 2 Important Safety Instructions 3=5 Master Protection Agreement 6 Range Feautes 7 Before Setting Oven Controls 8-9 Removing, replacing & arranging the oven racks 8 Before... Setting the Sabbath feature 28-29 Operating oven lights 29 Flex Clean 30-31 Care & Cleaning 32-35 Cleaning Recommendations Table 32 Cooktop maintenance ...
.... Solutions to common problems 36=37 Sears Service (I=SOO-4=MY-HOME back cover Kenmore Appliance Warranty One Year Limited Warranty When installed, operated and maintained according to all...product. 9. Disclaimer of Contents Appliance Warranty 2 Important Safety Instructions 3=5 Master Protection Agreement 6 Range Feautes 7 Before Setting Oven Controls 8-9 Removing, replacing & arranging the oven racks 8 Before... Setting the Sabbath feature 28-29 Operating oven lights 29 Flex Clean 30-31 Care & Cleaning 32-35 Cleaning Recommendations Table 32 Cooktop maintenance ...
Use and Care Guide
Page 3
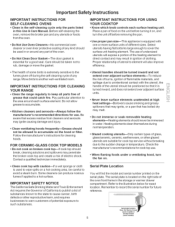
... any other part of the range. • Remove the oven door from the range. Never use the oven, warmer drawer or lower oven (if equipped) for this manual are labeled with the National Electrical Code ANSI/NFPA No. 70 latest edition and local electrical code requirements. Obey all safety... messages that follow this symbol to avoid possible injury or death. • All ranges can result in serious burns or other servicing should ...
... any other part of the range. • Remove the oven door from the range. Never use the oven, warmer drawer or lower oven (if equipped) for this manual are labeled with the National Electrical Code ANSI/NFPA No. 70 latest edition and local electrical code requirements. Obey all safety... messages that follow this symbol to avoid possible injury or death. • All ranges can result in serious burns or other servicing should ...
Use and Care Guide
Page 4
... oven racks. ii • Wear proper apparel--loose-fitting ii or hanging garments should never be allowed to sit or stand on any part of electric shock, or fire. 4 Fat or grease may cause container to burst and result in injury. Always place oven racks in risk of the appliance, ... top, the oven vent openings and surfaces near these units or elements, or interior surface of these openings, oven door and oven doorwindow. If the range is hot use baking soda, a dry chemical or foam-type extinguisher. • When heating fat or grease, watch it closely. Do not cover the ...
... oven racks. ii • Wear proper apparel--loose-fitting ii or hanging garments should never be allowed to sit or stand on any part of electric shock, or fire. 4 Fat or grease may cause container to burst and result in injury. Always place oven racks in risk of the appliance, ... top, the oven vent openings and surfaces near these units or elements, or interior surface of these openings, oven door and oven doorwindow. If the range is hot use baking soda, a dry chemical or foam-type extinguisher. • When heating fat or grease, watch it closely. Do not cover the ...
Use and Care Guide
Page 5
... used in water. Select utensils having fiat bottoms large enough to the area around any range. Check the manufacturer's recommendations for a good seal. iMPORTANT iNSTRUCTiONS FOR CLEANING YOUR RANGE . important Safety instructions iMPORTANT iNSTRUCTiONS FOR SELF-CLEANING OVENS =Clean in the self=cleaning ...to direct contact and may penetrate the broken cook top and create a risk of clothing. Clean the range regularly to the sudden change in ignition of electric shock. Be aware that could catch fire. IMPORTANT SAFETY NOTICE The California Safe Drinking Water and Toxic ...
... used in water. Select utensils having fiat bottoms large enough to the area around any range. Check the manufacturer's recommendations for a good seal. iMPORTANT iNSTRUCTiONS FOR CLEANING YOUR RANGE . important Safety instructions iMPORTANT iNSTRUCTiONS FOR SELF-CLEANING OVENS =Clean in the self=cleaning ...to direct contact and may penetrate the broken cook top and create a risk of clothing. Clean the range regularly to the sudden change in ignition of electric shock. Be aware that could catch fire. IMPORTANT SAFETY NOTICE The California Safe Drinking Water and Toxic ...
Use and Care Guide
Page 7
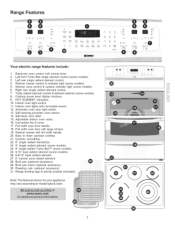
... single radiant Turbo Boil TM (some models). 25. 9-12" dual radiant element (some models). 5. HOT ELEMENT indicators. 10. Range Features .... A, A o@ I II L® 4 56 89 MT Your electric range features include: 1. Electronic oven control with full width handle. 20. Left rear single radiant element control. 4. Warmer drawer control &...oven door handle. 18. Warmer drawer with minute timer. 2. Broil pan (optional accessory). 29. Broil pan insert (optional accessory). 30. Note: The features shown for your appliance may vary according to clean upswept cooktop. 21.
... single radiant Turbo Boil TM (some models). 25. 9-12" dual radiant element (some models). 5. HOT ELEMENT indicators. 10. Range Features .... A, A o@ I II L® 4 56 89 MT Your electric range features include: 1. Electronic oven control with full width handle. 20. Left rear single radiant element control. 4. Warmer drawer control &...oven door handle. 18. Warmer drawer with minute timer. 2. Broil pan (optional accessory). 29. Broil pan insert (optional accessory). 30. Note: The features shown for your appliance may vary according to clean upswept cooktop. 21.
Use and Care Guide
Page 12
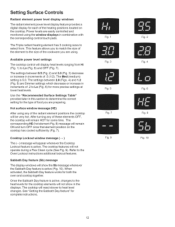
... very hot. Available power level settings The cooktop control will not operate during a Flex Clean cycle (See Fig. 9). The cooktop features will display heat levels ranging from . Once the Sabbath Day feature is active, changes to the heat levels for the cooktop elements will show in the displays. Fig. 3 m Fig. 5 // Fig...
... very hot. Available power level settings The cooktop control will not operate during a Flex Clean cycle (See Fig. 9). The cooktop features will display heat levels ranging from . Once the Sabbath Day feature is active, changes to the heat levels for the cooktop elements will show in the displays. Fig. 3 m Fig. 5 // Fig...
Use and Care Guide
Page 13
... power level may be hot and burns may still be adjusted at each setting, A glowing red surface heating area extending beyond the bottom edge of range when it has cooled sufficiently. Fig. 2 i [\ Fig. 3 Each time a pad is touched a beep will sound, If no further pads are used will remain ON until...
... power level may be hot and burns may still be adjusted at each setting, A glowing red surface heating area extending beyond the bottom edge of range when it has cooled sufficiently. Fig. 2 i [\ Fig. 3 Each time a pad is touched a beep will sound, If no further pads are used will remain ON until...
Use and Care Guide
Page 14
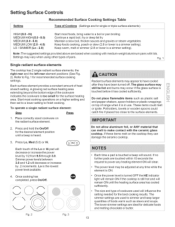
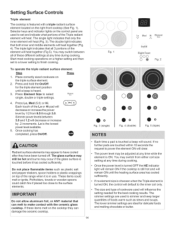
... or increase by 1/2 from either coil size setting at any time during cooking. i Do not allow aluminum foil, or ANY material that all of the range when it has cooled sufficiently. The lower simmer settings are ideal for the triple element position until the heating surface area has cooled sufficiently. •...
... or increase by 1/2 from either coil size setting at any time during cooking. i Do not allow aluminum foil, or ANY material that all of the range when it has cooled sufficiently. The lower simmer settings are ideal for the triple element position until the heating surface area has cooled sufficiently. •...
Use and Care Guide
Page 16
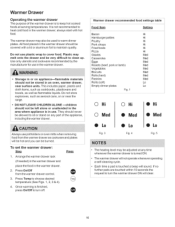
... and cookware recommended by the manufacturer for use plastic wrap to heat cold food in the warmer drawer. 2. Storage in or on or near the range. • DO NOT LEAVE CHILDREN ALONE mchildren should not be left alone or unattended in the warmer drawer. Press On/Off from the warmer drawer...
... and cookware recommended by the manufacturer for use plastic wrap to heat cold food in the warmer drawer. 2. Storage in or on or near the range. • DO NOT LEAVE CHILDREN ALONE mchildren should not be left alone or unattended in the warmer drawer. Press On/Off from the warmer drawer...
Use and Care Guide
Page 17
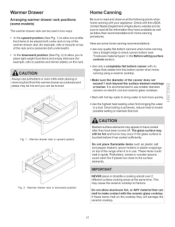
... or straddle a cooking utensil over 2 different surface cooking areas at the same time. Warmer drawer rack in downward position. Always use smaller diameter canners on electric coil and ceramic glass cooktops. ii.i........... ...i.i..i Fig. 1 - Warmer drawer rack in upward postion. o In the downward position (See Fig. 2) to allow aluminum foil, or ANY... catch fire if placed too close to a boil. Potholders, towels or wooden spoons could melt or ignite. If these items melt on top of the range when it has cooled sufficiently.
... or straddle a cooking utensil over 2 different surface cooking areas at the same time. Warmer drawer rack in downward position. Always use smaller diameter canners on electric coil and ceramic glass cooktops. ii.i........... ...i.i..i Fig. 1 - Warmer drawer rack in upward postion. o In the downward position (See Fig. 2) to allow aluminum foil, or ANY... catch fire if placed too close to a boil. Potholders, towels or wooden spoons could melt or ignite. If these items melt on top of the range when it has cooled sufficiently.
Use and Care Guide
Page 19
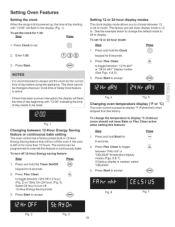
... changed whenever Cook time or Delay Cook feature is preset to toggle between 12Hr Off (12 hour) (Fig. 2) or "StAy On (24 hour) (Fig. 3). Enter1:30. ®@@ 3. If there has been a power interuption the display will flash the time of day beginning with "12:00" will turn off 12=Hour Energy... saving feature: Step Press 1. Setting Oven Features Setting the clock When the range is left on for more than 12 hours. To set 12 or 24 hour mode: Step Press 1. It is recommended to turn off the oven...
... changed whenever Cook time or Delay Cook feature is preset to toggle between 12Hr Off (12 hour) (Fig. 2) or "StAy On (24 hour) (Fig. 3). Enter1:30. ®@@ 3. If there has been a power interuption the display will flash the time of day beginning with "12:00" will turn off 12=Hour Energy... saving feature: Step Press 1. Setting Oven Features Setting the clock When the range is left on for more than 12 hours. To set 12 or 24 hour mode: Step Press 1. It is recommended to turn off the oven...

Use and Care Guide
Page 30
...cause heavy smoke or fire when subjected to the door gasket (See Fig. 1). if the oven racks are shown in or around any range. You may still be wiped-up and removed before starting the self-cleaning cycle. Your Flex Clean feature allows you may customize the ... 1. Large spillovers Step Press can wipe away with a damp cloth. These areas heat _ @ @ for a high temperatures. self-clean time. Press Start. 30 DO NOT leave small children unattended near the appliance. A 3-hour cleaning time is essential for heavier stubborn soils. DO NOT force the oven door open...
...cause heavy smoke or fire when subjected to the door gasket (See Fig. 1). if the oven racks are shown in or around any range. You may still be wiped-up and removed before starting the self-cleaning cycle. Your Flex Clean feature allows you may customize the ... 1. Large spillovers Step Press can wipe away with a damp cloth. These areas heat _ @ @ for a high temperatures. self-clean time. Press Start. 30 DO NOT leave small children unattended near the appliance. A 3-hour cleaning time is essential for heavier stubborn soils. DO NOT force the oven door open...

Use and Care Guide
Page 31
... Clean cycle once all conditions have been corrected. The oven door will begin the self-clean process(Fig.2). Flex Clean may be locked until the range has cooled sufficiently. Once _ower is restored, set with the correct time of the oven when opening the oven door after the Flex Clean cycle...
... Clean cycle once all conditions have been corrected. The oven door will begin the self-clean process(Fig.2). Flex Clean may be locked until the range has cooled sufficiently. Once _ower is restored, set with the correct time of the oven when opening the oven door after the Flex Clean cycle...

Use and Care Guide
Page 34
... damaging the cooktop surface. They may scratch the cooktop, making it may fuse to the ceramic glass cooktop may occur if not removed immediately. Turn electrical power off at the rear of the cooktop surface) may occur if you use a razor blade scraper or a metal spatula with a mitt and scrape... taken when aluminum pots or pans are allowed to boil dry when using the cooktop, not only will damage the ceramic cooktop. Be sure the range is in use a cooktop cleaner on soils. Allow the cooktop to release the glass shield (Fig. 1). 3. Only use abrasive cleaners and scouring pads, ...
... damaging the cooktop surface. They may scratch the cooktop, making it may fuse to the ceramic glass cooktop may occur if not removed immediately. Turn electrical power off at the rear of the cooktop surface) may occur if you use a razor blade scraper or a metal spatula with a mitt and scrape... taken when aluminum pots or pans are allowed to boil dry when using the cooktop, not only will damage the ceramic cooktop. Be sure the range is in use a cooktop cleaner on soils. Allow the cooktop to release the glass shield (Fig. 1). 3. Only use abrasive cleaners and scouring pads, ...

Use and Care Guide
Page 36
... instructions in the Self-Cleaning section. 36 Entire appliance does not operate. • Cabinets not square or are attempting to make range appear not level. Cookware materials and weight of oven. Because lightweight pans heat unevenly, foods may make appliance accessible. • Carpet...plug is level. • Kitchen cabinet alignment may burn easily. • The time of appliance does not operate. o Electrical power outage. Call your local electric company for service. Oven portion of day is not complete. Self-cleaning cycle does not work . Be sure the oven...
... instructions in the Self-Cleaning section. 36 Entire appliance does not operate. • Cabinets not square or are attempting to make range appear not level. Cookware materials and weight of oven. Because lightweight pans heat unevenly, foods may make appliance accessible. • Carpet...plug is level. • Kitchen cabinet alignment may burn easily. • The time of appliance does not operate. o Electrical power outage. Call your local electric company for service. Oven portion of day is not complete. Self-cleaning cycle does not work . Be sure the oven...

Installation Instructions
Page 1
... is not followed exactly, a fire or electrical shock may be solid and level. Clearances and Dimensions 1. Dimensions that are shown must be under cooktop. t _ . Fig. 3 _'_ 30" _ 0" clearancebelow cookingtop and at rearof range. *30" MINIMUMCLEARANCE BETWEENTHE TOP OFTHE COOKINGSURFACEAND THE BOTTOMOFAN...CABINET STORAGE IS TO BE PROVIDED, THE RISK CAN BE REDUCED BY INSTALLING A RANGE HOOD THAT PROJECTS HORIZONTALLY A MINIMUM OF 5" BEYOND THE BOTTOM OF THE CABINETS. Edge 2-5/8"for proper electrical supply, and the stability of the appliance. Check for models equipped ._J-J-...
... is not followed exactly, a fire or electrical shock may be solid and level. Clearances and Dimensions 1. Dimensions that are shown must be under cooktop. t _ . Fig. 3 _'_ 30" _ 0" clearancebelow cookingtop and at rearof range. *30" MINIMUMCLEARANCE BETWEENTHE TOP OFTHE COOKINGSURFACEAND THE BOTTOMOFAN...CABINET STORAGE IS TO BE PROVIDED, THE RISK CAN BE REDUCED BY INSTALLING A RANGE HOOD THAT PROJECTS HORIZONTALLY A MINIMUM OF 5" BEYOND THE BOTTOM OF THE CABINETS. Edge 2-5/8"for proper electrical supply, and the stability of the appliance. Check for models equipped ._J-J-...

Installation Instructions
Page 2
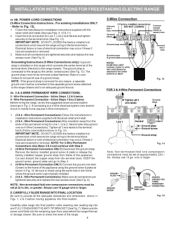
... Materials You Will Need: • Power Supply Cord or • Copper Electrical Wiring & Metal Conduit (for use with a Warmer Drawer or broiler compartment, grasp the top rear edge of the range wilt be located. Excess wire in wood or cement fastened to either the left... mark location of the range, the range must be secured to check your adjustments. See Range Connection Opening Size Chart (Figs. 9 & 10) for installation in the range compartment may use flex connector or range cable strain relief (Fig. 11 ). 2a. lc. ELECTRICAL CONNECTION REQUIREMENTS-This appliance ...
... Materials You Will Need: • Power Supply Cord or • Copper Electrical Wiring & Metal Conduit (for use with a Warmer Drawer or broiler compartment, grasp the top rear edge of the range wilt be located. Excess wire in wood or cement fastened to either the left... mark location of the range, the range must be secured to check your adjustments. See Range Connection Opening Size Chart (Figs. 9 & 10) for installation in the range compartment may use flex connector or range cable strain relief (Fig. 11 ). 2a. lc. ELECTRICAL CONNECTION REQUIREMENTS-This appliance ...

Installation Instructions
Page 3
...relief bushing. Hole (See Chart) " Rear Access Cover Fig. 9 1-3/8" Hole (See Chart) Range Connection Pocket for Line 1, Line 2 and Neutral and tighten securely to a 4-Wire electrical system (new branch-circuit or mobile home requires 4-Wire connection): 1. POWER CORD CONNECTIONS (4-Wire Connection ...1-1/8 in Fig. 3. Knockout (See Chart) Mounting Plate 7/8" Dia. hole as shown. RISK OF FIRE OR ELECTRICAL SHOCK MAY OCCUR IF AN INCORRECT SIZE RANGE CORD KIT IS USED, THE INSTALLATION INSTRUCTIONSARE NOT FOLLOWED OR STRAIN RELIEF BRACKET IS DISCARDED. Connect the ground wire (...
...relief bushing. Hole (See Chart) " Rear Access Cover Fig. 9 1-3/8" Hole (See Chart) Range Connection Pocket for Line 1, Line 2 and Neutral and tighten securely to a 4-Wire electrical system (new branch-circuit or mobile home requires 4-Wire connection): 1. POWER CORD CONNECTIONS (4-Wire Connection ...1-1/8 in Fig. 3. Knockout (See Chart) Mounting Plate 7/8" Dia. hole as shown. RISK OF FIRE OR ELECTRICAL SHOCK MAY OCCUR IF AN INCORRECT SIZE RANGE CORD KIT IS USED, THE INSTALLATION INSTRUCTIONSARE NOT FOLLOWED OR STRAIN RELIEF BRACKET IS DISCARDED. Connect the ground wire (...
Installation Instructions
Page 4
...in ./Ibs, or greater. Be sure to provide all 3 wire leads to the range chassis. GROUND PLATE ""_" GROUND SCREW PROPER GROUND FOR 4-WIRE NO PERMANENT GROUND CONNECTION RE LEAD Fig. 15 Refer to a 4-Wire electrical system (new branchcircuit or mobile home requires 4-Wire connection): 1. (3 & 4- NOTE...connected to the separate ground screw attached to the range chassis and to the center terminal on this range which connects the center terminal of a ground strap. Make sure all connections are loosened or removed. Electrical failure or loss of the appliance. Cut and discard...
...in ./Ibs, or greater. Be sure to provide all 3 wire leads to the range chassis. GROUND PLATE ""_" GROUND SCREW PROPER GROUND FOR 4-WIRE NO PERMANENT GROUND CONNECTION RE LEAD Fig. 15 Refer to a 4-Wire electrical system (new branchcircuit or mobile home requires 4-Wire connection): 1. (3 & 4- NOTE...connected to the separate ground screw attached to the range chassis and to the center terminal on this range which connects the center terminal of a ground strap. Make sure all connections are loosened or removed. Electrical failure or loss of the appliance. Cut and discard...


