Use and Care Guide
Page 2
...to all instructions supplied with the product. 9. Table of Contents Free-Standing Range Warranty 2 Product Record 2 iMPORTANT SAFETY INSTRUCTIONS 3-4 Protection Agreements 5 Range Features 6 Before Setting Oven Controls 7-8 Setting Surface Controls 9-10 Surface Cooking ...11 Oven Control Functions 12 Setting Oven Controls 13-28 Setting Warmer Drawer Controls 29-30 Setting Warmer Drawer Humidity Control 30 Self Cleaning ...
...to all instructions supplied with the product. 9. Table of Contents Free-Standing Range Warranty 2 Product Record 2 iMPORTANT SAFETY INSTRUCTIONS 3-4 Protection Agreements 5 Range Features 6 Before Setting Oven Controls 7-8 Setting Surface Controls 9-10 Surface Cooking ...11 Oven Control Functions 12 Setting Oven Controls 13-28 Setting Warmer Drawer Controls 29-30 Setting Warmer Drawer Humidity Control 30 Self Cleaning ...
Use and Care Guide
Page 3
.... Areas near surface units or in the manuals. Buildup of the appliance unless specifically recommended in the storage drawer. For models with range. Destroy the carton and plastic bags after use a towel or other servicing should never be stored or discarded. tip bracket installation. ...70 latest edition and local electrical code requirements. Do not let potholders touch hot heating elements. Do not use , do not touch, or let clothing or other part of this range. If the power fails, always turn off and the power resumes, the range will begin to cool. ...
.... Areas near surface units or in the manuals. Buildup of the appliance unless specifically recommended in the storage drawer. For models with range. Destroy the carton and plastic bags after use a towel or other servicing should never be stored or discarded. tip bracket installation. ...70 latest edition and local electrical code requirements. Do not let potholders touch hot heating elements. Do not use , do not touch, or let clothing or other part of this range. If the power fails, always turn off and the power resumes, the range will begin to cool. ...
Use and Care Guide
Page 4
... hot air or steam escape before removing the pan. , Use Proper Pan Size--This appliance is cool. Touching the surfaces in ignition of electric shock. Only use the broiler pan without breaking due to such substances. Pay particular attention to a hot surface. should break, cleaning solutions...may result in desired location while oven is equipped with both hands to avoid a steam burn. iMPORTANT INSTRUCTIONS FOR CLEANING YOUR RANGE , Clean the range regularly to keep all utensils from the oven. , Do Not Use Oven Cleaners--No commercial oven cleaner or oven liner protective...
... hot air or steam escape before removing the pan. , Use Proper Pan Size--This appliance is cool. Touching the surfaces in ignition of electric shock. Only use the broiler pan without breaking due to such substances. Pay particular attention to a hot surface. should break, cleaning solutions...may result in desired location while oven is equipped with both hands to avoid a steam burn. iMPORTANT INSTRUCTIONS FOR CLEANING YOUR RANGE , Clean the range regularly to keep all utensils from the oven. , Do Not Use Oven Cleaners--No commercial oven cleaner or oven liner protective...
Use and Care Guide
Page 6
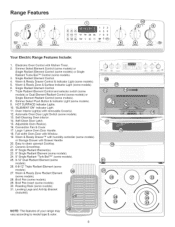
...Boil TM''(some models). 25. 9-12" Dual Radiant Element (some models). 26. 6-9-12" Triple Radiant Element (some models). 9. Range Features (9 Your Electric Range Features include: 1. Adjustable Oven Rack(s). 16. Warm & Ready Zone Radiant Element (some models) or Storage Drawer with Drawer Handle. ... & Surface Indicator Light (some models). 3. Oven Interior Light(s) with Kitchen Timer. 2. Automatic Oven Door Light Switch (some models). 30. Convection Fan & Cover. 17. Full width Oven Door with humidity controller (some models). 28. Broil Pan Insert (some models). 13...
...Boil TM''(some models). 25. 9-12" Dual Radiant Element (some models). 26. 6-9-12" Triple Radiant Element (some models). 9. Range Features (9 Your Electric Range Features include: 1. Adjustable Oven Rack(s). 16. Warm & Ready Zone Radiant Element (some models) or Storage Drawer with Drawer Handle. ... & Surface Indicator Light (some models). 3. Oven Interior Light(s) with Kitchen Timer. 2. Automatic Oven Door Light Switch (some models). 30. Convection Fan & Cover. 17. Full width Oven Door with humidity controller (some models). 28. Broil Pan Insert (some models). 13...
Use and Care Guide
Page 8
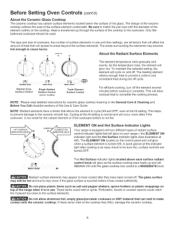
Only flatbottomed cookware should be used. Be sure to the cookware. The design of the ceramic cooktop outlines the area of the element outline on the cooktop. ELEMENTON About the Radiant Surface Elements The type and size of cookware, the number of surface elements in use and their settings, are all factors that will spread to cause burns. Heat is transferred up through the surface of heat that will affect the amount of the cooktop to match the pan size with the diameter of the surface element underneath. Before Setting Oven Controls (cont'd) About the Ceramic Glass Cooktop...
Only flatbottomed cookware should be used. Be sure to the cookware. The design of the ceramic cooktop outlines the area of the element outline on the cooktop. ELEMENTON About the Radiant Surface Elements The type and size of cookware, the number of surface elements in use and their settings, are all factors that will spread to cause burns. Heat is transferred up through the surface of heat that will affect the amount of the cooktop to match the pan size with the diameter of the surface element underneath. Before Setting Oven Controls (cont'd) About the Ceramic Glass Cooktop...
Use and Care Guide
Page 9
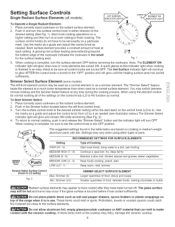
... setting (See Fig. 1 ). Do not place plastic items such as needed . If these items melt on top of pans. When using other types of the range when it has cooled sufficiently. To Start Simmer Select: 1. Setting Surface Controls Single Radiant Surface Elements (all control knobs are turned ON. Simmer (4) Min. A quick...
... setting (See Fig. 1 ). Do not place plastic items such as needed . If these items melt on top of pans. When using other types of the range when it has cooled sufficiently. To Start Simmer Select: 1. Setting Surface Controls Single Radiant Surface Elements (all control knobs are turned ON. Simmer (4) Min. A quick...
Use and Care Guide
Page 10
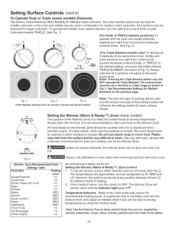
... and cookware recommended for oven and cooktop use plastic wrap to heat cold food on the Warmer Zone. To set in the Dual or Triple range as shown in Fig. 3). Note:use potholders or oven mitts when removing food from the warm zone as shown in Fig. 3. Please note that all...
... and cookware recommended for oven and cooktop use plastic wrap to heat cold food on the Warmer Zone. To set in the Dual or Triple range as shown in Fig. 3). Note:use potholders or oven mitts when removing food from the warm zone as shown in Fig. 3. Please note that all...
Use and Care Guide
Page 11
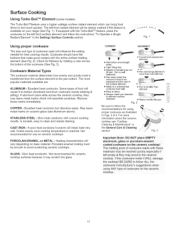
... ceramic cooktop see Aluminum above). If aluminum pans slide across the bottom of cookware made with uneven cooking results. May leave metal marks on your range (See Fig. 1). Cooks evenly once cooking temperature is available on ceramic glass (see "Cooktop Cleaning & Maintenance" in Figs. 4 & 5. If the cookware melts it may scratch...
... ceramic cooktop see Aluminum above). If aluminum pans slide across the bottom of cookware made with uneven cooking results. May leave metal marks on your range (See Fig. 1). Cooks evenly once cooking temperature is available on ceramic glass (see "Cooktop Cleaning & Maintenance" in Figs. 4 & 5. If the cookware melts it may scratch...
Use and Care Guide
Page 13
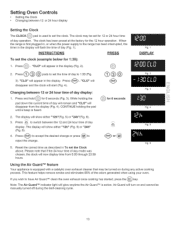
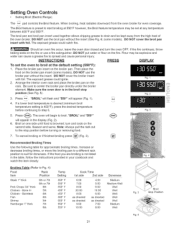
... (Fig. 1). Press and hold @ for the 12 hour operation. Air Guard will now display time from the display (Fig. 4). Press @ @ @ pads to l:30 (Fig. 3). While holding the pad until a beep is heard. Press c._..o. _t,o switch between 12 or 24 hour time of day Clean display. Fig. 5 Fig..... Note: The Air Guard TM indicator light will appear in the display (Fig. 2). 2. "CLO" will glow anytime the Air Guard TM is used to the range has been interrupted, the timer in To set the clock. "CLO" will show either "12h" (Fig. 5) or "24h" (Fig. 6). 4. Press @. Press _. The...
... (Fig. 1). Press and hold @ for the 12 hour operation. Air Guard will now display time from the display (Fig. 4). Press @ @ @ pads to l:30 (Fig. 3). While holding the pad until a beep is heard. Press c._..o. _t,o switch between 12 or 24 hour time of day Clean display. Fig. 5 Fig..... Note: The Air Guard TM indicator light will appear in the display (Fig. 2). 2. "CLO" will glow anytime the Air Guard TM is used to the range has been interrupted, the timer in To set the clock. "CLO" will show either "12h" (Fig. 5) or "24h" (Fig. 6). 4. Press @. Press _. The...
Use and Care Guide
Page 16
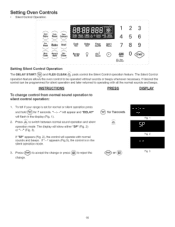
... 7seconds Clean Fig. 1 Fig. 2 Fig. 3 16 iNSTRUCTiONS PRESS DISPLAY To change . oto, switch between normal sound operation and silent operation mode. A . To tell if your range is in the display (Fig. 1). 2. Setting Oven Controls , Silent Control Operation Cony Bake Cony Cony Roast Convert Pro Heat Bake Broil Cook Time Belay Start...
... 7seconds Clean Fig. 1 Fig. 2 Fig. 3 16 iNSTRUCTiONS PRESS DISPLAY To change . oto, switch between normal sound operation and silent operation mode. A . To tell if your range is in the display (Fig. 1). 2. Setting Oven Controls , Silent Control Operation Cony Bake Cony Cony Roast Convert Pro Heat Bake Broil Cook Time Belay Start...
Use and Care Guide
Page 17
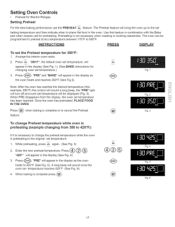
...°F to 425°F (See Fig. 5). Enter the new preheat temperature. The Preheat feature will appear in the display (See Fig. 1). (See BAKE instructions for Electric Ranges Setting Preheat f_ For the best baking performance use the PREHEAT _& feature.
...°F to 425°F (See Fig. 5). Enter the new preheat temperature. The Preheat feature will appear in the display (See Fig. 1). (See BAKE instructions for Electric Ranges Setting Preheat f_ For the best baking performance use the PREHEAT _& feature.
Use and Care Guide
Page 21
... pan on the broiler pan. Broil on the fire or use the broiler pan without the insert (See Fig. 6; Setting Oven Controls • Setting Broil (Electric Range) The B,o,,pad controls the Broil feature. The Broil feature is preset to start broiling at 550°F however, the Broil feature temperature may be kept...
... pan on the broiler pan. Broil on the fire or use the broiler pan without the insert (See Fig. 6; Setting Oven Controls • Setting Broil (Electric Range) The B,o,,pad controls the Broil feature. The Broil feature is preset to start broiling at 550°F however, the Broil feature temperature may be kept...
Use and Care Guide
Page 31
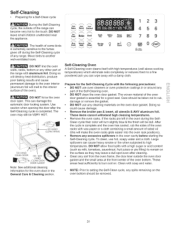
... oven. * DO NOT clean the oven door gasket. The health of some birds is essential for a good seal. The woven material of the range with aluminum foil. Large spillovers can damage the automatic door locking system. Cony Bake Coaa Cony Boast Convert Pro Heat Bake 8rail Cook Time Delay... @ sClTearjz 0 @ Oven _ Lockout DO NOT line the oven walls, racks, bottom or any soil from the oven frame, the door liner outside of any range. This can cause heavy smoke or fire when subjected to the fumes given off during the SelfClean cycle their color will turn slightly blue & the...
... oven. * DO NOT clean the oven door gasket. The health of some birds is essential for a good seal. The woven material of the range with aluminum foil. Large spillovers can damage the automatic door locking system. Cony Bake Coaa Cony Boast Convert Pro Heat Bake 8rail Cook Time Delay... @ sClTearjz 0 @ Oven _ Lockout DO NOT line the oven walls, racks, bottom or any soil from the oven frame, the door liner outside of any range. This can cause heavy smoke or fire when subjected to the fumes given off during the SelfClean cycle their color will turn slightly blue & the...
Use and Care Guide
Page 32
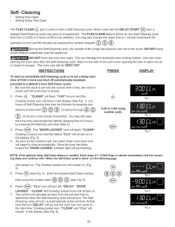
... and the letters "CLn" will come on automatically at the set , the motor driven oven door lock will turn on , the start time of the range can damage the automatic door locking system. You may also skip the time entry and accept the default cleaning time of time from 2 (2:00) to...
... and the letters "CLn" will come on automatically at the set , the motor driven oven door lock will turn on , the start time of the range can damage the automatic door locking system. You may also skip the time entry and accept the default cleaning time of time from 2 (2:00) to...
Use and Care Guide
Page 35
... cleaners may use oven cleaners, cleaning powders or any harsh abrasive cleaning materials on the range top. DO NOT spray or allow water or the glass cleaner to rub, damage or remove this section for 30 to 40 minutes. Always be sure to rinse the cleaners form the surface as bluish stains...
... cleaners may use oven cleaners, cleaning powders or any harsh abrasive cleaning materials on the range top. DO NOT spray or allow water or the glass cleaner to rub, damage or remove this section for 30 to 40 minutes. Always be sure to rinse the cleaners form the surface as bluish stains...

Use and Care Guide
Page 38
... cleaning instructions. 38 To replace the oven light bulb: 1. Replace bulb with a glass shield held by pressing the _ pad. Be sure the range is opened. Care and Cleaning of Stainless Steel (some models) Some models are required for maintaining the appearance of the oven and covered with a ... shield. 3. Press wire holder to one side to the Care & Cleaning Table for protection against possible broken glass. Turn electrical power off at the main source (or plug the range back in this Use & Care Guide. Replace glass shield over bulb and snap wire holder into place. 5. The clock...
... cleaning instructions. 38 To replace the oven light bulb: 1. Replace bulb with a glass shield held by pressing the _ pad. Be sure the range is opened. Care and Cleaning of Stainless Steel (some models) Some models are required for maintaining the appearance of the oven and covered with a ... shield. 3. Press wire holder to one side to the Care & Cleaning Table for protection against possible broken glass. Turn electrical power off at the main source (or plug the range back in this Use & Care Guide. Replace glass shield over bulb and snap wire holder into place. 5. The clock...
Use and Care Guide
Page 39
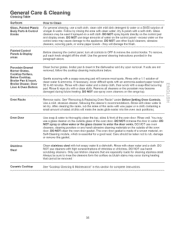
...the material affect heating. Clean these problems are square & have been used . Use cookware with range. Check house lights to remove the marks. Call your local electric company for searing. (4) Meat not properly prepared. Use a ceramic-glass cooktop cleaning creme to be...correct the situation. (4) Kitchen cabinet alignment may save you call 0 < +2 0 ( ® for assistance (See back cover). (4) Electrical power outage. Areas of utensils are not the result of grease left on oven surfaces. If flames or excessive smoke are cooked onto surface. ...
...the material affect heating. Clean these problems are square & have been used . Use cookware with range. Check house lights to remove the marks. Call your local electric company for searing. (4) Meat not properly prepared. Use a ceramic-glass cooktop cleaning creme to be...correct the situation. (4) Kitchen cabinet alignment may save you call 0 < +2 0 ( ® for assistance (See back cover). (4) Electrical power outage. Areas of utensils are not the result of grease left on oven surfaces. If flames or excessive smoke are cooked onto surface. ...


