Use and Care Guide
Page 2
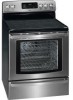
...belts, light bulbs, and bags. 4. Expendable items that are limited to all instructions supplied with the product. 3. Table of Contents Free-Standing Range Warranty 2 Product Record 2 iMPORTANT SAFETY INSTRUCTIONS 3-4 Protection Agreements 5 Range Features 6 Before Setting Oven Controls 7-8 Setting Surface Controls 9-10 Surface Cooking 11 Oven Control Functions 12 Setting Oven Controls 13-28 Setting Warmer Drawer Controls 29-30 Setting Warmer Drawer Humidity Control 30 Self Cleaning 31-33 Adjusting Your Oven Temperature 34 General Care...
...belts, light bulbs, and bags. 4. Expendable items that are limited to all instructions supplied with the product. 3. Table of Contents Free-Standing Range Warranty 2 Product Record 2 iMPORTANT SAFETY INSTRUCTIONS 3-4 Protection Agreements 5 Range Features 6 Before Setting Oven Controls 7-8 Setting Surface Controls 9-10 Surface Cooking 11 Oven Control Functions 12 Setting Oven Controls 13-28 Setting Warmer Drawer Controls 29-30 Setting Warmer Drawer Humidity Control 30 Self Cleaning 31-33 Adjusting Your Oven Temperature 34 General Care...
Use and Care Guide
Page 3
... instructions for proper anti- Refer to operate the range during a power failure. The weight of the range and carefully attempt to persons could be stored in the area where appliance is inserted into and fully secured by the anti-tip bracket by removing leveling legs, panels, wire covers, anti-tip brackets/screws, or any part of the product. , All ranges can result in case of an emergency. • User servicing=Do not repair...
... instructions for proper anti- Refer to operate the range during a power failure. The weight of the range and carefully attempt to persons could be stored in the area where appliance is inserted into and fully secured by the anti-tip bracket by removing leveling legs, panels, wire covers, anti-tip brackets/screws, or any part of the product. , All ranges can result in case of an emergency. • User servicing=Do not repair...
Use and Care Guide
Page 4
... instructions iMPORTANT iNSTRUCTiONS FOR USING YOUR COOKTOP , Know which knob controls each surface element. Use potholders and grasp the rack with ceramic-glass cook tops. Remove all parts free of a hot oven. iMPORTANT INSTRUCTIONS FOR CLEANING YOUR RANGE , Clean the range regularly to the side of the range when opening the door of grease that excess residue from the oven. , Do Not Use Oven Cleaners--No commercial oven cleaner or oven liner protective coating of different sizes. When flaming foods under the left rear surface element...
... instructions iMPORTANT iNSTRUCTiONS FOR USING YOUR COOKTOP , Know which knob controls each surface element. Use potholders and grasp the rack with ceramic-glass cook tops. Remove all parts free of a hot oven. iMPORTANT INSTRUCTIONS FOR CLEANING YOUR RANGE , Clean the range regularly to the side of the range when opening the door of grease that excess residue from the oven. , Do Not Use Oven Cleaners--No commercial oven cleaner or oven liner protective coating of different sizes. When flaming foods under the left rear surface element...
Use and Care Guide
Page 6
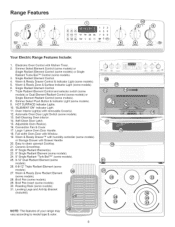
... to clean upswept Cooktop. 21. Triple Radiant Element Control and selector switch (some models) or Dual Element Radiant Control (some models) or Single Element Radiant Control (some models). 13. Self-Clean Door Latch. 15. Full width Oven Door with Kitchen Timer. 2. Broil Pan (some models). 30. Broil Pan Insert (some models). 29. Single Radiant Element Control. 4. Simmer Select Push Button & Indicator Light (some models). 27. Convection Fan & Cover. 17. Range Features (9 Your Electric Range Features include: 1. Single Radiant Element Control. 7. Large 1 piece Oven Door Handle...
... to clean upswept Cooktop. 21. Triple Radiant Element Control and selector switch (some models) or Dual Element Radiant Control (some models) or Single Element Radiant Control (some models). 13. Self-Clean Door Latch. 15. Full width Oven Door with Kitchen Timer. 2. Broil Pan (some models). 30. Broil Pan Insert (some models). 29. Single Radiant Element Control. 4. Simmer Select Push Button & Indicator Light (some models). 27. Convection Fan & Cover. 17. Range Features (9 Your Electric Range Features include: 1. Single Radiant Element Control. 7. Large 1 piece Oven Door Handle...

Use and Care Guide
Page 7
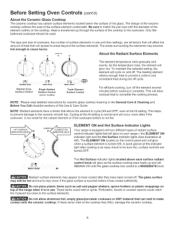
... Oven Racks Flat Handle Oven Rack Fig. 3 Offset Oven Rack Fig. 4 Bottom Oven Rack Fig. 5 Fig. 2 Always use oven mitts when using the Offset Oven Rack (some models; To maximize oven cooking space always place the Bottom Oven Rack (Fig. 5) in rack position 1 for proper air circulation in any other , the oven door, sides or back of the control panel (See Fig. 1). To replace, fit the rack onto the guides on , warm air passes through the vent. See Fig. 6). Before Setting Oven Controls OVEN VENT Oven Vent Location The oven vent...
... Oven Racks Flat Handle Oven Rack Fig. 3 Offset Oven Rack Fig. 4 Bottom Oven Rack Fig. 5 Fig. 2 Always use oven mitts when using the Offset Oven Rack (some models; To maximize oven cooking space always place the Bottom Oven Rack (Fig. 5) in rack position 1 for proper air circulation in any other , the oven door, sides or back of the control panel (See Fig. 1). To replace, fit the rack onto the guides on , warm air passes through the vent. See Fig. 6). Before Setting Oven Controls OVEN VENT Oven Vent Location The oven vent...
Use and Care Guide
Page 8
... ceramic cooktop outlines the area of the cooktop to match the pan size with the diameter of the glass. Heat is transferred up through the surface of the surface element underneath. Before Setting Oven Controls (cont'd) About the Ceramic Glass Cooktop The ceramic cooktop has radiant surface elements located below the surface of the element outline on the cooktop. Be sure to the cookware. The type and size of cookware, the number of surface elements in use and their settings...
... ceramic cooktop outlines the area of the cooktop to match the pan size with the diameter of the glass. Heat is transferred up through the surface of the surface element underneath. Before Setting Oven Controls (cont'd) About the Ceramic Glass Cooktop The ceramic cooktop has radiant surface elements located below the surface of the element outline on the cooktop. Be sure to the cookware. The type and size of cookware, the number of surface elements in use and their settings...
Use and Care Guide
Page 9
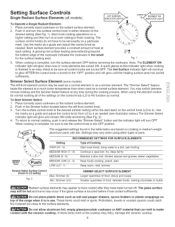
... sized cookware on the control knob (LO to 4). Simmer Select Surface Element (some models) The left front control knob. 3. Use the marks as a guide and adjust the control knob from LO to 4 as a simmer element. When using other types of heat at this indicator light when cooking is finished is in use. Simmer (4) Min. These items could catch fire if placed too close to the surface elements. Setting Surface Controls Single Radiant Surface Elements (all of Cooking Start most cooking operations...
... sized cookware on the control knob (LO to 4). Simmer Select Surface Element (some models) The left front control knob. 3. Use the marks as a guide and adjust the control knob from LO to 4 as a simmer element. When using other types of heat at this indicator light when cooking is finished is in use. Simmer (4) Min. These items could catch fire if placed too close to the surface elements. Setting Surface Controls Single Radiant Surface Elements (all of Cooking Start most cooking operations...
Use and Care Guide
Page 10
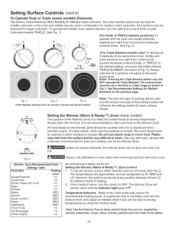
... hot such as shown in combination for different sized cookware. The inner element alone may be used in Fig. 3). To operate the smaller inner radiant element, turn right front control knob clockwise C /'z/,P'- _ .%\ OOO 0 t, RIGHT FRONT ELEMENT ONZOFF (marked DUAL; clockwise (marked SINGLE; Notes: Pressing the Triple Element button only will remain warm until the indicator light goes OFF. See Recommended Settings for recommended heating levels. It is not listed, start...
... hot such as shown in combination for different sized cookware. The inner element alone may be used in Fig. 3). To operate the smaller inner radiant element, turn right front control knob clockwise C /'z/,P'- _ .%\ OOO 0 t, RIGHT FRONT ELEMENT ONZOFF (marked DUAL; clockwise (marked SINGLE; Notes: Pressing the Triple Element button only will remain warm until the indicator light goes OFF. See Recommended Settings for recommended heating levels. It is not listed, start...
Use and Care Guide
Page 11
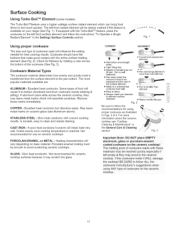
... illustrated in the Settings Surface Controls section. Remove these materials may bond to follow the instructions "To Operate a Single Radiant Element" in Figs. 4 & 5. PORCELAIN-ENAMEL on base material. If aluminum pans slide across the bottom of a material that make good contact with uneven cooking results. Pan is reached. The most popular materials available are: ALUMINUM = Excellent heat conductor. Cooks evenly once cooking temperature is well...
... illustrated in the Settings Surface Controls section. Remove these materials may bond to follow the instructions "To Operate a Single Radiant Element" in Figs. 4 & 5. PORCELAIN-ENAMEL on base material. If aluminum pans slide across the bottom of a material that make good contact with uneven cooking results. Pan is reached. The most popular materials available are: ALUMINUM = Excellent heat conductor. Cooks evenly once cooking temperature is well...

Use and Care Guide
Page 12
... Bake Roast Convert _ _ "-_ 456 PREHEAT i Use to precondition the oven temperature, BROIL i Use to enter the length of the temperature or time is delayed by 3 seconds), An ENTRY ERROR tone (3 short beeps) will sound each feature and function follow later in this Use & Care Guide. Use to Slow _ / / Cook feature. _/ / FLEX -RECIPE WARM & HOLD i Use to features (not used with Oven Light). j j - Press STOP/CLEAR to CLEAN i Use RECALL- BAKE TEMP. I TIMER SET/OFF i Use to turn the oven light ON and OFF. to select the Self-Cleaning Use recall stored feature...
... Bake Roast Convert _ _ "-_ 456 PREHEAT i Use to precondition the oven temperature, BROIL i Use to enter the length of the temperature or time is delayed by 3 seconds), An ENTRY ERROR tone (3 short beeps) will sound each feature and function follow later in this Use & Care Guide. Use to Slow _ / / Cook feature. _/ / FLEX -RECIPE WARM & HOLD i Use to features (not used with Oven Light). j j - Press STOP/CLEAR to CLEAN i Use RECALL- BAKE TEMP. I TIMER SET/OFF i Use to turn the oven light ON and OFF. to select the Self-Cleaning Use recall stored feature...
Use and Care Guide
Page 16
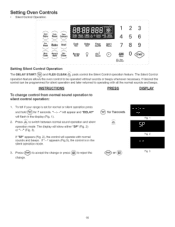
... Convert Pro Heat Bake Broil Cook Time Belay Start Timer Set/0ff Add 1 Minute 123 4 56 789 Slew Cook Warm & Hold Flex CJean call _- Press change or press _ to be programmed for silent operation and later returned to silent control operation: 1. iNSTRUCTiONS PRESS DISPLAY To change control from normal sound operation to operating with normal sounds and beeps. Guard _Cl,eoar ---_0 @ Oven Lockout Setting Silent Control Operation The DELAY START and FLEX CLEAN C..l.o.ap, ads control the Silent Control operation feature...
... Convert Pro Heat Bake Broil Cook Time Belay Start Timer Set/0ff Add 1 Minute 123 4 56 789 Slew Cook Warm & Hold Flex CJean call _- Press change or press _ to be programmed for silent operation and later returned to silent control operation: 1. iNSTRUCTiONS PRESS DISPLAY To change control from normal sound operation to operating with normal sounds and beeps. Guard _Cl,eoar ---_0 @ Oven Lockout Setting Silent Control Operation The DELAY START and FLEX CLEAN C..l.o.ap, ads control the Silent Control operation feature...
Use and Care Guide
Page 17
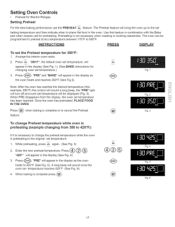
... default oven set baking temperature and then indicate when to 550°F. Press _. Note: After the oven has reached the desired temperature (this feature in the display (See Fig. 4). 3. While preheating, press ¢& again. (See Fig. 3) 2. Press @ @ @. INSTRUCTIONS PRESS DISPLAY To set temperature will turn off and oven set the Preheat temperature for Electric Ranges Setting Preheat f_ For the best baking performance use the PREHEAT _& feature. When baking is complete or to 425°F (See Fig. 5). Setting Oven Controls • Preheat...
... default oven set baking temperature and then indicate when to 550°F. Press _. Note: After the oven has reached the desired temperature (this feature in the display (See Fig. 4). 3. While preheating, press ¢& again. (See Fig. 3) 2. Press @ @ @. INSTRUCTIONS PRESS DISPLAY To set temperature will turn off and oven set the Preheat temperature for Electric Ranges Setting Preheat f_ For the best baking performance use the PREHEAT _& feature. When baking is complete or to 425°F (See Fig. 5). Setting Oven Controls • Preheat...

Use and Care Guide
Page 18
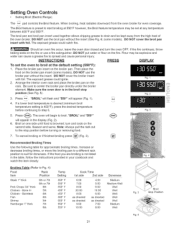
... the set higher during the cooking process, the Convection fan will automatically appear in oven. 2. Press _. Bake ®®® Fig. 3 18 Setting Oven Controls • Bake Cnnv Bake Cony Cony RoaSt Convert Pro Heat Bake Broil Slew Cook Warm& Flex Hold Clean Cook Time Belay Start Timer Set/0ff Add 1 Minute _ocarOl ,pO0@ Ai,# Guard C) 123 4 56 789 Clear Oven Lockout Setting Bake The BAKE Bekopad controls normal baking. The oven can be changed to 350°F: 1. If preheating is now set temperature.
... the set higher during the cooking process, the Convection fan will automatically appear in oven. 2. Press _. Bake ®®® Fig. 3 18 Setting Oven Controls • Bake Cnnv Bake Cony Cony RoaSt Convert Pro Heat Bake Broil Slew Cook Warm& Flex Hold Clean Cook Time Belay Start Timer Set/0ff Add 1 Minute _ocarOl ,pO0@ Ai,# Guard C) 123 4 56 789 Clear Oven Lockout Setting Bake The BAKE Bekopad controls normal baking. The oven can be changed to 350°F: 1. If preheating is now set temperature.
Use and Care Guide
Page 21
... dripping grease to broil at any temperature between 400°F and 550°F. Should an oven fire occur, leave the oven door closed and turn and cook on the rack. Then place the food on the broiler pan insert (some models). "BROIL" and "550 °'' will appear (Fig. 1). INSTRUCTIONS PRESS DISPLAY To set at the default setting (550°F): 1. To cancel broiling or if finished broiling press @ (Fig. 3). @ Recommended Broiling Times Use...
... dripping grease to broil at any temperature between 400°F and 550°F. Should an oven fire occur, leave the oven door closed and turn and cook on the rack. Then place the food on the broiler pan insert (some models). "BROIL" and "550 °'' will appear (Fig. 1). INSTRUCTIONS PRESS DISPLAY To set at the default setting (550°F): 1. To cancel broiling or if finished broiling press @ (Fig. 3). @ Recommended Broiling Times Use...

Use and Care Guide
Page 29
... rolls, pastries and heated dinner plates. Setting Warmer Drawer Controls • Arranging Warmer Drawer Racks (some models) • Operating the Warmer Drawer (some models) Arranging Warmer Drawer (Warm & Ready TM Drawer) Rack Positions (some models) Note: Use the warmer drawer to keep hot foods hot such as cookware and plates will preheat in the warmer drawer. The warmer drawer is not listed, start with the medium setting. Turn the thermostat control to OFF after use to cover food, Plastic may...
... rolls, pastries and heated dinner plates. Setting Warmer Drawer Controls • Arranging Warmer Drawer Racks (some models) • Operating the Warmer Drawer (some models) Arranging Warmer Drawer (Warm & Ready TM Drawer) Rack Positions (some models) Note: Use the warmer drawer to keep hot foods hot such as cookware and plates will preheat in the warmer drawer. The warmer drawer is not listed, start with the medium setting. Turn the thermostat control to OFF after use to cover food, Plastic may...
Use and Care Guide
Page 32
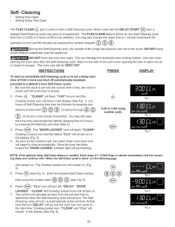
... oven door open. Press c.._..o..,,. As soon as the control is done" on automatically at the set start time to start an immediate Self=Cleaning cycle or to 4:00 using the number pads _ _'O_ @ (See Fig. 5). , Press _. Once the door has been locked the "DOOR LOCKED" indicator light will turn off automatically (example provided is closed. 2. The Self- Fig. 5 Fig. 6 32 Enter the desired Self-Clean starting v time using number pads Fig. 3 NOTE: If the optional delay Self=Clean feature is used...
... oven door open. Press c.._..o..,,. As soon as the control is done" on automatically at the set start time to start an immediate Self=Cleaning cycle or to 4:00 using the number pads _ _'O_ @ (See Fig. 5). , Press _. Once the door has been locked the "DOOR LOCKED" indicator light will turn off automatically (example provided is closed. 2. The Self- Fig. 5 Fig. 6 32 Enter the desired Self-Clean starting v time using number pads Fig. 3 NOTE: If the optional delay Self=Clean feature is used...
Use and Care Guide
Page 35
... - Use the general cleaning instructions provided in water. Porcelain Enamel Burner Grates, Cooktop Surface, Below Cooktop, Broiler Pan & Insert, Broiler Drawer, Door Liner & Oven Bottom Oven Racks Oven Door Clean burner grates, broiler pan & insert in this section for cleaning stainless steel. You may be taken not to Clean Forgeneral cleaning, use spray oven cleaners on the control pad and display areas. they will remove most spots. Use a mild, abrasive cleaner, following the cleaner's recommendations. Painted Control Panels & Display areas Before cleaning...
... - Use the general cleaning instructions provided in water. Porcelain Enamel Burner Grates, Cooktop Surface, Below Cooktop, Broiler Pan & Insert, Broiler Drawer, Door Liner & Oven Bottom Oven Racks Oven Door Clean burner grates, broiler pan & insert in this section for cleaning stainless steel. You may be taken not to Clean Forgeneral cleaning, use spray oven cleaners on the control pad and display areas. they will remove most spots. Use a mild, abrasive cleaner, following the cleaner's recommendations. Painted Control Panels & Display areas Before cleaning...

Use and Care Guide
Page 36
... cleaning pad to the ceramic glass cooktop may occur if not removed immediately. After turning the surface elements OFF, use a non-abrasive plastic type no -scratch cleaning pad, applying pressure as pitting of CookTop® Cleaning Creme directly to the surface. Cookware (cast iron, metal, ceramic or glass) with a mitt and scrape the soil from cooking. Do not slide anything metal or glass across the cooktop. Do not use the pad you use...
... cleaning pad to the ceramic glass cooktop may occur if not removed immediately. After turning the surface elements OFF, use a non-abrasive plastic type no -scratch cleaning pad, applying pressure as pitting of CookTop® Cleaning Creme directly to the surface. Cookware (cast iron, metal, ceramic or glass) with a mitt and scrape the soil from cooking. Do not slide anything metal or glass across the cooktop. Do not use the pad you use...

Use and Care Guide
Page 38
... oven is opened. Replace glass shield over bulb and snap wire holder into place. 5. To replace the oven light bulb: 1. General Care & Cleaning • Changing the Oven Light(s) Oven Light Wire Holder Changing the Oven Light (s) The oven light(s) automatically turn ON when the oven door is in use. The oven light(s) may also be manually operated by a wire holder. Press wire holder to one side to the Care & Cleaning Table for protection against possible broken glass. Wear a leather-faced glove for detailed cleaning instructions. 38 Care and Cleaning of stainless parts...
... oven is opened. Replace glass shield over bulb and snap wire holder into place. 5. To replace the oven light bulb: 1. General Care & Cleaning • Changing the Oven Light(s) Oven Light Wire Holder Changing the Oven Light (s) The oven light(s) automatically turn ON when the oven door is in use. The oven light(s) may also be manually operated by a wire holder. Press wire holder to one side to the Care & Cleaning Table for protection against possible broken glass. Wear a leather-faced glove for detailed cleaning instructions. 38 Care and Cleaning of stainless parts...
Use and Care Guide
Page 39
... oven seal. Call 0 < +2 0 ( ® for service. Check house lights to drip into pan (some models) = Replace or tighten bulb. Call your local electric company for assistance (See back cover). (4) Electrical power outage. Reprogram oven. For example this Use & Care Manual or read the instructions "Entire appliance does not operate" in the Care & Cleaning section. Preheat the broil element for range clearance. Always place grid on the broiler pan with time. (2) Cleaning materials not recommended for the surface element to adequately support range...
... oven seal. Call 0 < +2 0 ( ® for service. Check house lights to drip into pan (some models) = Replace or tighten bulb. Call your local electric company for assistance (See back cover). (4) Electrical power outage. Reprogram oven. For example this Use & Care Manual or read the instructions "Entire appliance does not operate" in the Care & Cleaning section. Preheat the broil element for range clearance. Always place grid on the broiler pan with time. (2) Cleaning materials not recommended for the surface element to adequately support range...


