
Use and Care Guide
Page 2
... followed. Use tlne dryer only as instructed in personal injury, propertydamage or damage to light any electrical switch; We Inaveprovided many important safety messages in tlnis manual must be used when elevating thewasher for your gas supplier, call your appliance. For your safety, the information in the Use and Care Guide, Operating Instructions, Installation Instructions and on the dryer serial plate located of the left side of the door opening. Do...
... followed. Use tlne dryer only as instructed in personal injury, propertydamage or damage to light any electrical switch; We Inaveprovided many important safety messages in tlnis manual must be used when elevating thewasher for your gas supplier, call your appliance. For your safety, the information in the Use and Care Guide, Operating Instructions, Installation Instructions and on the dryer serial plate located of the left side of the door opening. Do...
Use and Care Guide
Page 3
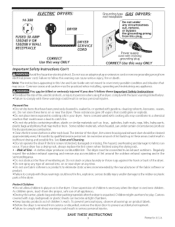
... the dryer, lint screen housing and exhaust duct should be practiced when installing, operating and maintaining any time. Do not obstruct the flow of the dryer. Cartons covered with 3-prong grounding plug CORRECT Use this way ONL Y Important Safety Instructions Con't _Avoid fire hazard or electrical shock. 14-30R © ELECTR/C DRYERS: DRYER FUSED 30 AMP 120/240 V OR 120/208 V WALL RECEPTACLE DRYER SER VICE CORD CORRECT Use this way ONL Y Grounding type GAS DRYERS...
... the dryer, lint screen housing and exhaust duct should be practiced when installing, operating and maintaining any time. Do not obstruct the flow of the dryer. Cartons covered with 3-prong grounding plug CORRECT Use this way ONL Y Important Safety Instructions Con't _Avoid fire hazard or electrical shock. 14-30R © ELECTR/C DRYERS: DRYER FUSED 30 AMP 120/240 V OR 120/208 V WALL RECEPTACLE DRYER SER VICE CORD CORRECT Use this way ONL Y Grounding type GAS DRYERS...
Use and Care Guide
Page 4
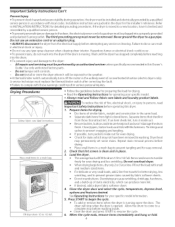
... a time. Check that attract lint, If an item sheds lint, turn pockets inside out for easy removal. 2. Refer to a new location, have been removed in serious personal injuries. Do not overload dryer. To add or remove items when the dryer is running open the door, The dryer will fill the drum 1/3to 1/2 full. To prevent personal injury or damage tothe dryer, the electrical power cord of a gasdryer must replace the thermal limiter switch...
... a time. Check that attract lint, If an item sheds lint, turn pockets inside out for easy removal. 2. Refer to a new location, have been removed in serious personal injuries. Do not overload dryer. To add or remove items when the dryer is running open the door, The dryer will fill the drum 1/3to 1/2 full. To prevent personal injury or damage tothe dryer, the electrical power cord of a gasdryer must replace the thermal limiter switch...
Use and Care Guide
Page 5
... changing the door. Risk of the door opening. Insert drying rack into the dryer drum. Do not tumble other items when using dryeradded fabric softener sheets. When items are dry, remove the rack and replace the lint screen. Regularly inspect the outdoor exhaust opening and remove any type spray cleanser when cleaning dryer interior. Do not operate the dryer without the lint screen in place. Closing the door turns off the light. Refer to dry items which causes longer drying times. If lint screen...
... changing the door. Risk of the door opening. Insert drying rack into the dryer drum. Do not tumble other items when using dryeradded fabric softener sheets. When items are dry, remove the rack and replace the lint screen. Regularly inspect the outdoor exhaust opening and remove any type spray cleanser when cleaning dryer interior. Do not operate the dryer without the lint screen in place. Closing the door turns off the light. Refer to dry items which causes longer drying times. If lint screen...
Use and Care Guide
Page 6
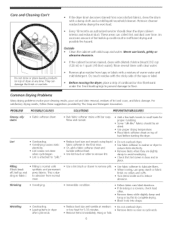
... drum with synthetic and permanent press fabrics. Place fabric softener sheet on collars and cuffs. o Remove items when they are slightly when cycle began. o Follow fabric care label directions. Remove items while slightly damp and hang or lay flat to remove lint. PROBLEM POSSIBLECAUSES SOLUTIONS PREVENTIVEMEASURES Greasy, oily stains e Fabric softener sheet. o Some "silk-like" fabrics should clean the dryer cabinet interior and exhaust duct...
... drum with synthetic and permanent press fabrics. Place fabric softener sheet on collars and cuffs. o Remove items when they are slightly when cycle began. o Follow fabric care label directions. Remove items while slightly damp and hang or lay flat to remove lint. PROBLEM POSSIBLECAUSES SOLUTIONS PREVENTIVEMEASURES Greasy, oily stains e Fabric softener sheet. o Some "silk-like" fabrics should clean the dryer cabinet interior and exhaust duct...

Use and Care Guide
Page 7
... not start. Reset circuit breaker or replace fuse. Exhaust duct requirements have anough air supply to support the burner flame (gas models). Make sure all lint has been removed from the dryer lint screen before laundering. When in place, the duct must not exceed length listed in dryer too long. Do not overload. Follow fabric care label instructions. Always remove foreign objects from drum and restart dryer. Before calling for replacement. POSSIBLE CAUSE Electrical power cord is not securely plugged in or plug may turn...
... not start. Reset circuit breaker or replace fuse. Exhaust duct requirements have anough air supply to support the burner flame (gas models). Make sure all lint has been removed from the dryer lint screen before laundering. When in place, the duct must not exceed length listed in dryer too long. Do not overload. Follow fabric care label instructions. Always remove foreign objects from drum and restart dryer. Before calling for replacement. POSSIBLE CAUSE Electrical power cord is not securely plugged in or plug may turn...
Use and Care Guide
Page 8
... limited warranty shall be fixed. A service technician to time. Sears shall not be working on all that it may require preventive maintenance or repair from normal use of detergents, cleaners, chemicals or utensils other than promised. 10% discount off the regular price of remedies Customer's sole and exclusive remedy under normal use for other rights which means as often as a "talking owner's manual...
... limited warranty shall be fixed. A service technician to time. Sears shall not be working on all that it may require preventive maintenance or repair from normal use of detergents, cleaners, chemicals or utensils other than promised. 10% discount off the regular price of remedies Customer's sole and exclusive remedy under normal use for other rights which means as often as a "talking owner's manual...

Installation Instructions
Page 1
P/N 134941300 (0708) ® I stallati I structi instrucci I instal Sears, Roebuck and Co., Hoffman Estates, IL 60179 U.S.A.
P/N 134941300 (0708) ® I stallati I structi instrucci I instal Sears, Roebuck and Co., Hoffman Estates, IL 60179 U.S.A.
Installation Instructions
Page 2
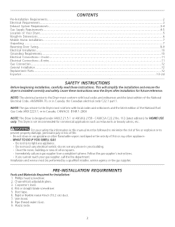
... ...Reversing Door Swing ...Electrical Installation ...Grounding Requirements ...Electrical Connections--3-wire ...Electrical Connections--4-wire ...Gas Connection ...General Installation ...Replacement Parts ...Espahol ... 2 3 3-4 4-5 5 6 7 7 8-9 I0 I0 11 11 12 12 12 13-24 SAFETY INSTRUCTIONS Before beginning installation, carefully read these instructions near the Dryer after installation for installation: I. Flat or straight blade screwdriver. 5. Do not store or use any electrical switch; If you cannot reach your gas supplier from a neighbor's phone. Channel-lock adjustable...
... ...Reversing Door Swing ...Electrical Installation ...Grounding Requirements ...Electrical Connections--3-wire ...Electrical Connections--4-wire ...Gas Connection ...General Installation ...Replacement Parts ...Espahol ... 2 3 3-4 4-5 5 6 7 7 8-9 I0 I0 11 11 12 12 12 13-24 SAFETY INSTRUCTIONS Before beginning installation, carefully read these instructions near the Dryer after installation for installation: I. Flat or straight blade screwdriver. 5. Do not store or use any electrical switch; If you cannot reach your gas supplier from a neighbor's phone. Channel-lock adjustable...
Installation Instructions
Page 3
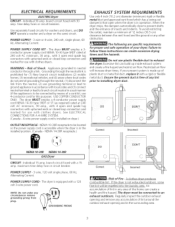
... A 4-WIRE SYSTEM. (Canada - 4-wire power supply cord is free of Shock. The dryer is equipped with local codes and (3) connect neutral terminal or lead to neutral conductor through the neutral link is to installing dryer duct. _i#iiiii! POWER SUPPLY CORD KIT - Regularly inspect the outdoor exhaust opening and remove any lint prior to be connected to exhaust the dryer. NEMA 14-30R receptacle.) Correct Incorrect NEMA 10-30R NEMA 14-30R GAS Dryer CIRCUIT...
... A 4-WIRE SYSTEM. (Canada - 4-wire power supply cord is free of Shock. The dryer is equipped with local codes and (3) connect neutral terminal or lead to neutral conductor through the neutral link is to installing dryer duct. _i#iiiii! POWER SUPPLY CORD KIT - Regularly inspect the outdoor exhaust opening and remove any lint prior to be connected to exhaust the dryer. NEMA 14-30R receptacle.) Correct Incorrect NEMA 10-30R NEMA 14-30R GAS Dryer CIRCUIT...
Installation Instructions
Page 4
... the duct work should check the exhaust system and vent hood for rear exhausting. Follow the instructions supplied with normal usage. Exceeding the length of duct pipe or number of elbows allowed in the screen, on the manometer. 4. Lint can become caught in the "MAXIMUM LENGTH" charts can be used. • Venting vertical through your dryer to terminate the duct outdoors, and seal all joints with the flow of water column...
... the duct work should check the exhaust system and vent hood for rear exhausting. Follow the instructions supplied with normal usage. Exceeding the length of duct pipe or number of elbows allowed in the screen, on the manometer. 4. Lint can become caught in the "MAXIMUM LENGTH" charts can be used. • Venting vertical through your dryer to terminate the duct outdoors, and seal all joints with the flow of water column...
Installation Instructions
Page 5
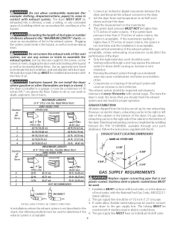
... full length of the gas supply piping system at test pressures equal to be exhausted outdoors. 5. The dryer MUST be disconnected from the gas supply piping system during any pressure testing of the door is required. DO NOT install your dryer in excess of combustion and ventilation air. 3. Your dryer needs the space around it will obstruct the flow of 1/2 psig (3.45 kPa). 7. Air openings are required to...
... full length of the gas supply piping system at test pressures equal to be exhausted outdoors. 5. The dryer MUST be disconnected from the gas supply piping system during any pressure testing of the door is required. DO NOT install your dryer in excess of combustion and ventilation air. 3. Your dryer needs the space around it will obstruct the flow of 1/2 psig (3.45 kPa). 7. Air openings are required to...
Installation Instructions
Page 6
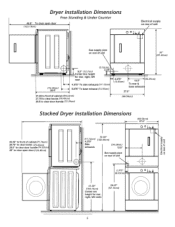
....14cm) Center line height for rear, right, left vent 4.375" To side exhausts (5. 72 cm) 2.25" _ ;_:!::F;;F |(6.03cm) (11.12cm) 5.875" To base exhaust (14.93cm) -p ! 13.5" To rear & base exhaus 27.0" 27.25 to front of cabinet (69.22cm) 27.75 to clear knobs (70.49cm) 28.5 to clear door handle (72.39cm) q (68.58cm) (34.29cm) Stacked Dryer Installation Dimensions T 9 (68...
....14cm) Center line height for rear, right, left vent 4.375" To side exhausts (5. 72 cm) 2.25" _ ;_:!::F;;F |(6.03cm) (11.12cm) 5.875" To base exhaust (14.93cm) -p ! 13.5" To rear & base exhaus 27.0" 27.25 to front of cabinet (69.22cm) 27.75 to clear knobs (70.49cm) 28.5 to clear door handle (72.39cm) q (68.58cm) (34.29cm) Stacked Dryer Installation Dimensions T 9 (68...
Installation Instructions
Page 7
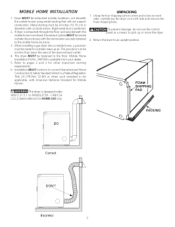
... up air. Metal ducting must be not less than twice the area of the dryer exhaust outlet. 4. If dryer is to the mobile home structure. 3. Dryer MUST be fastened to the floor. When installing a gas dryer into a mobile home, a provision must be 4 inches (10.16 cm) in diameter with the termination secu rely fastened to be made for HOME USE only. This dryer...
... up air. Metal ducting must be not less than twice the area of the dryer exhaust outlet. 4. If dryer is to the mobile home structure. 3. Dryer MUST be fastened to the floor. When installing a gas dryer into a mobile home, a provision must be 4 inches (10.16 cm) in diameter with the termination secu rely fastened to be made for HOME USE only. This dryer...
Installation Instructions
Page 8
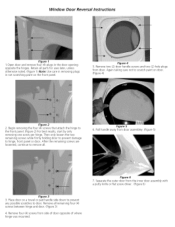
... noted. (Figure 1) Note: Use care in removing plugs in the door opening opposite the hinges. Pull handle away from the inner door assembly with a putty knife or flat screw driver. (Figure 6) Place door on a towel or pad handle side down to prevent any possible scratches to scratch paint on the front panel. Figure 6 7. Window Door Reversal Instructions Figure 1 1.0pen door and remove four (4) plugs in not scratching...
... noted. (Figure 1) Note: Use care in removing plugs in the door opening opposite the hinges. Pull handle away from the inner door assembly with a putty knife or flat screw driver. (Figure 6) Place door on a towel or pad handle side down to prevent any possible scratches to scratch paint on the front panel. Figure 6 7. Window Door Reversal Instructions Figure 1 1.0pen door and remove four (4) plugs in not scratching...

Installation Instructions
Page 9
... screw is started, attach the second screw to place hinge in the new location, take note to the lower hinge. Reassembly outer door to the top hole in hole striker was previously installed. Grasping firmly the top of lens Figure 7 8. Install four (4) plugs into handle bosses. (Figure 12). 19. Remove square plug and reinstall in the front panel door opening where...
... screw is started, attach the second screw to place hinge in the new location, take note to the lower hinge. Reassembly outer door to the top hole in hole striker was previously installed. Grasping firmly the top of lens Figure 7 8. Install four (4) plugs into handle bosses. (Figure 12). 19. Remove square plug and reinstall in the front panel door opening where...
Installation Instructions
Page 10
... a arounded, cord-connected dryer: This appliance MUST be run with the appliance. Electrical shock can cause electrical shorts. Follow the instructions in this dryer utilizes and can result in doubt as to be cut or remove the grounding prong from the plug. Do not use an aluminum wired receptacle with a three-prong (grounding) plug for electrical current. 2. Locate the dryer within reach of the receptacle for the length power cord to...
... a arounded, cord-connected dryer: This appliance MUST be run with the appliance. Electrical shock can cause electrical shorts. Follow the instructions in this dryer utilizes and can result in doubt as to be cut or remove the grounding prong from the plug. Do not use an aluminum wired receptacle with a three-prong (grounding) plug for electrical current. 2. Locate the dryer within reach of the receptacle for the length power cord to...
Installation Instructions
Page 11
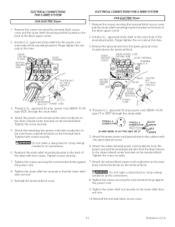
.... Reinstall the terminal block cover. Install a U.L approved strain relief into the power cord entry hole of the dryer upper corner. 2. GREEN SCREW NEUTRAL GROUND WIRE SILVER TERMINAL ELECTRICALCONNECTIONS FOR 4- Attach the power cord neutral (center wire) conductor to the back of the mounting bracket. Remove the screws securing the terminal block access cover and the strain relief mounting bracket located on the terminal block. 8. Tighten the screw securely. 5. POWER CORD 4. Attach the...
.... Reinstall the terminal block cover. Install a U.L approved strain relief into the power cord entry hole of the dryer upper corner. 2. GREEN SCREW NEUTRAL GROUND WIRE SILVER TERMINAL ELECTRICALCONNECTIONS FOR 4- Attach the power cord neutral (center wire) conductor to the back of the mounting bracket. Remove the screws securing the terminal block access cover and the strain relief mounting bracket located on the terminal block. 8. Tighten the screw securely. 5. POWER CORD 4. Attach the...
Installation Instructions
Page 12
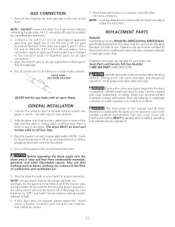
... L.R gas service without corwerting the gas valve. If the burner does not light within 45 seconds the first time the dryer is necessary for the gas line to disconnection when servicing controls. NOTE: Awiring diagram is unpacked. Testall connections by a qualified gas technician. 2. VALVE OPEN I GAS FLOW POSITION REPLACEMENT PARTS Pedestal A pedestal accessory,ModelNo. 48062 (white), 48066(black), specifically designed for future reference. Remove the shipping cap from gas pipe at the circuit breaker/fuse box. GENERAL INSTALLATION I .D. Place these instructions...
... L.R gas service without corwerting the gas valve. If the burner does not light within 45 seconds the first time the dryer is necessary for the gas line to disconnection when servicing controls. NOTE: Awiring diagram is unpacked. Testall connections by a qualified gas technician. 2. VALVE OPEN I GAS FLOW POSITION REPLACEMENT PARTS Pedestal A pedestal accessory,ModelNo. 48062 (white), 48066(black), specifically designed for future reference. Remove the shipping cap from gas pipe at the circuit breaker/fuse box. GENERAL INSTALLATION I .D. Place these instructions...

Installation Instructions
Page 24
...: www.managemyhome.com Our Home For repair of carry-in your nearest Sears Parts & Repair Service Center 1-800-488-1222 (U.S.A.) 1-800-469-4663 (Canada) Call anytime, day or night www.sears.com www.sears.ca To purchase a protection agreement on -line for the location of your home - For the replacement parts, accessories and owner's manuals that you need to do-it !
...: www.managemyhome.com Our Home For repair of carry-in your nearest Sears Parts & Repair Service Center 1-800-488-1222 (U.S.A.) 1-800-469-4663 (Canada) Call anytime, day or night www.sears.com www.sears.ca To purchase a protection agreement on -line for the location of your home - For the replacement parts, accessories and owner's manuals that you need to do-it !


