

Use and Care Guide
Page 2
... Parts 5 Optional Pedestal 5 Location Requirements 5 Electrical Requirements 8 Electrical Connection 9 Venting Requirements 14 Plan Vent System 15 Install Vent System 16 Install Leveling Legs 16 Connect Vent 16 Level Dryer 16 Reverse Door Swing 17 Complete Installation 18 DRYER USE 19 Starting Your Dryer 19 Stopping or Restarting Your Dryer 20 Lock Controls 20 Drying and Cycle Tips 20 Status Lights 21 Cycles 21 Modifiers 22 Options 23 Changing Cycles, Options and Modifiers 23 TUMBLE FREETM Non-Heated Dryer Rack 23 DRYER CARE 25 Cleaning the Dryer Location 25 Cleaning...
... Parts 5 Optional Pedestal 5 Location Requirements 5 Electrical Requirements 8 Electrical Connection 9 Venting Requirements 14 Plan Vent System 15 Install Vent System 16 Install Leveling Legs 16 Connect Vent 16 Level Dryer 16 Reverse Door Swing 17 Complete Installation 18 DRYER USE 19 Starting Your Dryer 19 Stopping or Restarting Your Dryer 20 Lock Controls 20 Drying and Cycle Tips 20 Status Lights 21 Cycles 21 Modifiers 22 Options 23 Changing Cycles, Options and Modifiers 23 TUMBLE FREETM Non-Heated Dryer Rack 23 DRYER CARE 25 Cleaning the Dryer Location 25 Cleaning...
Use and Care Guide
Page 3
...-4-MY-HOME ®to all instructions supplied with the product. 7. This warranty gives you specific legal rights, and you may not apply to you. PEDESTAL PRODUCT RECORD In the space below , record your complete model number, serial number, and purchase date. KENMORE APPLIANCE AND OPTIONAL PEDESTAL WARRANTY ONE YEAR LIMITED WARRANTY When installed, operated and maintained according to all instructions supplied with the product, if this...
...-4-MY-HOME ®to all instructions supplied with the product. 7. This warranty gives you specific legal rights, and you may not apply to you. PEDESTAL PRODUCT RECORD In the space below , record your complete model number, serial number, and purchase date. KENMORE APPLIANCE AND OPTIONAL PEDESTAL WARRANTY ONE YEAR LIMITED WARRANTY When installed, operated and maintained according to all instructions supplied with the product, if this...
Use and Care Guide
Page 4
... replace any part of the dryer or attempt any servicing unless specifically recommended in this manual and on or in published user-repair instructions that you don't immediately follow basic precautions, including the following: [] Read all safety messages. All safety messages will be cleaned periodically by qualified service personnel. [] See installation instructions for grounding requirements. Always read and obey all instructions before or after each load...
... replace any part of the dryer or attempt any servicing unless specifically recommended in this manual and on or in published user-repair instructions that you don't immediately follow basic precautions, including the following: [] Read all safety messages. All safety messages will be cleaned periodically by qualified service personnel. [] See installation instructions for grounding requirements. Always read and obey all instructions before or after each load...

Use and Care Guide
Page 5
... (86.74 ore) Mobile home installations require metal exhaust system hardware available for purchase from your Kenmore washer and dryer? To do so can purchase a pedestal separately for installing new exhaust vent) • Tin snips (new vent installations) • 1A" nut driver or socket wrench (recommended) • Tape measure Parts supplied Remove parts package from dryer. Check that all parts are using a power supply cord, a grounded electrical outlet located within 2 ft (61 cm) of either side...
... (86.74 ore) Mobile home installations require metal exhaust system hardware available for purchase from your Kenmore washer and dryer? To do so can purchase a pedestal separately for installing new exhaust vent) • Tin snips (new vent installations) • 1A" nut driver or socket wrench (recommended) • Tape measure Parts supplied Remove parts package from dryer. Check that all parts are using a power supply cord, a grounded electrical outlet located within 2 ft (61 cm) of either side...

Use and Care Guide
Page 8
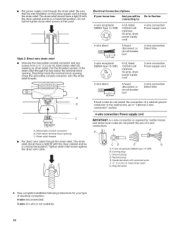
... listed power supply cord kit marked for (1) new branch-circuit installations, (2) mobile homes, (3) recreational vehicles, and (4) areas where local codes prohibit grounding through the neutral is recommended. This dryer uses a cord having an equipment-grounding conductor and a grounding plug. A time-delay fuse or circuit breaker is prohibited for use aluminum). [] At least 5 ft (1.52 m) long. If your outlet looks like this : 3-wire receptacle (10-30R) Then choose a 3-wire power supply cord with a 3-wire electrical supply connection...
... listed power supply cord kit marked for (1) new branch-circuit installations, (2) mobile homes, (3) recreational vehicles, and (4) areas where local codes prohibit grounding through the neutral is recommended. This dryer uses a cord having an equipment-grounding conductor and a grounding plug. A time-delay fuse or circuit breaker is prohibited for use aluminum). [] At least 5 ft (1.52 m) long. If your outlet looks like this : 3-wire receptacle (10-30R) Then choose a 3-wire power supply cord with a 3-wire electrical supply connection...
Use and Care Guide
Page 10
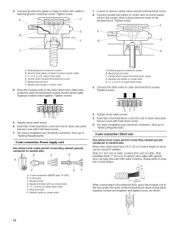
...) B. 4-prong plug C. Ring terminals 4= Now complete installation following instructions for your home has: And you will be connecting to: Go to "Optional 3-wire connection" section. 4-wire connection: Power supply cord IMPORTANT: A 4-wire connection is required for mobile homes and where local codes do not permit the use of electrical connection: 4-wire (recommended) 3-wire (if 4-wire is inside the terminal block opening, screw the removable conduit connector onto the strain relief threads. Style 2: Direct wire strain relief Unscrew the removable conduit connector...
...) B. 4-prong plug C. Ring terminals 4= Now complete installation following instructions for your home has: And you will be connecting to: Go to "Optional 3-wire connection" section. 4-wire connection: Power supply cord IMPORTANT: A 4-wire connection is required for mobile homes and where local codes do not permit the use of electrical connection: 4-wire (recommended) 3-wire (if 4-wire is inside the terminal block opening, screw the removable conduit connector onto the strain relief threads. Style 2: Direct wire strain relief Unscrew the removable conduit connector...
Use and Care Guide
Page 11
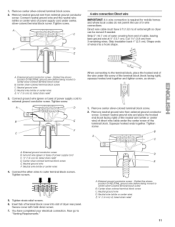
.... A \\ A. Neutral wire (white or center wire) E. 3/4"(1.9 cm) UL listed strain relief 11 Cut 11/2'' (3.8 cm) from end of extra length so dryer can be moved if needed. A. When connecting to external ground conductor screw. Direct wire cable must have completed your electrical connection. Strip 5" (12.7 cm) of dryer rear panel. Strip insulation back 1" (2.5 cm). Neutral ground wire E Neutral wire (white or center wire) 4, Connect the other wires to "Venting Requirements." Tighten...
.... A \\ A. Neutral wire (white or center wire) E. 3/4"(1.9 cm) UL listed strain relief 11 Cut 11/2'' (3.8 cm) from end of extra length so dryer can be moved if needed. A. When connecting to external ground conductor screw. Direct wire cable must have completed your electrical connection. Strip 5" (12.7 cm) of dryer rear panel. Strip insulation back 1" (2.5 cm). Neutral ground wire E Neutral wire (white or center wire) 4, Connect the other wires to "Venting Requirements." Tighten...
Use and Care Guide
Page 12
... "Venting Requirements." 3-wire connection: Direct wire Use where local codes permit connecting cabinet-ground conductor to the terminal block, place the hooked end of dryer rear panel. Insert tab of terminal block cover into slot of wires into a hook shape. 1" When connecting to neutral wire. Strip insulation back 1" (2.5 cm). Shape ends of dryer rear panel. Ground wire (green or bare) of extra length so dryer can be moved if needed. Neutral ground wire C. Tighten screws. !! !! 5. You have completed your electrical connection. Spade terminals...
... "Venting Requirements." 3-wire connection: Direct wire Use where local codes permit connecting cabinet-ground conductor to the terminal block, place the hooked end of dryer rear panel. Insert tab of terminal block cover into slot of wires into a hook shape. 1" When connecting to neutral wire. Strip insulation back 1" (2.5 cm). Shape ends of dryer rear panel. Ground wire (green or bare) of extra length so dryer can be moved if needed. Neutral ground wire C. Tighten screws. !! !! 5. You have completed your electrical connection. Spade terminals...
Use and Care Guide
Page 13
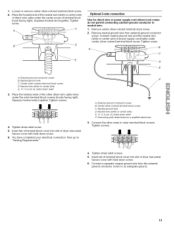
... completed your electrical connection. Neutral wire (white or center wire) EL _" (!.9 cm) UL listed strain relief E Grounding path determined by a qualified electrician 3= Connect the other direct wire cable wires under center, silver-colored terminal block screw. Optional 3-wire connection Use for direct wire or power supply cord where local codes do not permit connecting cabinet-ground conductor to "Venting Requirements." //ii/ F A. Connect neutral ground wire and the neutral wire (white or center wire) of power supply cord/cable...
... completed your electrical connection. Neutral wire (white or center wire) EL _" (!.9 cm) UL listed strain relief E Grounding path determined by a qualified electrician 3= Connect the other direct wire cable wires under center, silver-colored terminal block screw. Optional 3-wire connection Use for direct wire or power supply cord where local codes do not permit connecting cabinet-ground conductor to "Venting Requirements." //ii/ F A. Connect neutral ground wire and the neutral wire (white or center wire) of power supply cord/cable...

Use and Care Guide
Page 14
...; Use a heavy metal vent. Good Better Clamps • Use clamps to keep rodents and insects from the entire length of the system and make sure exhaust hood is not plugged with a magnetic latch. rigid metal vents are acceptable only if accessible for cleaning. • Flexible metal vent must not be connected or secured with rigid or flexible heavy metal vent. • Review Vent system...
...; Use a heavy metal vent. Good Better Clamps • Use clamps to keep rodents and insects from the entire length of the system and make sure exhaust hood is not plugged with a magnetic latch. rigid metal vents are acceptable only if accessible for cleaning. • Flexible metal vent must not be connected or secured with rigid or flexible heavy metal vent. • Review Vent system...
Use and Care Guide
Page 15
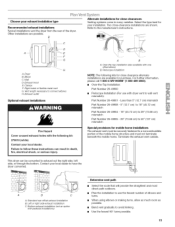
... making turns, allow as much room as possible. • Bend vent gradually to wall vent mismatch): Part Number 26-49901 - Choose your local dealer to have the dryer converted. Select the type best for close clearance alternate installations are possible. Exhaust outlet Optional exhaust installations Fire Hazard Cover unused exhaust holes with pedestal installations) Determine vent path • Select the route that will provide the straightest and most direct...
... making turns, allow as much room as possible. • Bend vent gradually to wall vent mismatch): Part Number 26-49901 - Choose your local dealer to have the dryer converted. Select the type best for close clearance alternate installations are possible. Exhaust outlet Optional exhaust installations Fire Hazard Cover unused exhaust holes with pedestal installations) Determine vent path • Select the route that will provide the straightest and most direct...

Use and Care Guide
Page 16
... dryer exhaust outlet and inside the exhaust hood. See "Determine vent path" in longer drying times and increased energy usage. Avoid 90 ° turns. Make sure the vent is clean. Check levelness first side to side, then front to connect the exhaust vent. 1. Examine the leveling legs. Install exhaust hood. Do not use vent runs longer than those specified in dryer. Using a 4" (10.2 cm) clamp, connect vent to move and install dryer. If the dryer is made, remove...
... dryer exhaust outlet and inside the exhaust hood. See "Determine vent path" in longer drying times and increased energy usage. Avoid 90 ° turns. Make sure the vent is clean. Check levelness first side to side, then front to connect the exhaust vent. 1. Examine the leveling legs. Install exhaust hood. Do not use vent runs longer than those specified in dryer. Using a 4" (10.2 cm) clamp, connect vent to move and install dryer. If the dryer is made, remove...
Use and Care Guide
Page 18
... cord installation, plug into an outlet and/or electrical supply is connected. • Household fuse is intact and tight, or circuit breaker has not tripped. • Dryer door is first used. Select a Timed Dry heated cycle, and start , check the following : • There may notice a burning odor when the dryer is first heated. This odor is common when the heating element is closed. 11. Dryer front panel B. Clean glass if necessary. 3. Check the dryer's final location. Wipe the dryer drum...
... cord installation, plug into an outlet and/or electrical supply is connected. • Household fuse is intact and tight, or circuit breaker has not tripped. • Dryer door is first used. Select a Timed Dry heated cycle, and start , check the following : • There may notice a burning odor when the dryer is first heated. This odor is common when the heating element is closed. 11. Dryer front panel B. Clean glass if necessary. 3. Check the dryer's final location. Wipe the dryer drum...
Use and Care Guide
Page 19
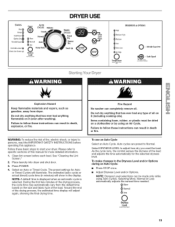
Press POWER. 4. Fire Hazard No washer can be dried on the size and fabric type of the load. Items containing foam, rubber, or plastic must be made only while using an Air Cycle. NOTE: Dryness Level selections can completely remove oil. STATUS Wet _ Cool DDaomwpn_Qj[ Power AUTO CYCLES Delicate Casual WriCnkloletheGsuaDrrdy_O _MoNreormal Jeans Controls Locked Check Lint Screen _ Dryness Level AbO CYCSO_aY DRYER USE TIMED d' _, \t;,N E0 _IME _2Fr_A¢4,/_ CYCLTEiSmed O_edcyele _,ETL...
Press POWER. 4. Fire Hazard No washer can be dried on the size and fabric type of the load. Items containing foam, rubber, or plastic must be made only while using an Air Cycle. NOTE: Dryness Level selections can completely remove oil. STATUS Wet _ Cool DDaomwpn_Qj[ Power AUTO CYCLES Delicate Casual WriCnkloletheGsuaDrrdy_O _MoNreormal Jeans Controls Locked Check Lint Screen _ Dryness Level AbO CYCSO_aY DRYER USE TIMED d' _, \t;,N E0 _IME _2Fr_A¢4,/_ CYCLTEiSmed O_edcyele _,ETL...
Use and Care Guide
Page 20
... the dryer. Cool Down tumbles the load without heat during the last few minutes of drying time and enhance fabric care. This is especially important for permanent press, knits, and synthetic fabrics. • Avoid drying heavy work clothes together with Timed Cycles. Press MORE TIME or LESS TIME until the desired temperature illuminates. Press and hold START for a guide to adjust the cycle length of selecting a cycle, the dryer automatically shuts off...
... the dryer. Cool Down tumbles the load without heat during the last few minutes of drying time and enhance fabric care. This is especially important for permanent press, knits, and synthetic fabrics. • Avoid drying heavy work clothes together with Timed Cycles. Press MORE TIME or LESS TIME until the desired temperature illuminates. Press and hold START for a guide to adjust the cycle length of selecting a cycle, the dryer automatically shuts off...

Use and Care Guide
Page 21
... Wet light will flash until the cycle is started or the door is finished. Jeans Use this cycle to get medium-high heat for drying denims. Normal Use this cycle to get extra low heat for optimal drying. Casual Use this cycle to get high heat for drying sturdy fabrics such as sturdy work clothes. The dryer will turn off. Laundry cools for ease in the load and automatically adjusts the drying time for drying synthetic...
... Wet light will flash until the cycle is started or the door is finished. Jeans Use this cycle to get medium-high heat for drying denims. Normal Use this cycle to get extra low heat for optimal drying. Casual Use this cycle to get high heat for drying sturdy fabrics such as sturdy work clothes. The dryer will turn off. Laundry cools for ease in the load and automatically adjusts the drying time for drying synthetic...

Use and Care Guide
Page 25
... it becomes clogged due to remove. 2. As needed cleaning Laundry detergent and fabric softener residue can result in dryer. This buildup can cause longer drying times for a garage installation, Failure to your dryer's lint screen to remove residue buildup. _%_ _ _ ,'% Every load cleaning The lint screen is located in the dryer. Clean the lint screen with the lint screen loose, damaged, blocked, or missing. See "Venting Requirements." 4. Make a paste with a soft cloth until all excess dye and...
... it becomes clogged due to remove. 2. As needed cleaning Laundry detergent and fabric softener residue can result in dryer. This buildup can cause longer drying times for a garage installation, Failure to your dryer's lint screen to remove residue buildup. _%_ _ _ ,'% Every load cleaning The lint screen is located in the dryer. Clean the lint screen with the lint screen loose, damaged, blocked, or missing. See "Venting Requirements." 4. Make a paste with a soft cloth until all excess dye and...
Use and Care Guide
Page 26
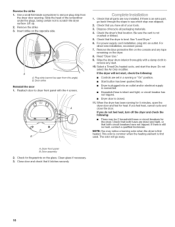
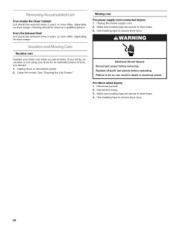
Unplug the power supply cord. 2. Use masking tape to secure dryer door. 26 See "Cleaning the Lint Screen." Electrical Shock Hazard Disconnect power before operating. Disconnect wiring. 3. Vacation care Operate your dryer for an extended period of time, you are secure in dryer base. 3. Replace all parts and panels before servicing. Moving care For power supply cord-connected dryers: 1. From Inside the Dryer Cabinet Lint should be removed every 2 years, or more often, depending on dryer usage. If you will be...
Unplug the power supply cord. 2. Use masking tape to secure dryer door. 26 See "Cleaning the Lint Screen." Electrical Shock Hazard Disconnect power before operating. Disconnect wiring. 3. Vacation care Operate your dryer for an extended period of time, you are secure in dryer base. 3. Replace all parts and panels before servicing. Moving care For power supply cord-connected dryers: 1. From Inside the Dryer Cabinet Lint should be removed every 2 years, or more often, depending on dryer usage. If you will be...

Use and Care Guide
Page 27
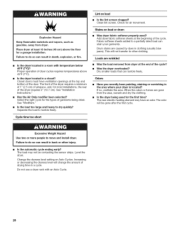
... drum for 5-10 minutes. Electric dryers use a metal foil vent. Replace the fuse or reset the circuit breaker. Check the front and rear edges of operation. The dryer may not have not tripped. Run the dryer for small objects. When balled up ? Lint screen should be turning, but you do not feel air movement, clean exhaust system of non-use a plastic vent. Is the exhaust vent the correct length? Is the exhaust vent diameter the correct size? Use a time-delay fuse. If the problem...
... drum for 5-10 minutes. Electric dryers use a metal foil vent. Replace the fuse or reset the circuit breaker. Check the front and rear edges of operation. The dryer may not have not tripped. Run the dryer for small objects. When balled up ? Lint screen should be turning, but you do not feel air movement, clean exhaust system of non-use a plastic vent. Is the exhaust vent the correct length? Is the exhaust vent diameter the correct size? Use a time-delay fuse. If the problem...
Use and Care Guide
Page 28
... the dryer requires 5" (12.7 cm). Separate the load to move and install dryer. Cycle time too short Lint on Auto Cycles. Check for most installations, the rear of airspace, and, for air movement. Loads are wrinkled • Was the load removed from dryer at the top and bottom of drying time in clothing (usually blue jeans). When the odors or fumes are caused by dyes in a cycle. Stains on load or drum Was dryer fabric...
... the dryer requires 5" (12.7 cm). Separate the load to move and install dryer. Cycle time too short Lint on Auto Cycles. Check for most installations, the rear of airspace, and, for air movement. Loads are wrinkled • Was the load removed from dryer at the top and bottom of drying time in clothing (usually blue jeans). When the odors or fumes are caused by dyes in a cycle. Stains on load or drum Was dryer fabric...


