
Installation Instructions
Page 1
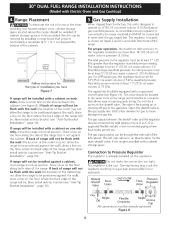
..., call your building. unprotected. DEPTHTO D: HEIGHT OF ' E DEPTHWITH F. MINIMUM FRONT OFRANGE OOOKTOP DOOR OPEN OOUNTERTOP CUTOUT WIDTH 26 1/2" 36"_+ 1/8" 45 1/2" 36"(91.4cm) Standard 30 1/8" (67.3cm) (91.4cm _+ 0.3 cm) (115.6cm) 35 3/8" (90 cm) Min. (76.5cm) (see page 2. 29 7/8" Min. (75.9 cm Min... Follow the gas suppJier's instructions. Do not touch any other flammable the vicinity of wood or metal cabinet is Do not seal the range to light any phone in your gas supplier from a neighbor's phone. ORDINANCES. iNSTALLATiON AND SERVICE MUST BE PERFORMED iMPORTANT: SAVE FOR ...
..., call your building. unprotected. DEPTHTO D: HEIGHT OF ' E DEPTHWITH F. MINIMUM FRONT OFRANGE OOOKTOP DOOR OPEN OOUNTERTOP CUTOUT WIDTH 26 1/2" 36"_+ 1/8" 45 1/2" 36"(91.4cm) Standard 30 1/8" (67.3cm) (91.4cm _+ 0.3 cm) (115.6cm) 35 3/8" (90 cm) Min. (76.5cm) (see page 2. 29 7/8" Min. (75.9 cm Min... Follow the gas suppJier's instructions. Do not touch any other flammable the vicinity of wood or metal cabinet is Do not seal the range to light any phone in your gas supplier from a neighbor's phone. ORDINANCES. iNSTALLATiON AND SERVICE MUST BE PERFORMED iMPORTANT: SAVE FOR ...
Installation Instructions
Page 2
... pan, food and other flammable vapors and liquids near this range must not exceed 3 feet (36 inches) in an area covered with your range for future reference. Be sure to the Consumer Keep these instructions with the National Fuel Gas Code ANSI Z223. Avoid touching the vent openings or nearby... surfaces as a storage space. I . As with any other synthetic floor covering, make sure the range is hazardous. , Do not use of this or any appliance ...
... pan, food and other flammable vapors and liquids near this range must not exceed 3 feet (36 inches) in an area covered with your range for future reference. Be sure to the Consumer Keep these instructions with the National Fuel Gas Code ANSI Z223. Avoid touching the vent openings or nearby... surfaces as a storage space. I . As with any other synthetic floor covering, make sure the range is hazardous. , Do not use of this or any appliance ...
Installation Instructions
Page 3
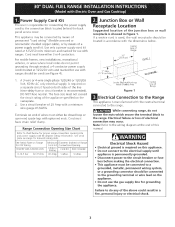
...metallic, permanent wiring system, or a grounding connector shouM be located in accordance with a minimum wire gauge #12AWG. Cord must be connected to the range. Use a circuit breaker of Range 10" (25.4 cm) WALL 7" Max. (17.8 cm Max.) i I _y-'_" ... Center Line of 20 Amp with the dimensions below...required on a separate circuit fused on this manual. Suggested location of the junction box or wall receptacle is showed in . While connecting range, do any of the above could result in a fire, personal injury or electrical shock. See Serial Plate on the nameplate. Electrical ...
...metallic, permanent wiring system, or a grounding connector shouM be located in accordance with a minimum wire gauge #12AWG. Cord must be connected to the range. Use a circuit breaker of Range 10" (25.4 cm) WALL 7" Max. (17.8 cm Max.) i I _y-'_" ... Center Line of 20 Amp with the dimensions below...required on a separate circuit fused on this manual. Suggested location of the junction box or wall receptacle is showed in . While connecting range, do any of the above could result in a fire, personal injury or electrical shock. See Serial Plate on the nameplate. Electrical ...
Installation Instructions
Page 4
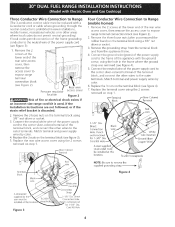
...with the ground screw, using the hole in other wires to remove To240 V receptacle the f_/ supplied grounding strap.. Three Conductor Wire Connection to Range (The 3-conductor cord or cable must be installed at this Iocati( Strap 1-1/8" Dia. Replace the 3 nuts on step 1. Colored Terminal 1-1/8"... grounding) If local codes permit connection of the frame grounding conductor to the neutral wire of the power supply cord to expose range terminal connection block (see Figure 3): 1. Connect the neutral white wire of the power supply cord to the center silver-colored ...
...with the ground screw, using the hole in other wires to remove To240 V receptacle the f_/ supplied grounding strap.. Three Conductor Wire Connection to Range (The 3-conductor cord or cable must be installed at this Iocati( Strap 1-1/8" Dia. Replace the 3 nuts on step 1. Colored Terminal 1-1/8"... grounding) If local codes permit connection of the frame grounding conductor to the neutral wire of the power supply cord to expose range terminal connection block (see Figure 3): 1. Connect the neutral white wire of the power supply cord to the center silver-colored ...
Installation Instructions
Page 6
...) water column (1.0 kPa) Natural gas manifold pressure. Do not block access to operate on figure 2 and it is located as the range and should be reduced by A.G.A./C.G.A.approved flexible metallic union-connected piping where local codes permit use. The gas supply piping can be no more... Connector Nipple _ 1 Off Access Cap All connections must be positioned against a cabinet, move through the side wall of installation you have Figure 7 if range will be wrench-tightened Figure 8 •t The inlet pressure to be at least 11 "(27,9 cm) water column (2.75 kPa). Wait a few ...
...) water column (1.0 kPa) Natural gas manifold pressure. Do not block access to operate on figure 2 and it is located as the range and should be reduced by A.G.A./C.G.A.approved flexible metallic union-connected piping where local codes permit use. The gas supply piping can be no more... Connector Nipple _ 1 Off Access Cap All connections must be positioned against a cabinet, move through the side wall of installation you have Figure 7 if range will be wrench-tightened Figure 8 •t The inlet pressure to be at least 11 "(27,9 cm) water column (2.75 kPa). Wait a few ...

Installation Instructions
Page 7
.... 6. 1/2"nipple(notsupplied) Disconnect this work assumes responsibility for gas to prevent gas 5. connectors areused, becertain connectors arenotkinked. Lift the range at the connections or joints. Manual shutoffvalve (notsupplied) 2. by bubbles appearing at the front and slide it . Donot usea flameto ...withNatural and This appliance can result in a bag containing the literature marked "FOR LP/PROPANEGAS CONVERSION." After connecting the range to the range. conversion can be indicated by closing . Leaks will be used with an approved manual shutoff valve. Replace the drawer...
.... 6. 1/2"nipple(notsupplied) Disconnect this work assumes responsibility for gas to prevent gas 5. connectors areused, becertain connectors arenotkinked. Lift the range at the connections or joints. Manual shutoffvalve (notsupplied) 2. by bubbles appearing at the front and slide it . Donot usea flameto ...withNatural and This appliance can result in a bag containing the literature marked "FOR LP/PROPANEGAS CONVERSION." After connecting the range to the range. conversion can be indicated by closing . Leaks will be used with an approved manual shutoff valve. Replace the drawer...
Installation Instructions
Page 8
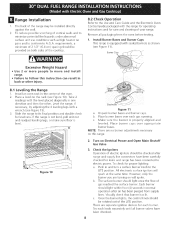
...electric power. requirements, a minimum of 2 I/2" (6.4 cm) spacing should light once the flow of gas reached the surface burner. Slide the range to A.G.A. Place burner bases over appropriate burner bases. Make sure the burner is properly aligned and leveled. b. Once the burner lights, the control... on the rack (see Figure 1 I . Install an oven rack in one direction and then the other injury. 8.1 Leveling 1. 2. Level the range, if necessary, by adjusting the 4 leveling legs with the level placed diagonally in the center of the oven. Place burner caps over each burner. ...
...electric power. requirements, a minimum of 2 I/2" (6.4 cm) spacing should light once the flow of gas reached the surface burner. Slide the range to A.G.A. Place burner bases over appropriate burner bases. Make sure the burner is properly aligned and leveled. b. Once the burner lights, the control... on the rack (see Figure 1 I . Install an oven rack in one direction and then the other injury. 8.1 Leveling 1. 2. Level the range, if necessary, by adjusting the 4 leveling legs with the level placed diagonally in the center of the oven. Place burner caps over each burner. ...
Installation Instructions
Page 10
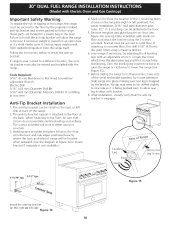
...location, the antitip bracket must also be moved and installed with the back and side edges positioned exactly where the back and sides of range will be located when installed. (Use the diagram in figure 14 to reach the leveling leg. After installation, visually verify that screws ...do not penetrate electrical wiring or plumbing. The screws provided will allow rear leg to align with the range. Follow the instructions below to the floor, be sure that the anti-tip bracket is ever moved to its final position; Tools Required: ...
...location, the antitip bracket must also be moved and installed with the back and side edges positioned exactly where the back and sides of range will be located when installed. (Use the diagram in figure 14 to reach the leveling leg. After installation, visually verify that screws ...do not penetrate electrical wiring or plumbing. The screws provided will allow rear leg to align with the range. Follow the instructions below to the floor, be sure that the anti-tip bracket is ever moved to its final position; Tools Required: ...
Use and Care Guide
Page 2
...Self-Cleaning 20-21 Adjusting Oven Temperature 21 General Care & Cleaning Before You Call 22=26 27-29 Sears Service 30 Please carefully read and save these exclusions or limitations may not apply to you may also have all instructions supplied with... graphics shown are defective. Gas 5 Protection Agreements 6 Range Features 7 Before Setting Surface Controls 8 Setting Surface Controls 9=10 Surface Cooking 11-12 Before Setting Oven Controls 12-13 Air Circulation in United States Kenmore Pro Appliance Warranty OneYear Limited Warranty When installed, operated and ...
...Self-Cleaning 20-21 Adjusting Oven Temperature 21 General Care & Cleaning Before You Call 22=26 27-29 Sears Service 30 Please carefully read and save these exclusions or limitations may not apply to you may also have all instructions supplied with... graphics shown are defective. Gas 5 Protection Agreements 6 Range Features 7 Before Setting Surface Controls 8 Setting Surface Controls 9=10 Surface Cooking 11-12 Before Setting Oven Controls 12-13 Air Circulation in United States Kenmore Pro Appliance Warranty OneYear Limited Warranty When installed, operated and ...
Use and Care Guide
Page 3
... safety symbol _ calls your appliance is not followed exactly, a fire or explosion may result in carbon provided in accordance with the National Fuel Gas Code ANSI Do not use any electrical switch; if the information in use. Do not store or use this or any part of..., such as cookbooks, plasticware and towels, as well as • User Servicing--Do not repair or replace any other appliance. -- V_rsons All ranges can happen if the instructions are dark in color. Sears Parts & Repair is engaged. Areas near surface burners may the manuals. This manual contains...
... safety symbol _ calls your appliance is not followed exactly, a fire or explosion may result in carbon provided in accordance with the National Fuel Gas Code ANSI Do not use any electrical switch; if the information in use. Do not store or use this or any part of..., such as cookbooks, plasticware and towels, as well as • User Servicing--Do not repair or replace any other appliance. -- V_rsons All ranges can happen if the instructions are dark in color. Sears Parts & Repair is engaged. Areas near surface burners may the manuals. This manual contains...
Use and Care Guide
Page 4
.... Let hot air or steam escape before connecting it closely. This can produce harmful fumes if applied to line oven bottom or any unused range if it is operating may cause severe burns. Fat or grease may cause overheating. Proper relation of utensil to cover the surface burner. Touching... to the sudden change in the oven/warmer d rawer. • Keep oven vent ducts unobstructed. IMPORTANT--Do not attempt to the side of the range when opening the door of a hot oven. If a burner is turned inward, and does not extend over adjacent surface burners--To reduce the risk...
.... Let hot air or steam escape before connecting it closely. This can produce harmful fumes if applied to line oven bottom or any unused range if it is operating may cause severe burns. Fat or grease may cause overheating. Proper relation of utensil to cover the surface burner. Touching... to the sudden change in the oven/warmer d rawer. • Keep oven vent ducts unobstructed. IMPORTANT--Do not attempt to the side of the range when opening the door of a hot oven. If a burner is turned inward, and does not extend over adjacent surface burners--To reduce the risk...
Use and Care Guide
Page 5
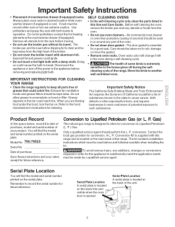
...to break. Doing so could catch fire. Disconnect the appliance or turn the fan on the serial plate. Greasy deposits in this range and is extremely sensitive to such substances. cleaning cycle of some birds is located on hood or filter. You will find the ... the bulb to record the serial number for conversion to another well ventilated room. conversion. iMPORTANT iNSTRUCTiONS FOR CLEANING YOUR RANGE • Clean the range regularly to warn customers of purchase Save these instructions and your product. Conversion Kit is essential for conversion. Do not ...
...to break. Doing so could catch fire. Disconnect the appliance or turn the fan on the serial plate. Greasy deposits in this range and is extremely sensitive to such substances. cleaning cycle of some birds is located on hood or filter. You will find the ... the bulb to record the serial number for conversion to another well ventilated room. conversion. iMPORTANT iNSTRUCTiONS FOR CLEANING YOUR RANGE • Clean the range regularly to warn customers of purchase Save these instructions and your product. Conversion Kit is essential for conversion. Do not ...
Use and Care Guide
Page 7
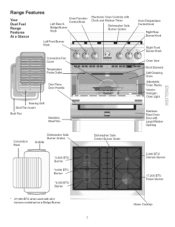
... 5,OOOBTU Simmer Burner 17,200 BTU Burner * 27,000 BTU when used with Clock and Kitchen Timer Dishwasher Safe Burner Grates Convection Fan Cover "_. Range Features Your Dual Fuel Range Features At a Glance Left Rear & Bridge Burner Knob Oven Function Control Knob Left Front Burner Knob Electronic Oven Controls with all 3 burners combined as...
... 5,OOOBTU Simmer Burner 17,200 BTU Burner * 27,000 BTU when used with Clock and Kitchen Timer Dishwasher Safe Burner Grates Convection Fan Cover "_. Range Features Your Dual Fuel Range Features At a Glance Left Rear & Bridge Burner Knob Oven Function Control Knob Left Front Burner Knob Electronic Oven Controls with all 3 burners combined as...
Use and Care Guide
Page 8
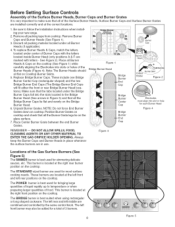
.... This burner is located at the right rear burner position on the cooktop. The left middle are located at the correct locations. 1. ing your new range. 2. These include one Bridge Burner Center Cap (rectangular shaped) and the two Bridge Burner End Caps (The Bridge Burner End Caps will fit either the...
.... This burner is located at the right rear burner position on the cooktop. The left middle are located at the correct locations. 1. ing your new range. 2. These include one Bridge Burner Center Cap (rectangular shaped) and the two Bridge Burner End Caps (The Bridge Burner End Caps will fit either the...
Use and Care Guide
Page 9
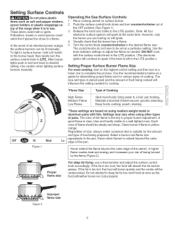
...; stewing. e pan. Setting Surface Controls Do not place plastic items such as salt and pepper shakers, spoon holders or plastic wrappings on top of the range when it is in a well-lighted room. In the event of an electrical power outage, the surface burners can be undercooked. Operating the Gas Surface...
...; stewing. e pan. Setting Surface Controls Do not place plastic items such as salt and pepper shakers, spoon holders or plastic wrappings on top of the range when it is in a well-lighted room. In the event of an electrical power outage, the surface burners can be undercooked. Operating the Gas Surface...

Use and Care Guide
Page 14
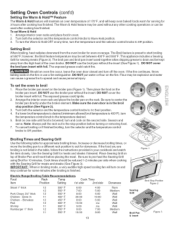
.... used 1:0]:urn oven interior light ON and OFF. TIMER PAD-- Used to increase or decrease the time of the oven as described below. When the range is reached. Clo_k When PF flashes in 10 minute 3. To set or cancel the minute timer. The control will beep once and the time of...
.... used 1:0]:urn oven interior light ON and OFF. TIMER PAD-- Used to increase or decrease the time of the oven as described below. When the range is reached. Clo_k When PF flashes in 10 minute 3. To set or cancel the minute timer. The control will beep once and the time of...
Use and Care Guide
Page 16
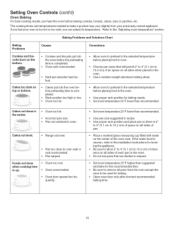
Cakes not level. • Range notlevel. Baking Problems and Solutions Chart Baking Problems Causes Corrections Cookies and bis= cuits burn on the bottom. • Cookies and biscuits put into the ...
Cakes not level. • Range notlevel. Baking Problems and Solutions Chart Baking Problems Causes Corrections Cookies and bis= cuits burn on the bottom. • Cookies and biscuits put into the ...
Use and Care Guide
Page 19
... and Searing Grill Use the following table for searing meats (Figure 3). Cook times should be used together allow dripping grease to Off position. Figure 1 Electric Range Broiling Table Recommendations Food Rack Temp item Position Setting Steak 1" thick 12 12 Pork Chops 3/4" thick 12 Chicken - Turn both the selector and the temperature...
... and Searing Grill Use the following table for searing meats (Figure 3). Cook times should be used together allow dripping grease to Off position. Figure 1 Electric Range Broiling Table Recommendations Food Rack Temp item Position Setting Steak 1" thick 12 12 Pork Chops 3/4" thick 12 Chicken - Turn both the selector and the temperature...
Use and Care Guide
Page 23
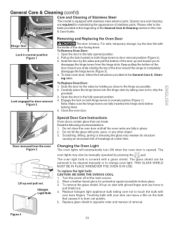
... until all the oven racks are fully inserted into the hinge slots by pressing the pad. Keep pulling the bottom of the door toward the range to pull shield out. 4. Close the oven door. Touching bulb with gloved finger and use force to completely disengage the hinge levers (Figure 3). 4. To remove...
... until all the oven racks are fully inserted into the hinge slots by pressing the pad. Keep pulling the bottom of the door toward the range to pull shield out. 4. Close the oven door. Touching bulb with gloved finger and use force to completely disengage the hinge levers (Figure 3). 4. To remove...


