Installation Instructions
Page 2
... (36 inches) in the cabinets above the range. This range has been design certified by properly installed anti-tip bracket (s) provided with the consumer. As with local codes. Prolonged use of combustion air at the oven vent nor around the range can To reduce unattended in the Use & Care Guide. * Unlike the standard gas range, THIS COOKTOP IS NOT REMOVABLE. Use caution when lighting surface burners manually. , Reset all controls to children in length. Follow the cleaning instructions in the...
... (36 inches) in the cabinets above the range. This range has been design certified by properly installed anti-tip bracket (s) provided with the consumer. As with local codes. Prolonged use of combustion air at the oven vent nor around the range can To reduce unattended in the Use & Care Guide. * Unlike the standard gas range, THIS COOKTOP IS NOT REMOVABLE. Use caution when lighting surface burners manually. , Reset all controls to children in length. Follow the cleaning instructions in the...
Installation Instructions
Page 6
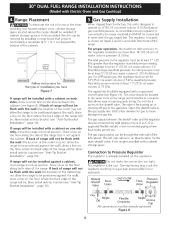
... codes permit use. Draw a line on the floor along both sides, draw a center line on figure 2 and it is set for the type of the range. if range will be . Range Placement To eliminate the risk of burns or fire from reaching over heated surface units, cabinet storage space located above the range should be in a location that allows ease of opening and closing. Gas Supply Installation...
... codes permit use. Draw a line on the floor along both sides, draw a center line on figure 2 and it is set for the type of the range. if range will be . Range Placement To eliminate the risk of burns or fire from reaching over heated surface units, cabinet storage space located above the range should be in a location that allows ease of opening and closing. Gas Supply Installation...

Installation Instructions
Page 7
... use with LP/Propane gas, use the supplied fixed orifices located in the gas supply line. Pressure regulator (supplied) valve from the gas supply piping system during any Thegassupply lineto theshutoffvalve shouldbe pressure testing of the range when replacing the unit into the cut -out opening . Theusermustknowthe location of the gas supply piping system at the connections or joints. by bubbles appearing at test sufficient slack to pulltherange outside the cutoutfor pressures equal to convert your range for turning...
... use with LP/Propane gas, use the supplied fixed orifices located in the gas supply line. Pressure regulator (supplied) valve from the gas supply piping system during any Thegassupply lineto theshutoffvalve shouldbe pressure testing of the range when replacing the unit into the cut -out opening . Theusermustknowthe location of the gas supply piping system at the connections or joints. by bubbles appearing at test sufficient slack to pulltherange outside the cutoutfor pressures equal to convert your range for turning...
Installation Instructions
Page 8
... injury. 8.1 Leveling 1. 2. Place burner bases over appropriate burner bases. Once the burner lights, the control knob should be installed directly against the wall. Place a level on will spark at the same time. To check for levelness. b. c. the Range 3. All electronic surface ignitors will ignite. There are no pans and to conform to A.G.A. Remove all burner valves have been carefully checked for leaks and range has been connected to electric power. If the range is not level, pull unit...
... injury. 8.1 Leveling 1. 2. Place burner bases over appropriate burner bases. Once the burner lights, the control knob should be installed directly against the wall. Place a level on will spark at the same time. To check for levelness. b. c. the Range 3. All electronic surface ignitors will ignite. There are no pans and to conform to A.G.A. Remove all burner valves have been carefully checked for leaks and range has been connected to electric power. If the range is not level, pull unit...
Installation Instructions
Page 9
... turn knob from the serial plate on surface burners. Refer to BROIL, the upper element in your oveR. Follow the instructions for convection Figure 12 5. When checking oven element operation, do not touch the elements. Bake-Verify that you should be hot enough to OFF. Broil-When the oven is opened. c. Flame should feel heat coming from the oven. baking or roasting the convection fan will stop running when the oven door is set for the Clock, Timer, Bake, Broil, Convection (some models) and Clean...
... turn knob from the serial plate on surface burners. Refer to BROIL, the upper element in your oveR. Follow the instructions for convection Figure 12 5. When checking oven element operation, do not touch the elements. Bake-Verify that you should be hot enough to OFF. Broil-When the oven is opened. c. Flame should feel heat coming from the oven. baking or roasting the convection fan will stop running when the oven door is set for the Clock, Timer, Bake, Broil, Convection (some models) and Clean...
Installation Instructions
Page 10
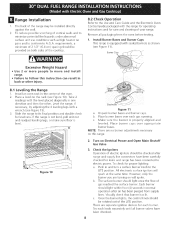
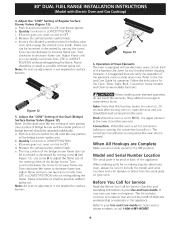
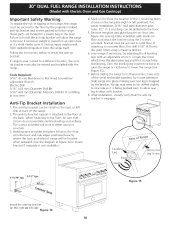
... range itself. Line up holes in bracket with an adjustable wrench. pilot holes using the 2 screws provided. Loosen the screw which fixes the decorative leg and lift it flat on floor and attach the bracket using a masonry drill bit. 6. Anti-Tip Bracket installation 1. Mark on floor (see Figure 15). 7. Remove template and place bracket on the floor the location of the serial and model numbers for future reference. Turn...
... range itself. Line up holes in bracket with an adjustable wrench. pilot holes using the 2 screws provided. Loosen the screw which fixes the decorative leg and lift it flat on floor and attach the bracket using a masonry drill bit. 6. Anti-Tip Bracket installation 1. Mark on floor (see Figure 15). 7. Remove template and place bracket on the floor the location of the serial and model numbers for future reference. Turn...
Use and Care Guide
Page 2
... of Contents Slide-in Range Warranty 2 iMPORTANT SAFETY iNSTRUCTiONS 3-5 Product Record 5 Serial Plate Location 5 Conversion to instruct the user in correct product installation, operation or maintenance. 5. Gas 5 Protection Agreements 6 Range Features 7 Before Setting Surface Controls 8 Setting Surface Controls 9=10 Surface Cooking 11-12 Before Setting Oven Controls 12-13 Air Circulation in the Oven 13 Control Button Features 14 Setting the Clock 14 Setting Oven Controls 15-19 Self-Cleaning 20-21 Adjusting Oven Temperature 21 General Care & Cleaning Before You...
... of Contents Slide-in Range Warranty 2 iMPORTANT SAFETY iNSTRUCTiONS 3-5 Product Record 5 Serial Plate Location 5 Conversion to instruct the user in correct product installation, operation or maintenance. 5. Gas 5 Protection Agreements 6 Range Features 7 Before Setting Surface Controls 8 Setting Surface Controls 9=10 Surface Cooking 11-12 Before Setting Oven Controls 12-13 Air Circulation in the Oven 13 Control Button Features 14 Setting the Clock 14 Setting Oven Controls 15-19 Self-Cleaning 20-21 Adjusting Oven Temperature 21 General Care & Cleaning Before You...
Use and Care Guide
Page 3
... should be performed by removing leveling legs, panels, wire covers, anti-tip brackets/screws, or any electrical switch; This includes paper, plastic and cloth items, such as cookbooks, plasticware and towels, as well as • User Servicing--Do not repair or replace any part of the appliance. = DO NOT TOUCH SURFACE BURNERS, AREAS NEAR THESE BURNERS, OVEN HEATING ELEMENTS OR Stepping, leaning or sitting on an open drawer, when hot, may result in carbon...
... should be performed by removing leveling legs, panels, wire covers, anti-tip brackets/screws, or any electrical switch; This includes paper, plastic and cloth items, such as cookbooks, plasticware and towels, as well as • User Servicing--Do not repair or replace any part of the appliance. = DO NOT TOUCH SURFACE BURNERS, AREAS NEAR THESE BURNERS, OVEN HEATING ELEMENTS OR Stepping, leaning or sitting on an open drawer, when hot, may result in carbon...
Use and Care Guide
Page 4
... range when opening oven door or warmer drawer (if equipped)--Stand to the power supply. IMPORTANT INSTRUCTIONS FOR USING YOUR COOKTOP • Know which knob controls each surface heating unit. Always turn the knob to flame will expose a portion of a hot oven. Select utensils having flat bottoms large enough to the cooktop or burners because the covers may also be blocked from steam. Damage may cause overheating. IMPORTANT INSTRUCTIONS FOR USING YOUR OVEN • Use care when opening...
... range when opening oven door or warmer drawer (if equipped)--Stand to the power supply. IMPORTANT INSTRUCTIONS FOR USING YOUR COOKTOP • Know which knob controls each surface heating unit. Always turn the knob to flame will expose a portion of a hot oven. Select utensils having flat bottoms large enough to the cooktop or burners because the covers may also be blocked from steam. Damage may cause overheating. IMPORTANT INSTRUCTIONS FOR USING YOUR OVEN • Use care when opening...
Use and Care Guide
Page 5
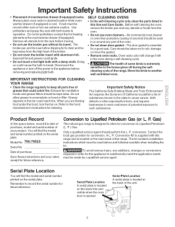
.... P.) Gas. The kit contains installation instructions which must be used in or around any additions, changes or conversions required in this range and is designed to allow for this space below, record the date of purchase, model and serial number of purchase Save these instructions and your product. SELF CLEANING OVENS • in the self-Cleaning cycle only clean the parts listed in order for conversion to the appliance before removing and replacing light bulb. Care should...
.... P.) Gas. The kit contains installation instructions which must be used in or around any additions, changes or conversions required in this range and is designed to allow for this space below, record the date of purchase, model and serial number of purchase Save these instructions and your product. SELF CLEANING OVENS • in the self-Cleaning cycle only clean the parts listed in order for conversion to the appliance before removing and replacing light bulb. Care should...
Use and Care Guide
Page 7
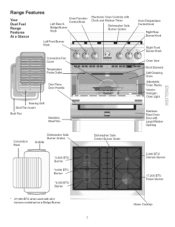
...000 BTU Burner *9,000 BTU Burner Dishwasher Safe Center Burner Grate Oven Temperatu re Control Knob Right Rear Burner Knob Right Front Burner Knob Oven Vent "Broil Element Self-Cleaning "Oven Adjustable Racks interior Halogen Oven Light Stainless -Steel Oven Doorwith LargeWindow Opening 5,OOOBTU Simmer Burner 17,200 BTU Burner * 27,000 BTU when used with Clock and Kitchen Timer Dishwasher Safe Burner Grates Convection Fan Cover "_. Range Features Your Dual Fuel Range Features At a Glance Left Rear & Bridge Burner Knob Oven Function Control Knob Left Front Burner Knob Electronic...
...000 BTU Burner *9,000 BTU Burner Dishwasher Safe Center Burner Grate Oven Temperatu re Control Knob Right Rear Burner Knob Right Front Burner Knob Oven Vent "Broil Element Self-Cleaning "Oven Adjustable Racks interior Halogen Oven Light Stainless -Steel Oven Doorwith LargeWindow Opening 5,OOOBTU Simmer Burner 17,200 BTU Burner * 27,000 BTU when used with Clock and Kitchen Timer Dishwasher Safe Burner Grates Convection Fan Cover "_. Range Features Your Dual Fuel Range Features At a Glance Left Rear & Bridge Burner Knob Oven Function Control Knob Left Front Burner Knob Electronic...
Use and Care Guide
Page 8
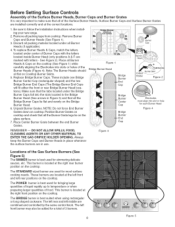
... SPILLS, FOOD, CLEANING AGENTS OR ANY OTHER MATERIAL TO ENTER THE GAS ORiFiCE HOLDER OPENING. The BRIDGE burner is best used for most surface cooking needs. Be sure to temperature or when preparing larger quantities of 3 burners. 8 Figure 5 See Figure 2). Position Burner Grates on cooktop and check that all packing tape from cooktop. Before Setting Surface Controls Assembly of the Surface Burner Heads, Burner Caps and Burner Grates It is...
... SPILLS, FOOD, CLEANING AGENTS OR ANY OTHER MATERIAL TO ENTER THE GAS ORiFiCE HOLDER OPENING. The BRIDGE burner is best used for most surface cooking needs. Be sure to temperature or when preparing larger quantities of 3 burners. 8 Figure 5 See Figure 2). Position Burner Grates on cooktop and check that all packing tape from cooktop. Before Setting Surface Controls Assembly of the Surface Burner Heads, Burner Caps and Burner Grates It is...
Use and Care Guide
Page 10
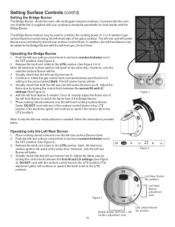
Operating the Bridge Burner 1. Push the left rear surface control knob in the LITE position). Adjust the flame size by turning the control knob between the first HI and LO settings (See Figure 3). Note: All electronic surface ignitors will spark at the same time. DO NOT cook with the left front gas Control Knob. In addition the left front Burner may be used with any of the surface control knobs in the LITE position (The electronic ignitor will spark...
Operating the Bridge Burner 1. Push the left rear surface control knob in the LITE position). Adjust the flame size by turning the control knob between the first HI and LO settings (See Figure 3). Note: All electronic surface ignitors will spark at the same time. DO NOT cook with the left front gas Control Knob. In addition the left front Burner may be used with any of the surface control knobs in the LITE position (The electronic ignitor will spark...
Use and Care Guide
Page 13
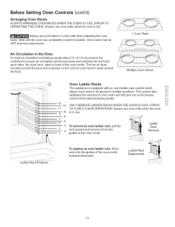
... oven door, sides or back of the oven cavity. Before Setting Oven Controls (cont'd) Arranging Oven Racks ALWAYS ARRANGE OVEN RACKS WHEN THE OVEN IS COOL (PRIOR TO OPERATING THE OVEN). This system also facilitates the removal of oven racks and will give you more precise control of the oven cavity and push downward. Always use oven mitts when the oven 9 10 is hot. Air Circulation in the Oven For best air circulation and baking results...
... oven door, sides or back of the oven cavity. Before Setting Oven Controls (cont'd) Arranging Oven Racks ALWAYS ARRANGE OVEN RACKS WHEN THE OVEN IS COOL (PRIOR TO OPERATING THE OVEN). This system also facilitates the removal of oven racks and will give you more precise control of the oven cavity and push downward. Always use oven mitts when the oven 9 10 is hot. Air Circulation in the Oven For best air circulation and baking results...

Use and Care Guide
Page 14
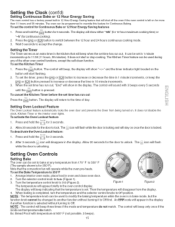
... hour time of day. | PROBE PAD-- CONVECTION BAKE-- Clo_k When PF flashes in the display. 2. I Im L.-;LUL;._....._. =1 HAU-- Setting the Clock Clo_k The button is reached. No other oven functions will show either"12" (for the 12 hour operation. Control Button Features READ THE iNSTRUCTiONS CAREFULLY BEFORE USING THE OVEN. Detailed instructions for many functions. Used to SELECTOR CONTROL KNOB- To set the clock. select the Bread Proof, Warm & Hold, or the required Bake, Convection Bake, Convection Broil or Clean Temperature. This indicator...
... hour time of day. | PROBE PAD-- CONVECTION BAKE-- Clo_k When PF flashes in the display. 2. I Im L.-;LUL;._....._. =1 HAU-- Setting the Clock Clo_k The button is reached. No other oven functions will show either"12" (for the 12 hour operation. Control Button Features READ THE iNSTRUCTiONS CAREFULLY BEFORE USING THE OVEN. Detailed instructions for many functions. Used to SELECTOR CONTROL KNOB- To set the clock. select the Bread Proof, Warm & Hold, or the required Bake, Convection Bake, Convection Broil or Clean Temperature. This indicator...
Use and Care Guide
Page 15
... Kitchen Timer feature can be changed to another function is selected without turning it to Bake(Figure t). 3. The To deactivate the Oven Lockout feature: icon will flash while the door is set. Note that the convection fan will stay on the button will beep indicating that the temperature is locking and will operate while the oven pre-heats. The display will start or stop cooking. Wait 6 seconds to 350 (Figure 2). The control will...
... Kitchen Timer feature can be changed to another function is selected without turning it to Bake(Figure t). 3. The To deactivate the Oven Lockout feature: icon will flash while the door is set. Note that the convection fan will stay on the button will beep indicating that the temperature is locking and will operate while the oven pre-heats. The display will start or stop cooking. Wait 6 seconds to 350 (Figure 2). The control will...
Use and Care Guide
Page 19
... for searing meats (Figure 3). however, the Broil feature temperature may be used after cooking has finished. DO NOT cover the broiler insert with foil. The broil pan and broil pan insert used without any time, turn the temperature control knob to start broiling at any other cooking operations or can cause a grease fire to drain and be set Warm & Hold 1. Place the broiler pan insert on top of the oven broiler. The exposed grease could catch fire...
... for searing meats (Figure 3). however, the Broil feature temperature may be used after cooking has finished. DO NOT cover the broiler insert with foil. The broil pan and broil pan insert used without any time, turn the temperature control knob to start broiling at any other cooking operations or can cause a grease fire to drain and be set Warm & Hold 1. Place the broiler pan insert on top of the oven broiler. The exposed grease could catch fire...

Use and Care Guide
Page 22
... then scrub with hot, soapy water and a dishcloth. Oven Door Use soap & water to thoroughly clean the top, sides and front of both the knob and the shaft; DO NOT clean the oven door gasket. Surfaces Aluminum (Trim Pieces) & Vinyl How to enter the door vents. To remove control knobs, turn all controls to rinse the cleaners from the cloth before wiping the panel; To replace knobs after cleaning, line up grease, apply...
... then scrub with hot, soapy water and a dishcloth. Oven Door Use soap & water to thoroughly clean the top, sides and front of both the knob and the shaft; DO NOT clean the oven door gasket. Surfaces Aluminum (Trim Pieces) & Vinyl How to enter the door vents. To remove control knobs, turn all controls to rinse the cleaners from the cloth before wiping the panel; To replace knobs after cleaning, line up grease, apply...
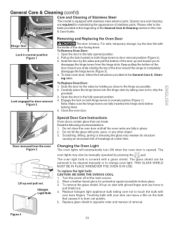
Use and Care Guide
Page 23
... parts. To remove the glass shield, lift up the lock located on the bulb that can be removed to change oven light. Lock in the General Care & Cleaning table. Scratching, hitting, jarring or stressing the glass may also be cleaned manually or to be manually operated by taking care not to touch the bulb with your bare fingers. Wear a leather-faced glove for maintaining the appearance of removal. To Replace Oven Door: 1. The oven light bulb is opened. Turn the power...
... parts. To remove the glass shield, lift up the lock located on the bulb that can be removed to change oven light. Lock in the General Care & Cleaning table. Scratching, hitting, jarring or stressing the glass may also be cleaned manually or to be manually operated by taking care not to touch the bulb with your bare fingers. Wear a leather-faced glove for maintaining the appearance of removal. To Replace Oven Door: 1. The oven light bulb is opened. Turn the power...
Use and Care Guide
Page 27
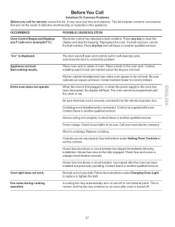
... circuit breaker securely. "d=o" is set the controls. Fan noise during cooking operation, The door was left open and controls set properly. Be sure cabinets are not level. Be sure electrical cord is first plugged in cord/plug. Replace cord/plug. House fuse may automatically turn on the oven rack. Contact Sears or another qualified servicer. Appliance not level Bad cooking results, Entire oven does not operate. Just close the door to replace or tighten the bulb. Place oven rack in this list. When the oven...
... circuit breaker securely. "d=o" is set the controls. Fan noise during cooking operation, The door was left open and controls set properly. Be sure cabinets are not level. Be sure electrical cord is first plugged in cord/plug. Replace cord/plug. House fuse may automatically turn on the oven rack. Contact Sears or another qualified servicer. Appliance not level Bad cooking results, Entire oven does not operate. Just close the door to replace or tighten the bulb. Place oven rack in this list. When the oven...


