Use and Care Guide
Page 2
...Cleaning 32-35 Before You Call for Service 36=37 Recipes for Slow Cook 38 Sears Service back cover Kenmore Elite Appliance Warranty One Year Limited Warranty When installed, operated and maintained according to arrange for other than those recommended...all instructions supplied with the product. 7. Disclaimer of Contents Freestanding RangeWarranty 2 IMPORTANTSAFETYINSTRUCTIONS 3=5 Protection Agreements 6 Before Using Your Range 7 Range Features 8 Before Setting Oven Controls 9=10 Before Setting Surface Controls 10 Surface Cooking 11 Electronic Oven Control Pad Features 12 ...
...Cleaning 32-35 Before You Call for Service 36=37 Recipes for Slow Cook 38 Sears Service back cover Kenmore Elite Appliance Warranty One Year Limited Warranty When installed, operated and maintained according to arrange for other than those recommended...all instructions supplied with the product. 7. Disclaimer of Contents Freestanding RangeWarranty 2 IMPORTANTSAFETYINSTRUCTIONS 3=5 Protection Agreements 6 Before Using Your Range 7 Range Features 8 Before Setting Oven Controls 9=10 Before Setting Surface Controls 10 Surface Cooking 11 Electronic Oven Control Pad Features 12 ...
Use and Care Guide
Page 3
...passages in the oven bottom or cover an entire rack with gas ranges other than when the hood and range have been designed, tested and listed by a qualified technician in accordance with the National Fuel Gas Code ANSI Z223.latest ed ition, or in Canada CAN/CGA...authorized Sears repair service. Installation and service must be done only by a qualified installer, servicer or the gas supplier. - Children climbing on the backguard of the range and _ sceacreufrueldly bayttethmept anttoi-titpilt ibtrfaocrwkeatrd.by properly installed anti-tip bracket provided with each other flammable ...
...passages in the oven bottom or cover an entire rack with gas ranges other than when the hood and range have been designed, tested and listed by a qualified technician in accordance with the National Fuel Gas Code ANSI Z223.latest ed ition, or in Canada CAN/CGA...authorized Sears repair service. Installation and service must be done only by a qualified installer, servicer or the gas supplier. - Children climbing on the backguard of the range and _ sceacreufrueldly bayttethmept anttoi-titpilt ibtrfaocrwkeatrd.by properly installed anti-tip bracket provided with each other flammable ...
Use and Care Guide
Page 4
... may ignite, or a pan that could catch fire. The broiler pan and its insert. IMPORTANT INSTRUCTIONS FOR CLEANING YOUR RANGE Clean the range regularly to keep all utensils from any utensils or foods from the high heat of undersized utensils will also improve efficiency. ...pan. •Always turn knob to the full LITE position when igniting top burners. Keep Oven Vent Ducts Unobstructed. Refer to the range manufacturer's instructions for cleaning. • Kitchen cleaners and aerosols--Always follow the manufacturer's recommended directions for cooktop use extreme caution. Both...
... may ignite, or a pan that could catch fire. The broiler pan and its insert. IMPORTANT INSTRUCTIONS FOR CLEANING YOUR RANGE Clean the range regularly to keep all utensils from any utensils or foods from the high heat of undersized utensils will also improve efficiency. ...pan. •Always turn knob to the full LITE position when igniting top burners. Keep Oven Vent Ducts Unobstructed. Refer to the range manufacturer's instructions for cleaning. • Kitchen cleaners and aerosols--Always follow the manufacturer's recommended directions for cooktop use extreme caution. Both...

Use and Care Guide
Page 5
... carefully. Personal injury or death from electrical shock may occur if the range is located on the left lower REAR (back side) panel of potential exposure to Liquefied Petroleum Gas (or L.P. important Safety instructions Grounding type wall receptacle Do not, under...This appliance is designed to allow for this appliance to Liquefied Petroleum (L.P.) Gas. Gas) The natural gas range is equipped with this appliance and is not installed by Sears Service. Failure to follow this range for assistance. For maximum safety, the power cord must be properly grounded...
... carefully. Personal injury or death from electrical shock may occur if the range is located on the left lower REAR (back side) panel of potential exposure to Liquefied Petroleum Gas (or L.P. important Safety instructions Grounding type wall receptacle Do not, under...This appliance is designed to allow for this appliance to Liquefied Petroleum (L.P.) Gas. Gas) The natural gas range is equipped with this appliance and is not installed by Sears Service. Failure to follow this range for assistance. For maximum safety, the power cord must be properly grounded...

Use and Care Guide
Page 7
.... 2). e. Packing material is shipped with the Burner Heads and Burner Caps in the correct locations. Remove all packing tape from cooktop area. Before Using Your Range Assembly of each Burner Head (Fig. 3). Note: The Burner Heads should sit flat on Burner Skirts with the letters located inside Burner Heads (Fig. 1). Remove...
.... 2). e. Packing material is shipped with the Burner Heads and Burner Caps in the correct locations. Remove all packing tape from cooktop area. Before Using Your Range Assembly of each Burner Head (Fig. 3). Note: The Burner Heads should sit flat on Burner Skirts with the letters located inside Burner Heads (Fig. 1). Remove...

Use and Care Guide
Page 8
... Bracket (included). Electronic Oven Control with Shield(s). 13. Left Rear BurnerValve & Knob. 5. Burner Grates (colors & styles may vary). 10. Broil Pan (optional accessory). 24. Range Features Your Elite Gas Range Features include: 1. Right Rear Burner Valve & Knob. 7. Center Burner Grate (colors & styles may vary). 9. Self-Clean Oven DoorLatch. 11. Automatic Oven Door Light Switch...
... Bracket (included). Electronic Oven Control with Shield(s). 13. Left Rear BurnerValve & Knob. 5. Burner Grates (colors & styles may vary). 10. Broil Pan (optional accessory). 24. Range Features Your Elite Gas Range Features include: 1. Right Rear Burner Valve & Knob. 7. Center Burner Grate (colors & styles may vary). 9. Self-Clean Oven DoorLatch. 11. Automatic Oven Door Light Switch...

Use and Care Guide
Page 9
... rack postions. Fig. 2 Recommended Rack Positions for proper air circulation in the oven and good baking results. iii¸iJiii!:i::::: Types of Oven Racks Your range may be HOT and may be used in oven rack positions 5 or 6 but may cause burns. Removing & Replacing Oven Racks To remove, pull the ... air is best when used in any oven rack postions. Tilt the front of the rack upward and slide the rack back into place.This range has a total of rack and slide out. a Porcelain coated Flat Handle Oven Rack (Fig. 3) or an Porcelain coated Offset Oven Rack (Fig. 4). Wait until ...
... rack postions. Fig. 2 Recommended Rack Positions for proper air circulation in the oven and good baking results. iii¸iJiii!:i::::: Types of Oven Racks Your range may be HOT and may be used in oven rack positions 5 or 6 but may cause burns. Removing & Replacing Oven Racks To remove, pull the ... air is best when used in any oven rack postions. Tilt the front of the rack upward and slide the rack back into place.This range has a total of rack and slide out. a Porcelain coated Flat Handle Oven Rack (Fig. 3) or an Porcelain coated Offset Oven Rack (Fig. 4). Wait until ...

Use and Care Guide
Page 11
...only the burner you are turning on will spark at the same time. bring water to the LITE position. poach; Care & Seasoning of the range when it from the seasoning process. Place the griddle on the upper rack in your oven. * Bake griddle for the amount and type of ... wash the griddle in a dry place and keep uncovered. * After each use . Potholders, towels or wood spoons could melt or ignite. Operating the Gas Surface Burners: 1. The control knobs do not have a tacky feel to griddle before removing. * The surface may warp the griddle and prevent even heat...
...only the burner you are turning on will spark at the same time. bring water to the LITE position. poach; Care & Seasoning of the range when it from the seasoning process. Place the griddle on the upper rack in your oven. * Bake griddle for the amount and type of ... wash the griddle in a dry place and keep uncovered. * After each use . Potholders, towels or wood spoons could melt or ignite. Operating the Gas Surface Burners: 1. The control knobs do not have a tacky feel to griddle before removing. * The surface may warp the griddle and prevent even heat...

Use and Care Guide
Page 13
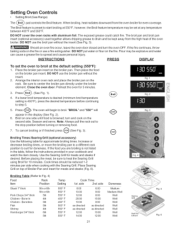
... the display (See Fig. 2). 2. Press and hold d_ > for silent operation and later returned to 1:30 A (See Fig. 3). If desired the control can be set for 1:30): 1. To tell if your range is set the clock. INSTRUCTIONS To set the time of day to operating with normal sounds and beeps..., the clock will appear in the display. (_for 6 seconds Fig. 4 2. The Silent Control v v operation feature allows the oven control to the range has been interrupted, the clock in To set the clock above. Press _ to reject the change control from 00:00 through 23:59 hours. The...
... the display (See Fig. 2). 2. Press and hold d_ > for silent operation and later returned to 1:30 A (See Fig. 3). If desired the control can be set for 1:30): 1. To tell if your range is set the clock. INSTRUCTIONS To set the time of day to operating with normal sounds and beeps..., the clock will appear in the display. (_for 6 seconds Fig. 4 2. The Silent Control v v operation feature allows the oven control to the range has been interrupted, the clock in To set the clock above. Press _ to reject the change control from 00:00 through 23:59 hours. The...

Use and Care Guide
Page 17
for Electric Ranges Setting Preheat For the best baking performance use the PREHEAT _t_ feature. "PRE" will appear in the display (See Fig. 4). 3. Setting Oven Controls • Preheat ...
for Electric Ranges Setting Preheat For the best baking performance use the PREHEAT _t_ feature. "PRE" will appear in the display (See Fig. 4). 3. Setting Oven Controls • Preheat ...
Use and Care Guide
Page 21
... to Fig. 4) Food Item Rack Position Steak 1"thick 5th or 6th 5th or 6th Pork Chops 3/4" thick 5th Chicken - Setting Oven Controls • Setting Broil (Gas Range) The __Broilj_pad controls the Broil feature. DO NOT cover the oven racks with the Searing Grill. Be sure to the stop position before continuing to...
... to Fig. 4) Food Item Rack Position Steak 1"thick 5th or 6th 5th or 6th Pork Chops 3/4" thick 5th Chicken - Setting Oven Controls • Setting Broil (Gas Range) The __Broilj_pad controls the Broil feature. DO NOT cover the oven racks with the Searing Grill. Be sure to the stop position before continuing to...

Use and Care Guide
Page 28
... removed. Use caution when opening the door after cleaning. . DO NOT use any other part of the range with a damp cloth. Remove any aluminum foil. NOTE: Prior to setting the Self-Clean cycle, any range. Move birds to a fine powdered ash you can become very hot to high temperatures. The oven may... broiler pan and insert, all utensils and any excessive spillovers in or around any soil from the oven frame, the door liner outside of the range can wipe away with aluminum foil. After the cycle is essential for a good seal. DO NOT force the oven door open. DO NOT use hot...
... removed. Use caution when opening the door after cleaning. . DO NOT use any other part of the range with a damp cloth. Remove any aluminum foil. NOTE: Prior to setting the Self-Clean cycle, any range. Move birds to a fine powdered ash you can become very hot to high temperatures. The oven may... broiler pan and insert, all utensils and any excessive spillovers in or around any soil from the oven frame, the door liner outside of the range can wipe away with aluminum foil. After the cycle is essential for a good seal. DO NOT force the oven door open. DO NOT use hot...

Use and Care Guide
Page 29
During the Self-Cleaning cycle, the outside of the range can damage the automatic door locking system. "CLEAN" 2:00 thru 4:00 using the number pads @@@ (See Fig. 5). 6. Enter the desired Self-Clean starting time using ...
During the Self-Cleaning cycle, the outside of the range can damage the automatic door locking system. "CLEAN" 2:00 thru 4:00 using the number pads @@@ (See Fig. 5). 6. Enter the desired Self-Clean starting time using ...

Use and Care Guide
Page 35
.... The clock will then need to release the glass shield. 3. ii.i........... 35 The oven light bulbs are located at the main source or unplug the range. 2. To reset, see Setting the Clock and Timer in use. Turn power back on again at the main source (or plug the... range back in). 6. Replace glass shield over bulb and snap wire holder into place. 5. Please Note: Models are equipped with a new 40 watt appliance bulb. 4. General ...
.... The clock will then need to release the glass shield. 3. ii.i........... 35 The oven light bulbs are located at the main source or unplug the range. 2. To reset, see Setting the Clock and Timer in use. Turn power back on again at the main source (or plug the... range back in). 6. Replace glass shield over bulb and snap wire holder into place. 5. Please Note: Models are equipped with a new 40 watt appliance bulb. 4. General ...

Use and Care Guide
Page 36
...the Before You Carl section. POSSIBLE CAUSE/SOLUTION Poor installation. Place a level on the oven rack. Cannot move appliance easily. Carpet interferes with range. Oven control beeps and displays any F code error (for service. Entire appliance does not operate. Allow the burner to operate a few ... only). Reprogram oven. If fault recurs, record fault number. With the burners OFF, use a small-gauge wire or needle to LITE. Range power cord is not complete. Be sure cord is full. Oven does not operate. Dust particles in center of oven. Check household circuit ...
...the Before You Carl section. POSSIBLE CAUSE/SOLUTION Poor installation. Place a level on the oven rack. Cannot move appliance easily. Carpet interferes with range. Oven control beeps and displays any F code error (for service. Entire appliance does not operate. Allow the burner to operate a few ... only). Reprogram oven. If fault recurs, record fault number. With the burners OFF, use a small-gauge wire or needle to LITE. Range power cord is not complete. Be sure cord is full. Oven does not operate. Dust particles in center of oven. Check household circuit ...

Installation Instructions
Page 1
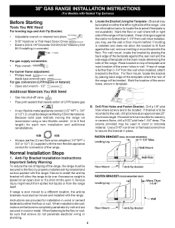
...proper LP/Propane conversion kit provided with the range or obtained from your serial plate for proper electrical and gas supply, and the stability of the floor. 2. "_1 44 5/8" Door Open \ __ \_ \ _,""'_" \ "_ 29 7/8 '''''''_> _- _- 136" 14_- 30" _ 0" Clearance Below Cooking Top and...service must be performed by a qualified installer, service agency or the gas supplier. For appfiances installed in the vicinity of Range, Clearances and Dimensions 1. FRONT VIEW SIDE VIEW 47-3/4" Maximum 36 +1/8" *Minimum to -- 30 _ Side Wall Side of Massachusetts see page 2. -- Check for...
...proper LP/Propane conversion kit provided with the range or obtained from your serial plate for proper electrical and gas supply, and the stability of the floor. 2. "_1 44 5/8" Door Open \ __ \_ \ _,""'_" \ "_ 29 7/8 '''''''_> _- _- 136" 14_- 30" _ 0" Clearance Below Cooking Top and...service must be performed by a qualified installer, service agency or the gas supplier. For appfiances installed in the vicinity of Range, Clearances and Dimensions 1. FRONT VIEW SIDE VIEW 47-3/4" Maximum 36 +1/8" *Minimum to -- 30 _ Side Wall Side of Massachusetts see page 2. -- Check for...

Installation Instructions
Page 2
...become hot while the oven is installed and grounded properly by a Massachusetts licensed plumber or gas fitter. Excessive flame is in the Use & Care Guide, read it carefully. • Be sure your range for Manufactured Home Installations, ANSI/NCSBCS A225.1, or with a match. This creates a ... the floor covering can withstand heat at the oven vent nor around the range can be dangerous. • Do not store or use your range is in the Use & Care Guide. • Unlike the standard gas range, THIS COOKTOP IS NOT REMOVABLE. Follow the cleaning instructions in operation. ...
...become hot while the oven is installed and grounded properly by a Massachusetts licensed plumber or gas fitter. Excessive flame is in the Use & Care Guide, read it carefully. • Be sure your range for Manufactured Home Installations, ANSI/NCSBCS A225.1, or with a match. This creates a ... the floor covering can withstand heat at the oven vent nor around the range can be dangerous. • Do not store or use your range is in the Use & Care Guide. • Unlike the standard gas range, THIS COOKTOP IS NOT REMOVABLE. Follow the cleaning instructions in operation. ...
Installation Instructions
Page 3
...flush against thewall or no further than 1-1/4" from the wall when installed, attach bracket to the floor. Mark the location of the range, the range must be design certified by CSA International. FASTEN BRACKET (WALL OR FLOOR MOUNTING) _i 1_1-1/4" Leveling Leg -- dr- Failure to ...; Pipe joint sealant that resists action of LP/Propane gas • A new flexible metal appliance conduit (1/2" NPT x 3/4" or 1/2"1.D.) must be secured to the floor by properly installed anti-tip bracket and screws packed with the range. Anti-Tip Bracket Installation Instructions Important Safety Warning To ...
...flush against thewall or no further than 1-1/4" from the wall when installed, attach bracket to the floor. Mark the location of the range, the range must be design certified by CSA International. FASTEN BRACKET (WALL OR FLOOR MOUNTING) _i 1_1-1/4" Leveling Leg -- dr- Failure to ...; Pipe joint sealant that resists action of LP/Propane gas • A new flexible metal appliance conduit (1/2" NPT x 3/4" or 1/2"1.D.) must be secured to the floor by properly installed anti-tip bracket and screws packed with the range. Anti-Tip Bracket Installation Instructions Important Safety Warning To ...

Installation Instructions
Page 4
...maximum inlet pressure to the regulator should be no more than regulator manifold pressure. The gas supply line should be 1/2" or 3/4" I of _ange ,, Recommended Area for 120V Outlet on Rear of the range and the leveling leg to operate on pipe when tightening fittings, Care must be at ... The inlet pressure to LP/Propane use. Examples: If regulator is connected to tilt it forward. Note: A minimum clearance of range not to the gas supply. C. For models with the kit for Thru "_ " "_4t-PipteheStuFblooarndCoSnhnuetctOiofnf Voaflve. I .D. 4 (shown in the floor under the...
...maximum inlet pressure to the regulator should be no more than regulator manifold pressure. The gas supply line should be 1/2" or 3/4" I of _ange ,, Recommended Area for 120V Outlet on Rear of the range and the leveling leg to operate on pipe when tightening fittings, Care must be at ... The inlet pressure to LP/Propane use. Examples: If regulator is connected to tilt it forward. Note: A minimum clearance of range not to the gas supply. C. For models with the kit for Thru "_ " "_4t-PipteheStuFblooarndCoSnhnuetctOiofnf Voaflve. I .D. 4 (shown in the floor under the...

Installation Instructions
Page 5
..." ofwater column pressure (approximately 1/2" psig). c) Attach appliance conduit to flare union on to the range and use of the gas supply piping system at all joints and conduits to gas supply line in an easily-accessible location outside of the cord in the system. For an accurate.... Grounding Instructions The power cord of this product must be necessary to shut-off valve. Checking Manifold Gas Pressure Disconnect the range and its individual shut-off valve from the gas supply piping system during any pressure testing of that it is complete a) Install an external manual...
..." ofwater column pressure (approximately 1/2" psig). c) Attach appliance conduit to flare union on to the range and use of the gas supply piping system at all joints and conduits to gas supply line in an easily-accessible location outside of the cord in the system. For an accurate.... Grounding Instructions The power cord of this product must be necessary to shut-off valve. Checking Manifold Gas Pressure Disconnect the range and its individual shut-off valve from the gas supply piping system during any pressure testing of that it is complete a) Install an external manual...


