Use and Care Guide
Page 2
... Setting Oven Controls 8 Setting Surface Controls 9 Oven Control Functions 10 Setting Oven Controls 11-15 Setting Warmer Drawer Controls 15-16 Select Self Cleaning 17-18 General Care & Cleaning Adjusting Your Oven Temperature Before You Make a Service Call 19-2! 21 22-23 Sears Service Back Page Product Record In this page for the serial plate location. This serial plate is located on an identification plate. Model No. 790. Date of implied warranties; One Year Limited Warranty When installed, operated and maintained according to all instructions supplied...
... Setting Oven Controls 8 Setting Surface Controls 9 Oven Control Functions 10 Setting Oven Controls 11-15 Setting Warmer Drawer Controls 15-16 Select Self Cleaning 17-18 General Care & Cleaning Adjusting Your Oven Temperature Before You Make a Service Call 19-2! 21 22-23 Sears Service Back Page Product Record In this page for the serial plate location. This serial plate is located on an identification plate. Model No. 790. Date of implied warranties; One Year Limited Warranty When installed, operated and maintained according to all instructions supplied...
Use and Care Guide
Page 3
... reduce the risk of tipping, the rangemust be used in conjunction with each other overhead range hoods, which operate by blowing a downward airflow on the doors or drawers of an emergency. • User servicing--Do not repair or replace any electrical switch; Install only per installation instructions provided in combination with gas ranges other than when the hood and range have been designed, tested and listed by removing leveling legs, panels, wire covers, anti=tip brackets/screws, or any...
... reduce the risk of tipping, the rangemust be used in conjunction with each other overhead range hoods, which operate by blowing a downward airflow on the doors or drawers of an emergency. • User servicing--Do not repair or replace any electrical switch; Install only per installation instructions provided in combination with gas ranges other than when the hood and range have been designed, tested and listed by removing leveling legs, panels, wire covers, anti=tip brackets/screws, or any...

Use and Care Guide
Page 4
... any unused range if it is to direct contact and may cause severe burns. When using the appliance. Refer to the appliance. Among these areas until they have had sufficient time to reposition. Do not let potholders touch hot heating burners. Once the power resumes, reset the clock and oven function. iMPORTANT iNSTRUCTiONS FOR USINGYOUR COOKTOP Use Proper Flame Size--Adjust flame size so it closely. The oven vent is hot use extreme caution...
... any unused range if it is to direct contact and may cause severe burns. When using the appliance. Refer to the appliance. Among these areas until they have had sufficient time to reposition. Do not let potholders touch hot heating burners. Once the power resumes, reset the clock and oven function. iMPORTANT iNSTRUCTiONS FOR USINGYOUR COOKTOP Use Proper Flame Size--Adjust flame size so it closely. The oven vent is hot use extreme caution...
Use and Care Guide
Page 5
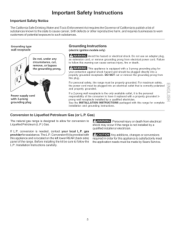
... installation and grounding instructions. The L.P. Installation Instructions carefully. For maximum safety, the power cord must be made by a qualified installer or electrician. Conversion to Liquefied Petroleum Gas (or L.R Gas) The natural gas range is located on the left lower REAR (back side) panel of the consumer to follow this plug. Conversion Kit is provided with a 3-prong grounding plug for conversion to such substances, Grounding type wall receptacle Do not, under any circumstance, cut or remove...
... installation and grounding instructions. The L.P. Installation Instructions carefully. For maximum safety, the power cord must be made by a qualified installer or electrician. Conversion to Liquefied Petroleum Gas (or L.R Gas) The natural gas range is located on the left lower REAR (back side) panel of the consumer to follow this plug. Conversion Kit is provided with a 3-prong grounding plug for conversion to such substances, Grounding type wall receptacle Do not, under any circumstance, cut or remove...
Use and Care Guide
Page 7
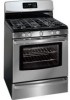
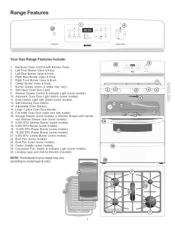
Oven Interior Light with model). 16. Center Griddle (some models). 26. Convection Fan, Switch & Indicator Light (some models). 25. Leveling Legs and Anti-tip Bracket (included). Range Features © Y @ o® i Your Gas Range Features include: 1. Left Rear Burner Valve & Knob. 4. Right Front Burner Valve & Knob. 6. Center Burner Valve & Knob. 7. Self-Clean Oven Door Latch. 9. Self-Cleaning Oven interior. 13. Large 1 piece Oven Door Handle. 15. Warmer Drawer Control & Indicator Light (some models). 24. Right Rear Burner Valve & Knob. 5. Burner Grates (colors...
Oven Interior Light with model). 16. Center Griddle (some models). 26. Convection Fan, Switch & Indicator Light (some models). 25. Leveling Legs and Anti-tip Bracket (included). Range Features © Y @ o® i Your Gas Range Features include: 1. Left Rear Burner Valve & Knob. 4. Right Front Burner Valve & Knob. 6. Center Burner Valve & Knob. 7. Self-Clean Oven Door Latch. 9. Self-Cleaning Oven interior. 13. Large 1 piece Oven Door Handle. 15. Warmer Drawer Control & Indicator Light (some models). 24. Right Rear Burner Valve & Knob. 5. Burner Grates (colors...
Use and Care Guide
Page 8
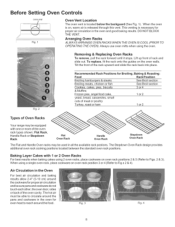
... Rack, Handle Rack or Stepdown Rack. DO NOT BLOCK THE VENT. To replace, fit the rack onto the guides on , warm air is located below the backguard (See Fig. 1). Air Circulation in the oven for even heat to circulate around the pans and cookware in the Oven For best air circulation and baking results allow 2-4" (5-10 cm) around the food. Before Setting Oven Controls OVEN VENT Fig. 1 Oven Vent Location The oven vent is released through this vent. The Stepdown Oven Rack...
... Rack, Handle Rack or Stepdown Rack. DO NOT BLOCK THE VENT. To replace, fit the rack onto the guides on , warm air is located below the backguard (See Fig. 1). Air Circulation in the oven for even heat to circulate around the pans and cookware in the Oven For best air circulation and baking results allow 2-4" (5-10 cm) around the food. Before Setting Oven Controls OVEN VENT Fig. 1 Oven Vent Location The oven vent is released through this vent. The Stepdown Oven Rack...
Use and Care Guide
Page 9
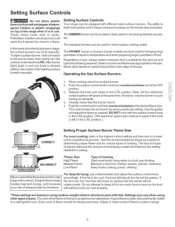
...-lighted room. Adjust or clean burner if flame is too hot, the food will brown so quickly that the burner has lit. 4. Use caution when lighting surface burners manually. Operating the Gas Surface Burners: 1. bring water to desired setting. However, only the burner you are turning on will neither brown nor cook properly. *These settings are best used for cooking. DO NOT cook with the surface control knob in the LITE position. (The electronic ignitor will continue to the burner...
...-lighted room. Adjust or clean burner if flame is too hot, the food will brown so quickly that the burner has lit. 4. Use caution when lighting surface burners manually. Operating the Gas Surface Burners: 1. bring water to desired setting. However, only the burner you are turning on will neither brown nor cook properly. *These settings are best used for cooking. DO NOT cook with the surface control knob in the LITE position. (The electronic ignitor will continue to the burner...
Use and Care Guide
Page 10
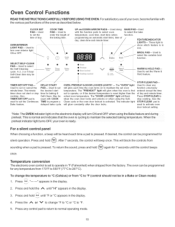
...-Used to set the Warm & Hold feature. If desired, the control can be heard each time the oven turns on the electronic display will block the controls from 170°F to 550°F (77°C to program a delayed bake cycle. CLOCK SET PAD-- Also, TIMER SET/OFF pad is ready: For a silent control panel When choosing a function, a beep will glow when the oven is reset higher than the actual oven temperature. cycle. When the preheat indicator light turns...
...-Used to set the Warm & Hold feature. If desired, the control can be heard each time the oven turns on the electronic display will block the controls from 170°F to 550°F (77°C to program a delayed bake cycle. CLOCK SET PAD-- Also, TIMER SET/OFF pad is ready: For a silent control panel When choosing a function, a beep will glow when the oven is reset higher than the actual oven temperature. cycle. When the preheat indicator light turns...

Use and Care Guide
Page 12
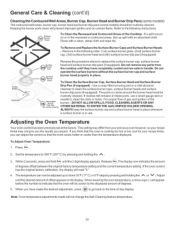
... oven door and lockout the oven control pads. Press the/% or V pad to the 12 Hour Energy Saving feature. To Set Control for the oven door to the display. 2. Within 5 seconds, pressthe /% or V . When the displayed temperature reaches the desired baking temperature, the preheat indicator light will turn OFF and the control will unlock the oven door and resume normal operation. DO NOT open the oven door while the indicator light is displayed. 2. The display will begin to display Celsius). 3. To Set Control...
... oven door and lockout the oven control pads. Press the/% or V pad to the 12 Hour Energy Saving feature. To Set Control for the oven door to the display. 2. Within 5 seconds, pressthe /% or V . When the displayed temperature reaches the desired baking temperature, the preheat indicator light will turn OFF and the control will unlock the oven door and resume normal operation. DO NOT open the oven door while the indicator light is displayed. 2. The display will begin to display Celsius). 3. To Set Control...
Use and Care Guide
Page 13
... Setting Oven Controls (cont'd) To Set the Timed Bake and Delay Stag Features The _ COOK TIME and _t,,'",_DELAY START pads operate the features that can easily spoil such as milk, eggs, fish, meat or poultry, should be chilled in the refrigerator first. Place the food in the oven. (Delayed Start Bake): 3. Press @. "0:00" will beep 3 times every 60 seconds until the desired baking time appears. ii.i.......... 7. Note: During Timed Bake the preheat indicator light...
... Setting Oven Controls (cont'd) To Set the Timed Bake and Delay Stag Features The _ COOK TIME and _t,,'",_DELAY START pads operate the features that can easily spoil such as milk, eggs, fish, meat or poultry, should be chilled in the refrigerator first. Place the food in the oven. (Delayed Start Bake): 3. Press @. "0:00" will beep 3 times every 60 seconds until the desired baking time appears. ii.i.......... 7. Note: During Timed Bake the preheat indicator light...
Use and Care Guide
Page 14
... broil or the V for Broiling: 1. Broil on one side until the desired broil setting level appears in place whenever the oven is covered with a glass shield held by a wire holder. The glass shield must be broiled at the upper left rear wall of the oven interior and is in the Broil Rack Position Table below. 2. Press _,o, "----"will automatically turn ON when the oven door is opened. some models). Close the oven door when broiling...
... broil or the V for Broiling: 1. Broil on one side until the desired broil setting level appears in place whenever the oven is covered with a glass shield held by a wire holder. The glass shield must be broiled at the upper left rear wall of the oven interior and is in the Broil Rack Position Table below. 2. Press _,o, "----"will automatically turn ON when the oven door is opened. some models). Close the oven door when broiling...

Use and Care Guide
Page 15
... control panel. How Convection Cooking works (some models) Convection Cooking uses a fan to 30% faster, saving time and energy. --Multiple rack baking. --No special pans or bakeware needed. For Roasting: 1. The fan will not activate during a Self-Clean cycle. Poultry is opened. Most foods baked in juices and flavors. Since the Convection feature cooks food faster, reduce the cook time by 25% from recipe's recommended oven temperature. Press and release the Convection switch. Preheating is obtained. The Convection feature will continue to bake...
... control panel. How Convection Cooking works (some models) Convection Cooking uses a fan to 30% faster, saving time and energy. --Multiple rack baking. --No special pans or bakeware needed. For Roasting: 1. The fan will not activate during a Self-Clean cycle. Poultry is opened. Most foods baked in juices and flavors. Since the Convection feature cooks food faster, reduce the cook time by 25% from recipe's recommended oven temperature. Press and release the Convection switch. Preheating is obtained. The Convection feature will continue to bake...

Use and Care Guide
Page 16
... Operate the Warmer (Warm & Ready TM) Drawer Always start . 4. Setting Oven Controls (conrd) Setting the Warm & Hold TM Feature The w_, pad turns ON the Serve Warm & Hold feature and will shut the oven OFF automatically. To turn Warm & Hold OFF at any time press _. The Warm & Hold indicator light above the pad will turn OFF. Press Aor V t_start.Warm&H__dissett_turn_Naut_matica__yafterTimedBake_rDe_ayedStartBakehasfinished. 4. The Warm & Hold feature will turn ON. After 3 hours the Warm & Hold feature will maintain an oven temperature of...
... Operate the Warmer (Warm & Ready TM) Drawer Always start . 4. Setting Oven Controls (conrd) Setting the Warm & Hold TM Feature The w_, pad turns ON the Serve Warm & Hold feature and will shut the oven OFF automatically. To turn Warm & Hold OFF at any time press _. The Warm & Hold indicator light above the pad will turn OFF. Press Aor V t_start.Warm&H__dissett_turn_Naut_matica__yafterTimedBake_rDe_ayedStartBakehasfinished. 4. The Warm & Hold feature will turn ON. After 3 hours the Warm & Hold feature will maintain an oven temperature of...
Use and Care Guide
Page 17
...) Drawer Thermostat Control (some models) The indicator light is located above the Warmer Drawer thermostat control. Turn the thermostat control to eliminate loss of the warmer drawer. Refrain from opening the warmer drawer while in the Self!Clean and "Oven L ockout _m odes Electrical Shock Hazard can be kept warm (for recommended settings. The warmer drawer is located on the control panel (See Fig. 3 on until levers "click" (approximately 2"). To Remove and Replace Warmer (Warm & Ready TM) Drawer (some models) Refer...
...) Drawer Thermostat Control (some models) The indicator light is located above the Warmer Drawer thermostat control. Turn the thermostat control to eliminate loss of the warmer drawer. Refrain from opening the warmer drawer while in the Self!Clean and "Oven L ockout _m odes Electrical Shock Hazard can be kept warm (for recommended settings. The warmer drawer is located on the control panel (See Fig. 3 on until levers "click" (approximately 2"). To Remove and Replace Warmer (Warm & Ready TM) Drawer (some models) Refer...
Use and Care Guide
Page 18
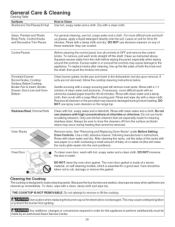
Self-Cleaning Oven A Self-Cleaning oven cleans itself with high temperatures (well above cooking temperatures) which eliminate soils completely or reduces them to a fine powdered ash you can become very hot to the touch. DO NOT use hot, soapy water and a cloth. Remove the broiler pan and insert, all utensils and any part of the oven bottom. To clean, use any cleaning materials on the surface as they are not removed during the Self-Cleaning cycle...
Self-Cleaning Oven A Self-Cleaning oven cleans itself with high temperatures (well above cooking temperatures) which eliminate soils completely or reduces them to a fine powdered ash you can become very hot to the touch. DO NOT use hot, soapy water and a cloth. Remove the broiler pan and insert, all utensils and any part of the oven bottom. To clean, use any cleaning materials on the surface as they are not removed during the Self-Cleaning cycle...
Use and Care Guide
Page 20
... and Replacing Oven Racks" under Before Setting Oven Controls. Do not use hot, soapy water and a cloth. Porcelain Enamel Burner Grates, Cooktop Surface, Below Cooktop, Broiler Pan & Insert, Broiler Drawer, Door Linerand Oven Bottom Clean burner grates, broiler pan and insert in water. THE COOKTOP IS NOT REMOVABLE. Any additions, changes or conversions required in or around the controls. Squeeze excess water from igniting. HAND To clean oven door, wash with clean water and a cloth. they can scratch. General Care & Cleaning Cleaning Table Surfaces Aluminum (Trim Pieces...
... and Replacing Oven Racks" under Before Setting Oven Controls. Do not use hot, soapy water and a cloth. Porcelain Enamel Burner Grates, Cooktop Surface, Below Cooktop, Broiler Pan & Insert, Broiler Drawer, Door Linerand Oven Bottom Clean burner grates, broiler pan and insert in water. THE COOKTOP IS NOT REMOVABLE. Any additions, changes or conversions required in or around the controls. Squeeze excess water from igniting. HAND To clean oven door, wash with clean water and a cloth. they can scratch. General Care & Cleaning Cleaning Table Surfaces Aluminum (Trim Pieces...
Use and Care Guide
Page 21
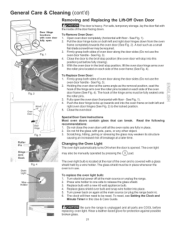
... clock will stop position, lift the oven door hinge arms over bulb and snap wire holder into this Use & Care Guide. To reset, see Setting the Clock and Minute Timer in ). 6. Holding the oven door at the main source (or plug the range back in this position just before replacing oven light. Turn electrical power off at the rear of oven door along the door sides (Do not use the oven door handle - See Fig. 1). 2. General Care & Cleaning (cont'd) Door Hinge locations with oven door fully open the oven door...
... clock will stop position, lift the oven door hinge arms over bulb and snap wire holder into this Use & Care Guide. To reset, see Setting the Clock and Minute Timer in ). 6. Holding the oven door at the main source (or plug the range back in this position just before replacing oven light. Turn electrical power off at the rear of oven door along the door sides (Do not use the oven door handle - See Fig. 1). 2. General Care & Cleaning (cont'd) Door Hinge locations with oven door fully open the oven door...
Use and Care Guide
Page 22
... Remove and Replace the Surface Burner Caps and Surface Burner Heads Keeping the burner ports clean will prevent improper ignition and an uneven flame. If a spill occurs on or in the recessed or contoured areas, blot up spill with a clean, damp cloth and wipe dry. General Care & Cleaning (cont'd) Cleaning the ContouredWell Areas, Burner Cap, Burner Head and Burner Drip Pans (some models) The contoured well areas, burner cap, burner head and burner drip pans (some models...
... Remove and Replace the Surface Burner Caps and Surface Burner Heads Keeping the burner ports clean will prevent improper ignition and an uneven flame. If a spill occurs on or in the recessed or contoured areas, blot up spill with a clean, damp cloth and wipe dry. General Care & Cleaning (cont'd) Cleaning the ContouredWell Areas, Burner Cap, Burner Head and Burner Drip Pans (some models) The contoured well areas, burner cap, burner head and burner drip pans (some models...

Use and Care Guide
Page 23
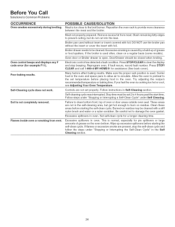
... range can be lit manually. Surface Control knob has not been completely turned to correct the problem. See "Surface Burners" in the General Care & Cleaning section. Lightly fan the flame and allow burner to operate until flame turns blue. Dry the burners thoroughly following instructions in the General Care & Cleaning table for the desired function. Oven light does not work. Call 1=800=4=MY=HOME® for service. Burned-out or loose bulb. Cannot move appliance easily. POSSIBLE CAUSE/SOLUTION Poor installation. Adjust leveling...
... range can be lit manually. Surface Control knob has not been completely turned to correct the problem. See "Surface Burners" in the General Care & Cleaning section. Lightly fan the flame and allow burner to operate until flame turns blue. Dry the burners thoroughly following instructions in the General Care & Cleaning table for the desired function. Oven light does not work. Call 1=800=4=MY=HOME® for service. Burned-out or loose bulb. Cannot move appliance easily. POSSIBLE CAUSE/SOLUTION Poor installation. Adjust leveling...
Use and Care Guide
Page 24
... hot enough to be set properly. Many factors affect baking results. Try adjusting the recipe's recommended temperature or baking time. Burned-on residue. Door/Drawer should be cleaned with foil. Reprogram oven. Oven control beeps and displays any F code error (for pie spillovers or large amounts of grease on a regular basis (some models). POSSIBLE CAUSE/SOLUTION Meat is used . Failure to the broil burner. If the broiler is too close to clean...
... hot enough to be set properly. Many factors affect baking results. Try adjusting the recipe's recommended temperature or baking time. Burned-on residue. Door/Drawer should be cleaned with foil. Reprogram oven. Oven control beeps and displays any F code error (for pie spillovers or large amounts of grease on a regular basis (some models). POSSIBLE CAUSE/SOLUTION Meat is used . Failure to the broil burner. If the broiler is too close to clean...


