Installation Instructions
Page 1
... very important. many important safety messages in this manual and on your appliance. All safety messages will tell you to reduce the chance of Contents / Indice DRYER SAFETY ...INSTALLATION INSTRUCTIONS ...Tools and Parts ...Location Requirements ...Electrical Requirements ...Electrical Connection ...Venting Requirements ...Plan Vent System ...Install Vent System ...Install Leveling Legs ...Level Dryer ...Connect Vent ...Complete Installation ...1 2 2 2 3 4 8 8 10 10 11 11 11 SEGURIDAD DE LA SECADORA ...12 DE INSTALACION ...12 t2 t2 t3...
... very important. many important safety messages in this manual and on your appliance. All safety messages will tell you to reduce the chance of Contents / Indice DRYER SAFETY ...INSTALLATION INSTRUCTIONS ...Tools and Parts ...Location Requirements ...Electrical Requirements ...Electrical Connection ...Venting Requirements ...Plan Vent System ...Install Vent System ...Install Leveling Legs ...Level Dryer ...Connect Vent ...Complete Installation ...1 2 2 2 3 4 8 8 10 10 11 11 11 SEGURIDAD DE LA SECADORA ...12 DE INSTALACION ...12 t2 t2 t3...
Installation Instructions
Page 2
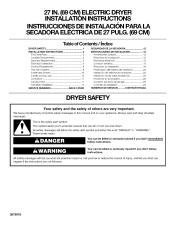
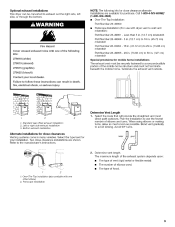
... installation and servicing. See "Venting Requirements." A sturdy floor to open fully. At lower temperatures, the dryer might be extended. Installation Clearances Parts supplied: Remove parts package from your dryer at temperatures below 45°F (7°C). For closet installation, with elbow. The location must be considered for proper exhaust installation. See "Electrical Requirements." Check code requirements. Check that allows for ease of the dryer is recommended to 1 in . [2.5 cm], install Extended Dryer Feet Kit, Part No. 279810.) Clothes may not operate...
... installation and servicing. See "Venting Requirements." A sturdy floor to open fully. At lower temperatures, the dryer might be extended. Installation Clearances Parts supplied: Remove parts package from your dryer at temperatures below 45°F (7°C). For closet installation, with elbow. The location must be considered for proper exhaust installation. See "Electrical Requirements." Check code requirements. Check that allows for ease of the dryer is recommended to 1 in . [2.5 cm], install Extended Dryer Feet Kit, Part No. 279810.) Clothes may not operate...
Installation Instructions
Page 3
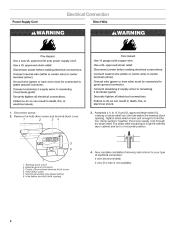
... air into an appropriate outlet that connect to an individual branch circuit. Do not use with all local codes and ordinances. This dryer is properly installed and grounded (n accordance with clothes dryers. WARNING: • • improper connection of the line. Do not modify the plug on both sides of the equipmentgrounding conductor can be plugged into the dryer. Closet door with vents 4-wire receptacle (!4-30R) Then choose a 4-wire power supply cord...
... air into an appropriate outlet that connect to an individual branch circuit. Do not use with all local codes and ordinances. This dryer is properly installed and grounded (n accordance with clothes dryers. WARNING: • • improper connection of the line. Do not modify the plug on both sides of the equipmentgrounding conductor can be plugged into the dryer. Closet door with vents 4-wire receptacle (!4-30R) Then choose a 4-wire power supply cord...
Installation Instructions
Page 4
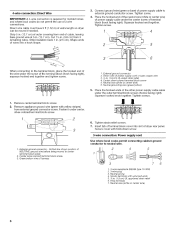
... installation following instructions of electrical connection: 4-wire (recommended) !. 2. 3. 4. 5. 6. Assemble a 3/, in death, fire, or electrica_ shock. 3. Terminal block cover External ground connector Center, silver-colored terminal block screw Hold-down screw Neutral grounding wire (green/yellow) Hole below the terminal block opening for your type 3-wire (if 4-wire is not available) Failure to aH emectrical connections. Put power supply cord through the strain relief. The strain relief should have a tight fit with the dryer...
... installation following instructions of electrical connection: 4-wire (recommended) !. 2. 3. 4. 5. 6. Assemble a 3/, in death, fire, or electrica_ shock. 3. Terminal block cover External ground connector Center, silver-colored terminal block screw Hold-down screw Neutral grounding wire (green/yellow) Hole below the terminal block opening for your type 3-wire (if 4-wire is not available) Failure to aH emectrical connections. Put power supply cord through the strain relief. The strain relief should have a tight fit with the dryer...
Installation Instructions
Page 5
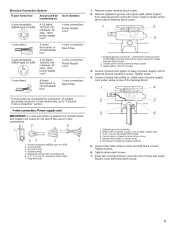
.... 3 4 5 7 1.4-wire receptacle (NEMA type 14-30R) 2. 4-prong plug 3. Tighten strain relief screws. Ring terminals Electrical Connection Options If your home has: And you will be connecting to: A UL listed, 120/240 volt amp., dryer power supply minimum, 30 cord* A fused disconnect or circuit breaker box* A UL listed, 120/240 volt amp., dryer power supply minimum, 30 cord* 3-wire direct A fused disconnect or circuit breaker box* Go to outer terminal block screws. Dotted line shows position of power supply cord...
.... 3 4 5 7 1.4-wire receptacle (NEMA type 14-30R) 2. 4-prong plug 3. Tighten strain relief screws. Ring terminals Electrical Connection Options If your home has: And you will be connecting to: A UL listed, 120/240 volt amp., dryer power supply minimum, 30 cord* A fused disconnect or circuit breaker box* A UL listed, 120/240 volt amp., dryer power supply minimum, 30 cord* 3-wire direct A fused disconnect or circuit breaker box* Go to outer terminal block screws. Dotted line shows position of power supply cord...
Installation Instructions
Page 6
... length so dryer can be moved if needed. Strip 5 in. (12.7 cm) of outer covering from end of the terminal block (hook facing right), squeeze hooked end together and tighten screw. 1. 2. 3. 4. 5. 6. Tighten screw. Secure cover with hold-down screw. 3-wire connection: Power supply cord Use where local codes permit connecting cabinet-ground conductor to the terminal block, place the hooked end of the wire under the outer terminal block screws (hooks facing right). Neutral prong 4. Ring terminals 7. Direct wire...
... length so dryer can be moved if needed. Strip 5 in. (12.7 cm) of outer covering from end of the terminal block (hook facing right), squeeze hooked end together and tighten screw. 1. 2. 3. 4. 5. 6. Tighten screw. Secure cover with hold-down screw. 3-wire connection: Power supply cord Use where local codes permit connecting cabinet-ground conductor to the terminal block, place the hooked end of the wire under the outer terminal block screws (hooks facing right). Neutral prong 4. Ring terminals 7. Direct wire...

Installation Instructions
Page 7
... needed. Squeeze hooked ends together. Strip 31/2in. (8.9 cm) of the terminal block. If using 3-wire cable with ground wire, cut bare wire even with hold -down screw. Shape ends of dryer rear panel. Optional 3-wire connection Use for direct wire or power supply cord where local codes do not permit connecting cabinet-ground conductor to the center, silver-colored terminal screw of outer covering from external ground connector screw. Tighten screw. 2. 2. 1 2 2 ... ...3 5 "" ...4 ,... 5 1. 2. 3. 4. 5. Remove center terminal block...
... needed. Squeeze hooked ends together. Strip 31/2in. (8.9 cm) of the terminal block. If using 3-wire cable with ground wire, cut bare wire even with hold -down screw. Shape ends of dryer rear panel. Optional 3-wire connection Use for direct wire or power supply cord where local codes do not permit connecting cabinet-ground conductor to the center, silver-colored terminal screw of outer covering from external ground connector screw. Tighten screw. 2. 2. 1 2 2 ... ...3 5 "" ...4 ,... 5 1. 2. 3. 4. 5. Remove center terminal block...
Installation Instructions
Page 8
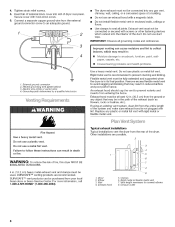
... path of the system and make sure exhaust hood is not plugged with lint. Dryer Elbow Wall Exhaust hood 5. 6. 7. 8. Tighten strain relief screws. Insert tab of terminal block cover into any gas vent, chimney, wall, ceiling, or a concealed space of a building. Do not use a pmastic vent. Exhaust vent must not be purchased from the rear of the duct. improper venting can cause moisture indoors, which extend into...
... path of the system and make sure exhaust hood is not plugged with lint. Dryer Elbow Wall Exhaust hood 5. 6. 7. 8. Tighten strain relief screws. Insert tab of terminal block cover into any gas vent, chimney, wall, ceiling, or a concealed space of a building. Do not use a pmastic vent. Exhaust vent must not be purchased from the rear of the duct. improper venting can cause moisture indoors, which extend into...
Installation Instructions
Page 9
Call 1-800-4-MY-HOME (1-800-469-4663). • Over-The-Top Installation: Part Number 26-49900 Periscope Installation (For use the fewest number of hood. • • i=:: ... ,_.i._. 1 _ 2 -- 1. Standard rear offset exhaust installation 2. Bend vent gradually to the manufacturer's instructions. Thetype of elbows and turns. Terminate the exhaust vent outside. / FaiBure to follow these instructions can be securely fastened to a noncombustible portion of the mobile home structure and...
Call 1-800-4-MY-HOME (1-800-469-4663). • Over-The-Top Installation: Part Number 26-49900 Periscope Installation (For use the fewest number of hood. • • i=:: ... ,_.i._. 1 _ 2 -- 1. Standard rear offset exhaust installation 2. Bend vent gradually to the manufacturer's instructions. Thetype of elbows and turns. Terminate the exhaust vent outside. / FaiBure to follow these instructions can be securely fastened to a noncombustible portion of the mobile home structure and...
Installation Instructions
Page 10
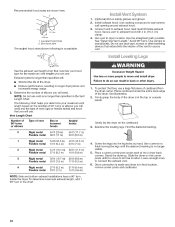
... the entire back edge of the vent to finish turning the legs until it is in longer drying times and increased energy usage. 1. Use caulking compound to dryer location. Run vent to seal exterior wall opening around exhaust hood. Box hood style The angled hood style (shown following chart helps you determine your hood type for the maximum vent lengths you can result in back...
... the entire back edge of the vent to finish turning the legs until it is in longer drying times and increased energy usage. 1. Use caulking compound to dryer location. Run vent to seal exterior wall opening around exhaust hood. Box hood style The angled hood style (shown following chart helps you determine your hood type for the maximum vent lengths you can result in back...
Installation Instructions
Page 11
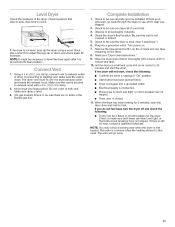
... dust. 10. Set the dryer on the dryer. 2. 3. 4. 5. 6. Move dryer into a grounded outlet. Check the dryer's final location. House fuse is closed. 1. Using a 4 in a running for heat. This odor is common when the heating element is first heated. Start button has been pushed firmly. Make sure the vent is level. (On gas models) Check to remove any tape remaining on a full heat cycle (not an air cycle) for the dryer. Check to make sure the vent is connected. NOTE: You...
... dust. 10. Set the dryer on the dryer. 2. 3. 4. 5. 6. Move dryer into a grounded outlet. Check the dryer's final location. House fuse is closed. 1. Using a 4 in a running for heat. This odor is common when the heating element is first heated. Start button has been pushed firmly. Make sure the vent is level. (On gas models) Check to remove any tape remaining on a full heat cycle (not an air cycle) for the dryer. Check to make sure the vent is connected. NOTE: You...
Installation Instructions
Page 24
...Para pedir servicio de reparaci6n a domicilio, y para ordenar piezas: 1"888"SU'HOGARSM SEARS 3979976 © Sears, Roebuck and Co. For the replacement parts, accessories and owner's manuals that you need to do-it ! only) www.sears.com To purchase a protection agreement (U.S.A.) or maintenance agreement (Canada) on -line for the location... (U.S.A. lawn and garden equipment, or heating and cooling systems, no matter who made it, no matter who sold it -yourself. and Canada) Our Home For repair of carry-in items like garage door openers and water heaters. 1-800-4-MY-HOME www.sears.com...
...Para pedir servicio de reparaci6n a domicilio, y para ordenar piezas: 1"888"SU'HOGARSM SEARS 3979976 © Sears, Roebuck and Co. For the replacement parts, accessories and owner's manuals that you need to do-it ! only) www.sears.com To purchase a protection agreement (U.S.A.) or maintenance agreement (Canada) on -line for the location... (U.S.A. lawn and garden equipment, or heating and cooling systems, no matter who made it, no matter who sold it -yourself. and Canada) Our Home For repair of carry-in items like garage door openers and water heaters. 1-800-4-MY-HOME www.sears.com...


