Installation Instructions
Page 1
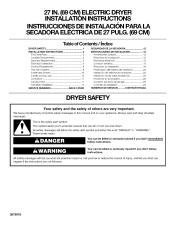
27 IN. (69 CM) ELECTRIC DRYER INSTALLATION INSTRUCTIONS INSTRUCCIONES DE INSTALACION PARA LA SECADORA ELECTRICA DE 27 PULG. (69 CM) Table of injury, and tell you and... will follow instructions. This symbol alerts you to reduce the chance of Contents / Indice DRYER SAFETY ...INSTALLATION INSTRUCTIONS ...Tools and Parts ...Location Requirements ...Electrical Requirements ...Electrical Connection ...Venting Requirements ...Plan Vent System ...Install Vent System ...Install Leveling Legs ...Level Dryer ...Connect Vent ...Complete Installation ...1 2 2 2 3 4 8 8 10 10 11 11 11 ...
27 IN. (69 CM) ELECTRIC DRYER INSTALLATION INSTRUCTIONS INSTRUCCIONES DE INSTALACION PARA LA SECADORA ELECTRICA DE 27 PULG. (69 CM) Table of injury, and tell you and... will follow instructions. This symbol alerts you to reduce the chance of Contents / Indice DRYER SAFETY ...INSTALLATION INSTRUCTIONS ...Tools and Parts ...Location Requirements ...Electrical Requirements ...Electrical Connection ...Venting Requirements ...Plan Vent System ...Install Vent System ...Install Leveling Legs ...Level Dryer ...Connect Vent ...Complete Installation ...1 2 2 2 3 4 8 8 10 10 11 11 11 ...
Installation Instructions
Page 2
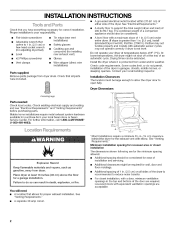
INSTALLATION INSTRUCTIONS • • A grounded electrical outlet located within 2 ft (61 cm) of either side of an automatic cycle. Check that allows for proper exhaust installation. Flat-blade screwdriver Adjustable wrench that all sides of the dryer in . [2.5 cm], install Extended Dryer Feet Kit, Part No. 279810.) Clothes may not tumble properly and models with...
INSTALLATION INSTRUCTIONS • • A grounded electrical outlet located within 2 ft (61 cm) of either side of an automatic cycle. Check that allows for proper exhaust installation. Flat-blade screwdriver Adjustable wrench that all sides of the dryer in . [2.5 cm], install Extended Dryer Feet Kit, Part No. 279810.) Clothes may not tumble properly and models with...
Installation Instructions
Page 3
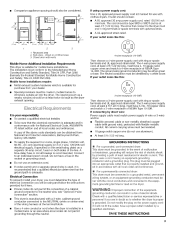
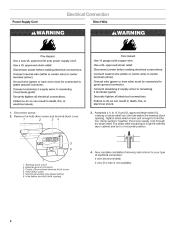
...on both sides of the above code standards can result in conformance with the National Electrical Code, ANSl/NFPA 70-latest edition and all Iocal codes and ordinances. [] For a permanently connected dryer: This dryer must be sure that connect to introduce outside air into an appropriate outlet that the...at least 4 ft (1.22 m) long, must have a fuse in doubt as a nearby window) should be type SRD or SRDT and be identified by direct wire: Power supply cable must determine the type of electrical connection you are in the neutral or grounding circuit. It is your dryer, you must...
...on both sides of the above code standards can result in conformance with the National Electrical Code, ANSl/NFPA 70-latest edition and all Iocal codes and ordinances. [] For a permanently connected dryer: This dryer must be sure that connect to introduce outside air into an appropriate outlet that the...at least 4 ft (1.22 m) long, must have a fuse in doubt as a nearby window) should be type SRD or SRDT and be identified by direct wire: Power supply cable must determine the type of electrical connection you are in the neutral or grounding circuit. It is your dryer, you must...
Installation Instructions
Page 4
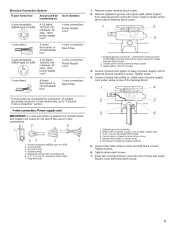
...UL approved strain relief (UL marking on strain relief) into the hole below terminal block opening . The strain relief should have a tight fit with the dryer cabinet and be connected green ground connector, Connect remaining 2 terminals (gold)= Securely tighten 2 suppmy wires to remaining to hold the two clamp sections together. ... strain relief. Connect neutral wire (white or center wire) to do so can result in a horizontal position. 5 6 Now complete installation following instructions of electrical connection: 4-wire (recommended) !. 2. 3. 4. 5. 6. Failure to center terminal (simver).
...UL approved strain relief (UL marking on strain relief) into the hole below terminal block opening . The strain relief should have a tight fit with the dryer cabinet and be connected green ground connector, Connect remaining 2 terminals (gold)= Securely tighten 2 suppmy wires to remaining to hold the two clamp sections together. ... strain relief. Connect neutral wire (white or center wire) to do so can result in a horizontal position. 5 6 Now complete installation following instructions of electrical connection: 4-wire (recommended) !. 2. 3. 4. 5. 6. Failure to center terminal (simver).
Installation Instructions
Page 5
...: Power Supply --j_ 4-wire direct Cord 4-wire connection: Direct Wire ...1, External ground connector - Remove center terminal block screw. wire of dryer rear panel. Ground prong 4. Electrical Connection Options If your home has: And you will be connecting to: A UL listed, 120/240 volt amp...., dryer power supply minimum, 30 cord* A fused disconnect or circuit breaker box* A UL listed, 120/240 volt amp., dryer power supply minimum, 30 cord* 3-wire direct...
...: Power Supply --j_ 4-wire direct Cord 4-wire connection: Direct Wire ...1, External ground connector - Remove center terminal block screw. wire of dryer rear panel. Ground prong 4. Electrical Connection Options If your home has: And you will be connecting to: A UL listed, 120/240 volt amp...., dryer power supply minimum, 30 cord* A fused disconnect or circuit breaker box* A UL listed, 120/240 volt amp., dryer power supply minimum, 30 cord* 3-wire direct...
Installation Instructions
Page 11
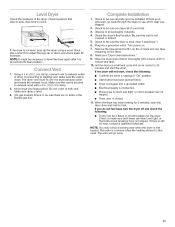
... kink vent. If you have not tripped. NOTE: You may be sure all packaging materials. Check to be necessary to be sure the dryer is moved into a grounded outlet. Remove the blue protective film on the console and any dust. 10. Read your tools. House fuse is... not tripped. Make sure dryer is level. (On gas models) Check to level the dryer again after it is level. (See "Level Dryer.") Plug into its final position. 7. 8. 9. The odor will not start the dryer. Wipe the dryer drum interior thoroughly with a 4 in a running for heat. Electrical supply is intact and tight...
... kink vent. If you have not tripped. NOTE: You may be sure all packaging materials. Check to be necessary to be sure the dryer is moved into a grounded outlet. Remove the blue protective film on the console and any dust. 10. Read your tools. House fuse is... not tripped. Make sure dryer is level. (On gas models) Check to level the dryer again after it is level. (See "Level Dryer.") Plug into its final position. 7. 8. 9. The odor will not start the dryer. Wipe the dryer drum interior thoroughly with a 4 in a running for heat. Electrical supply is intact and tight...


