
Use and Care Guide
Page 1
® TOP FREEZER REFRIGERATOR i CONGELADOR SUPERIOR REFRIGERADOR CONGI_LATEUR SUPI_RIEUR REFRIGI_RATEUR Models / Modelos / Mod_les 795.6997_,795.6991_ 795.7997_,795.7991_ 795.6937_,795.6929_ 795.7937_,795.7929_ = color number, n_mero de colo_ num_ro de couleur tl1 Z O t=, m cn z m Z_ O r=,, "13 Z m MFL61920619 Printed in Mexico Sears, Roebuck and Co., Hoffman Estates, IL 60179 U.S.A. www.sears.cem
® TOP FREEZER REFRIGERATOR i CONGELADOR SUPERIOR REFRIGERADOR CONGI_LATEUR SUPI_RIEUR REFRIGI_RATEUR Models / Modelos / Mod_les 795.6997_,795.6991_ 795.7997_,795.7991_ 795.6937_,795.6929_ 795.7937_,795.7929_ = color number, n_mero de colo_ num_ro de couleur tl1 Z O t=, m cn z m Z_ O r=,, "13 Z m MFL61920619 Printed in Mexico Sears, Roebuck and Co., Hoffman Estates, IL 60179 U.S.A. www.sears.cem
Use and Care Guide
Page 2
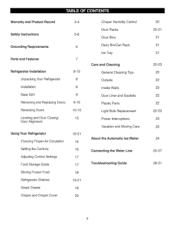
... Replacing Doors Reversing Doors Leveling and Door Closing/ Door Alignment 8-15 8 8 8 9-10 10-15 15 Using Your Refrigerator Ensuring Proper Air Circulation Setting the Controls Adjusting Control Settings Food Storage Guide Storing Frozen Food Refrigerator Shelves Snack Drawer Crisper and Crisper Cover 16-21 16 16 17 17 18 19-21 19... Bulb Replacement Power Interruptions Vacation and Moving Care About the Automatic Ice Maker Connecting the Water Line Troubleshooting Guide 2O 20-21 21 21 21 22-23 22 22 22 22 22 22-23 23 23 24 25-27 28-31
... Replacing Doors Reversing Doors Leveling and Door Closing/ Door Alignment 8-15 8 8 8 9-10 10-15 15 Using Your Refrigerator Ensuring Proper Air Circulation Setting the Controls Adjusting Control Settings Food Storage Guide Storing Frozen Food Refrigerator Shelves Snack Drawer Crisper and Crisper Cover 16-21 16 16 17 17 18 19-21 19... Bulb Replacement Power Interruptions Vacation and Moving Care About the Automatic Ice Maker Connecting the Water Line Troubleshooting Guide 2O 20-21 21 21 21 22-23 22 22 22 22 22 22-23 23 23 24 25-27 28-31
Use and Care Guide
Page 3
.... Sears shall not be product repair as provided herein. Sears, Roebuck and Co., Hoffman Estates, IL 60179 Sears Canada, Inc., Toronto, Ontario, Canada MSB 2B8 TOP FREEZER REFRIGERATOR ® Kenrnore Appliance Warranty forte Year Limited Warranty When installed, operated and maintained according to all instructions supplied with the product, if this appliance fails...
.... Sears shall not be product repair as provided herein. Sears, Roebuck and Co., Hoffman Estates, IL 60179 Sears Canada, Inc., Toronto, Ontario, Canada MSB 2B8 TOP FREEZER REFRIGERATOR ® Kenrnore Appliance Warranty forte Year Limited Warranty When installed, operated and maintained according to all instructions supplied with the product, if this appliance fails...
Use and Care Guide
Page 4
... you to time. Purchase your new product. call 1-800-827-6655. *Coverage in Canada varies on all that is designed and manufactured for any covered refrigerator or freezer. [] Rental reimbursement if repair of us . [] "No-lemon" guarantee- You can trust will be Fixed. [] Annual Preventive Maintenance Check at your covered product... [] Expert service by phone = we will find the model and serial number printed on an identification label located on making a smart purchase. Your new Kenmor# _ product is the result of mechanical failure of the refrigerator compartment.
... you to time. Purchase your new product. call 1-800-827-6655. *Coverage in Canada varies on all that is designed and manufactured for any covered refrigerator or freezer. [] Rental reimbursement if repair of us . [] "No-lemon" guarantee- You can trust will be Fixed. [] Annual Preventive Maintenance Check at your covered product... [] Expert service by phone = we will find the model and serial number printed on an identification label located on making a smart purchase. Your new Kenmor# _ product is the result of mechanical failure of the refrigerator compartment.
Use and Care Guide
Page 5
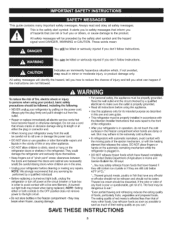
... between the doors and cabinet are in order to avoid contact with the Attention Installer Instructions that releases the cubes. Unplug your refrigerator is properly grounded. ° Read all electric service cords that have become frayed or otherwise damaged. Thawed ice cream should not... be performed by pulling on the refrigerator doors or shelves in the freezer compartment when hands are not followed. You can ." Skin may break when being replaced.) NOTE: Setting either the plug...
... between the doors and cabinet are in order to avoid contact with the Attention Installer Instructions that releases the cubes. Unplug your refrigerator is properly grounded. ° Read all electric service cords that have become frayed or otherwise damaged. Thawed ice cream should not... be performed by pulling on the refrigerator doors or shelves in the freezer compartment when hands are not followed. You can ." Skin may break when being replaced.) NOTE: Setting either the plug...
Use and Care Guide
Page 6
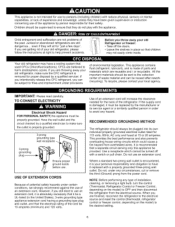
...from overheated wires. If the supply cord is damaged, it is your local agency. However, if you are throwing away your old Refrigerator or freezer: • Take off with a switch or pull chain. Where a standard two-prong wall outlet is encountered, it must be provided... an extension cord will sit for the back of installation, cleaning, or removing a light bulb, turn the control (Thermostat, Refrigerator Control or Freezer Control, depending on the model) to harm stratospheric ozone. This provides the best performance and also prevents overloading house wiring circuits ...
...from overheated wires. If the supply cord is damaged, it is your local agency. However, if you are throwing away your old Refrigerator or freezer: • Take off with a switch or pull chain. Where a standard two-prong wall outlet is encountered, it must be provided... an extension cord will sit for the back of installation, cleaning, or removing a light bulb, turn the control (Thermostat, Refrigerator Control or Freezer Control, depending on the model) to harm stratospheric ozone. This provides the best performance and also prevents overloading house wiring circuits ...

Use and Care Guide
Page 7
... purchased may have some models NOTE: This guide covers several different models. Page references are included for your model. O CustomCube Ice maker * O Ice Bin * Freezer Shelf _ Digital Temperature Control Refrigerator Light _t Snack Drawer Shelves Crispers Keeps fruits and vegetables fresh and crisp OFreezer Door Racks OCan Rack* ODairy Bin O Door Bins...
... purchased may have some models NOTE: This guide covers several different models. Page references are included for your model. O CustomCube Ice maker * O Ice Bin * Freezer Shelf _ Digital Temperature Control Refrigerator Light _t Snack Drawer Shelves Crispers Keeps fruits and vegetables fresh and crisp OFreezer Door Racks OCan Rack* ODairy Bin O Door Bins...
Use and Care Guide
Page 8
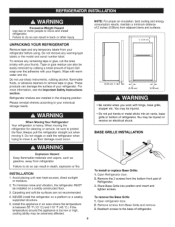
...appliance in the shipping position. Place Base Grille into air vents, base grille or bottom of your refrigerator before using. Remove screws from refrigerator. UNPACKING YOUR REFRIGERATOR Remove tape and any warning-type labels or the model and serial number label. Do not remove... Be careful when you work with warm water and dry. Wipe with hinge, base grille, stopper etc. ExcessiveWeightHazard Usetwoor morepeopleto moveandinstall refrigerator. Do not use sharp instruments, rubbing alcohol, flammable fluids, or abrasive cleaners to the base of liquid dish soap over the ...
...appliance in the shipping position. Place Base Grille into air vents, base grille or bottom of your refrigerator before using. Remove screws from refrigerator. UNPACKING YOUR REFRIGERATOR Remove tape and any warning-type labels or the model and serial number label. Do not remove... Be careful when you work with warm water and dry. Wipe with hinge, base grille, stopper etc. ExcessiveWeightHazard Usetwoor morepeopleto moveandinstall refrigerator. Do not use sharp instruments, rubbing alcohol, flammable fluids, or abrasive cleaners to the base of liquid dish soap over the ...

Use and Care Guide
Page 9
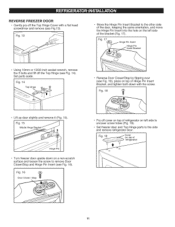
...freezer door slightly and remove it . Fig. 1 REMOVE REFRIGERATOR DOOR • Loosen and remove the 2 bolts and the phillips head screw to remove the Middle Hinge Bracket from refrigerator housing (Fig. 4 and 5). Set parts aside. Fig. 3 To replace doors, begin with refrigerator...Using 10mm or 13/32-inch socket wrench, remove the 3 bolts and lift off the Top Hinge Cover with freezer door. ELECTRICASLHOCKHAZARD Beforeyoubegine, itherunplugtherefrigeratoorr turnoffpoweratthecircuitbreakeor rfusebox.Removfeood andanyAdjustablDe ooror UtilityBinsfromdoorsF. TOOLSNEEDED: • 10mmor 13...
...freezer door slightly and remove it . Fig. 1 REMOVE REFRIGERATOR DOOR • Loosen and remove the 2 bolts and the phillips head screw to remove the Middle Hinge Bracket from refrigerator housing (Fig. 4 and 5). Set parts aside. Fig. 3 To replace doors, begin with refrigerator...Using 10mm or 13/32-inch socket wrench, remove the 3 bolts and lift off the Top Hinge Cover with freezer door. ELECTRICASLHOCKHAZARD Beforeyoubegine, itherunplugtherefrigeratoorr turnoffpoweratthecircuitbreakeor rfusebox.Removfeood andanyAdjustablDe ooror UtilityBinsfromdoorsF. TOOLSNEEDED: • 10mmor 13...
Use and Care Guide
Page 10
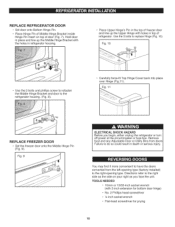
... (Fig. 10). I Fig. 11 REPLACE FREEZER DOOR • Set the freezer door onto the Middle Hinge Pin (Fig. 9). Fig. 9 ELECTRICAL SHOCK HAZARD Before you face the unit. TOOLS NEEDED • 10mm or 13/32-inch socket wrench (with the holes in top of refrigerator. You may find it more convenient to have... the doors converted from doors Failure to do so could result in death or serious injury. Place Upper Hinge's Pin in the top of freezer door and line up the Middle Hinge Bracket with...
... (Fig. 10). I Fig. 11 REPLACE FREEZER DOOR • Set the freezer door onto the Middle Hinge Pin (Fig. 9). Fig. 9 ELECTRICAL SHOCK HAZARD Before you face the unit. TOOLS NEEDED • 10mm or 13/32-inch socket wrench (with the holes in top of refrigerator. You may find it more convenient to have... the doors converted from doors Failure to do so could result in death or serious injury. Place Upper Hinge's Pin in the top of freezer door and line up the Middle Hinge Bracket with...
Use and Care Guide
Page 11
... Fig. 18 (_ Lift up door slightly and remove it (Fig. 15). Fi- 1_' Y" _ -- REVERSE FREEZER DOOR ° Gently pry off the Top Hinge (see Fig. 14). Fig. 15 Middle Hinge Bracket _ Hinge Pin Turn freezer door upside down with a flat head screwdriver and remove (see Fig.13). Fig. 17 i_ Hinge.... 19). • Set freezer door and Top Hinge parts to remove Door Closer/Stop and Hinge Pin insert (see Fig. 18), place on top of Hinge Pin insert Bracket, and tighten both down on a non-scratch surface and loosen the screw to the side and remove refrigerator door. Fig. 16 Door Closer...
... Fig. 18 (_ Lift up door slightly and remove it (Fig. 15). Fi- 1_' Y" _ -- REVERSE FREEZER DOOR ° Gently pry off the Top Hinge (see Fig. 14). Fig. 15 Middle Hinge Bracket _ Hinge Pin Turn freezer door upside down with a flat head screwdriver and remove (see Fig.13). Fig. 17 i_ Hinge.... 19). • Set freezer door and Top Hinge parts to remove Door Closer/Stop and Hinge Pin insert (see Fig. 18), place on top of Hinge Pin insert Bracket, and tighten both down on a non-scratch surface and loosen the screw to the side and remove refrigerator door. Fig. 16 Door Closer...
Use and Care Guide
Page 12
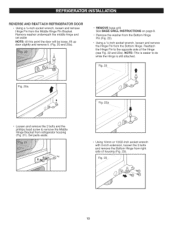
o Using a 1A-inch socket wrench, loosen and remove the Hinge Pin from refrigerator housing (Fig. 21). Fig. 22 Fig. 20a 22a Loosen and remove the 2 bolts and the phillips head screw... the 3 bolts and remove the Bottom Hinge from right side of the Hinge (see Fig. 22 and 22a). REVERSEAND REATTACHREFRIGERATORDOOR • Using a 1A-inch socket wrench, loosen and remove Hinge Pin from the Bottom Hinge... Pin (Fig. 22). NOTE: This is easier to the opposite side of housing (Fig. 23). 12 Set parts aside. Remove...
o Using a 1A-inch socket wrench, loosen and remove the Hinge Pin from refrigerator housing (Fig. 21). Fig. 22 Fig. 20a 22a Loosen and remove the 2 bolts and the phillips head screw... the 3 bolts and remove the Bottom Hinge from right side of the Hinge (see Fig. 22 and 22a). REVERSEAND REATTACHREFRIGERATORDOOR • Using a 1A-inch socket wrench, loosen and remove Hinge Pin from the Bottom Hinge... Pin (Fig. 22). NOTE: This is easier to the opposite side of housing (Fig. 23). 12 Set parts aside. Remove...
Use and Care Guide
Page 13
..., carefully pry off and remove the cover over the screw holes on all models. The model you have may not include this part. NOTE: The Refrigerator Door Closer/Stop is not used on a non-scratching surface. • With door upside down on all models. Fig. 25 • Turn... the same orientation (Fig. 28). • Place Hinge Pin Insert into the left side of housing. It is not used on the left side of refrigerator housing (Fig. 30). Fig. 30 Fig. 27 Hinge Pin Bracket Hinge Pin Insert 13 Now move the Bracket to the other two screws to door...
..., carefully pry off and remove the cover over the screw holes on all models. The model you have may not include this part. NOTE: The Refrigerator Door Closer/Stop is not used on a non-scratching surface. • With door upside down on all models. Fig. 25 • Turn... the same orientation (Fig. 28). • Place Hinge Pin Insert into the left side of housing. It is not used on the left side of refrigerator housing (Fig. 30). Fig. 30 Fig. 27 Hinge Pin Bracket Hinge Pin Insert 13 Now move the Bracket to the other two screws to door...

Use and Care Guide
Page 14
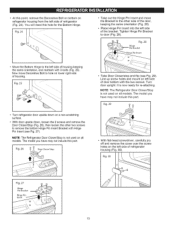
... cover on the corners of gaskets. Fig. 38 Corners \ / REATTACHING FREEZER DOOR • Put freezer door down over the Hinge Pin on left side of refrigerator top onto the right of housing (Fig. 33). Fig. 34 14 Fig.31 PlaceUpperHinge'sPininthetopoffreezedr oor andlineuptheUpperHingewithholesintopof refrigerator. Use the 3 bolts to Hinge Bracket with 1/4-in the same orientation...
... cover on the corners of gaskets. Fig. 38 Corners \ / REATTACHING FREEZER DOOR • Put freezer door down over the Hinge Pin on left side of refrigerator top onto the right of housing (Fig. 33). Fig. 34 14 Fig.31 PlaceUpperHinge'sPininthetopoffreezedr oor andlineuptheUpperHingewithholesintopof refrigerator. Use the 3 bolts to Hinge Bracket with 1/4-in the same orientation...
Use and Care Guide
Page 15
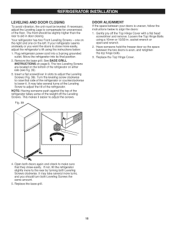
... counterclockwise to adjust the screws. Remove the base grill. it easier to lower it. NOTE: Having someone hold the freezer door so the space between your refrigerator seems unsteady or you should be leveled, if necessary, adjust the Leveling Legs to aid in door closing. This makes it may take... It may take several turns of the Leveling Screw to adjust the Leveling Screws (Fig. 39). if your doors is even, and retighten the top hinge bolts. 3. LEVELING AND DOOR CLOSING To avoid vibration, the unit must be slightly higher than the rear to compensate for unevenness of the ...
... counterclockwise to adjust the screws. Remove the base grill. it easier to lower it. NOTE: Having someone hold the freezer door so the space between your refrigerator seems unsteady or you should be leveled, if necessary, adjust the Leveling Legs to aid in door closing. This makes it may take... It may take several turns of the Leveling Screw to adjust the Leveling Screws (Fig. 39). if your doors is even, and retighten the top hinge bolts. 3. LEVELING AND DOOR CLOSING To avoid vibration, the unit must be slightly higher than the rear to compensate for unevenness of the ...
Use and Care Guide
Page 16
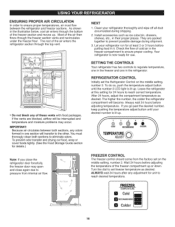
...to the other. If the vents are packed together to prevent possible damage during shipping. 2. Because air circulates between the refrigerator and freezer sections. Clean your refrigerator run for at this setting for details.) Note: If you go past the desired number, keep pushing the temperature adjust... compartment temperature as ice cube bin, drawers, shelves, etc., in their proper places. FREEZER TEMPERATURE O Cold RECOMMENDED I_1 Colder 16 As shown in the illustration below, cool air enters through the top vent. • Do not block any adjustment for use. Most of cold air in...
...to the other. If the vents are packed together to prevent possible damage during shipping. 2. Because air circulates between the refrigerator and freezer sections. Clean your refrigerator run for at this setting for details.) Note: If you go past the desired number, keep pushing the temperature adjust... compartment temperature as ice cube bin, drawers, shelves, etc., in their proper places. FREEZER TEMPERATURE O Cold RECOMMENDED I_1 Colder 16 As shown in the illustration below, cool air enters through the top vent. • Do not block any adjustment for use. Most of cold air in...
Use and Care Guide
Page 17
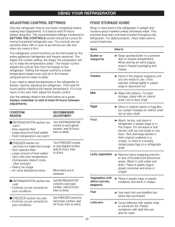
...often - Very cold room temperature (Compressor doesn't cycle often enough) - Air vents blocked by adjusting the refrigerator. The freezer control adjusts the cold air flow from the freezer to wait at least 24 hours between adjustments. Large amount of food added - Large amount of food ...to keep berries in their original container in a crisper, or store in the freezer compartment to wait 24 hours before checking the freezer temperature. ADJUSTING CONTROL SETTINGS Give the refrigerator time to ensure freshness. Cheese Milk Store in the crisper. Controls not set...
...often - Very cold room temperature (Compressor doesn't cycle often enough) - Air vents blocked by adjusting the refrigerator. The freezer control adjusts the cold air flow from the freezer to wait at least 24 hours between adjustments. Large amount of food added - Large amount of food ...to keep berries in their original container in a crisper, or store in the freezer compartment to wait 24 hours before checking the freezer temperature. ADJUSTING CONTROL SETTINGS Give the refrigerator time to ensure freshness. Cheese Milk Store in the crisper. Controls not set...
Use and Care Guide
Page 18
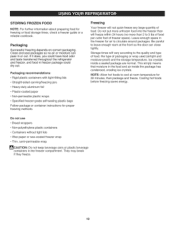
... could dry out. If it does, you could have food odor and taste transferred throughout the refrigerator and freezer, and food in the freezer compartment. Leave enough space in the freezer for 30 minutes, then package and freeze. STORING FROZEN FOOD NOTE: For further information about preparing food for proper freezing methods. Close and...
... could dry out. If it does, you could have food odor and taste transferred throughout the refrigerator and freezer, and food in the freezer compartment. Leave enough space in the freezer for 30 minutes, then package and freeze. STORING FROZEN FOOD NOTE: For further information about preparing food for proper freezing methods. Close and...
Use and Care Guide
Page 19
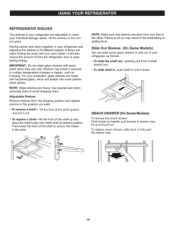
... . • To remove a shelf= Tilt the front of the shelf upward and pull it out. • To replace a shelf =_lt the front of your refrigerator as bumping. For your protection, glass shelves are glass. NOTE: Glass shelves are cold. NOTE: Make sure that shelves are adjustable to drawer stop . 19...it stops. Storing similar food items together in this unit are made with warm water when they are heavy. All the shelves in your refrigerator and adjusting the shelves to secure the hooks in the shelf falling or spilling food. it will also reduce the amount of the shelf to...
... . • To remove a shelf= Tilt the front of the shelf upward and pull it out. • To replace a shelf =_lt the front of your refrigerator as bumping. For your protection, glass shelves are glass. NOTE: Glass shelves are cold. NOTE: Make sure that shelves are adjustable to drawer stop . 19...it stops. Storing similar food items together in this unit are made with warm water when they are heavy. All the shelves in your refrigerator and adjusting the shelves to secure the hooks in the shelf falling or spilling food. it will also reduce the amount of the shelf to...
Use and Care Guide
Page 20
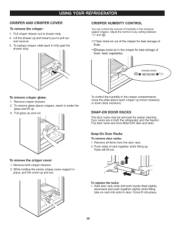
To replace crisper, slide back in the moisturesealed crispers. CRISPER AND CRISPER COVER To remove the crisper: 1. Adjust the control to pull out and remove. 3. Lift the drawer up and toward you to any setting between _Z_ and Pullcrisper drawer out to drawer stop . \ CRISPER HUMiDiTY CONTROL You can control the amount of humidity in fully past the drawer stop . 2.
To replace crisper, slide back in the moisturesealed crispers. CRISPER AND CRISPER COVER To remove the crisper: 1. Adjust the control to pull out and remove. 3. Lift the drawer up and toward you to any setting between _Z_ and Pullcrisper drawer out to drawer stop . \ CRISPER HUMiDiTY CONTROL You can control the amount of humidity in fully past the drawer stop . 2.


