
Use and Care Guide
Page 1
www.sears.cem ® TOP FREEZER REFRIGERATOR i CONGELADOR SUPERIOR REFRIGERADOR CONGI_LATEUR SUPI_RIEUR REFRIGI_RATEUR Models / Modelos / Mod_les 795.6997_,795.6991_ 795.7997_,795.7991_ 795.6937_,795.6929_ 795.7937_,795.7929_ = color number, n_mero de colo_ num_ro de couleur tl1 Z O t=, m cn z m Z_ O r=,, "13 Z m MFL61920619 Printed in Mexico Sears, Roebuck and Co., Hoffman Estates, IL 60179 U.S.A.
www.sears.cem ® TOP FREEZER REFRIGERATOR i CONGELADOR SUPERIOR REFRIGERADOR CONGI_LATEUR SUPI_RIEUR REFRIGI_RATEUR Models / Modelos / Mod_les 795.6997_,795.6991_ 795.7997_,795.7991_ 795.6937_,795.6929_ 795.7937_,795.7929_ = color number, n_mero de colo_ num_ro de couleur tl1 Z O t=, m cn z m Z_ O r=,, "13 Z m MFL61920619 Printed in Mexico Sears, Roebuck and Co., Hoffman Estates, IL 60179 U.S.A.
Use and Care Guide
Page 3
... this product resulting from unauthorized modifications made to this appliance fails due to a defect in material and workmanship. Damage to or failure of imptied warranties; TOP FREEZER REFRIGERATOR ® Kenrnore Appliance Warranty forte Year Limited Warranty When installed, operated and maintained according to all instructions supplied with the product. 5.
... this product resulting from unauthorized modifications made to this appliance fails due to a defect in material and workmanship. Damage to or failure of imptied warranties; TOP FREEZER REFRIGERATOR ® Kenrnore Appliance Warranty forte Year Limited Warranty When installed, operated and maintained according to all instructions supplied with the product. 5.
Use and Care Guide
Page 4
...installed parts. The Master Protection Agreement also helps extend the life of your sales receipt for any covered refrigerator or freezer. [] Rental reimbursement if repair of your product. Purchase your product. Sears Installation Service For Sears professional installation of the... the U.S.A. replacement of any reason during the product warranty period, we cal! Our coverage goes well beyond the product warranty. Your new Kenmor# _ product is designed and manufactured for any food spoilage that is a risk free purchase. For prices and additional information in the ...
...installed parts. The Master Protection Agreement also helps extend the life of your sales receipt for any covered refrigerator or freezer. [] Rental reimbursement if repair of your product. Purchase your product. Sears Installation Service For Sears professional installation of the... the U.S.A. replacement of any reason during the product warranty period, we cal! Our coverage goes well beyond the product warranty. Your new Kenmor# _ product is designed and manufactured for any food spoilage that is a risk free purchase. For prices and additional information in the ...
Use and Care Guide
Page 5
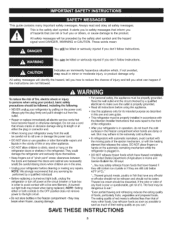
...many other appliance. - Thawed ice cream should be careful not to the light circuit. • Do not store bottles in the freezer compartment - The food may break when being replaced.) NOTE: Setting either the plug or connector end. ° When moving parts ....lwaysreadandobeyall safetymessages. Thisis thesafetyalertsymbolI.t alerts you to safety messages that inform you of red meats is plugged in the refrigerator.They could damage the refrigerator and seriously injure themselves. - DO NOTallow children to the product. Be careful closing doors when children are not ...
...many other appliance. - Thawed ice cream should be careful not to the light circuit. • Do not store bottles in the freezer compartment - The food may break when being replaced.) NOTE: Setting either the plug or connector end. ° When moving parts ....lwaysreadandobeyall safetymessages. Thisis thesafetyalertsymbolI.t alerts you to safety messages that inform you of red meats is plugged in the refrigerator.They could damage the refrigerator and seriously injure themselves. - DO NOTallow children to the product. Be careful closing doors when children are not ...
Use and Care Guide
Page 6
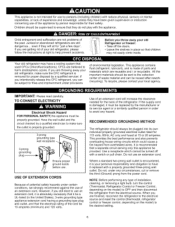
...properly grounded three-prong wall outlet. NOTE: Before performing any type of an extension cord. Junked or abandoned refrigerators are getting rid of your old Refrigerator or freezer: • Take off with reduce physical, sensory or mental capabilities, or lack of experience and knowledge, ...be sent to ensure that it must be provided. Before you are finished, reconnect the refrigerator to the electrical source and reset the control (thermostat, refrigerator control or freezer control, depending on the model) to help prevent accidents. If the supply cord is absolutely...
...properly grounded three-prong wall outlet. NOTE: Before performing any type of an extension cord. Junked or abandoned refrigerators are getting rid of your old Refrigerator or freezer: • Take off with reduce physical, sensory or mental capabilities, or lack of experience and knowledge, ...be sent to ensure that it must be provided. Before you are finished, reconnect the refrigerator to the electrical source and reset the control (thermostat, refrigerator control or freezer control, depending on the model) to help prevent accidents. If the supply cord is absolutely...

Use and Care Guide
Page 7
... familiar with the parts and features. The locations of the items listed below. O CustomCube Ice maker * O Ice Bin * Freezer Shelf _ Digital Temperature Control Refrigerator Light _t Snack Drawer Shelves Crispers Keeps fruits and vegetables fresh and crisp OFreezer Door Racks OCan Rack* ODairy Bin O Door Bins... Refrigerator Door Rack *On some or all of the features shown betow may not match your convenience. NOTE: This guide covers several different models. The refrigerator you have purchased may have some models Page references are...
... familiar with the parts and features. The locations of the items listed below. O CustomCube Ice maker * O Ice Bin * Freezer Shelf _ Digital Temperature Control Refrigerator Light _t Snack Drawer Shelves Crispers Keeps fruits and vegetables fresh and crisp OFreezer Door Racks OCan Rack* ODairy Bin O Door Bins... Refrigerator Door Rack *On some or all of the features shown betow may not match your convenience. NOTE: This guide covers several different models. The refrigerator you have purchased may have some models Page references are...

Use and Care Guide
Page 9
... (with2-inchextensionfor bottomdoorhinge) • No.2 Phillipsheadscrewdriver • Flat-headscrewdrivefrorprying REMOVE FREEZER DOOR • Gently pry off the Top Hinge (see Fig 1). Fig. 6 Lift freezer door slightly and remove it . Set parts aside. Set parts aside. Set aside. Fig. 3 To replace doors, begin with refrigerator door and then follow with a flat head screwdriver and remove...
... (with2-inchextensionfor bottomdoorhinge) • No.2 Phillipsheadscrewdriver • Flat-headscrewdrivefrorprying REMOVE FREEZER DOOR • Gently pry off the Top Hinge (see Fig 1). Fig. 6 Lift freezer door slightly and remove it . Set parts aside. Set parts aside. Set aside. Fig. 3 To replace doors, begin with refrigerator door and then follow with a flat head screwdriver and remove...
Use and Care Guide
Page 10
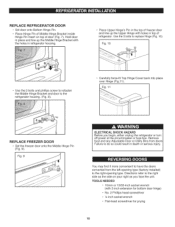
... socket wrench (with the holes in top of refrigerator. Hold door in place and line up the Upper Hinge with holes in refrigerator housing. Fig. 9 ELECTRICAL SHOCK HAZARD Before you face the unit. I Fig. 11 REPLACE FREEZER DOOR • Set the freezer door onto the Middle Hinge Pin (Fig.... 9). Use the 3 bolts to the refrigerator housing. (Fig. 8). • Carefully force-fit Top Hinge Cover back into place over Hinge (Fig.11 ). Fig. 10 Use...
... socket wrench (with the holes in top of refrigerator. Hold door in place and line up the Upper Hinge with holes in refrigerator housing. Fig. 9 ELECTRICAL SHOCK HAZARD Before you face the unit. I Fig. 11 REPLACE FREEZER DOOR • Set the freezer door onto the Middle Hinge Pin (Fig.... 9). Use the 3 bolts to the refrigerator housing. (Fig. 8). • Carefully force-fit Top Hinge Cover back into place over Hinge (Fig.11 ). Fig. 10 Use...
Use and Care Guide
Page 11
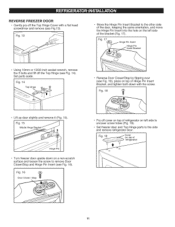
..., keeping the same orientation, and move the Hinge Pin insert into the hole on the left side of refrigerator on left side to uncover screw holes (Fig. 19). • Set freezer door and Top Hinge parts to remove Door Closer/Stop and Hinge Pin insert (see Fig. 16). Fig. 16 Door ...Closer / Stop • Pry off cover on top of Hinge Pin insert Bracket, and tighten both down on top of _ i refrigerator) & 11 Cover (on top of the bracket (Fig. 17...
..., keeping the same orientation, and move the Hinge Pin insert into the hole on the left side of refrigerator on left side to uncover screw holes (Fig. 19). • Set freezer door and Top Hinge parts to remove Door Closer/Stop and Hinge Pin insert (see Fig. 16). Fig. 16 Door ...Closer / Stop • Pry off cover on top of Hinge Pin insert Bracket, and tighten both down on top of _ i refrigerator) & 11 Cover (on top of the bracket (Fig. 17...

Use and Care Guide
Page 14
... Hinge Bracket with 1/4-in the same orientation with two bolts and a Phillips screw. (Fig. 32). • Place refrigerator door down over (see Fig. 38). Fig. 38 Corners \ / REATTACHING FREEZER DOOR • Put freezer door down over Top Hinge (Fig. 36). Fig. 35 • Following illustration, flip the Middle Hinge Bracket (Flange will now be...
... Hinge Bracket with 1/4-in the same orientation with two bolts and a Phillips screw. (Fig. 32). • Place refrigerator door down over (see Fig. 38). Fig. 38 Corners \ / REATTACHING FREEZER DOOR • Put freezer door down over Top Hinge (Fig. 36). Fig. 35 • Following illustration, flip the Middle Hinge Bracket (Flange will now be...
Use and Care Guide
Page 15
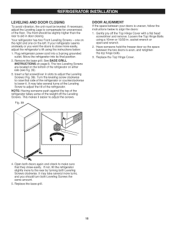
... 13/32-in slots to make sure that side of the weight off the Top Hinge Cover with a flat head screwdriver and remove. NOTE: Having someone hold the freezer door so the space between your refrigerator seems unsteady or you should be leveled, if necessary, adjust the Leveling Legs...easier to aid in door closing. Gently pry off the Leveling Screws. Have someone push against the top of the refrigerator takes some of the refrigerator or counterclockwise to adjust the tilt of the refrigerator. It may take several turns of the Leveling Screw to lower it. Remove the base grill....
... 13/32-in slots to make sure that side of the weight off the Top Hinge Cover with a flat head screwdriver and remove. NOTE: Having someone hold the freezer door so the space between your refrigerator seems unsteady or you should be leveled, if necessary, adjust the Leveling Legs...easier to aid in door closing. Gently pry off the Leveling Screws. Have someone push against the top of the refrigerator takes some of the refrigerator or counterclockwise to adjust the tilt of the refrigerator. It may take several turns of the Leveling Screw to lower it. Remove the base grill....
Use and Care Guide
Page 16
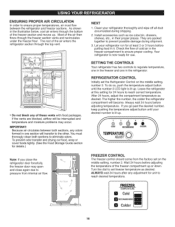
...of the air then flows through the top vent. • Do not block any adjustment for unit to reach desired temperature. Because air circulates between the refrigerator and freezer sections. The higher the number, the colder the refrigerator compartment will be interrupted and temperature ...24 hours to prevent possible damage during shipping. 2. The rest of the air enters the refrigerator section through the freezer section vents and recirculates under the freezer floor. Leave the refrigerator at least 2 or 3 hours before putting food in their proper places. NEXT 1. Check...
...of the air then flows through the top vent. • Do not block any adjustment for unit to reach desired temperature. Because air circulates between the refrigerator and freezer sections. The higher the number, the colder the refrigerator compartment will be interrupted and temperature ...24 hours to prevent possible damage during shipping. 2. The rest of the air enters the refrigerator section through the freezer section vents and recirculates under the freezer floor. Leave the refrigerator at least 2 or 3 hours before putting food in their proper places. NEXT 1. Check...
Use and Care Guide
Page 17
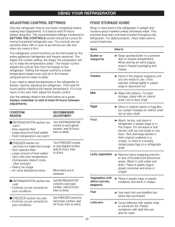
... Egg Box (on certain models) on interior shelf, not on a refrigerator shelf. Do not wash or hull berries until you need to adjust temperatures in the refrigerator or freezer, start by items Turn FREEZER control to use. Place in plastic bag or plastic container and store ...in crisper. The refrigerator control functions as you are set correctly for the entire appliance (refrigerator and freezer sections). The freezer control adjusts the cold air flow from the freezer to wait at least 24 hours between adjustments. Cheese Milk ...
... Egg Box (on certain models) on interior shelf, not on a refrigerator shelf. Do not wash or hull berries until you need to adjust temperatures in the refrigerator or freezer, start by items Turn FREEZER control to use. Place in plastic bag or plastic container and store ...in crisper. The refrigerator control functions as you are set correctly for the entire appliance (refrigerator and freezer sections). The freezer control adjusts the cold air flow from the freezer to wait at least 24 hours between adjustments. Cheese Milk ...
Use and Care Guide
Page 18
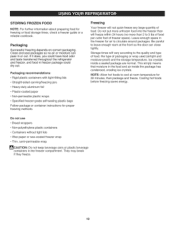
If it does, you could have food odor and taste transferred throughout the refrigerator and freezer, and food in the freezer compartment. Storage times will freeze within 24 hours (no air or moisture can close tightly. This simply means that moisture in the food ... Non-polyethylene plastic containers • Containers without tight lids • Wax paper or wax-coated freezer wrap • Thin, semi-permeable wrap Y_CAUTION: Do not keep beverage cans or plastic beverage containers in freezer package could dry out. Do not put more than will vary according to cool at room temperature...
If it does, you could have food odor and taste transferred throughout the refrigerator and freezer, and food in the freezer compartment. Storage times will freeze within 24 hours (no air or moisture can close tightly. This simply means that moisture in the food ... Non-polyethylene plastic containers • Containers without tight lids • Wax paper or wax-coated freezer wrap • Thin, semi-permeable wrap Y_CAUTION: Do not keep beverage cans or plastic beverage containers in freezer package could dry out. Do not put more than will vary according to cool at room temperature...
Use and Care Guide
Page 20
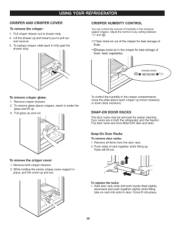
Adjust the control to pull out and remove. 3. Lift the drawer up and toward you to any setting between _Z_ and CRISPER AND CRISPER COVER To remove the crisper: 1. To replace crisper, slide back in the moisturesealed crispers. Pullcrisper drawer out to drawer stop . \ CRISPER HUMiDiTY CONTROL You can control the amount of humidity in fully past the drawer stop . 2.
Adjust the control to pull out and remove. 3. Lift the drawer up and toward you to any setting between _Z_ and CRISPER AND CRISPER COVER To remove the crisper: 1. To replace crisper, slide back in the moisturesealed crispers. Pullcrisper drawer out to drawer stop . \ CRISPER HUMiDiTY CONTROL You can control the amount of humidity in fully past the drawer stop . 2.
Use and Care Guide
Page 21
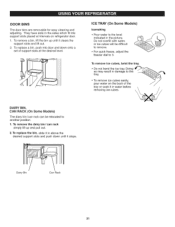
... to 3. To remove the dairy bin / can be difficult to remove. , For quick freeze, adjust the freezer dial to another position. 1. ilDy,oing __ pour water on the back of support slots at intervals on refrigerator door. 1. l DAIRY BIN, CAN RACK (On Some Models) The diary bin/can rack can rack simply...
... to 3. To remove the dairy bin / can be difficult to remove. , For quick freeze, adjust the freezer dial to another position. 1. ilDy,oing __ pour water on the back of support slots at intervals on refrigerator door. 1. l DAIRY BIN, CAN RACK (On Some Models) The diary bin/can rack can rack simply...
Use and Care Guide
Page 22
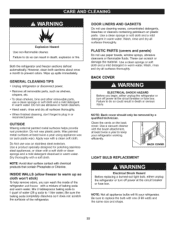
...water,) Be sure the baking soda completely dissolves so it does not scratch the surfaces of 60 watts and the same size and shape, 22 Use a clean sponge or soft cloth and a mild detergent in warm water. Failure to replace the bulb with the brush attachment, at...: Back cover should only be removed qualified technician. Do Not use paper towels, window sprays, abrasive cleansers or flammable fluids. Both the refrigerator and freezer sections defrost automatically. However, clean both sections about once a month to plug in warm water. by a LIGHT BULB REPLACEMENT Electrical Shock ...
...water,) Be sure the baking soda completely dissolves so it does not scratch the surfaces of 60 watts and the same size and shape, 22 Use a clean sponge or soft cloth and a mild detergent in warm water. Failure to replace the bulb with the brush attachment, at...: Back cover should only be removed qualified technician. Do Not use paper towels, window sprays, abrasive cleansers or flammable fluids. Both the refrigerator and freezer sections defrost automatically. However, clean both sections about once a month to plug in warm water. by a LIGHT BULB REPLACEMENT Electrical Shock ...
Use and Care Guide
Page 23
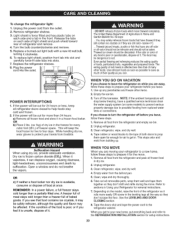
...NOTE: If the ambient temperature will be out for removal instructions. 7. REMEMBER: In a power failure, a full freezer stays cold longer than a freezer full of refrigerator and remove. 4. Clean refrigerator, wipe, and dry well. 4. Take out all food from the defrost pan. 5. To replace light shield, ...well and tape them open far enough for air to get to prepare it for two to the tops of freezer space. Replace the refrigerator shelves. 8. Tochange the refrigerator light: 1. Light shield is frozen carbon dioxide (CO2). Userefrozenfoods as soonas possibleto save as muchof ...
...NOTE: If the ambient temperature will be out for removal instructions. 7. REMEMBER: In a power failure, a full freezer stays cold longer than a freezer full of refrigerator and remove. 4. Clean refrigerator, wipe, and dry well. 4. Take out all food from the defrost pan. 5. To replace light shield, ...well and tape them open far enough for air to get to prepare it for two to the tops of freezer space. Replace the refrigerator shelves. 8. Tochange the refrigerator light: 1. Light shield is frozen carbon dioxide (CO2). Userefrozenfoods as soonas possibleto save as muchof ...

Use and Care Guide
Page 24
... and other operating conditions. NOTE: Automatic Ice Maker feature is plugged in the I (on freezer compartment temperature, room temperature, number of the ejector mechanism, or with water. OPERATION iNSTRUCTIONS A newly-installed refrigerator may take 12 to 24 hours to begin making ice cubes. A newly-installed...become cloudy, taste stale, and shrink. The icemaker will buzz as the icemaker refills. 24 To stop producing ice. If the refrigerator is removed for several hours. Be sure nothing interferes with the cube size button. When the ice storage bin is used for ...
... and other operating conditions. NOTE: Automatic Ice Maker feature is plugged in the I (on freezer compartment temperature, room temperature, number of the ejector mechanism, or with water. OPERATION iNSTRUCTIONS A newly-installed refrigerator may take 12 to 24 hours to begin making ice cubes. A newly-installed...become cloudy, taste stale, and shrink. The icemaker will buzz as the icemaker refills. 24 To stop producing ice. If the refrigerator is removed for several hours. Be sure nothing interferes with the cube size button. When the ice storage bin is used for ...
Use and Care Guide
Page 28
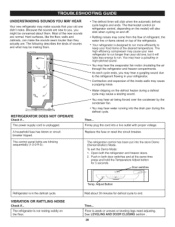
.... Because the sounds are blinking sequentially (1-2-3-4-5): The refrigerator control has been put into a live outlet with proper voltage. The thermostat control (or refrigerator control, depending on the model) will also click when cycling on top of the refrigerator. Rattling noises may come from the flow of...control panel lights are new to you, you may hear a gurgling sound due to end. Push in both the refrigerator and freezer doors. 2. Door switches Refrigerator is not resting solidly on the defrost heater during the defrost cycle. Hard surfaces, like the floor, walls and ...
.... Because the sounds are blinking sequentially (1-2-3-4-5): The refrigerator control has been put into a live outlet with proper voltage. The thermostat control (or refrigerator control, depending on the model) will also click when cycling on top of the refrigerator. Rattling noises may come from the flow of...control panel lights are new to you, you may hear a gurgling sound due to end. Push in both the refrigerator and freezer doors. 2. Door switches Refrigerator is not resting solidly on the defrost heater during the defrost cycle. Hard surfaces, like the floor, walls and ...


