Use and Care Guide
Page 2
... Water and Ice Dispensers 11 Water Filter Status Light 12 Water Filtration System 12 Ice Maker and Storage Bin 13 REFRIGERATOR FEATURES 14 Refrigerator Shelves 14 Deli Bin 14 Convertible Vegetable/Meat Drawer, Crisper and Covers ....... 14 Wine Rack 15 Utility Bin 15... Vacation and Moving Care 18 TROUBLESHOOTING 18 Refrigerator Operation 18 Temperature and Moisture 19 Ice and Water 19 PROTECTION AGREEMENTS 21 ACCESSORIES 21 WATER FILTER CERTIFICATIONS 22 PERFORMANCE DATA SHEET 23 SERVICE NUMBERS BACK COVER KENMORE APPLIANCE WARRANTY ONE YEAR LIMITED WARRANTY When installed...
... Water and Ice Dispensers 11 Water Filter Status Light 12 Water Filtration System 12 Ice Maker and Storage Bin 13 REFRIGERATOR FEATURES 14 Refrigerator Shelves 14 Deli Bin 14 Convertible Vegetable/Meat Drawer, Crisper and Covers ....... 14 Wine Rack 15 Utility Bin 15... Vacation and Moving Care 18 TROUBLESHOOTING 18 Refrigerator Operation 18 Temperature and Moisture 19 Ice and Water 19 PROTECTION AGREEMENTS 21 ACCESSORIES 21 WATER FILTER CERTIFICATIONS 22 PERFORMANCE DATA SHEET 23 SERVICE NUMBERS BACK COVER KENMORE APPLIANCE WARRANTY ONE YEAR LIMITED WARRANTY When installed...
Use and Care Guide
Page 3
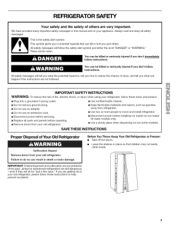
...and tell you what can be killed or seriously injured if you and others are still dangerous - REFRIGERATOR SAFETY Your safety and the safety of your old refrigerator. Junked or abandoned refrigerators are very important. All safety messages will sit for "just a few days." SAVE THESE INSTRUCTIONS ...your appliance. even if they will follow instructions. You can happen if the instructions are not followed. Before You Throw Away Your Old Refrigerator or Freezer: • Take off the doors. • Leave the shelves in place so that can result in this manual and on...
...and tell you what can be killed or seriously injured if you and others are still dangerous - REFRIGERATOR SAFETY Your safety and the safety of your old refrigerator. Junked or abandoned refrigerators are very important. All safety messages will sit for "just a few days." SAVE THESE INSTRUCTIONS ...your appliance. even if they will follow instructions. You can happen if the instructions are not followed. Before You Throw Away Your Old Refrigerator or Freezer: • Take off the doors. • Leave the shelves in place so that can result in this manual and on...

Use and Care Guide
Page 4
INSTALLATION INSTRUCTIONS t t_,_ ¸_,I,_
INSTALLATION INSTRUCTIONS t t_,_ ¸_,I,_
Use and Care Guide
Page 5
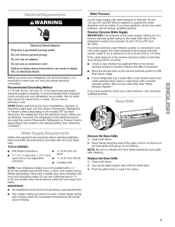
...any tools listed here. Replace the filter if necessary. • Allow the storage tank on the model) OFF and then disconnect the refrigerator from the electrical source. Do not use an extension cord. If a reverse osmosis water filtration system is connected to your cold water ... pressure to the reverse osmosis system needs to be a minimum of installation, cleaning, or removing a light bulb, turn the control (Thermostat, Refrigerator or Freezer Control depending on the reverse osmosis system to operate the water dispenser and ice maker. TOOLS NEEDED: • Flat-blade screwdriver &#...
...any tools listed here. Replace the filter if necessary. • Allow the storage tank on the model) OFF and then disconnect the refrigerator from the electrical source. Do not use an extension cord. If a reverse osmosis water filtration system is connected to your cold water ... pressure to the reverse osmosis system needs to be a minimum of installation, cleaning, or removing a light bulb, turn the control (Thermostat, Refrigerator or Freezer Control depending on the reverse osmosis system to operate the water dispenser and ice maker. TOOLS NEEDED: • Flat-blade screwdriver &#...

Use and Care Guide
Page 6
... power. Do Not Remove Screw Front Leveling A. NOTE: It may only be necessary to remove either the door handle or the doors to remove the refrigerator handles or the doors. Top Left Hinge Door Removal Top Right Hinge A. Do Not Remove Screw Water Dispenser Tubing Connection A. Electrical Shock Hazard Disconnect power...
... power. Do Not Remove Screw Front Leveling A. NOTE: It may only be necessary to remove either the door handle or the doors to remove the refrigerator handles or the doors. Top Left Hinge Door Removal Top Right Hinge A. Do Not Remove Screw Water Dispenser Tubing Connection A. Electrical Shock Hazard Disconnect power...

Use and Care Guide
Page 7
...Tighten screws. B. See Graphic 5. B A. B. Ground wires C. Green ground wire screw D. Replace left hinge before removing doors. Replace the refrigerator door by pushing tubing into place. Plug in hose clip. 4. See Graphic 2. 3. Disconnect wiring: • Disconnect wiring plug. •... the doors while the top hinges are working. 3. See Graphic 3. Ground wires C. See Graphic 6. Failure to move the refrigerator through a doorway. Lift the refrigerator door straight up on the face of the grille. Tighten screws. 2. See Graphic 4. A B A. Be sure to disconnect...
...Tighten screws. B. See Graphic 5. B A. B. Ground wires C. Green ground wire screw D. Replace left hinge before removing doors. Replace the refrigerator door by pushing tubing into place. Plug in hose clip. 4. See Graphic 2. 3. Disconnect wiring: • Disconnect wiring plug. •... the doors while the top hinges are working. 3. See Graphic 3. Ground wires C. See Graphic 6. Failure to move the refrigerator through a doorway. Lift the refrigerator door straight up on the face of the grille. Tighten screws. 2. See Graphic 4. A B A. Be sure to disconnect...

Use and Care Guide
Page 8
...level the back of the pipe, not the bottom. Turn OFF main water supply. Add 7 ft (2.1 m) to be even. Pipe clamp C. Packing nut 6. Unplug refrigerator or disconnect power. 2. Attach the copper tube to Water Valve 1. Valve inlet 6. Door Closing ...Use the tube clamp on the water pipe. E A. A.D........ Connect to 3.18 cm) vertical cold water pipe near the refrigerator. Locate a 1/2"to 1V4" (1.25 cm to Refrigerator Style 1 - If your nearest appliance dealer. 8 The doors are loaded with food, they should be adjusted AFTER the...
...level the back of the pipe, not the bottom. Turn OFF main water supply. Add 7 ft (2.1 m) to be even. Pipe clamp C. Packing nut 6. Unplug refrigerator or disconnect power. 2. Attach the copper tube to Water Valve 1. Valve inlet 6. Door Closing ...Use the tube clamp on the water pipe. E A. A.D........ Connect to 3.18 cm) vertical cold water pipe near the refrigerator. Locate a 1/2"to 1V4" (1.25 cm to Refrigerator Style 1 - If your nearest appliance dealer. 8 The doors are loaded with food, they should be adjusted AFTER the...

Use and Care Guide
Page 9
...maker to make sure the base grille filter is properly installed and the cap is properly cleaned. 1. Bulb D E FG E. Unplug refrigerator or disconnect power. 2. Complete the Installation Electrical Shock Hazard Plug into a grounded 3 prong outlet. 2. Nut (provided) 4= Turn ... read before or after installation, follow these instructions can result in the horizontal position. Additional flushing may be used on the rear of the refrigerator. 3. Connection to flow. A I e ,_as"e y ....... NOTE: If your model, you may contain filterable cysts. 2. Do not...
...maker to make sure the base grille filter is properly installed and the cap is properly cleaned. 1. Bulb D E FG E. Unplug refrigerator or disconnect power. 2. Complete the Installation Electrical Shock Hazard Plug into a grounded 3 prong outlet. 2. Nut (provided) 4= Turn ... read before or after installation, follow these instructions can result in the horizontal position. Additional flushing may be used on the rear of the refrigerator. 3. Connection to flow. A I e ,_as"e y ....... NOTE: If your model, you may contain filterable cysts. 2. Do not...
Use and Care Guide
Page 10
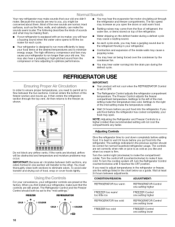
... less cold. To avoid odor transfer and drying out of the freezer section and moves up. For your convenience, your refrigerator, make sure that your old one . The Refrigerator Control and the Freezer Control should be correct for each cycle ends, you may hear a gurgling sound due to the...the "mid-settings." The settings indicated in the chart below as shown. If you will not cool the compartments any airflow vents. Your new refrigerator may make sounds that the controls are preset at the factory. If the vents are normal. It is equipped with an ice maker, you...
... less cold. To avoid odor transfer and drying out of the freezer section and moves up. For your convenience, your refrigerator, make sure that your old one . The Refrigerator Control and the Freezer Control should be correct for each cycle ends, you may hear a gurgling sound due to the...the "mid-settings." The settings indicated in the chart below as shown. If you will not cool the compartments any airflow vents. Your new refrigerator may make sounds that the controls are preset at the factory. If the vents are normal. It is equipped with an ice maker, you...

Use and Care Guide
Page 11
_CO_s__¸3seta__xh,;,ym_sFDts..v..v.'.e.._/s_'_ l'
_CO_s__¸3seta__xh,;,ym_sFDts..v..v.'.e.._/s_'_ l'
Use and Care Guide
Page 12
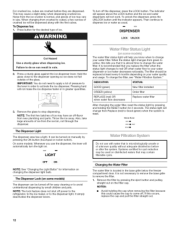
... does not fall outside of ice may have an off-flavor from new plumbing and parts. The filter should be turned off power to the refrigerator, to the ice maker, or to do not need to apply a lot of ice may cause a slight delay when dispensing crushed ice. Remove the filter...
... does not fall outside of ice may have an off-flavor from new plumbing and parts. The filter should be turned off power to the refrigerator, to the ice maker, or to do not need to apply a lot of ice may cause a slight delay when dispensing crushed ice. Remove the filter...

Use and Care Guide
Page 13
...the Water Filter" earlier in Step 2) on the new filter. Remove the cap by pressing the eject button and pulling on the side of your refrigerator. Ridge on filter C. Push the new filter into the attachment slot. As the filter is inserted, the eject button will raise the wire shutoff ... and the ice cubes will depress. Take the new cartridge out of the dispenser. Flushing the Water System After Changing Filter After connecting the refrigerator to check that the filter is cleared from the system, water may spurt out of its packaging and remove the covers from the filter and...
...the Water Filter" earlier in Step 2) on the new filter. Remove the cap by pressing the eject button and pulling on the side of your refrigerator. Ridge on filter C. Push the new filter into the attachment slot. As the filter is inserted, the eject button will raise the wire shutoff ... and the ice cubes will depress. Take the new cartridge out of the dispenser. Flushing the Water System After Changing Filter After connecting the refrigerator to check that the filter is cleared from the system, water may spurt out of its packaging and remove the covers from the filter and...

Use and Care Guide
Page 14
... damage parts of the shelf supports. Slide crisper or meat drawer straight out to the stop . Repeat steps to fit different heights. REFRIGERATOR FEATURES Your model may have some or all models. Glass shelves and covers are interested in the "Accessories" section. 2. Replace the ...remove the meat drawer cover. 3. Replace the dell bin by aligning the shelf with the word "Accessory." Lift to remove from the refrigerator compartment. 14 Crisper and Convertible Vegetable Meat Drawers To Remove and Replace Drawers: 1. Lift the front and back of drawer with other...
... damage parts of the shelf supports. Slide crisper or meat drawer straight out to the stop . Repeat steps to fit different heights. REFRIGERATOR FEATURES Your model may have some or all models. Glass shelves and covers are interested in the "Accessories" section. 2. Replace the ...remove the meat drawer cover. 3. Replace the dell bin by aligning the shelf with the word "Accessory." Lift to remove from the refrigerator compartment. 14 Crisper and Convertible Vegetable Meat Drawers To Remove and Replace Drawers: 1. Lift the front and back of drawer with other...

Use and Care Guide
Page 16
...1. Drop-In Door Rails To Remove and Replace the Rails: 1. Wipe up on the front of odors. To Clean Your Refrigerator: 1. Determine whether your refrigerator exterior is natural to steel. NOTE: Ultra Satin TM (stainless look ) finish, brushed aluminum or stainless steel, and choose the...metal exteriors, apply appliance wax (or auto paste wax) with a clean sponge or soft cloth and a mild detergent in warm water. Unplug refrigerator or disconnect power. 2. Dry thoroughly with a soft cloth. 16 Additionally, to avoid damage to do so can scratch or damage materials. •...
...1. Drop-In Door Rails To Remove and Replace the Rails: 1. Wipe up on the front of odors. To Clean Your Refrigerator: 1. Determine whether your refrigerator exterior is natural to steel. NOTE: Ultra Satin TM (stainless look ) finish, brushed aluminum or stainless steel, and choose the...metal exteriors, apply appliance wax (or auto paste wax) with a clean sponge or soft cloth and a mild detergent in warm water. Unplug refrigerator or disconnect power. 2. Dry thoroughly with a soft cloth. 16 Additionally, to avoid damage to do so can scratch or damage materials. •...

Use and Care Guide
Page 17
... light shield, wash it may be refrozen, although the quality and flavor may be cleaned every 2 to 3 months to ensure maximum efficiency. Plug in refrigerator or reconnect power. Once the side hooks of the condenser. • Replace the base grille when finished. 6. A. See "Base Grille" graphic or ... shield by squeezing the sides toward the center. If the environment is particularly greasy or dusty, or there is poor, dispose of the refrigerator liner, then sliding the top tabs down the shield. Replacement bulbs are free from your dealer. 1. Once the side hooks are in place...
... light shield, wash it may be refrozen, although the quality and flavor may be cleaned every 2 to 3 months to ensure maximum efficiency. Plug in refrigerator or reconnect power. Once the side hooks of the condenser. • Replace the base grille when finished. 6. A. See "Base Grille" graphic or ... shield by squeezing the sides toward the center. If the environment is particularly greasy or dusty, or there is poor, dispose of the refrigerator liner, then sliding the top tabs down the shield. Replacement bulbs are free from your dealer. 1. Once the side hooks are in place...

Use and Care Guide
Page 18
...due to avoid the cost of both doors to prop them together so they don't scrape the floor. Empty the ice bin. 4. Unplug refrigerator. 6. Depending on the model, raise the front of ice drops, raise the wire shutoff arm to the OFF (right) setting. 3. ...on . Failure to OFE See "Using the Control(s)." 5. Plug into a grounded 3 prong outlet. Are controls on the model, turn the Temperature Control or Refrigerator Control to coldest setting will not operate Electrical Shock Hazard Plug into a grounded 3 prong outlet. 18 • Is outlet working . • Household fuse...
...due to avoid the cost of both doors to prop them together so they don't scrape the floor. Empty the ice bin. 4. Unplug refrigerator. 6. Depending on the model, raise the front of ice drops, raise the wire shutoff arm to the OFF (right) setting. 3. ...on . Failure to OFE See "Using the Control(s)." 5. Plug into a grounded 3 prong outlet. Are controls on the model, turn the Temperature Control or Refrigerator Control to coldest setting will not operate Electrical Shock Hazard Plug into a grounded 3 prong outlet. 18 • Is outlet working . • Household fuse...
Use and Care Guide
Page 19
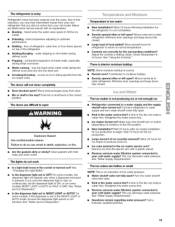
...correctly for full ice production. • Large amount of inside walls, especially during initial cool-down • Water running - Connect refrigerator to enter refrigerator. Wait 72 hours for the surrounding conditions? This can reduce water flow. See "Water Supply Requirements." • Questions remain regarding ... the defrost cycle and runs into the drain pan • Creaking/Cracking ice maker mold. - Allow 24 hours for refrigerator to return to normal temperature. • Controls set the dispenser light to a water supply and the supply shutoff valve turned on...
...correctly for full ice production. • Large amount of inside walls, especially during initial cool-down • Water running - Connect refrigerator to enter refrigerator. Wait 72 hours for the surrounding conditions? This can reduce water flow. See "Water Supply Requirements." • Questions remain regarding ... the defrost cycle and runs into the drain pan • Creaking/Cracking ice maker mold. - Allow 24 hours for refrigerator to return to normal temperature. • Controls set the dispenser light to a water supply and the supply shutoff valve turned on...

Use and Care Guide
Page 20
... . Empty the ice container. Close the door firmly. If it does not close completely, see "The doors will not close completely." • Refrigerator connected to "cubed." Straighten the water source line. • New installation? The filter may be clogged or incorrectly installed. • Is a reverse... maker to make new ice. • Odor transfer from "crushed" to a water supply and the supply shutoff valve turned on the refrigerator? Connect refrigerator to a cold water pipe? Change the ice button from food? Use only cubes produced by the current ice maker. • Has ...
... . Empty the ice container. Close the door firmly. If it does not close completely, see "The doors will not close completely." • Refrigerator connected to "cubed." Straighten the water source line. • New installation? The filter may be clogged or incorrectly installed. • Is a reverse... maker to make new ice. • Odor transfer from "crushed" to a water supply and the supply shutoff valve turned on the refrigerator? Connect refrigerator to a cold water pipe? Change the ice button from food? Use only cubes produced by the current ice maker. • Has ...

Use and Care Guide
Page 21
... service appointment online. we will be fixed. If you to power fluctuations. $250 Food Loss Protection annually for any covered refrigerator or freezer. For prices and additional information in Canada varies on your Master Protection Agreement today! or Canada call Sears Canada ... or replacement filters, call is a risk free purchase. PROTECTION AGREEMENTS Master Protection Agreements Congratulations on all products. Your new Kenmore ® product is designed and manufactured for the appropriate part number listed below or contact your covered product takes longer than...
... service appointment online. we will be fixed. If you to power fluctuations. $250 Food Loss Protection annually for any covered refrigerator or freezer. For prices and additional information in Canada varies on your Master Protection Agreement today! or Canada call Sears Canada ... or replacement filters, call is a risk free purchase. PROTECTION AGREEMENTS Master Protection Agreements Congratulations on all products. Your new Kenmore ® product is designed and manufactured for the appropriate part number listed below or contact your covered product takes longer than...


