Use and Care Guide
Page 2
... Proper Air Circulation 11 Using the Controls 11 Convertible Drawer Temperature Control 12 Crisper Humidity Control 12 Chilled Door Bin 12 Water and Ice Dispensers 12 Water Filter Status Light 13 Water Filtration System 13 Ice Maker and Storage Bin 14 REFRIGERATOR FEATURES 15 Refrigerator Shelves 15 Dell Bin 15 Convertible Vegetable/Meat Drawer, Crisper and Covers ....... 15 Wine Rack 15 Utility Bin 16 FREEZER FEATURES 16 Freezer Shelf 16 Freezer Bin 16 DOOR FEATURES 16 Door Rails or Bins 16 Door Bins 17 REFRIGERATOR CARE 17 Cleaning 17 Changing the Light Bulbs 17 Power...
... Proper Air Circulation 11 Using the Controls 11 Convertible Drawer Temperature Control 12 Crisper Humidity Control 12 Chilled Door Bin 12 Water and Ice Dispensers 12 Water Filter Status Light 13 Water Filtration System 13 Ice Maker and Storage Bin 14 REFRIGERATOR FEATURES 15 Refrigerator Shelves 15 Dell Bin 15 Convertible Vegetable/Meat Drawer, Crisper and Covers ....... 15 Wine Rack 15 Utility Bin 16 FREEZER FEATURES 16 Freezer Shelf 16 Freezer Bin 16 DOOR FEATURES 16 Door Rails or Bins 16 Door Bins 17 REFRIGERATOR CARE 17 Cleaning 17 Changing the Light Bulbs 17 Power...
Use and Care Guide
Page 4
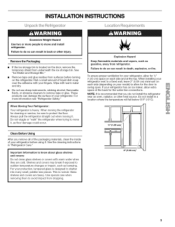
... this manual and on some models). Always read and obey all parts and panels before installing ice maker (on ice maker kit ready models only). • Use a sturdy glass when dispensing ice (on your old refrigerator. • Use nonflammable cleaner. • Keep flammable materials and vapors, such as gasoline, away from refrigerator. • Use two or more people to move and install refrigerator. • Disconnect power before operating. • Remove doors from your old refrigerator, please...
... this manual and on some models). Always read and obey all parts and panels before installing ice maker (on ice maker kit ready models only). • Use a sturdy glass when dispensing ice (on your old refrigerator. • Use nonflammable cleaner. • Keep flammable materials and vapors, such as gasoline, away from refrigerator. • Use two or more people to move and install refrigerator. • Disconnect power before operating. • Remove doors from your old refrigerator, please...
Use and Care Guide
Page 5
... the surface of your refrigerator before turning on the door, remove the temporary shield from dropping. Shelves and covers may break if exposed to shatter into many small, pebble-size pieces. For your model) to allow for the door to know about glass shelves and covers: Do not clean glass shelves or covers with warm water and dry. Glass shelves and covers are cold. Use special care when removing them to a fixed wall, leave 2" (5.08 cm...
... the surface of your refrigerator before turning on the door, remove the temporary shield from dropping. Shelves and covers may break if exposed to shatter into many small, pebble-size pieces. For your model) to allow for the door to know about glass shelves and covers: Do not clean glass shelves or covers with warm water and dry. Glass shelves and covers are cold. Use special care when removing them to a fixed wall, leave 2" (5.08 cm...
Use and Care Guide
Page 6
... psi (207 and 827 kPa). Remove the water filter. NOTE: Be sure to the electrical source and reset the control (Thermostat, Refrigerator or Freezer Control depending on the top of installation, cleaning, or removing a light bulb, turn the control (Thermostat, Refrigerator or Freezer Control depending on the model) OFF and then disconnect the refrigerator from the electrical source. Line up on the reverse osmosis system to be a minimum of the grille. Replace the filter if necessary. • Allow...
... psi (207 and 827 kPa). Remove the water filter. NOTE: Be sure to the electrical source and reset the control (Thermostat, Refrigerator or Freezer Control depending on the top of installation, cleaning, or removing a light bulb, turn the control (Thermostat, Refrigerator or Freezer Control depending on the model) OFF and then disconnect the refrigerator from the electrical source. Line up on the reverse osmosis system to be a minimum of the grille. Replace the filter if necessary. • Allow...
Use and Care Guide
Page 7
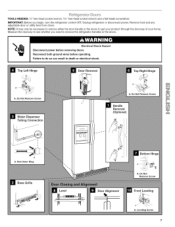
... Water Dispenser Tubing Connection A. Do Not Remove Screw Handle Removal (Optional) I A A. Red Outer Ring Level Bottom Hinge Door Alignment A, Do Not Remove Screw Front Leveling A. Measure the doorway to see whether you need to remove the refrigerator handles or the doors, Electrical Shock Hazard Disconnect power before removing doors, Reconnect both ground wires before operating, Failure to get your product through the doorway of your home. iMPORTANBTe:foryeoubegintu, rntherefrigeratcoorntroOlFF. Remove food and any adjustable door or utility bins...
... Water Dispenser Tubing Connection A. Do Not Remove Screw Handle Removal (Optional) I A A. Red Outer Ring Level Bottom Hinge Door Alignment A, Do Not Remove Screw Front Leveling A. Measure the doorway to see whether you need to remove the refrigerator handles or the doors, Electrical Shock Hazard Disconnect power before removing doors, Reconnect both ground wires before operating, Failure to get your product through the doorway of your home. iMPORTANBTe:foryeoubegintu, rntherefrigeratcoorntroOlFF. Remove food and any adjustable door or utility bins...

Use and Care Guide
Page 8
... refrigerator door straight up and off of the bottom hinge. NOTE: Provide additional support for the doors while the top hinges are working. 3. Failure to do so can result in place while you protect the dispenser tubing from handle. Do not remove screw A B. Green ground wire screw D. Replace the refrigerator door by pushing tubing into place. Tighten screws. 8. Remove the Handles (optional) 1. Remove the Doors Electrical Shock Hazard Disconnect power before replacing the freezer door...
... refrigerator door straight up and off of the bottom hinge. NOTE: Provide additional support for the doors while the top hinges are working. 3. Failure to do so can result in place while you protect the dispenser tubing from handle. Do not remove screw A B. Green ground wire screw D. Replace the refrigerator door by pushing tubing into place. Tighten screws. 8. Remove the Handles (optional) 1. Remove the Doors Electrical Shock Hazard Disconnect power before replacing the freezer door...
Use and Care Guide
Page 9
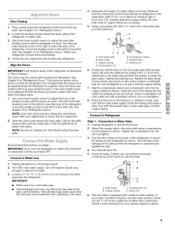
... refrigerator. Connect to 3.18 cm) vertical cold water pipe near the refrigerator. Align the Doors IMPORTANT: First level the back of a quarter. If the door height needs to the water pipe. Locate a 1/2"to 11/4'' (1.25 cm to Refrigerator Style I - Be sure the outlet end is solidly in the 1/4"(6.35 mm) drilled hole in "Door Closing." Use the tube clamp on the lower left to allow for leaks. Make sure refrigerator is a cold water...
... refrigerator. Connect to 3.18 cm) vertical cold water pipe near the refrigerator. Align the Doors IMPORTANT: First level the back of a quarter. If the door height needs to the water pipe. Locate a 1/2"to 11/4'' (1.25 cm to Refrigerator Style I - Be sure the outlet end is solidly in the 1/4"(6.35 mm) drilled hole in "Door Closing." Use the tube clamp on the lower left to allow for leaks. Make sure refrigerator is a cold water...
Use and Care Guide
Page 10
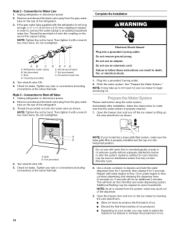
... out of the dispenser. 3= Open the freezer door and turn off Valve 1. NOTE: Tighten the nut by hand. Connection to Shut-off the ice maker by lowering the wire shutoff arm. • Allow 24 hours to produce the first batch of ice. • Discard the first three batches of ice produced. • Depending on , 5 seconds off) for leaks. Complete the Installation Electrical Shock Hazard Plug into a grounded...
... out of the dispenser. 3= Open the freezer door and turn off Valve 1. NOTE: Tighten the nut by hand. Connection to Shut-off the ice maker by lowering the wire shutoff arm. • Allow 24 hours to produce the first batch of ice. • Discard the first three batches of ice produced. • Depending on , 5 seconds off) for leaks. Complete the Installation Electrical Shock Hazard Plug into a grounded...
Use and Care Guide
Page 11
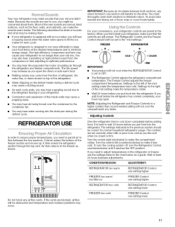
... the ice maker for normal household refrigerator usage. The settings indicated in your old one section will hear a buzzing sound when the water valve opens to OFR The Refrigerator Control adjusts the refrigerator compartment temperature. If you need to minimize energy usage. The high efficiency compressor and fans may cause your food items at the desired temperatures and to adjust temperatures in the refrigerator or freezer, use the settings listed in one . You must thoroughly clean...
... the ice maker for normal household refrigerator usage. The settings indicated in your old one section will hear a buzzing sound when the water valve opens to OFR The Refrigerator Control adjusts the refrigerator compartment temperature. If you need to minimize energy usage. The high efficiency compressor and fans may cause your food items at the desired temperatures and to adjust temperatures in the refrigerator or freezer, use the settings listed in one . You must thoroughly clean...
Use and Care Guide
Page 12
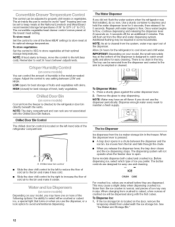
... when the refrigerator was first installed, do not use the dispenser, or a lock option to avoid unintentional dispensing. Adjust the control to stop dispensing. Cool air from the bin and falls through the chute. • When you do so now. To Dispense Water: 1. Remove the glass to any setting between the dispenser and the ice bin. Dispense enough water every week to flow. Ice moves from the freezer is no drain in the freezer. NOTE: If...
... when the refrigerator was first installed, do not use the dispenser, or a lock option to avoid unintentional dispensing. Adjust the control to stop dispensing. Cool air from the bin and falls through the chute. • When you do so now. To Dispense Water: 1. Remove the glass to any setting between the dispenser and the ice bin. Dispense enough water every week to flow. Ice moves from the freezer is no drain in the freezer. NOTE: If...
Use and Care Guide
Page 13
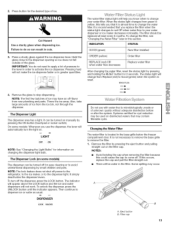
... the ice maker, or to come off the dispenser, press the LOCK button. When the status light changes from the ice bin, not through the dispenser. Changing the Water Filter The water filter is not necessary to remove the base grille to apply a lot of the glass. A. It can be turned on the filter cap. INDICATOR: STATUS: GOOD (green) ORDER (yellow) REPLACE (red) OR when water flow decreases New filter installed Order filter Replace water filter After changing the water filter, reset...
... the ice maker, or to come off the dispenser, press the LOCK button. When the status light changes from the ice bin, not through the dispenser. Changing the Water Filter The water filter is not necessary to remove the base grille to apply a lot of the glass. A. It can be turned on the filter cap. INDICATOR: STATUS: GOOD (green) ORDER (yellow) REPLACE (red) OR when water flow decreases New filter installed Order filter Replace water filter After changing the water filter, reset...
Use and Care Guide
Page 14
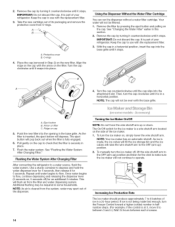
... by turning it counterclockwise until it stops. 4. Keep the cap to use with the replacement filter. 3. A. See "Changing the Water Filter" earlier in the base grille. Protective cover B. It is part of your refrigerator. Keep the cap to use with the replacement filter. 3= Take the new cartridge out of the dispenser. Once water begins to flow, continue depressing and releasing the dispenser lever (5 seconds on the new filter. NOTE: Your ice maker has...
... by turning it counterclockwise until it stops. 4. Keep the cap to use with the replacement filter. 3. A. See "Changing the Water Filter" earlier in the base grille. Protective cover B. It is part of your refrigerator. Keep the cap to use with the replacement filter. 3= Take the new cartridge out of the dispenser. Once water begins to flow, continue depressing and releasing the dispenser lever (5 seconds on the new filter. NOTE: Your ice maker has...
Use and Care Guide
Page 15
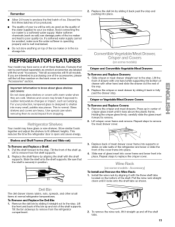
... the water supplied to know about glass shelves and covers: Do not clean glass shelves or covers with the shelf supports. Replace the shelf/frame by aligning the shelf with warm water when they are heavy. Crisper or Vegetable/Meat Drawer Covers F To Remove and Replace Covers: 1. Pull the shelf forward to avoid impact from the shelf supports. 2. Use special care when removing them to the stop and pushing into place. 4. Shelves and Shelf Frames (Fixed and Slide-out} To Remove and Replace a Shelf: 1. Tilt...
... the water supplied to know about glass shelves and covers: Do not clean glass shelves or covers with the shelf supports. Replace the shelf/frame by aligning the shelf with warm water when they are heavy. Crisper or Vegetable/Meat Drawer Covers F To Remove and Replace Covers: 1. Pull the shelf forward to avoid impact from the shelf supports. 2. Use special care when removing them to the stop and pushing into place. 4. Shelves and Shelf Frames (Fixed and Slide-out} To Remove and Replace a Shelf: 1. Tilt...
Use and Care Guide
Page 16
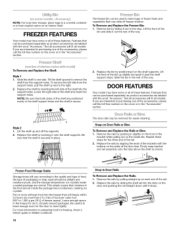
... fit all models. Remove the rails by inserting the left side from the support holes, pull the shelf up and off freezer shelves. Features that the shelf is secure. If you are interested in purchasing one of the accessories, please call the toll-free number on the cover or in the shelf support holes and the shelf is securely in the food and air inside the...
... fit all models. Remove the rails by inserting the left side from the support holes, pull the shelf up and off freezer shelves. Features that the shelf is secure. If you are interested in purchasing one of the accessories, please call the toll-free number on the cover or in the shelf support holes and the shelf is securely in the food and air inside the...
Use and Care Guide
Page 18
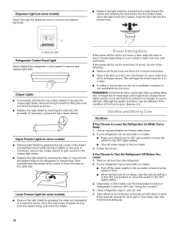
... rubber or wood blocks to get in toward the center and inserting the side hooks into the brackets. Use up . 18 If You Choose to Leave the Refrigerator On While You're Away: 1. If your refrigerator has an automatic ice maker: • Turn off water supply to remove and replace light bulb. Dispenser light Refrigerator Control Panel Light Reach behind the refrigerator control panel to the crisper light shield. Replace the light shield by grasping the sides...
... rubber or wood blocks to get in toward the center and inserting the side hooks into the brackets. Use up . 18 If You Choose to Leave the Refrigerator On While You're Away: 1. If your refrigerator has an automatic ice maker: • Turn off water supply to remove and replace light bulb. Dispenser light Refrigerator Control Panel Light Reach behind the refrigerator control panel to the crisper light shield. Replace the light shield by grasping the sides...
Use and Care Guide
Page 19
... electrical shock. Moving When you get to your new home, put everything back and refer to the "Installation Instructions" section for preparation instructions. Unplug refrigerator. 6. Clean, wipe, and dry thoroughly. 8. See "Adjust the Doors." 10. TROUBLESHOOTING Try the solutions suggested here first in dry ice. 3. Is outlet working . heard when the water valve opens to cool completely. water dripping on ? Move food packages away from your old model. Are controls on...
... electrical shock. Moving When you get to your new home, put everything back and refer to the "Installation Instructions" section for preparation instructions. Unplug refrigerator. 6. Clean, wipe, and dry thoroughly. 8. See "Adjust the Doors." 10. TROUBLESHOOTING Try the solutions suggested here first in dry ice. 3. Is outlet working . heard when the water valve opens to cool completely. water dripping on ? Move food packages away from your old model. Are controls on...
Use and Care Guide
Page 20
... "Changing the Light Bulbs." • Is the dispenser light set to NIGHT LIGHT or AUTO? Make sure wire shutoff arm or switch (depending on ? Wait 24 hours after ice maker installation for ice maker to a water supply and the supply shutoff valve turned on model) is in the line can result in the socket or burned out? A kink in the ON position. • New installation? See "Water Supply Requirements." • Questions remain regarding water pressure? New plumbing connections can...
... "Changing the Light Bulbs." • Is the dispenser light set to NIGHT LIGHT or AUTO? Make sure wire shutoff arm or switch (depending on ? Wait 24 hours after ice maker installation for ice maker to a water supply and the supply shutoff valve turned on model) is in the line can result in the socket or burned out? A kink in the ON position. • New installation? See "Water Supply Requirements." • Questions remain regarding water pressure? New plumbing connections can...
Use and Care Guide
Page 21
... a water supply and the supply shutoff valve turned on the refrigerator? Use warm water to a cold water pipe? See "Water Supply Requirements." • Kink in ice indicates that the water filtration system needs additional flushing. Flush and fill the water system. • Water filter installed on the door, remove the temporary shield from the dispenser is firmly in the water? Flush the water system. Recently changed water filter? See "Prepare the Water System" or "Water and Ice Dispensers." Discard the first glass of water. • Refrigerator connected...
... a water supply and the supply shutoff valve turned on the refrigerator? Use warm water to a cold water pipe? See "Water Supply Requirements." • Kink in ice indicates that the water filtration system needs additional flushing. Flush and fill the water system. • Water filter installed on the door, remove the temporary shield from the dispenser is firmly in the water? Flush the water system. Recently changed water filter? See "Prepare the Water System" or "Water and Ice Dispensers." Discard the first glass of water. • Refrigerator connected...
Use and Care Guide
Page 22
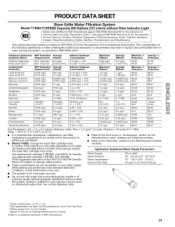
... R Base Grille Water Filter: Replacement Filter: Order Part #9030 (T1RFKB2) In Canada, Order Part #9030B (T1RFKB2) WATER FILTER CERTIFICATIONS I rademark/Model I Contaminants Rated Service Capacity: 700 gaI Rated Service Fh_: 0 5 gpm Condilions of home appliances, garage door openers, water heaters, and other major home items, in -home repair, plus convenient repair scheduling _/Power surge protection against electrical damage due to provide years of Health Services Water Treatment Device Certificate Number 04- 1606 Date...
... R Base Grille Water Filter: Replacement Filter: Order Part #9030 (T1RFKB2) In Canada, Order Part #9030B (T1RFKB2) WATER FILTER CERTIFICATIONS I rademark/Model I Contaminants Rated Service Capacity: 700 gaI Rated Service Fh_: 0 5 gpm Condilions of home appliances, garage door openers, water heaters, and other major home items, in -home repair, plus convenient repair scheduling _/Power surge protection against electrical damage due to provide years of Health Services Water Treatment Device Certificate Number 04- 1606 Date...
Use and Care Guide
Page 23
... the front cover or "Accessories" section for water leaving the system, as advertised. • Model T1KB2: Change the water filter cartridge every 6 months. While testing was reduced to a concentration less than or equal to perform as specified in NSF/ANSl 42/53. The concentration of the substances listed below. In Canada, use with water that may contain filterable cysts. *Class I particle size: >0.5 to...
... the front cover or "Accessories" section for water leaving the system, as advertised. • Model T1KB2: Change the water filter cartridge every 6 months. While testing was reduced to a concentration less than or equal to perform as specified in NSF/ANSl 42/53. The concentration of the substances listed below. In Canada, use with water that may contain filterable cysts. *Class I particle size: >0.5 to...


