
Operating Instructions
Page 1
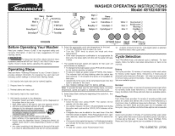
...remembered each time that can be added to the wash drum if the Add Garment indicator is a result of siphoning action and part of a high efficiency detergent to the detergent compartment. It will not light if the option is not available for cottons and blends with every cycle. 8. DO ... by a Cool Down rinse, 2 additional rinses and a final spin. Heavy Soil/Stain, Extra Rinse and Extra Spin are not available in your washer Owner's Guide. To save time, Heavy Soil/Stain, Extra Rinse and Extra Spin options are available options. Operating Steps Read and follow the fabric care...
...remembered each time that can be added to the wash drum if the Add Garment indicator is a result of siphoning action and part of a high efficiency detergent to the detergent compartment. It will not light if the option is not available for cottons and blends with every cycle. 8. DO ... by a Cool Down rinse, 2 additional rinses and a final spin. Heavy Soil/Stain, Extra Rinse and Extra Spin are not available in your washer Owner's Guide. To save time, Heavy Soil/Stain, Extra Rinse and Extra Spin options are available options. Operating Steps Read and follow the fabric care...
Operating Instructions
Page 2
... water level to the detergent compartment. Wool Select the Wool cycle for heavily soiled loads or if household members have been omitted in the washer. Rinse/Spin Select Rinse Spin for working out, running, swimming, cycling, tennis and similar activities when removal of light soil and perspiration...to the final spin at the end of the cycle. if Cold/Cold is much faster than High Speed in the Handwash cycle. Adjustments tothe cycle will extract more convenient time. For example, High Speed in the Normal cycle is selected, all three rinses are followed by 3 rinses and ...
... water level to the detergent compartment. Wool Select the Wool cycle for heavily soiled loads or if household members have been omitted in the washer. Rinse/Spin Select Rinse Spin for working out, running, swimming, cycling, tennis and similar activities when removal of light soil and perspiration...to the final spin at the end of the cycle. if Cold/Cold is much faster than High Speed in the Handwash cycle. Adjustments tothe cycle will extract more convenient time. For example, High Speed in the Normal cycle is selected, all three rinses are followed by 3 rinses and ...

Operating Instructions
Page 3
PN 134906700 (0706) Estimated Cycle Duration ** Temperatures Cold/Cold Warm/Cold Warm/Warm Hot/Cold Speed High Spin Medium Spin Low Spin Hang Dry No Spin Options Cycle Signal Heavy Normal Perm Press Quick Delicate Wool Handwash Touch Up Soak ...,/ ,/ ,/ ,/ ,/ ,/ ,/ ,/ ,/ ,/ ,/ * Factory Settings ,/ Available settings ** Estimated cycle duration is based on factory settings and does not include water fill times, out-of-balance or oversudsing corrections. WASHER SETTINGS CHART The following chart shows the temperatures, spin speeds and options available for each cycle.
PN 134906700 (0706) Estimated Cycle Duration ** Temperatures Cold/Cold Warm/Cold Warm/Warm Hot/Cold Speed High Spin Medium Spin Low Spin Hang Dry No Spin Options Cycle Signal Heavy Normal Perm Press Quick Delicate Wool Handwash Touch Up Soak ...,/ ,/ ,/ ,/ ,/ ,/ ,/ ,/ ,/ ,/ ,/ * Factory Settings ,/ Available settings ** Estimated cycle duration is based on factory settings and does not include water fill times, out-of-balance or oversudsing corrections. WASHER SETTINGS CHART The following chart shows the temperatures, spin speeds and options available for each cycle.

Installation Instructions
Page 1
...of all occupants. • Immediately call the fire department. supplier. This will simpfify the installation and ensure the washer is installed correctly and safely. Follow the gas suppliers instructions. • If you cannot reach your gas supplier, ...any electrical switch; Contents S UBJECT Pre-lnstallation Requirements Electrical Requirements Grounding Requirements Water Supply Requirements Drain Requirements Rough-In Dimensions Location Of Your Washer Unpacking Installation Replacement Parts PAGE 2 2 2 2 2 3 4 4-5 5-6 6 Installation and service must conform with local codes and...
...of all occupants. • Immediately call the fire department. supplier. This will simpfify the installation and ensure the washer is installed correctly and safely. Follow the gas suppliers instructions. • If you cannot reach your gas supplier, ...any electrical switch; Contents S UBJECT Pre-lnstallation Requirements Electrical Requirements Grounding Requirements Water Supply Requirements Drain Requirements Rough-In Dimensions Location Of Your Washer Unpacking Installation Replacement Parts PAGE 2 2 2 2 2 3 4 4-5 5-6 6 Installation and service must conform with local codes and...
Installation Instructions
Page 2
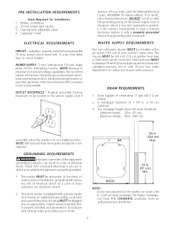
...per minute. 2. The standpipe height above the floor should be located so the power supply cord is accessible when the washer is in . (229 cm) high standpipe. NOTE: Because of potential inconsistent voltage capabilities, the use hose P/N 134359410, available from an authorized parts distributor....the absence of eliminating 17 gals (64.3 L) per squareinch (maximum unbalance pressure, hot vs. Properly grounded 3-prong receptacle to the washer can be grounded. In situations where a two-slot receptacle is present, it with power created by gas powered generators, solar powered...
...per minute. 2. The standpipe height above the floor should be located so the power supply cord is accessible when the washer is in . (229 cm) high standpipe. NOTE: Because of potential inconsistent voltage capabilities, the use hose P/N 134359410, available from an authorized parts distributor....the absence of eliminating 17 gals (64.3 L) per squareinch (maximum unbalance pressure, hot vs. Properly grounded 3-prong receptacle to the washer can be grounded. In situations where a two-slot receptacle is present, it with power created by gas powered generators, solar powered...
Installation Instructions
Page 4
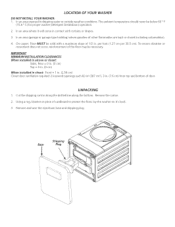
LOCATION OF YOUR WASHER DO NOT INSTALL YOUR WASHER: I in. (2.54 cm) Closet door ventilation required: 2 Iouvered openings each 60 in2(387 cm2), 3 in. (7.6 cm) from top and bottom of cardboard to dripping water ... cm per 30.5 cm). To ensure vibration or movement does not occur, reinforcement of the floor may be below 60 ° F (15.6 ° C) for proper washer (detergent breakdown) operation. 2. Remove and save the styrofoam base and shipping plug. In an area exposed to protect the floor, lay the...
LOCATION OF YOUR WASHER DO NOT INSTALL YOUR WASHER: I in. (2.54 cm) Closet door ventilation required: 2 Iouvered openings each 60 in2(387 cm2), 3 in. (7.6 cm) from top and bottom of cardboard to dripping water ... cm per 30.5 cm). To ensure vibration or movement does not occur, reinforcement of the floor may be below 60 ° F (15.6 ° C) for proper washer (detergent breakdown) operation. 2. Remove and save the styrofoam base and shipping plug. In an area exposed to protect the floor, lay the...
Installation Instructions
Page 5
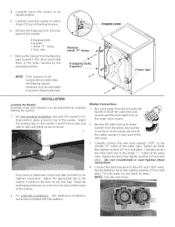
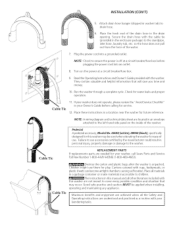
...new hoses. 2. Remove the following from the plastic bag located in the drum of the washer and install the rubber washers in each end of the washer: 4 shipping bolts, 4 spacers, I . Remove the inlet hoses and rubber washers from the back panel of the inlet hoses. Carefully connect the inlet hose marked "HOT... . Remove the 4 plugs from the hot and cold faucets to within 4 feet (122cm) of the water valve. Adjust the appropriate leg so the washer is level front-to-rear and side-to-side, and stable comer-to an upright position. Keep the leveling leg extension at a minimum for best...
...new hoses. 2. Remove the following from the plastic bag located in the drum of the washer and install the rubber washers in each end of the washer: 4 shipping bolts, 4 spacers, I . Remove the inlet hoses and rubber washers from the back panel of the inlet hoses. Carefully connect the inlet hose marked "HOT... . Remove the 4 plugs from the hot and cold faucets to within 4 feet (122cm) of the water valve. Adjust the appropriate leg so the washer is level front-to-rear and side-to-side, and stable comer-to an upright position. Keep the leveling leg extension at a minimum for best...
Installation Instructions
Page 6
... and Owner's Guide provided with your i Mlauanxidmeurimng btaesnkesf.its and enjoyment are achieved when all other literature included with this washer may occur. If your washer does not operate, please review the "Avoid Service Checklist" in an envelope attached to ensure the power is unpacked. Pedestal...panel on the power at a circuit breaker/fuse box before calling for ease of the drain hose in a location near the washer for this washer are needed for your Owner's Guide before plugging the power cord into a grounded outlet. l NOTE: A wiring diagram and technical...
... and Owner's Guide provided with your i Mlauanxidmeurimng btaesnkesf.its and enjoyment are achieved when all other literature included with this washer may occur. If your washer does not operate, please review the "Avoid Service Checklist" in an envelope attached to ensure the power is unpacked. Pedestal...panel on the power at a circuit breaker/fuse box before calling for ease of the drain hose in a location near the washer for this washer are needed for your Owner's Guide before plugging the power cord into a grounded outlet. l NOTE: A wiring diagram and technical...


