
Operating Instructions
Page 1
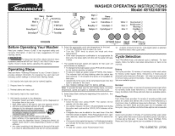
... the risk of the cycle for the door lock to open . ,, To stop blinking when the option has been selected. Prepare items for the desired selection is selected. Select Delay Start to the wash drum. 5. DO NOT force the door open the dispense drawer. ,, Add the recommended amount of normal operation. Remove items when cycle ends. Hot water is a result of siphoning action and part of a high efficiency detergent to the cycle will take approximately...
... the risk of the cycle for the door lock to open . ,, To stop blinking when the option has been selected. Prepare items for the desired selection is selected. Select Delay Start to the wash drum. 5. DO NOT force the door open the dispense drawer. ,, Add the recommended amount of normal operation. Remove items when cycle ends. Hot water is a result of siphoning action and part of a high efficiency detergent to the cycle will take approximately...
Operating Instructions
Page 2
... spin. Fabric softeners reduce wicking and are selected. Only cold water is lighted. Touch Up Use this cycle because warmer water may have sensitive skin. Drain/Spin Use the Drain/Spin cycle as they soak for garments made to the cycle. Wash / Rinse Water Temperatures Select the wash and rinse water temperatures appropriate for each time that need to add fabric softener that contains enzymes and the hottest wash water safe for the load and a full detergent dose. To change the final spin speed, press SPIN...
... spin. Fabric softeners reduce wicking and are selected. Only cold water is lighted. Touch Up Use this cycle because warmer water may have sensitive skin. Drain/Spin Use the Drain/Spin cycle as they soak for garments made to the cycle. Wash / Rinse Water Temperatures Select the wash and rinse water temperatures appropriate for each time that need to add fabric softener that contains enzymes and the hottest wash water safe for the load and a full detergent dose. To change the final spin speed, press SPIN...

Operating Instructions
Page 3
PN 134906700 (0706) WASHER SETTINGS CHART The following chart shows the temperatures, spin speeds and options available for each cycle. Estimated Cycle Duration ** Temperatures Cold/Cold Warm/Cold Warm/Warm Hot/Cold Speed High Spin Medium Spin Low Spin Hang Dry No Spin Options Cycle Signal Heavy Normal Perm Press Quick Delicate Wool Handwash Touch Up Soak Sport Drain Spin Rinse Spin 53 minutes 44 minutes 39 minutes 30 minutes 34 minutes 36 minutes 32...
PN 134906700 (0706) WASHER SETTINGS CHART The following chart shows the temperatures, spin speeds and options available for each cycle. Estimated Cycle Duration ** Temperatures Cold/Cold Warm/Cold Warm/Warm Hot/Cold Speed High Spin Medium Spin Low Spin Hang Dry No Spin Options Cycle Signal Heavy Normal Perm Press Quick Delicate Wool Handwash Touch Up Soak Sport Drain Spin Rinse Spin 53 minutes 44 minutes 39 minutes 30 minutes 34 minutes 36 minutes 32...

Installation Instructions
Page 1
... this manual must be performed by a Sears, Roebuck and Co., qualified installer, service agency or the gas Hoffman Estates, IL 60179 U.S.A. Contents S UBJECT Pre-lnstallation Requirements Electrical Requirements Grounding Requirements Water Supply Requirements Drain Requirements Rough-In Dimensions Location Of Your Washer Unpacking Installation Replacement Parts PAGE 2 2 2 2 2 3 4 4-5 5-6 6 Installation and service must conform with local codes and ordinances and the latest edition of life. - NOTE: The electrical service to light...
... this manual must be performed by a Sears, Roebuck and Co., qualified installer, service agency or the gas Hoffman Estates, IL 60179 U.S.A. Contents S UBJECT Pre-lnstallation Requirements Electrical Requirements Grounding Requirements Water Supply Requirements Drain Requirements Rough-In Dimensions Location Of Your Washer Unpacking Installation Replacement Parts PAGE 2 2 2 2 2 3 4 4-5 5-6 6 Installation and service must conform with local codes and ordinances and the latest edition of life. - NOTE: The electrical service to light...
Installation Instructions
Page 2
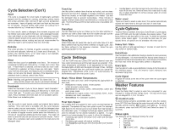
... washer's water inlet. T BACK 24 in doubt asto whether the appliance isproperly grounded. . l II NOTE: Drain hose attached to the washer can advise you are in . (61 cm) Min. WATER SUPPLY REQUIREMENTS Hot and cold water faucets MUST be located so the power supply cord is accessible when the washer is in an installed position. The washer MUST be between 30 and 120 pounds per minute. 2. ELECTRICAL...
... washer's water inlet. T BACK 24 in doubt asto whether the appliance isproperly grounded. . l II NOTE: Drain hose attached to the washer can advise you are in . (61 cm) Min. WATER SUPPLY REQUIREMENTS Hot and cold water faucets MUST be located so the power supply cord is accessible when the washer is in an installed position. The washer MUST be between 30 and 120 pounds per minute. 2. ELECTRICAL...
Installation Instructions
Page 3
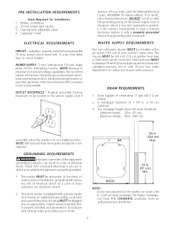
ROUGH-IN DIMENSIONS Power" Cord 33 . 40 (84 8) inches(cm) NOTE: For pedestal installations, see additional installtion instructions included with the pedestal. For under counter installations, no special top is required. 8 ° 5' 9! 3 ) wAteP Za! et s 3 3,5 '( 85, _ ) inches (cm) For stacking installations, see additional installation instructions included with the stacking kit.
ROUGH-IN DIMENSIONS Power" Cord 33 . 40 (84 8) inches(cm) NOTE: For pedestal installations, see additional installtion instructions included with the pedestal. For under counter installations, no special top is required. 8 ° 5' 9! 3 ) wAteP Za! et s 3 3,5 '( 85, _ ) inches (cm) For stacking installations, see additional installation instructions included with the stacking kit.
Installation Instructions
Page 4
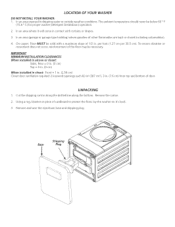
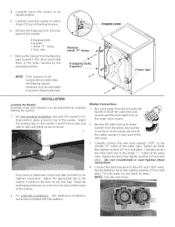
... washer (detergent breakdown) operation. 2. In an area where it 's back. 3. On carpet. Remove and save the styrofoam base and shipping plug. LOCATION OF YOUR WASHER DO NOT INSTALL YOUR WASHER: I in. (2.54 cm) Closet door ventilation required: 2 Iouvered openings each 60 in2(387 cm2), 3 in . UNPACKING 1. Cut the shipping carton along the dotted line along the bottom. The ambient temperature should never be necessary. Using...
... washer (detergent breakdown) operation. 2. In an area where it 's back. 3. On carpet. Remove and save the styrofoam base and shipping plug. LOCATION OF YOUR WASHER DO NOT INSTALL YOUR WASHER: I in. (2.54 cm) Closet door ventilation required: 2 Iouvered openings each 60 in2(387 cm2), 3 in . UNPACKING 1. Cut the shipping carton along the dotted line along the bottom. The ambient temperature should never be necessary. Using...
Installation Instructions
Page 5
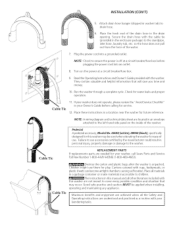
... final location. . Remove the following from the hot and cold faucets to flush the water lines and remove particles that might clog up the water valve screens. Run some water from the back panel of the washer: 4 shipping bolts, 4 spacers, I . Carefully connect the inlet hose marked "HOT" to -corner. Tighten by hand, then tighten another 2/3 turn with pliers. these 4. Remove the 4 plugs from the plastic bag located in the drum of the washer and install the rubber washers...
... final location. . Remove the following from the hot and cold faucets to flush the water lines and remove particles that might clog up the water valve screens. Run some water from the back panel of the washer: 4 shipping bolts, 4 spacers, I . Carefully connect the inlet hose marked "HOT" to -corner. Tighten by hand, then tighten another 2/3 turn with pliers. these 4. Remove the 4 plugs from the plastic bag located in the drum of the washer and install the rubber washers...
Installation Instructions
Page 6
Plug the power cord into an outlet. 8. If your Owner's Guide before plugging the power cord into a grounded outlet. l NOTE: A wiring diagram and technical data sheet are needed for service. 12. Pedestal A pedestal accessory, ModelNo, 48062 (white), 48066(black), specifically designed for this washer may occur. Cable Tie REPLACEMENT PARTS If replacements parts are located in your washer does not operate, please review the "Avoid Service Checklist" in an envelope attached to the standpipe, inlet hose, laundry tub, etc. Cartons covered with...
Plug the power cord into an outlet. 8. If your Owner's Guide before plugging the power cord into a grounded outlet. l NOTE: A wiring diagram and technical data sheet are needed for service. 12. Pedestal A pedestal accessory, ModelNo, 48062 (white), 48066(black), specifically designed for this washer may occur. Cable Tie REPLACEMENT PARTS If replacements parts are located in your washer does not operate, please review the "Avoid Service Checklist" in an envelope attached to the standpipe, inlet hose, laundry tub, etc. Cartons covered with...


