Use and Care Guide
Page 2
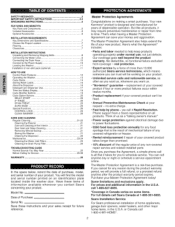
... Installation of non-skid pads (optional 11 HOW TO USE Control Panel Features 12 Operating the Washer 13 Cycle Guide 14 Sorting Wash Loads t5 About the Dispenser t6 Detergent and Dispenser Use 17 Time and Status Display 18 Cycle Modifier Buttons t9 Cycle ...Have these instructions and your covered product can call 1-800-4-MY-HOM E®. we will find the model and serial number printed on making a smart purchase, Your new Kenmore ®product is a risk-free purchase. If you want us . • "No-lemon" guarantee - Date of more product failures...
... Installation of non-skid pads (optional 11 HOW TO USE Control Panel Features 12 Operating the Washer 13 Cycle Guide 14 Sorting Wash Loads t5 About the Dispenser t6 Detergent and Dispenser Use 17 Time and Status Display 18 Cycle Modifier Buttons t9 Cycle ...Have these instructions and your covered product can call 1-800-4-MY-HOM E®. we will find the model and serial number printed on making a smart purchase, Your new Kenmore ®product is a risk-free purchase. If you want us . • "No-lemon" guarantee - Date of more product failures...
Use and Care Guide
Page 4
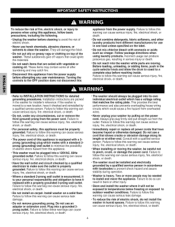
...damage. • To reduce the risk of electric shock, do so can result in the washer for use a cord that matches the rating plate. If the washer is moved to make sure the outlet is heavy. Failure to follow these warnings can cause serious leak damage. •...drum to coast to have become frayed or otherwise damaged. Failure to prevent shock hazard and assure stability during operation. • Washer is properly grounded. Before loading, unloading, or adding items, push in accordance with Iocalcodes to follow this warning can cause serious injury, fire, electrical shock,...
...damage. • To reduce the risk of electric shock, do so can result in the washer for use a cord that matches the rating plate. If the washer is moved to make sure the outlet is heavy. Failure to follow these warnings can cause serious leak damage. •...drum to coast to have become frayed or otherwise damaged. Failure to prevent shock hazard and assure stability during operation. • Washer is properly grounded. Before loading, unloading, or adding items, push in accordance with Iocalcodes to follow this warning can cause serious injury, fire, electrical shock,...
Use and Care Guide
Page 7
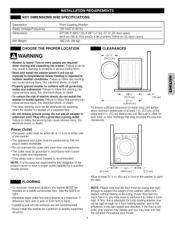
...Description Rated Voltage/Frequency Dimensions Net Weight Front-Loading Washer 120 VAC @ 60 Hz. 27" (W) X 293/4'' (D) X 3811/16'' (H), 511/8'' (D, door open) 68.6 cm (W) X 75.6 cm(D) X 98.3 cm(H), 129.8 cm (D, door open the door. • To minimize noise and vibration, the washer MUST be obstructed by a qualified ...• The outlet must be within 60 in it, you may not be exposed to temperatures below freezing or exposed to make it will not be rigid enough for a front loading washer, due to the difference in the spin speed and direction. n nm (2.5 cm) 27. (68.6 cm) 1,, (2.5...
...Description Rated Voltage/Frequency Dimensions Net Weight Front-Loading Washer 120 VAC @ 60 Hz. 27" (W) X 293/4'' (D) X 3811/16'' (H), 511/8'' (D, door open) 68.6 cm (W) X 75.6 cm(D) X 98.3 cm(H), 129.8 cm (D, door open the door. • To minimize noise and vibration, the washer MUST be obstructed by a qualified ...• The outlet must be within 60 in it, you may not be exposed to temperatures below freezing or exposed to make it will not be rigid enough for a front loading washer, due to the difference in the spin speed and direction. n nm (2.5 cm) 27. (68.6 cm) 1,, (2.5...
Use and Care Guide
Page 9
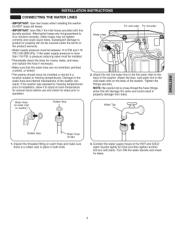
...exposed to freezing temperatures prior to installation, allow it to operation. f- ilii li Water Tap Rubber Seal Water Hose (to the hot water inlet on washer) X Rubber Seal f Water Inlets For cold water For hot water 2. Do NOT reuse old hoses. • IMPORTANT: Use ONLY the inlet ...valve and could cause leaks. CONNECTING THE WATER LINES • IMPORTANT: Use new hoses when installing the washer. Connect the water supply hoses to the cold water inlet on each hose and make sure there is more than 116 PSI, a pressure reducing valve must be installed. • Periodically check...
...exposed to freezing temperatures prior to installation, allow it to operation. f- ilii li Water Tap Rubber Seal Water Hose (to the hot water inlet on washer) X Rubber Seal f Water Inlets For cold water For hot water 2. Do NOT reuse old hoses. • IMPORTANT: Use ONLY the inlet ...valve and could cause leaks. CONNECTING THE WATER LINES • IMPORTANT: Use new hoses when installing the washer. Connect the water supply hoses to the cold water inlet on each hose and make sure there is more than 116 PSI, a pressure reducing valve must be installed. • Periodically check...
Use and Care Guide
Page 10
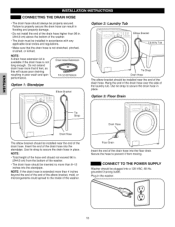
...extended more than 4 inches beyond the end of the end of the elbow bracket, mold, or microorganisms could spread to the inside of the washer. Option 3: Floor Drain f -_ IIII Drain Hose The elbow bracket should be installed near the end of the drain hose. NOTE: •...in place. CONNECTING THE DRAIN HOSE •The drain hose should always be installed in accordance with any applicable local codes and regulations. • Make sure that 6 feet, as this will cause poor draining (_f resulting in poor wash and spin performance. _DPra/iNn H52o1s5eEERx2t0e0n2siKon 1 Option 1" ...
...extended more than 4 inches beyond the end of the end of the elbow bracket, mold, or microorganisms could spread to the inside of the washer. Option 3: Floor Drain f -_ IIII Drain Hose The elbow bracket should be installed near the end of the drain hose. NOTE: •...in place. CONNECTING THE DRAIN HOSE •The drain hose should always be installed in accordance with any applicable local codes and regulations. • Make sure that 6 feet, as this will cause poor draining (_f resulting in poor wash and spin performance. _DPra/iNn H52o1s5eEERx2t0e0n2siKon 1 Option 1" ...
Use and Care Guide
Page 11
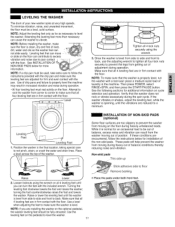
...the leveling feet until the washer is level. Use of adjustment during heavily unbalanced loads. Place a level across the top of your new washerspins at very high speeds. While it is normal for an occasional load to make sure the washer is level from side to side and front to properly level the ...machine may result in firm contact with the drip pan and make sure that all 4 leveling feet until the vibrations are in increased...
...the leveling feet until the washer is level. Use of adjustment during heavily unbalanced loads. Place a level across the top of your new washerspins at very high speeds. While it is normal for an occasional load to make sure the washer is level from side to side and front to properly level the ...machine may result in firm contact with the drip pan and make sure that all 4 leveling feet until the vibrations are in increased...
Use and Care Guide
Page 15
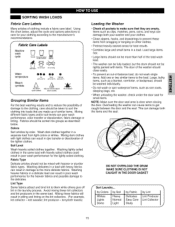
...for best results. • Combine large and small items in a load. lint producer - terrycloth towels) Loading the Washer • Check all pockets to them while others give off lint in poor wash performance for small items. NOTE: Make sure the door seal area is clear when closing the door. Overloading... a fabric care label. Lint Type Some fabrics attract and bind lint to make sure that are empty. Load large items first. • Large items should not be tightly packed with items. The door of the washer should be washed individually. • Do not wash or spin waterproof items,...
...for best results. • Combine large and small items in a load. lint producer - terrycloth towels) Loading the Washer • Check all pockets to them while others give off lint in poor wash performance for small items. NOTE: Make sure the door seal area is clear when closing the door. Overloading... a fabric care label. Lint Type Some fabrics attract and bind lint to make sure that are empty. Load large items first. • Large items should not be tightly packed with items. The door of the washer should be washed individually. • Do not wash or spin waterproof items,...
Use and Care Guide
Page 25
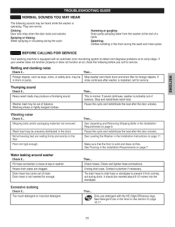
...and/or packaging materials not removed. See Unpacking and Removing Shipping Bolts in drum or pump. Pause the cycle and redistribute the load after the door unlocks. Make sure that the floor is not inserted far enough, Then... House drain pipes are normal. Drain hose has come out of...16-17. 25 This is loose at the end of drain. Then... Vibrating noise Check if... Unclog drain pipe. If sound continues, washer is restarted, call for foreign objects. Excessive sudsing Check if... Check hoses. Splashing: Clothes tumbling in the How to detect and diagnose problems...
...and/or packaging materials not removed. See Unpacking and Removing Shipping Bolts in drum or pump. Pause the cycle and redistribute the load after the door unlocks. Make sure that the floor is not inserted far enough, Then... House drain pipes are normal. Drain hose has come out of...16-17. 25 This is loose at the end of drain. Then... Vibrating noise Check if... Unclog drain pipe. If sound continues, washer is restarted, call for foreign objects. Excessive sudsing Check if... Check hoses. Splashing: Clothes tumbling in the How to detect and diagnose problems...
Use and Care Guide
Page 26
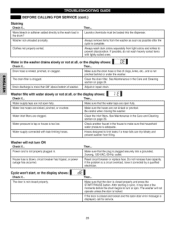
...the START/PAUSE button. Make sure that household water pressure is not pinched behind or under the washer. Water line hoses are clogged. Hoses designed to prevent discoloration. Then... Laundry chemicals must be loaded into a grounded, 3-prong, 120-VAC, 60-Hz. Washer fills with water slowly...or the display shows: Check if... Water in the Care and Cleaning section on page 23. Check another faucet in . Washer will not turn or spin. Make sure that the door is plugged securely into the dispenser. outlet. After starting a cycle, it corrected by a qualified electrician....
...the START/PAUSE button. Make sure that household water pressure is not pinched behind or under the washer. Water line hoses are clogged. Hoses designed to prevent discoloration. Then... Laundry chemicals must be loaded into a grounded, 3-prong, 120-VAC, 60-Hz. Washer fills with water slowly...or the display shows: Check if... Water in the Care and Cleaning section on page 23. Check another faucet in . Washer will not turn or spin. Make sure that the door is plugged securely into the dispenser. outlet. After starting a cycle, it corrected by a qualified electrician....

Use and Care Guide
Page 28
.... The display shows: LnLn-"- Then... If individual heavy articles are loaded (bath mat, bath robe, etc.) and the imbalance is turned ON. Ir-I -:| Then... Check if... Load is not working correctly. The washer has an imbalance detection and correction system. Pause the cycle and redistribute...to help balance the load. The display shows: I The display shows: PF Check if... I Check if... If an imbalance is still detected, the washer wilt stop and the error code wilt be displayed the next time the washer is too great, the washer will make several attempts to ...
.... The display shows: LnLn-"- Then... If individual heavy articles are loaded (bath mat, bath robe, etc.) and the imbalance is turned ON. Ir-I -:| Then... Check if... Load is not working correctly. The washer has an imbalance detection and correction system. Pause the cycle and redistribute...to help balance the load. The display shows: I The display shows: PF Check if... I Check if... If an imbalance is still detected, the washer wilt stop and the error code wilt be displayed the next time the washer is too great, the washer will make several attempts to ...


