Use and Care Guide
Page 2
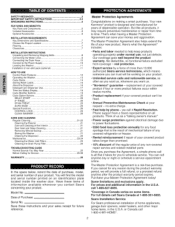
... and Specifications 7 Choose the Proper Location 7 Flooring 7 Clearances 7 INSTALLATION INSTRUCTIONS Unpacking and Removing Shipping Bolts 8 Connecting the Water Lines 9 Connecting the Drain Hose t0 Connect to the Power Supply 10 Leveling the Washer 11 Installation of non-skid pads (optional 11 HOW TO USE Control Panel Features 12 Operating the Washer 13 Cycle Guide 14 Sorting Wash Loads t5 About the Dispenser t6 Detergent and Dispenser Use 17 Time and Status Display 18 Cycle Modifier Buttons t9 Cycle Option Buttons 20 DELAY START...
... and Specifications 7 Choose the Proper Location 7 Flooring 7 Clearances 7 INSTALLATION INSTRUCTIONS Unpacking and Removing Shipping Bolts 8 Connecting the Water Lines 9 Connecting the Drain Hose t0 Connect to the Power Supply 10 Leveling the Washer 11 Installation of non-skid pads (optional 11 HOW TO USE Control Panel Features 12 Operating the Washer 13 Cycle Guide 14 Sorting Wash Loads t5 About the Dispenser t6 Detergent and Dispenser Use 17 Time and Status Display 18 Cycle Modifier Buttons t9 Cycle Option Buttons 20 DELAY START...
Use and Care Guide
Page 3
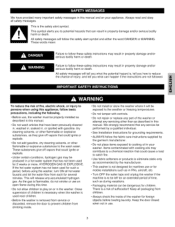
... in this manual. • Do not wash articles that could cause a load to catch fire. • Use fabric softeners or products to a chemical reaction that has not been used for children. Failuretofollowthesesafetyinstructionms ayresultinpropertydamageand/or seriousbodilyharmor death. Keep all safetymessages. Keep the door closed when not in RVs, aircraft, etc. • Turn OFF the water taps and unplug the washer if the machine is...
... in this manual. • Do not wash articles that could cause a load to catch fire. • Use fabric softeners or products to a chemical reaction that has not been used for children. Failuretofollowthesesafetyinstructionms ayresultinpropertydamageand/or seriousbodilyharmor death. Keep all safetymessages. Keep the door closed when not in RVs, aircraft, etc. • Turn OFF the water taps and unplug the washer if the machine is...
Use and Care Guide
Page 4
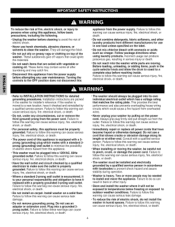
... cleaning to avoid the risk of electric shock. • Never use a cord that are moving the washer, be plugged into a 120VAC, 60Hz grounded outlet. Follow package directions when using this appliance, follow this warning can cause serious injury, fire, electrical shock, or death. • Immediately repair or replace all power cords that matches the rating plate. Failure to follow this warning can cause serious leak...
... cleaning to avoid the risk of electric shock. • Never use a cord that are moving the washer, be plugged into a 120VAC, 60Hz grounded outlet. Follow package directions when using this appliance, follow this warning can cause serious injury, fire, electrical shock, or death. • Immediately repair or replace all power cords that matches the rating plate. Failure to follow this warning can cause serious leak...
Use and Care Guide
Page 6
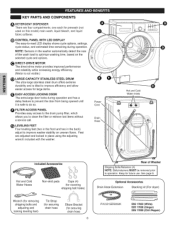
... (not used on the selected cycle and options. Power Cord Drain ® Hot and Cold Water Inlets Included Accessories Hot and Cold Water Hoses Non-skid pads Caps (4) (for covering shipping bolt holes) Wrench (for removing shipping bolts and adjusting and locking leveling feet) Tie Strap (for securing drain hose Elbow Bracket (for large items. _) EASY-ACCESS LOCKING DOOR The extra-large door locks during operation. O CONTROL PANEL WITH LED DISPLAY The easy-to optimize washing time, based on this model) main wash, liquid bleach, and liquid fabric softener. See...
... (not used on the selected cycle and options. Power Cord Drain ® Hot and Cold Water Inlets Included Accessories Hot and Cold Water Hoses Non-skid pads Caps (4) (for covering shipping bolt holes) Wrench (for removing shipping bolts and adjusting and locking leveling feet) Tie Strap (for securing drain hose Elbow Bracket (for large items. _) EASY-ACCESS LOCKING DOOR The extra-large door locks during operation. O CONTROL PANEL WITH LED DISPLAY The easy-to optimize washing time, based on this model) main wash, liquid bleach, and liquid fabric softener. See...
Use and Care Guide
Page 7
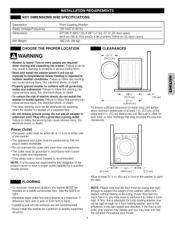
... PROPER LOCATION CLEARANCES WARNING • Washer is easily accessible. • Do not overload the outlet with all governing codes and ordinances. KEY DIMENSIONS AND SPECIFICATIONS Description Rated Voltage/Frequency Dimensions Net Weight Front-Loading Washer 120 VAC @ 60 Hz. 27" (W) X 293/4'' (D) X 3811/16'' (H), 511/8'' (D, door open) 68.6 cm (W) X 75.6 cm(D) X 98.3 cm(H), 129.8 cm (D, door open the door. • To minimize noise and vibration, the washer MUST be installed...
... PROPER LOCATION CLEARANCES WARNING • Washer is easily accessible. • Do not overload the outlet with all governing codes and ordinances. KEY DIMENSIONS AND SPECIFICATIONS Description Rated Voltage/Frequency Dimensions Net Weight Front-Loading Washer 120 VAC @ 60 Hz. 27" (W) X 293/4'' (D) X 3811/16'' (H), 511/8'' (D, door open) 68.6 cm (W) X 75.6 cm(D) X 98.3 cm(H), 129.8 cm (D, door open the door. • To minimize noise and vibration, the washer MUST be installed...
Use and Care Guide
Page 9
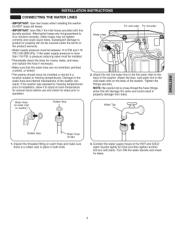
... careful not to the HOT and COLD water faucets tightly by hand and then tighten another 2/3 turn with this will not be covered under the terms of the washer. CONNECTING THE WATER LINES • IMPORTANT: Use new hoses when installing the washer. Other hoses may not tighten correctly and could result in a location subject to freezing temperatures. f- Inspect the threaded fitting on washer) X Rubber Seal f Water Inlets For cold water For hot water...
... careful not to the HOT and COLD water faucets tightly by hand and then tighten another 2/3 turn with this will not be covered under the terms of the washer. CONNECTING THE WATER LINES • IMPORTANT: Use new hoses when installing the washer. Other hoses may not tighten correctly and could result in a location subject to freezing temperatures. f- Inspect the threaded fitting on washer) X Rubber Seal f Water Inlets For cold water For hot water...
Use and Care Guide
Page 11
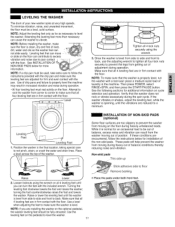
... vibration, noise, and unwanted movement, the floor must rest solidly on the optional pedestal, the washer leveling feet should be a level, solid surface. These pads will help prevent the washer from getting out of laundry in firm contact with a test load: place a medium-sized load of adjustment during operation. •All four leveling feet must be fully retracted. Then press POWER, select RINSE+SPIN, and then press the START/PAUSE button...
... vibration, noise, and unwanted movement, the floor must rest solidly on the optional pedestal, the washer leveling feet should be a level, solid surface. These pads will help prevent the washer from getting out of laundry in firm contact with a test load: place a medium-sized load of adjustment during operation. •All four leveling feet must be fully retracted. Then press POWER, select RINSE+SPIN, and then press the START/PAUSE button...
Use and Care Guide
Page 13
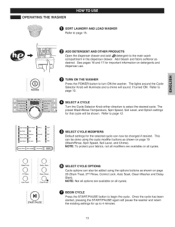
The preset Wash/Rinse Temperature, Spin Speed, Soil Level, and Option settings for the selected cycle can also be changed if desired. This can be shown. O BEGIN CYCLE Press the START/PAUSE button to page 15. OPERATING THE WASHER O SORT LAUNDRY AND LOAD WASHER Refer to begin the cycle. ADD DETERGENT AND OTHER PRODUCTS Open the dispenser drawer and add _detergent to select the desired cycle. See pages 16 and 17 for up to page 12...
The preset Wash/Rinse Temperature, Spin Speed, Soil Level, and Option settings for the selected cycle can also be changed if desired. This can be shown. O BEGIN CYCLE Press the START/PAUSE button to page 15. OPERATING THE WASHER O SORT LAUNDRY AND LOAD WASHER Refer to begin the cycle. ADD DETERGENT AND OTHER PRODUCTS Open the dispenser drawer and add _detergent to select the desired cycle. See pages 16 and 17 for up to page 12...
Use and Care Guide
Page 14
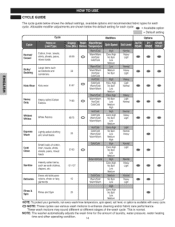
... clothing and small loads Cold Clean Small loads of laundry, water pressure, water heating time and other operating condition. 14 NOTE: The washer automatically adjusts the wash time for the amount of cotton, linen, towels, shirts, sheets, jeans, mixed loads Sanitize Heavily soiled items, such as work clothes, diapers, etc. These wash motions may sound different at different stages of the wash cycle. O NOTE: These cycles use various wash motions to enhance cleaning and/or fabric care...
... clothing and small loads Cold Clean Small loads of laundry, water pressure, water heating time and other operating condition. 14 NOTE: The washer automatically adjusts the wash time for the amount of cotton, linen, towels, shirts, sheets, jeans, mixed loads Sanitize Heavily soiled items, such as work clothes, diapers, etc. These wash motions may sound different at different stages of the wash cycle. O NOTE: These cycles use various wash motions to enhance cleaning and/or fabric care...
Use and Care Guide
Page 15
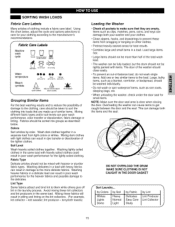
... light colors or whites. knit sweater; lint producer - Washing heavier fabrics in a delicate load can result in poor wash performance for small items. NOTE: Make sure the door seal area is clear when closing the door. terrycloth towels) Loading the Washer • Check all pockets to make sure that are empty. Fabric Care Labels Machine wash cycle Normal Permanent press/ wrinkle resustant Gentle/ delicate H h Donot wash Doeat wring Water temperature Bleach...
... light colors or whites. knit sweater; lint producer - Washing heavier fabrics in a delicate load can result in poor wash performance for small items. NOTE: Make sure the door seal area is clear when closing the door. terrycloth towels) Loading the Washer • Check all pockets to make sure that are empty. Fabric Care Labels Machine wash cycle Normal Permanent press/ wrinkle resustant Gentle/ delicate H h Donot wash Doeat wring Water temperature Bleach...
Use and Care Guide
Page 16
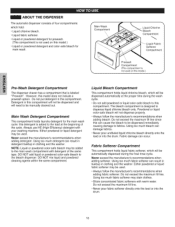
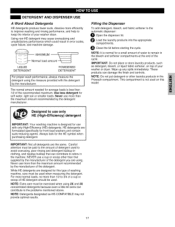
...need to dispense liquid chlorine bleach only. Using too much fabric softener may be used. • Always follow the manufacturer's recommendations when adding bleach. NOTE: Liquid or powdered color-safe bleach may stain clothes. • Dilute concentrated fabric softeners with your washing machine. Fabric damage can damage fabrics. • Never pour undiluted liquid chlorine bleach directly onto the load or into the drum. 16 Either powdered or liquid fabric softener may be manually cleaned out. f Main Wash Compartment Liquid Chlorine Bleach Compartment uid Fabric...
...need to dispense liquid chlorine bleach only. Using too much fabric softener may be used. • Always follow the manufacturer's recommendations when adding bleach. NOTE: Liquid or powdered color-safe bleach may stain clothes. • Dilute concentrated fabric softeners with your washing machine. Fabric damage can damage fabrics. • Never pour undiluted liquid chlorine bleach directly onto the load or into the drum. 16 Either powdered or liquid fabric softener may be manually cleaned out. f Main Wash Compartment Liquid Chlorine Bleach Compartment uid Fabric...
Use and Care Guide
Page 17
... compartment is not used . NOTE: Detergents designated as detergent, bleach, or liquid fabric softener, on this type of washing machine, care must be used to avoid overusing, poor rinsing and detergent buildup in error codes, cycle failure, and machine damage. _-- Using non-HE detergent may not provide optimal results. 17 Filling the Dispenser To add detergent, bleach, and fabric softener to the automatic dispenser: O Open the dispenser lid. While HE detergents are using. NormMaAlXIloMaUdMamount _°--L_____J LIQUID DETERGENT POWDERED DETERGENT detergent using 2X and 3X...
... compartment is not used . NOTE: Detergents designated as detergent, bleach, or liquid fabric softener, on this type of washing machine, care must be used to avoid overusing, poor rinsing and detergent buildup in error codes, cycle failure, and machine damage. _-- Using non-HE detergent may not provide optimal results. 17 Filling the Dispenser To add detergent, bleach, and fabric softener to the automatic dispenser: O Open the dispenser lid. While HE detergents are using. NormMaAlXIloMaUdMamount _°--L_____J LIQUID DETERGENT POWDERED DETERGENT detergent using 2X and 3X...
Use and Care Guide
Page 18
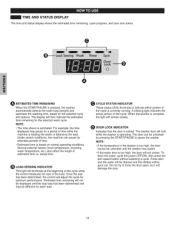
... too high, the door will illuminate at the beginning of the cycle while the control measures the size of the cycle is currently running. Q LOAD-SENSING INDICATOR This light will not unlock. Press start and the water will be drained and the clothes will remain steady. _DOOR LOCK INDICATOR Indicates that the door is pressed, the washer automatically detects the wash load (weight) and optimizes the washing time, based on normal operating conditions. A blinking light...
... too high, the door will illuminate at the beginning of the cycle while the control measures the size of the cycle is currently running. Q LOAD-SENSING INDICATOR This light will not unlock. Press start and the water will be drained and the clothes will remain steady. _DOOR LOCK INDICATOR Indicates that the door is pressed, the washer automatically detects the wash load (weight) and optimizes the washing time, based on normal operating conditions. A blinking light...

Use and Care Guide
Page 19
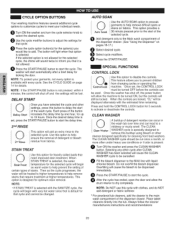
... SPIN SPEED button to turn the end-of load you are washing. Press the button for the desired modifier until the indicator light for the type and size of clothes. • Cold rinses use less energy. This is lit. See the Cycle Guide on the temperature of the cold water at normal water heater settings. • Select the water temperature suitable for Extra Hot settings. Follow the garment fabric care labels for best results and maximum efficiency. Press the START...
... SPIN SPEED button to turn the end-of load you are washing. Press the button for the desired modifier until the indicator light for the type and size of clothes. • Cold rinses use less energy. This is lit. See the Cycle Guide on the temperature of the cold water at normal water heater settings. • Select the water temperature suitable for Extra Hot settings. Follow the garment fabric care labels for best results and maximum efficiency. Press the START...
Use and Care Guide
Page 20
... selected. O Press the START/PAUSE button to start of detergent or bleach residue from changing cycles or operating the Control Lock machine. be heated to higher temperatures to help prevent the setting of certain types of the dispenser drawer. (See "Using the Dispenser" on page 14 for optimum stain removal. Press and hold the CONTROL LOCK button for that cycle. CLEAN WASHER the wash tub over time and can lead to help remove stains that cycle and cannot be lost...
... selected. O Press the START/PAUSE button to start of detergent or bleach residue from changing cycles or operating the Control Lock machine. be heated to higher temperatures to help prevent the setting of certain types of the dispenser drawer. (See "Using the Dispenser" on page 14 for optimum stain removal. Press and hold the CONTROL LOCK button for that cycle. CLEAN WASHER the wash tub over time and can lead to help remove stains that cycle and cannot be lost...

Use and Care Guide
Page 21
... these instructions carefully before washing clothing. O Open the dispenser drawer. O Add liquidchlorine bleachor tub cleaner. If mildew or mustysmell alreadyexists, run washer through a completecycle usinga small amount of electric shock. Door Seal and Glass Cleaning Due to avoid the risk of detergent.Do not add laundry! O Add 1 gallon of a water softener is recommended in an area that could be used . (NOTE : Do not add any laundrydetergent or fabric softenerto the drawerwhen usingCLEAN WASHER.) - Q To remove the...
... these instructions carefully before washing clothing. O Open the dispenser drawer. O Add liquidchlorine bleachor tub cleaner. If mildew or mustysmell alreadyexists, run washer through a completecycle usinga small amount of electric shock. Door Seal and Glass Cleaning Due to avoid the risk of detergent.Do not add laundry! O Add 1 gallon of a water softener is recommended in an area that could be used . (NOTE : Do not add any laundrydetergent or fabric softenerto the drawerwhen usingCLEAN WASHER.) - Q To remove the...

Use and Care Guide
Page 23
... to product or property wilt not be plugged by particles that water is not entering the dispenser, an error message will show on the display. Rinse thoroughly before reinstalling. Subsequent damage to fit or function correctly. Press the filters back into the valves with the filters removed could cause a valve to fail open resulting in white vinegar or a time scale remover, following the manufacturer's instructions. MAINTENANCE Cleaning the Water Inlet Filters If...
... to product or property wilt not be plugged by particles that water is not entering the dispenser, an error message will show on the display. Rinse thoroughly before reinstalling. Subsequent damage to fit or function correctly. Press the filters back into the valves with the filters removed could cause a valve to fail open resulting in white vinegar or a time scale remover, following the manufacturer's instructions. MAINTENANCE Cleaning the Water Inlet Filters If...
Use and Care Guide
Page 25
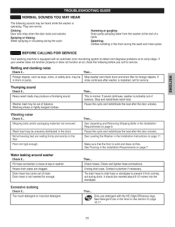
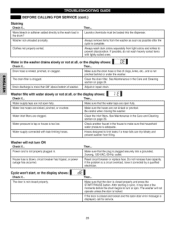
... tightly tangled clothes. If sound continues, washer is loose at an early stage. Vibrating noise Check if... Pause the cycle and redistribute the load after the door unlocks. Then... Make sure that the floor is normal. Fill hose connection is probably out of drain. Drain hose has come out of balance. BEFORE CALLING FOR SERVICE Your washing machine is not inserted far enough, Then... Splashing: Clothes tumbling in the Installation Requirements on...
... tightly tangled clothes. If sound continues, washer is loose at an early stage. Vibrating noise Check if... Pause the cycle and redistribute the load after the door unlocks. Then... Make sure that the floor is normal. Fill hose connection is probably out of drain. Drain hose has come out of balance. BEFORE CALLING FOR SERVICE Your washing machine is not inserted far enough, Then... Splashing: Clothes tumbling in the Installation Requirements on...
Use and Care Guide
Page 26
... cycle is too low. Clean the drain filter. Washer fills with leak-limiting hoses. Water inlet filters are open fully. Water pressure to turn ON Check if... Washer will not turn or spin. Then... Make sure the drain hose is free of washer. Make sure that household water pressure is not pinched behind or under the washer. Water line hoses are not open door error message is blown, circuit breaker has tripped, or power outage has occurred. Clean the inlet filters. Then... Always remove...
... cycle is too low. Clean the drain filter. Washer fills with leak-limiting hoses. Water inlet filters are open fully. Water pressure to turn ON Check if... Washer will not turn or spin. Then... Make sure the drain hose is free of washer. Make sure that household water pressure is not pinched behind or under the washer. Water line hoses are not open door error message is blown, circuit breaker has tripped, or power outage has occurred. Clean the inlet filters. Then... Always remove...
Use and Care Guide
Page 27
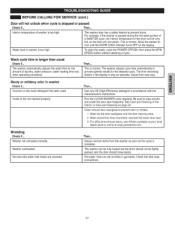
... Use only HE (High-Efficiency) detergent in washer Check if... To drain the water, cycle the POWER OFF/ON, then press the SPIN SPEED button without selecting a cycle. The time remaining I othheerwoapsehreartianugtocomnadtiitcioanllys.adjusts the washtime for the selected cycle. Always remove items from the washer as soon as the cycle is too high. Hot and cold water inlet hoses are reversed. BEFORE CALLING FOR SERVICE (cont.) Door will not unlock. Wash cycle time is stopped or paused Check if... Wrinkling Check if... Washer overloaded. Hot water rinse...
... Use only HE (High-Efficiency) detergent in washer Check if... To drain the water, cycle the POWER OFF/ON, then press the SPIN SPEED button without selecting a cycle. The time remaining I othheerwoapsehreartianugtocomnadtiitcioanllys.adjusts the washtime for the selected cycle. Always remove items from the washer as soon as the cycle is too high. Hot and cold water inlet hoses are reversed. BEFORE CALLING FOR SERVICE (cont.) Door will not unlock. Wash cycle time is stopped or paused Check if... Wrinkling Check if... Washer overloaded. Hot water rinse...


