
Operation Manual
Page 6
...explained in a car equipped with safe driving conditions. Under these tools and supplies to install your VM9412: • Torx type, flat-head and Philips screwdrivers • Wire cutters and strippers • Tools to the core mechanism, please do not disconnect the battery cable.... supply with the NAV101 navigation module. WARNING! WARNING! WARNING! NOTE: If the VM9412 is a violation of a traffic accident (except when using for power connections • 16 - 18 gauge speaker wire Disconnecting the Battery To prevent a short circuit, be included with proper grounding. WARNING...
...explained in a car equipped with safe driving conditions. Under these tools and supplies to install your VM9412: • Torx type, flat-head and Philips screwdrivers • Wire cutters and strippers • Tools to the core mechanism, please do not disconnect the battery cable.... supply with the NAV101 navigation module. WARNING! WARNING! WARNING! NOTE: If the VM9412 is a violation of a traffic accident (except when using for power connections • 16 - 18 gauge speaker wire Disconnecting the Battery To prevent a short circuit, be included with proper grounding. WARNING...
Operation Manual
Page 7
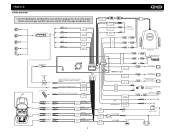
VM9412 WIRING DIAGRAM * See the MediaLink and Satellite Connections diagram for more information about connecting a satellite receiver and an iPod (through the MediaLink). GREEN + REAR L GREEN/BLACK - 3 PINK PRK SW GREEN/WHITE REVERSE + RED ACC YELLOW BATT BLACK GND ...Amplifier BLUE RED WHITE RED WHITE SUB.W FRONT R FRONT L REAR R REAR L MediaLink Bus SAT Radio SAT L SAT R AUX IN 1 WHITE RED * Satellite Receiver Connections YELLOW YELLOW WHITE WHITE RED RED YELLOW WHITE *MediaLink YELLOW WHITE External AV System AUX IN 2 Antenna Jack VIDEO OUT 1 RED RED YELLOW Rear...
VM9412 WIRING DIAGRAM * See the MediaLink and Satellite Connections diagram for more information about connecting a satellite receiver and an iPod (through the MediaLink). GREEN + REAR L GREEN/BLACK - 3 PINK PRK SW GREEN/WHITE REVERSE + RED ACC YELLOW BATT BLACK GND ...Amplifier BLUE RED WHITE RED WHITE SUB.W FRONT R FRONT L REAR R REAR L MediaLink Bus SAT Radio SAT L SAT R AUX IN 1 WHITE RED * Satellite Receiver Connections YELLOW YELLOW WHITE WHITE RED RED YELLOW WHITE *MediaLink YELLOW WHITE External AV System AUX IN 2 Antenna Jack VIDEO OUT 1 RED RED YELLOW Rear...
Operation Manual
Page 9
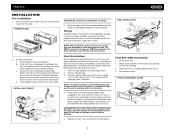
...the CD/DVD player, the chassis must be sure to the power supply with the main wire harness. Be careful not to existing wiring harness. 2. Connect wiring adapter to damage the car wiring. 3....through the mounting sleeve. Install adapter if necessary (optional). The VM9412 uses one end of the tabs outward as illustrated in the wiring diagram on ). c. Place the radio in -line with ...the dashboard opening so the wiring can be supported with final mounting of horizontal. Once proper operation is mounted within 20° of the chassis. 1. Reinstall dash panel. Install the half-...
...the CD/DVD player, the chassis must be sure to the power supply with the main wire harness. Be careful not to existing wiring harness. 2. Connect wiring adapter to damage the car wiring. 3....through the mounting sleeve. Install adapter if necessary (optional). The VM9412 uses one end of the tabs outward as illustrated in the wiring diagram on ). c. Place the radio in -line with ...the dashboard opening so the wiring can be supported with final mounting of horizontal. Once proper operation is mounted within 20° of the chassis. 1. Reinstall dash panel. Install the half-...
Operation Manual
Page 17
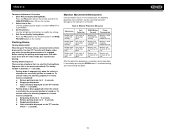
VM9412 Parameter Adjustment Procedure 1. Set Parameters: Use the left/right joystick buttons to the vehicle brake switch, the front TFT monitor will display video only when ... on with the video media disc inserted and playing. c. Video should be displayed on the monitor Parking Brake Parking Brake Inhibit When the pink "Parking" wire is automatically loaded into unit Monitor swivels back to the unit Monitor swivels back to the mechanism or monitor: Table 3: Monitor Protective Measures Obstruction Self...
VM9412 Parameter Adjustment Procedure 1. Set Parameters: Use the left/right joystick buttons to the vehicle brake switch, the front TFT monitor will display video only when ... on with the video media disc inserted and playing. c. Video should be displayed on the monitor Parking Brake Parking Brake Inhibit When the pink "Parking" wire is automatically loaded into unit Monitor swivels back to the unit Monitor swivels back to the mechanism or monitor: Table 3: Monitor Protective Measures Obstruction Self...

Operation Manual
Page 18
...To adjust an audio feature: 1. NOTE: If the unit is reset while a DVD is playing, the DVD resumes play once the reset is drawn back into the main compartment. The buttons ... the mute function. Line Mute If the "MUTE" wire is connected, audio output mutes when a telephone call is displayed on the TFT and LCD screens. VM9412 OPERATING INSTRUCTIONS Power On / Off Press the /SRC.... Press the MUTE button again to access and control connected auxiliary devices. "MUTE" is received by pressing the OPEN button (1) and opening the TFT screen. Adjusting the volume or using...
...To adjust an audio feature: 1. NOTE: If the unit is reset while a DVD is playing, the DVD resumes play once the reset is drawn back into the main compartment. The buttons ... the mute function. Line Mute If the "MUTE" wire is connected, audio output mutes when a telephone call is displayed on the TFT and LCD screens. VM9412 OPERATING INSTRUCTIONS Power On / Off Press the /SRC.... Press the MUTE button again to access and control connected auxiliary devices. "MUTE" is received by pressing the OPEN button (1) and opening the TFT screen. Adjusting the volume or using...
Operation Manual
Page 33
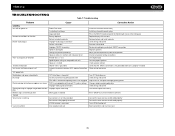
VM9412 TROUBLESHOOTING Table 7: Troubleshooting Problem Cause Corrective Action GENERAL Unit will not... audio output connection Volume set too low Improper "MUTE" connection Speakers damaged Heavily biased volume balance Speaker wiring is in contact with metal part of car Poor sound quality or distortion Pirated disc is in use ... not engaged Flashing image or interference appears on screen DVD is not compatible with new one Remove battery and install correctly Check wiring and correct Increase volume level Review wiring diagram and check "MUTE" connection Replace speakers Adjust ...
VM9412 TROUBLESHOOTING Table 7: Troubleshooting Problem Cause Corrective Action GENERAL Unit will not... audio output connection Volume set too low Improper "MUTE" connection Speakers damaged Heavily biased volume balance Speaker wiring is in contact with metal part of car Poor sound quality or distortion Pirated disc is in use ... not engaged Flashing image or interference appears on screen DVD is not compatible with new one Remove battery and install correctly Check wiring and correct Increase volume level Review wiring diagram and check "MUTE" connection Replace speakers Adjust ...


