Operation Manual
Page 3
... owner's manual clear and easy to use all the features of your new Jensen VM9312HD Mobile Multimedia Receiver for choosing a Jensen product. We hope you 'll learn how to follow. CONTENTS Thank you for maximum enjoyment. Preparation...1 Installation ...2 Controls and Indicators ...6 Remote Control ...8 Using the TFT Monitor ...11 Operating Instructions ...12 Setup Menu...13 Tuner Operation ...15 Satellite Radio Operation ...17 DVD/VCD Video Operation 19 DVD/CD Audio Operation 22 MP3/WMA Operation ...23 iPod Operation ...25 Troubleshooting ...26 Specifications ...29 VM9312HD...
... owner's manual clear and easy to use all the features of your new Jensen VM9312HD Mobile Multimedia Receiver for choosing a Jensen product. We hope you 'll learn how to follow. CONTENTS Thank you for maximum enjoyment. Preparation...1 Installation ...2 Controls and Indicators ...6 Remote Control ...8 Using the TFT Monitor ...11 Operating Instructions ...12 Setup Menu...13 Tuner Operation ...15 Satellite Radio Operation ...17 DVD/VCD Video Operation 19 DVD/CD Audio Operation 22 MP3/WMA Operation ...23 iPod Operation ...25 Troubleshooting ...26 Specifications ...29 VM9312HD...
Operation Manual
Page 5
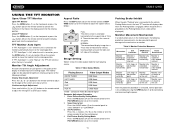
... video display function while driving the vehicle. It's a good idea to keep the chip sets operating at nominal temperatures General • 44-Key Infrared Remote Control • Two Composite Video Outputs for Additional Screens • Two Audio / Video Auxiliary Inputs for rear view video camera) never use irregular discs. U.S. Never install this unit where operation and viewing could interfere with XM and Sirius Tuners (Sold Separately) • Requires XMDJEN100 or JXMC cables for iPod • 3.5mm audio only Input • RCA Audio / Video Input...
... video display function while driving the vehicle. It's a good idea to keep the chip sets operating at nominal temperatures General • 44-Key Infrared Remote Control • Two Composite Video Outputs for Additional Screens • Two Audio / Video Auxiliary Inputs for rear view video camera) never use irregular discs. U.S. Never install this unit where operation and viewing could interfere with XM and Sirius Tuners (Sold Separately) • Requires XMDJEN100 or JXMC cables for iPod • 3.5mm audio only Input • RCA Audio / Video Input...
Operation Manual
Page 6
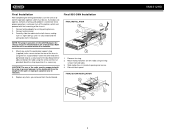
... main wire harness. 2 d. Install support strap to damage the car wiring. 3. INSTALL HALF SLEEVE CAUTION! Wiring Complete wiring as necessary so that the sleeve is "navigation ready." The VM9312HD uses one 15 amp mini-ATM fuse, located in the black filter box in-line with the NAV101 navigation module. Remote Control 8. All installation and operating instructions will need these conditions, use only the supplied screws). HD Radio Module connecting DIN cable 7. Media Link Module 10. Before accessing any camera...
... main wire harness. 2 d. Install support strap to damage the car wiring. 3. INSTALL HALF SLEEVE CAUTION! Wiring Complete wiring as necessary so that the sleeve is "navigation ready." The VM9312HD uses one 15 amp mini-ATM fuse, located in the black filter box in-line with the NAV101 navigation module. Remote Control 8. All installation and operating instructions will need these conditions, use only the supplied screws). HD Radio Module connecting DIN cable 7. Media Link Module 10. Before accessing any camera...
Operation Manual
Page 7
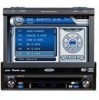
... spring clips lock it is achieved, turn the unit on to confirm operation (ignition switch must be on the rear of the chassis using the hex nut provided. Bend the strap to existing wiring harness. 2. Replace any items you removed from old radio. 3. Remove trim ring. 2. FINAL ISO-DIN INSTALLATION 3 BAND AS/PS PRELOSS/DAXUDIO VM9312 SRC DISP OPEN EJECT MUTE 4 1 2 3 VM9312HD Final Installation After completing the wiring connections, turn off the...
... spring clips lock it is achieved, turn the unit on to confirm operation (ignition switch must be on the rear of the chassis using the hex nut provided. Bend the strap to existing wiring harness. 2. Replace any items you removed from old radio. 3. Remove trim ring. 2. FINAL ISO-DIN INSTALLATION 3 BAND AS/PS PRELOSS/DAXUDIO VM9312 SRC DISP OPEN EJECT MUTE 4 1 2 3 VM9312HD Final Installation After completing the wiring connections, turn off the...
Operation Manual
Page 8
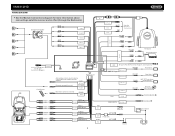
... External AV System Connect to HD Module (See Module Connections Diagram) HD RADIO Harness Cord Auto antenna control (connect to antenna control lead & power supply of antenna amplifier) BLUE ANT.CONT External power amplifier control BLUE/WHITE Car Phone P.CONT Car Mute (leave open if not connected) BROWN MUTE SWC (Requires PAC SWI-PS Interface Adapter, Sold Separately) VIDEO OUT 1 NAV101 Input YELLOW Rear Video 1 YELLOW Rear Video 2 VIDEO OUT 2 MZ7-TFT BLACK MZ7-TFT Touch Screen (Sold Separately) CAMERA YELLOW Rear View Video Camera PINK PRK SW PARKING BRAKE...
... External AV System Connect to HD Module (See Module Connections Diagram) HD RADIO Harness Cord Auto antenna control (connect to antenna control lead & power supply of antenna amplifier) BLUE ANT.CONT External power amplifier control BLUE/WHITE Car Phone P.CONT Car Mute (leave open if not connected) BROWN MUTE SWC (Requires PAC SWI-PS Interface Adapter, Sold Separately) VIDEO OUT 1 NAV101 Input YELLOW Rear Video 1 YELLOW Rear Video 2 VIDEO OUT 2 MZ7-TFT BLACK MZ7-TFT Touch Screen (Sold Separately) CAMERA YELLOW Rear View Video Camera PINK PRK SW PARKING BRAKE...
Operation Manual
Page 10
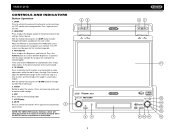
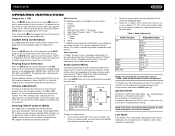
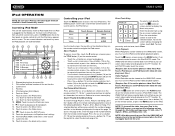
.... PICTURE/AS Press to close the TFT. 2. TILT/BAND Press to adjust the volume. AUDIO Rotate to activate the tilt function. LCD Display 8. WIDE/DISP Press to automatically store strong radio stations in a continuous motion. Press the AUDIO button (5) to display the navigation user interface. Press and hold to move the TFT monitor into viewing position. With the monitor closed , press the DISP button to enter and/ or confirm audio settings. 6. MUTE...
.... PICTURE/AS Press to close the TFT. 2. TILT/BAND Press to adjust the volume. AUDIO Rotate to activate the tilt function. LCD Display 8. WIDE/DISP Press to automatically store strong radio stations in a continuous motion. Press the AUDIO button (5) to display the navigation user interface. Press and hold to move the TFT monitor into viewing position. With the monitor closed , press the DISP button to enter and/ or confirm audio settings. 6. MUTE...
Operation Manual
Page 13
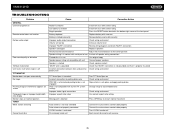
VM9312HD Table 1: Remote Control Functions Button Function Name MENU TITLE MUTE POWER/ AUDIO REPT A-B REPT SRC SUBTITLE DISP PRESET PRESET ANGLE VOL VOL + BAND GOTO ZOOM PIC Ref# DVD VCD TUNER 1 Enters the main menu of picture dis- tle 10 Displays playing information Displays playing information Displays playing information 11 Navigates the preset station list 12 Navigates the preset station list 13 Plays back disc in different Plays back Picture CD with angle for a scene different angle of the Turns on /off 5 Changes the audio language...
VM9312HD Table 1: Remote Control Functions Button Function Name MENU TITLE MUTE POWER/ AUDIO REPT A-B REPT SRC SUBTITLE DISP PRESET PRESET ANGLE VOL VOL + BAND GOTO ZOOM PIC Ref# DVD VCD TUNER 1 Enters the main menu of picture dis- tle 10 Displays playing information Displays playing information Displays playing information 11 Navigates the preset station list 12 Navigates the preset station list 13 Plays back disc in different Plays back Picture CD with angle for a scene different angle of the Turns on /off 5 Changes the audio language...
Operation Manual
Page 15
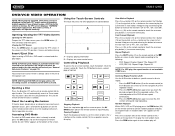
... display. Table 2: Video Output Modes Playing Source Video Output Modes AM/FM TUNER RGB Mode SAT TUNER RGB Mode iPod RGB Mode DVD RGB Mode AUX IN CVBS Mode *CVBS - Select Item to Set: Press the AUDIO button (5) on the control panel to "Manual", the TFT will not close when the key is set to select "BRIGHT" or "CONTRAST". 3. If "TFT Auto Open" is turned off " when the unit is the same at a time. Continuous Angle Adjustment Press and hold the ( ) or ( ) button...
... display. Table 2: Video Output Modes Playing Source Video Output Modes AM/FM TUNER RGB Mode SAT TUNER RGB Mode iPod RGB Mode DVD RGB Mode AUX IN CVBS Mode *CVBS - Select Item to Set: Press the AUDIO button (5) on the control panel to "Manual", the TFT will not close when the key is set to select "BRIGHT" or "CONTRAST". 3. If "TFT Auto Open" is turned off " when the unit is the same at a time. Continuous Angle Adjustment Press and hold the ( ) or ( ) button...
Operation Manual
Page 16
... the audio setup features cancels the mute function. Volume Adjustment To increase or decrease the volume level, turn on the remote control, or use the joystick to highlight the audio feature to be connected to this unit via RCA output or MediaLink. "MUTE" is drawn back into the main compartment. The playing mode is compatible with the PAC adapter for detailed installation information. +14 - 0- Touch the +/- VM9312HD OPERATING INSTRUCTIONS Power On / Off Press the /SRC button (6) on the unit...
... the audio setup features cancels the mute function. Volume Adjustment To increase or decrease the volume level, turn on the remote control, or use the joystick to highlight the audio feature to be connected to this unit via RCA output or MediaLink. "MUTE" is drawn back into the main compartment. The playing mode is compatible with the PAC adapter for detailed installation information. +14 - 0- Touch the +/- VM9312HD OPERATING INSTRUCTIONS Power On / Off Press the /SRC button (6) on the unit...
Operation Manual
Page 17
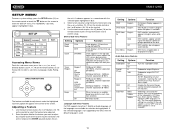
...) on your installation, reversing the subwoofer phase may increase Bass output. VM9312HD SETUP MENU To access system settings, press the SETUP button (31) on the remote control or touch the button on the remote control, or use the joystick to select a sub-menu (Language, Audio, Rating, etc.). General Sub-menu Features Setting Clock Mode Clock Tuner Region Beep Options Function 12Hr Clock displays 12 hour time using the touchscreen or pressing the >> or /|| button (18) on the disc. tion selection. DVD subtitles automatically appear in blue. 3. A submenu appears in...
...) on your installation, reversing the subwoofer phase may increase Bass output. VM9312HD SETUP MENU To access system settings, press the SETUP button (31) on the remote control or touch the button on the remote control, or use the joystick to select a sub-menu (Language, Audio, Rating, etc.). General Sub-menu Features Setting Clock Mode Clock Tuner Region Beep Options Function 12Hr Clock displays 12 hour time using the touchscreen or pressing the >> or /|| button (18) on the disc. tion selection. DVD subtitles automatically appear in blue. 3. A submenu appears in...
Operation Manual
Page 18
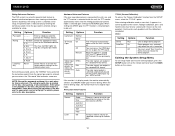
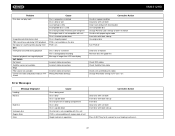
... mode, a crosshair appears in the standard PAL format. Hardware Sub-menu Features If the rear-view video camera is connected, the unit is completed. P.VOL Sub-menu Features Setting Source Level Options Function Radio Disc AUX IN1 AUX IN2 SAT iPod 0-6 Choose a source for each quadrant until it was previously out The color signals are output in a corner quadrant of the disc and the appropriate content will play. TS Cal (Screen Calibration) To access the "Screen Calibration" function from the Aux...
... mode, a crosshair appears in the standard PAL format. Hardware Sub-menu Features If the rear-view video camera is connected, the unit is completed. P.VOL Sub-menu Features Setting Source Level Options Function Radio Disc AUX IN1 AUX IN2 SAT iPod 0-6 Choose a source for each quadrant until it was previously out The color signals are output in a corner quadrant of the disc and the appropriate content will play. TS Cal (Screen Calibration) To access the "Screen Calibration" function from the Aux...
Operation Manual
Page 21
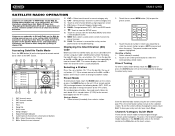
... Channel/Category Guide mode 16. Touch this area to enter current channel into preset memory 20. or CH + buttons on the touch screen to change between SAT1, SAT2 and SAT3 bands 17. : Touch to view the SETUP menu 18. The preset number and station appears highlighted. Direct Tuning To enter a radio station directly, touch the button or press the GOTO button (21) on the front panel or remote control (8) to switch to the SAT source. 18...
... Channel/Category Guide mode 16. Touch this area to enter current channel into preset memory 20. or CH + buttons on the touch screen to change between SAT1, SAT2 and SAT3 bands 17. : Touch to view the SETUP menu 18. The preset number and station appears highlighted. Direct Tuning To enter a radio station directly, touch the button or press the GOTO button (21) on the front panel or remote control (8) to switch to the SAT source. 18...
Operation Manual
Page 23
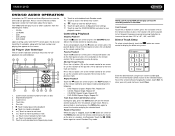
... the ) to DVD mode when a disc is entered and disc play off . Press the RDM button again to cancel the A-B section setting and stop DVD play . A Opening/Closing the TFT Video Screen Opening the TFT Screen To open the TFT video screen, press the OPEN button (1). B A - AUDIO Ejecting a Disc Press the button (21) on the unit or remote control (35) to Tuner mode. The unit will now repeat continuously. • Press the REPT A-B button again to turn random play begins. A-B 1/2 MENU SUBTITLE TITLE...
... the ) to DVD mode when a disc is entered and disc play off . Press the RDM button again to cancel the A-B section setting and stop DVD play . A Opening/Closing the TFT Video Screen Opening the TFT Screen To open the TFT video screen, press the OPEN button (1). B A - AUDIO Ejecting a Disc Press the button (21) on the unit or remote control (35) to Tuner mode. The unit will now repeat continuously. • Press the REPT A-B button again to turn random play begins. A-B 1/2 MENU SUBTITLE TITLE...
Operation Manual
Page 26
... disc play. Current track and total number of tracks on the remote control (18) to increase the rate from the following disc media: • CD-DA • CD-R/RW • DVD • DVD+R/RW • DVD-R/RW Upon inserting a disc with the TFT screen open, the disc and track title (if available), along with the track number and playing time appear on the disc. Disc title 6. : Touch to play music or other audio files...
... disc play. Current track and total number of tracks on the remote control (18) to increase the rate from the following disc media: • CD-DA • CD-R/RW • DVD • DVD+R/RW • DVD-R/RW Upon inserting a disc with the TFT screen open, the disc and track title (if available), along with the track number and playing time appear on the disc. Disc title 6. : Touch to play music or other audio files...
Operation Manual
Page 29
... play music files.) Video Playback While iPod video can select video media to be viewed on the VM9312HD screen, you can be displayed on the TFT monitor. iPod Touch, iPod Classic and iPod Nano with the number of pages and files in one of files on screen, to return to resume normal play music files.) Touch the button on screen or press the AUDIO button (5) on the iPod. The on the screen. ID3 information (Artist/Album) 6. Release to the previous menu. VM9312HD iPod OPERATION...
... play music files.) Video Playback While iPod video can select video media to be viewed on the VM9312HD screen, you can be displayed on the TFT monitor. iPod Touch, iPod Classic and iPod Nano with the number of pages and files in one of files on screen, to return to resume normal play music files.) Touch the button on screen or press the AUDIO button (5) on the iPod. The on the screen. ID3 information (Artist/Album) 6. Release to the previous menu. VM9312HD iPod OPERATION...
Operation Manual
Page 30
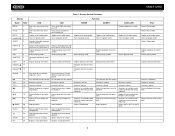
VM9312HD TROUBLESHOOTING Problem GENERAL Unit will not power on Remote control does not function No/low audio output Poor sound quality or distortion Tel-Mute malfunction Unit resets itself when engine is off TFT MONITOR Monitor does not open automatically No image Flashing image or interference appears on screen Prolonged image or improper height/width ratio display Monitor stops at incorrect position TUNER Weak station searching Cannot insert disc Cause Corrective Action Radio Fuse blown Install new fuse with correct rating Car battery fuse blown...
VM9312HD TROUBLESHOOTING Problem GENERAL Unit will not power on Remote control does not function No/low audio output Poor sound quality or distortion Tel-Mute malfunction Unit resets itself when engine is off TFT MONITOR Monitor does not open automatically No image Flashing image or interference appears on screen Prolonged image or improper height/width ratio display Monitor stops at incorrect position TUNER Weak station searching Cannot insert disc Cause Corrective Action Radio Fuse blown Install new fuse with correct rating Car battery fuse blown...
Operation Manual
Page 31
... disc Turn PCB off Clean disc or replace Recreate disc with good files Check RCA cables Check Satellite Data cable Check jLink and MediaLink cables Change iPod video settings to TV Out = On Error Messages Message Displayed Loading No Disc Bad Disc Unknown disc Region Error Error Cause Disc is being read Disc is dirty Disc is upside down Disc not present in loading compartment Disc is dirty Disc is upside down Disc format is not compatible with this unit DVD is not compatible with region code...
... disc Turn PCB off Clean disc or replace Recreate disc with good files Check RCA cables Check Satellite Data cable Check jLink and MediaLink cables Change iPod video settings to TV Out = On Error Messages Message Displayed Loading No Disc Bad Disc Unknown disc Region Error Error Cause Disc is being read Disc is dirty Disc is upside down Disc not present in loading compartment Disc is dirty Disc is upside down Disc format is not compatible with this unit DVD is not compatible with region code...
Operation Manual
Page 33
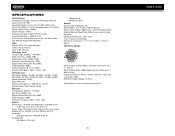
... Display (LCD) active matrix Response Time: 30mSec rise time, 50mSec fall time Resolution: • 336,960 sub pixels, 1440 (W) X 234 (H) Viewing angle: • 65 degrees left or right • 40 degrees up • 65 degrees down General Auxiliary Input impedance: 10k Power Supply: 11 to 16VDC, negative ground Power Antenna (Blue): 500mA max, current limited protection Amplifier Remote (Blue/White): 500mA max, current limited protection Operating Temperature: -20C ~ 65C Fuse...
... Display (LCD) active matrix Response Time: 30mSec rise time, 50mSec fall time Resolution: • 336,960 sub pixels, 1440 (W) X 234 (H) Viewing angle: • 65 degrees left or right • 40 degrees up • 65 degrees down General Auxiliary Input impedance: 10k Power Supply: 11 to 16VDC, negative ground Power Antenna (Blue): 500mA max, current limited protection Amplifier Remote (Blue/White): 500mA max, current limited protection Operating Temperature: -20C ~ 65C Fuse...
Operation Manual
Page 35
... conditions or external natural causes Please review the "Care and Maintenance" section of your product. We recommend using a carrier that should this Warranty, call 1-800-323-4815 for the location of a warranty station serving your Installation and Operation Manual for the Company... Radios/Headunits Audiovox Electronics Corporation ("the Company") is committed to quality and customer service, and are not covered by improper installation, mishandling, misuse, neglect, accident, blown fuse, battery leakage, theft or improper storage • Products whose factory serial number/bar code ...
... conditions or external natural causes Please review the "Care and Maintenance" section of your product. We recommend using a carrier that should this Warranty, call 1-800-323-4815 for the location of a warranty station serving your Installation and Operation Manual for the Company... Radios/Headunits Audiovox Electronics Corporation ("the Company") is committed to quality and customer service, and are not covered by improper installation, mishandling, misuse, neglect, accident, blown fuse, battery leakage, theft or improper storage • Products whose factory serial number/bar code ...
Quick Start Guide
Page 1
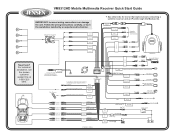
.../WHITE REVERSE + RED ACC ACC YELLOW BATT BATTERY + FUSE (15A) BLACK GND BATTERY Ground YELLOW Rear Video 2 BLACK MZ7-TFT Touch Screen (Sold Separately) YELLOW Rear View Video Camera PARKING BRAKE REVERSE + Ignition Switch Battery Printed in China GREY + FRONT R GREY/BLACK - FRONT L AUX IN 2 RED YELLOW WHITE YELLOW WHITE *MediaLink External AV System RED RED SWC (Requires PAC SWI-PS Interface Adapter, Sold Separately) NAV101 Input VIDEO OUT 1 YELLOW Rear Video 1 Harness Cord Auto antenna control (connect to HD Module (See Module Connections Diagram) Car Phone...
.../WHITE REVERSE + RED ACC ACC YELLOW BATT BATTERY + FUSE (15A) BLACK GND BATTERY Ground YELLOW Rear Video 2 BLACK MZ7-TFT Touch Screen (Sold Separately) YELLOW Rear View Video Camera PARKING BRAKE REVERSE + Ignition Switch Battery Printed in China GREY + FRONT R GREY/BLACK - FRONT L AUX IN 2 RED YELLOW WHITE YELLOW WHITE *MediaLink External AV System RED RED SWC (Requires PAC SWI-PS Interface Adapter, Sold Separately) NAV101 Input VIDEO OUT 1 YELLOW Rear Video 1 Harness Cord Auto antenna control (connect to HD Module (See Module Connections Diagram) Car Phone...


