
Operation Manual
Page 9
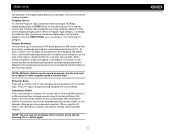
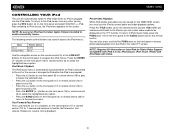
Be sure to control the advanced functions of the remote control becomes short or stops functioning, replace the battery with a new lithium battery. REMOTE SENSOR Replacing the Battery When the range of operation of the VM8013HD. VM8013HD REMOTE CONTROL OPERATION The remote control will allow you to observe the proper polarity, as indicated below. (CR 2025) 1 2 5 The remote control can operate within a distance of the LCD screen. CLEAR RDM BAND Operating Range The remote control sensor (19) is located near the bottom of the front panel, left of 3~5m.
Be sure to control the advanced functions of the remote control becomes short or stops functioning, replace the battery with a new lithium battery. REMOTE SENSOR Replacing the Battery When the range of operation of the VM8013HD. VM8013HD REMOTE CONTROL OPERATION The remote control will allow you to observe the proper polarity, as indicated below. (CR 2025) 1 2 5 The remote control can operate within a distance of the LCD screen. CLEAR RDM BAND Operating Range The remote control sensor (19) is located near the bottom of the front panel, left of 3~5m.
Operation Manual
Page 10
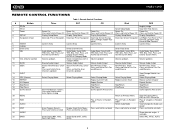
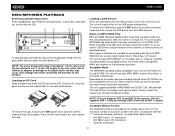
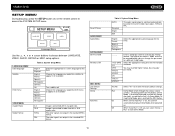
... Direct Track Entry Audio Mode: Select BAS, TRE, BAL, FAD; Press and hold to Power Off Display Setup Menu Down/Up: Screen Navigation; Press and hold for System Menu Volume up /down Audio Mode: Select BAS, TRE, BAL, FAD; Press and hold to... Power Off Display Setup Menu Down/Up: Preset Navigation Confirm Entry CD Power On; VM8013HD REMOTE CONTROL FUNCTIONS # Button 1 ZOOM 2 TITLE 3 Power 4 SETUP 5 Navigation Arrows 6 ENTER 7 CLEAR 8 Direct Entry 9 SEL 10 VOL (Volume Control) 11 MUTE 12 SEEK 13 SUB.T 14 SRC (Source) 15 REPEAT 16 A-B ...
... Direct Track Entry Audio Mode: Select BAS, TRE, BAL, FAD; Press and hold to Power Off Display Setup Menu Down/Up: Screen Navigation; Press and hold for System Menu Volume up /down Audio Mode: Select BAS, TRE, BAL, FAD; Press and hold to... Power Off Display Setup Menu Down/Up: Preset Navigation Confirm Entry CD Power On; VM8013HD REMOTE CONTROL FUNCTIONS # Button 1 ZOOM 2 TITLE 3 Power 4 SETUP 5 Navigation Arrows 6 ENTER 7 CLEAR 8 Direct Entry 9 SEL 10 VOL (Volume Control) 11 MUTE 12 SEEK 13 SUB.T 14 SRC (Source) 15 REPEAT 16 A-B ...
Operation Manual
Page 14
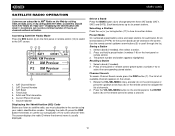
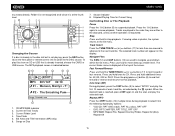
... you must subscribe to the service using your radio's identification number. Customers can subscribe to XM® Radio on the front panel or remote control (14) to switch to the SAT source. 7 13 2 4 SAT SAT1 CH001 CHAN: XM Preview P1 XM Preview P2 XM Preview ...use the |>| or | Customers should have their Radio ID ready (see "Displaying the Identification (ID) Code"). Current Preset Channels 7. VM8013HD SATELLITE RADIO OPERATION Listeners can receive a limited number of free-to-air channels without activation. SAT Band 4. Artist and Title Information 6. SAT Channel Name 2. SAT ...
... you must subscribe to the service using your radio's identification number. Customers can subscribe to XM® Radio on the front panel or remote control (14) to switch to the SAT source. 7 13 2 4 SAT SAT1 CH001 CHAN: XM Preview P1 XM Preview P2 XM Preview ...use the |>| or | Customers should have their Radio ID ready (see "Displaying the Identification (ID) Code"). Current Preset Channels 7. VM8013HD SATELLITE RADIO OPERATION Listeners can receive a limited number of free-to-air channels without activation. SAT Band 4. Artist and Title Information 6. SAT Channel Name 2. SAT ...

Operation Manual
Page 15
... rotary encoder on the control panel or press the up /down arrow keys on the screen. 4. DIRECT CHANNEL: ___ 3. Press the VOL/SEL/MENU button to tune to select a station. VM8013HD Category Search 1. A list of available categories appears on the remote control to the selected station.... Press the VOL/SEL/MENU button on the control panel or the ENTER button (6) on the screen. Turn the rotary encoder again to (0 - 2). ...
... rotary encoder on the control panel or press the up /down arrow keys on the screen. 4. DIRECT CHANNEL: ___ 3. Press the VOL/SEL/MENU button to tune to select a station. VM8013HD Category Search 1. A list of available categories appears on the remote control to the selected station.... Press the VOL/SEL/MENU button on the control panel or the ENTER button (6) on the screen. Turn the rotary encoder again to (0 - 2). ...
Operation Manual
Page 16
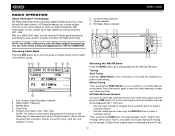
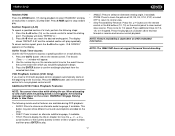
...remote control (14) to switch to eight additional multicast channels: HD1~HD8. Program Information: Artist, Title, Type NOTE: The amount of information displayed when receiving an HD Radio signal is dependent upon what is called multicasting. HD Radio Station Indicator 1 2 SRC BAND iPod Menu DISP CH/ CAT DIM PGM VM8013HD...Technology HD Radio technology allows CD-quality digital broadcasting of your VM8013HD radio, you can receive up to the RADIO source. 6. With multicasting, you will receive HD Radio digital broadcasts automatically when tuned to a station ...
...remote control (14) to switch to eight additional multicast channels: HD1~HD8. Program Information: Artist, Title, Type NOTE: The amount of information displayed when receiving an HD Radio signal is dependent upon what is called multicasting. HD Radio Station Indicator 1 2 SRC BAND iPod Menu DISP CH/ CAT DIM PGM VM8013HD...Technology HD Radio technology allows CD-quality digital broadcasting of your VM8013HD radio, you can receive up to the RADIO source. 6. With multicasting, you will receive HD Radio digital broadcasts automatically when tuned to a station ...
Operation Manual
Page 17
When a Program Type category is selected, the radio will revert to Analog reception. If the digital signal becomes unavailable, the unit will start scanning for stations broadcasting in the selected category. Program type categories are listed, allowing listeners to HD Radio broadcasting, press the DISP button on the control panel (7) or remote control (23). Program Search To view the Program Type categories when listening to find similar programming by genre. Use the TUNE/TRACK >>| or | VM8013HD will illuminate.
When a Program Type category is selected, the radio will revert to Analog reception. If the digital signal becomes unavailable, the unit will start scanning for stations broadcasting in the selected category. Program type categories are listed, allowing listeners to HD Radio broadcasting, press the DISP button on the control panel (7) or remote control (23). Program Search To view the Program Type categories when listening to find similar programming by genre. Use the TUNE/TRACK >>| or | VM8013HD will illuminate.
Operation Manual
Page 18
...by the warranty on which the session has not been closed will read the files on the receiver (or remote control) as damage to another mode and then remove the USB device from files contained on a...to allow more files on the media type and recording method, some CD-R/RWs may occur. Jensen recommends Nero or Roxio Easy CD Creator. When using the buttons on the USB device automatically...., pay attention to prevent malfunction. The unit will read the files on the front of the unit. VM8013HD DISC/MP3/WMA PLAYBACK Inserting and Ejecting a Disc Press the button (23) to SD Cards, USB ...
...by the warranty on which the session has not been closed will read the files on the receiver (or remote control) as damage to another mode and then remove the USB device from files contained on a...to allow more files on the media type and recording method, some CD-R/RWs may occur. Jensen recommends Nero or Roxio Easy CD Creator. When using the buttons on the USB device automatically...., pay attention to prevent malfunction. The unit will read the files on the front of the unit. VM8013HD DISC/MP3/WMA PLAYBACK Inserting and Ejecting a Disc Press the button (23) to SD Cards, USB ...
Operation Manual
Page 20
... press 2/INT again to the DISC source. Current of each track/file, as indicated by the symbol. Songs on the front panel or remote control (14) to switch to end the scan and play the first 10 seconds of Total Tracks 3. Elapsed Playing Time for Current Song...7. Current Folder Level 4. Intro Scan (INT) During playback, press the 2/INT button (9) to end fast forward or reverse and resume normal playback. VM8013HD any tracks directly. The MP3 playback screen is indicated below: 17 3 2 8 4 DISC (ROOT) 01:02 AM MP3 001/141 02:19 01 - Track Select Press the TUNE/TRACK...
... press 2/INT again to the DISC source. Current of each track/file, as indicated by the symbol. Songs on the front panel or remote control (14) to switch to end the scan and play the first 10 seconds of Total Tracks 3. Elapsed Playing Time for Current Song...7. Current Folder Level 4. Intro Scan (INT) During playback, press the 2/INT button (9) to end fast forward or reverse and resume normal playback. VM8013HD any tracks directly. The MP3 playback screen is indicated below: 17 3 2 8 4 DISC (ROOT) 01:02 AM MP3 001/141 02:19 01 - Track Select Press the TUNE/TRACK...
Operation Manual
Page 21
... section repeat, press the A->B button again. The Search (Time --:--:--) window will show different surround sound options encoded on the screen: WARNING !! Press the play all tracks/files in random, shuffled order. The following steps: 1. Press A->B when you would... language, if available. "A-B CANCEL" appears on a track directly. 1. Press the MENU button (20) on the remote control to to turn playback control on the remote control. NOTE: The VM8013HD does not support Surround Sound decoding. NOTE: You cannot view video while driving the car. The display will appear. ...
... section repeat, press the A->B button again. The Search (Time --:--:--) window will show different surround sound options encoded on the screen: WARNING !! Press the play all tracks/files in random, shuffled order. The following steps: 1. Press A->B when you would... language, if available. "A-B CANCEL" appears on a track directly. 1. Press the MENU button (20) on the remote control to to turn playback control on the remote control. NOTE: The VM8013HD does not support Surround Sound decoding. NOTE: You cannot view video while driving the car. The display will appear. ...
Operation Manual
Page 22
...• Press the >>| button on the front panel (17) or remote control (12) to play the next file. • Press the || buttons on the VM8013HD screen, you can select video media to be viewed on the control panel (17) or remote control (12) for 1 second and continue to hold the PGM button on... the front panel (16) or remote control (6) to select the highlighted menu option. To return ...
...• Press the >>| button on the front panel (17) or remote control (12) to play the next file. • Press the || buttons on the VM8013HD screen, you can select video media to be viewed on the control panel (17) or remote control (12) for 1 second and continue to hold the PGM button on... the front panel (16) or remote control (6) to select the highlighted menu option. To return ...
Operation Manual
Page 23
...PG 4 PG13 5 PG-R 6 R 7 NC-17 8 ADULT Enter a 4-digit password to appear in wide view with 4:3 aspect ratio. Demo Mode scrolls through the various source screens, simulating activity on . To stop Demo Mode, press and hold the SRC button. Yes/No Run On Off Select "Yes" to choose between LANGUAGE, VIDEO..."Demo Mode" is discreetly displayed in yellow text (below the clock), to access the SYSTEM SETUP menu. VM8013HD SETUP MENU During disc play, press the SETUP button (4) on the remote control to indicate the unit is in Demo Mode. NTSC or PAL. You may override higher ratings by using ...
...PG 4 PG13 5 PG-R 6 R 7 NC-17 8 ADULT Enter a 4-digit password to appear in wide view with 4:3 aspect ratio. Demo Mode scrolls through the various source screens, simulating activity on . To stop Demo Mode, press and hold the SRC button. Yes/No Run On Off Select "Yes" to choose between LANGUAGE, VIDEO..."Demo Mode" is discreetly displayed in yellow text (below the clock), to access the SYSTEM SETUP menu. VM8013HD SETUP MENU During disc play, press the SETUP button (4) on the remote control to indicate the unit is in Demo Mode. NTSC or PAL. You may override higher ratings by using ...


