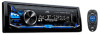
Instruction Manual
Page 23
AUTO: Repeats scrolling at 5-second intervals. ; OFF: Cancels. *1 The illumination control wire connection is required. ( 26, 27) *2 Some characters or symbols will not be shown correctly (or will be played on the faceplate with a dry silicone or ... button and display brightness for : - NIGHT: 09 DISP ZONE: DAY: 31 ; REFERENCES Maintenance Cleaning the unit Wipe off dirt on this unit. Android™ application JVC MUSIC PLAY - The AAC (.m4a) file in an online manual on a USB mass storage class device. • You cannot connect a USB device via a USB hub...
AUTO: Repeats scrolling at 5-second intervals. ; OFF: Cancels. *1 The illumination control wire connection is required. ( 26, 27) *2 Some characters or symbols will not be shown correctly (or will be played on the faceplate with a dry silicone or ... button and display brightness for : - NIGHT: 09 DISP ZONE: DAY: 31 ; REFERENCES Maintenance Cleaning the unit Wipe off dirt on this unit. Android™ application JVC MUSIC PLAY - The AAC (.m4a) file in an online manual on a USB mass storage class device. • You cannot connect a USB device via a USB hub...
Instruction Manual
Page 25
... Android device is unable to route the audio signal to unit. ( 20) ANDROID Cannot playback at [AUTO MODE]. • Make sure JVC MUSIC PLAY APP is poor. • Static noise while listening to the nearest service center. "CANNOT PLAY" • Make sure Android ...device contains playable audio files. • Reconnect the Android device. • Restart the Android device. General "MISWIRING CHECK WIRING THEN PWR ON" appears. Check the [SRC SELECT] setting. ( 4) Radio • Radio reception is installed on the Android device. ( 7) •...
... Android device is unable to route the audio signal to unit. ( 20) ANDROID Cannot playback at [AUTO MODE]. • Make sure JVC MUSIC PLAY APP is poor. • Static noise while listening to the nearest service center. "CANNOT PLAY" • Make sure Android ...device contains playable audio files. • Reconnect the Android device. • Restart the Android device. General "MISWIRING CHECK WIRING THEN PWR ON" appears. Check the [SRC SELECT] setting. ( 4) Radio • Radio reception is installed on the Android device. ( 7) •...

Instruction Manual
Page 28
... of this unit in parallel. • Connect speakers with one that has the same rating. Caution • For safety's sake, leave wiring and mounting to turn on and off by the ignition key. • Keep all cables away from the ignition switch, then disconnect the ...terminal of the car battery. 2 Connect the wires properly. Consult the car audio dealer. • Install this unit during and shortly after installation. SPECIFICATIONS Audio Maximum Output Power Full Bandwidth Power ...
... of this unit in parallel. • Connect speakers with one that has the same rating. Caution • For safety's sake, leave wiring and mounting to turn on and off by the ignition key. • Keep all cables away from the ignition switch, then disconnect the ...terminal of the car battery. 2 Connect the wires properly. Consult the car audio dealer. • Install this unit during and shortly after installation. SPECIFICATIONS Audio Maximum Output Power Full Bandwidth Power ...
Instruction Manual
Page 29
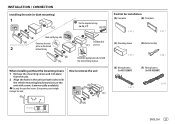
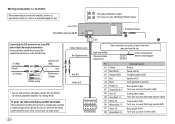
... to hold the sleeve firmly in place. INSTALLATION / CONNECTION Installing the unit (in-dash mounting) Do the required wiring. ( 26, 27) Part list for KD-X33MBT) ENGLISH 25 When installing without the mounting sleeve 1 Remove the mounting sleeve and trim plate from the unit...plate as illustrated before fitting. Dashboard of your car Bend the appropriate tabs to remove the unit (C) Mounting sleeve (E) Wiring harness (for KD-X330BT) (D) Extraction key (F) Wiring harness (for installation (A) Faceplate (B) Trim plate Hook on both sides) with the vehicle mounting bracket and secure the...
... to hold the sleeve firmly in place. INSTALLATION / CONNECTION Installing the unit (in-dash mounting) Do the required wiring. ( 26, 27) Part list for KD-X33MBT) ENGLISH 25 When installing without the mounting sleeve 1 Remove the mounting sleeve and trim plate from the unit...plate as illustrated before fitting. Dashboard of your car Bend the appropriate tabs to remove the unit (C) Mounting sleeve (E) Wiring harness (for KD-X330BT) (D) Extraction key (F) Wiring harness (for installation (A) Faceplate (B) Trim plate Hook on both sides) with the vehicle mounting bracket and secure the...
Instruction Manual
Page 30
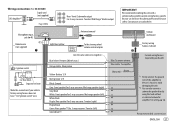
... with a commercially available custom wiring harness specific for your car and leave this job to professionals for KD-X330BT) When connecting to an external amplifier, connect its ground wire to the car's chassis to modify the wiring of the supplied wiring harness as illustrated below. Consult... your car audio dealer. 26 Yellow (Battery wire) Red (Ignition wire) Light blue/yellow (Steering remote control wire)...
... with a commercially available custom wiring harness specific for your car and leave this job to professionals for KD-X330BT) When connecting to an external amplifier, connect its ground wire to the car's chassis to modify the wiring of the supplied wiring harness as illustrated below. Consult... your car audio dealer. 26 Yellow (Battery wire) Red (Ignition wire) Light blue/yellow (Steering remote control wire)...
Instruction Manual
Page 31
... job to avoid damaging the unit. *2 You can also connect a subwoofer speaker directly using this connection if your vehicle factory wiring harness does not have "12 V ignition switch" wire. Wiring connection (for KD-X33MBT) JVC Amplifier*1 Signal cord (not supplied) Fuse (10 A) Rear/ Front/ Subwoofer output For 3-way crossover: Tweeter/ Mid Range/ Woofer output IMPORTANT...
... job to avoid damaging the unit. *2 You can also connect a subwoofer speaker directly using this connection if your vehicle factory wiring harness does not have "12 V ignition switch" wire. Wiring connection (for KD-X33MBT) JVC Amplifier*1 Signal cord (not supplied) Fuse (10 A) Rear/ Front/ Subwoofer output For 3-way crossover: Tweeter/ Mid Range/ Woofer output IMPORTANT...


