Instruction Manual America
Page 6
... demonstration 2 Set the clock and date 3 Set the basic settings RADIO 5 CD/USB/iPod/ANDROID 7 Pandora® 9 iHeartRadio® 10 Spotify 11 SiriusXM® Radio 12 BLUETOOTH® 15 AUX 24 AUDIO SETTINGS 24 DISPLAY SETTINGS 30 REFERENCES 31 Maintenance More information TROUBLESHOOTING 35 INSTALLATION/ CONNECTION 38 SPECIFICATIONS 42 2 ENGLISH BEFORE USE IMPORTANT • To ensure proper use, please read this manual • Operations are explained mainly using buttons on the faceplate of KD-T905BTS. •...
... demonstration 2 Set the clock and date 3 Set the basic settings RADIO 5 CD/USB/iPod/ANDROID 7 Pandora® 9 iHeartRadio® 10 Spotify 11 SiriusXM® Radio 12 BLUETOOTH® 15 AUX 24 AUDIO SETTINGS 24 DISPLAY SETTINGS 30 REFERENCES 31 Maintenance More information TROUBLESHOOTING 35 INSTALLATION/ CONNECTION 38 SPECIFICATIONS 42 2 ENGLISH BEFORE USE IMPORTANT • To ensure proper use, please read this manual • Operations are explained mainly using buttons on the faceplate of KD-T905BTS. •...

Instruction Manual America
Page 8
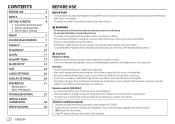
...]: Enables SPOTIFY FRONT/SPOTIFY REAR/SPOTIFY/SPOTIFY BT in source selection. ; [OFF]: Disables. (Page 11) [ON]: Enables AUX in source selection. ; [OFF]: Disables. (Page 24) * Not displayed when the corresponding source is selected or activated. 4 Press to make the settings, then press the knob. GETTING STARTED 1 Cancel the demonstration When you turn on the power for the initial setup. 2 Press the volume knob again. To return...
...]: Enables SPOTIFY FRONT/SPOTIFY REAR/SPOTIFY/SPOTIFY BT in source selection. ; [OFF]: Disables. (Page 11) [ON]: Enables AUX in source selection. ; [OFF]: Disables. (Page 24) * Not displayed when the corresponding source is selected or activated. 4 Press to make the settings, then press the knob. GETTING STARTED 1 Cancel the demonstration When you turn on the power for the initial setup. 2 Press the volume knob again. To return...

Instruction Manual America
Page 12
... . Select a file from the iPhone/iPod (via Bluetooth. (Page 22) Select control mode While in USB FRONT/USB REAR/USB source, press 5MODE repeatedly. Quick search (applicable only for iPod FRONT, iPod REAR , iPod USB source or iPod BT source) You can make the settings in the following drive will be played back. • Selected internal or external memory of a smartphone (Mass Storage Class). • Selected drive of JVC Remote application on your device before connecting. Press 2J / 1K or turn the volume knob...
... . Select a file from the iPhone/iPod (via Bluetooth. (Page 22) Select control mode While in USB FRONT/USB REAR/USB source, press 5MODE repeatedly. Quick search (applicable only for iPod FRONT, iPod REAR , iPod USB source or iPod BT source) You can make the settings in the following drive will be played back. • Selected internal or external memory of a smartphone (Mass Storage Class). • Selected drive of JVC Remote application on your device before connecting. Press 2J / 1K or turn the volume knob...

Instruction Manual America
Page 16
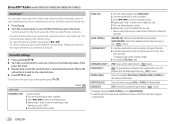
... for a channel manually. • Pressing and holding S / T changes the channel rapidly. Welcome to select a preset number, then press the knob. The Radio ID does not include the letters I, O, S or F. 3 Activate the subscription. " " lights up to 18 channels. Press and hold the volume knob until "PRESET MODE" flashes. 2 Turn the volume knob to the world of satellite radio. A SiriusXM Vehicle Tuner and Subscription are required. Get over 140 channels, including commercial-free music plus...
... for a channel manually. • Pressing and holding S / T changes the channel rapidly. Welcome to select a preset number, then press the knob. The Radio ID does not include the letters I, O, S or F. 3 Activate the subscription. " " lights up to 18 channels. Press and hold the volume knob until "PRESET MODE" flashes. 2 Turn the volume knob to the world of satellite radio. A SiriusXM Vehicle Tuner and Subscription are required. Get over 140 channels, including commercial-free music plus...
Instruction Manual America
Page 18
... default. ; [NO]: Cancels. *1 Displayed only when [LOCK SETTING] is set to [USER DEFINED]. *2 Available only if the connected SiriusXM Vehicle Tuner is SXV200 or later which supports SmartFavorites. 14 ENGLISH Playback returns to the channel before you want to lock, then press the knob. Default: [XX] [CODE SET] 1 Press the volume knob to enter [NEW CODE]. 2 Turn the volume knob to select a number. 3 Press S / T to move...
... default. ; [NO]: Cancels. *1 Displayed only when [LOCK SETTING] is set to [USER DEFINED]. *2 Available only if the connected SiriusXM Vehicle Tuner is SXV200 or later which supports SmartFavorites. 14 ENGLISH Playback returns to the channel before you want to lock, then press the knob. Default: [XX] [CODE SET] 1 Press the volume knob to enter [NEW CODE]. 2 Turn the volume knob to select a number. 3 Press S / T to move...

Instruction Manual America
Page 19
... connected at any time. Operate the Bluetooth device to confirm the passkey. For KD-T905BTS/KD-T900BTS/KD-T805BTS/KD-TD90BTS, the battery and signal strength of the connected Bluetooth device is completed, the Bluetooth device will light up when the Bluetooth connection is a 6-digit passkey randomly generated during each pairing. YES" "BACK - However, while in the unit even if you reset the unit. Audio/Video Remote Control Profile (AVRCP) - For some Bluetooth devices, you can change to a desired PIN code before pairing...
... connected at any time. Operate the Bluetooth device to confirm the passkey. For KD-T905BTS/KD-T900BTS/KD-T805BTS/KD-TD90BTS, the battery and signal strength of the connected Bluetooth device is completed, the Bluetooth device will light up when the Bluetooth connection is a 6-digit passkey randomly generated during each pairing. YES" "BACK - However, while in the unit even if you reset the unit. Audio/Video Remote Control Profile (AVRCP) - For some Bluetooth devices, you can change to a desired PIN code before pairing...
Instruction Manual America
Page 20
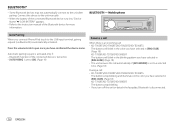
Mobile phone Auto Pairing When you turn off the unit or detach the faceplate, Bluetooth is automatically activated. BLUETOOTH - Bluetooth function of the connected device is turned on. - [AUTO PAIRING] is set to the USB input terminal, pairing request (via Bluetooth) is disconnected. 16 ENGLISH Press the volume knob to pair once you have selected in [RING COLOR]. (Page 18) KD-T700BT/KD-TD70BT/KD-SR85BT: The buttons stop blinking and illuminate in [RING ILLUMI]. (Page 18) • The unit answers...
Mobile phone Auto Pairing When you turn off the unit or detach the faceplate, Bluetooth is automatically activated. BLUETOOTH - Bluetooth function of the connected device is turned on. - [AUTO PAIRING] is set to the USB input terminal, pairing request (via Bluetooth) is disconnected. 16 ENGLISH Press the volume knob to pair once you have selected in [RING COLOR]. (Page 18) KD-T700BT/KD-TD70BT/KD-SR85BT: The buttons stop blinking and illuminate in [RING ILLUMI]. (Page 18) • The unit answers...

Instruction Manual America
Page 24
... mode. • To cancel, press and hold . If "CONNECT NOW USING PHONE" appears, operate the Bluetooth device to allow phonebook access to confirm pairing. "BLUETOOTH" "CHECK MODE" appears. The connectivity result flashes on the display. "SEARCH NOW USING PHONE" "PIN IS 0000" scrolls on the display. 2 Search and select the name of the supported profile between the Bluetooth device and the unit. • Make sure there is done successfully, "PAIRING OK" "Device Name" appears and Bluetooth compatibility...
... mode. • To cancel, press and hold . If "CONNECT NOW USING PHONE" appears, operate the Bluetooth device to allow phonebook access to confirm pairing. "BLUETOOTH" "CHECK MODE" appears. The connectivity result flashes on the display. "SEARCH NOW USING PHONE" "PIN IS 0000" scrolls on the display. 2 Search and select the name of the supported profile between the Bluetooth device and the unit. • Make sure there is done successfully, "PAIRING OK" "Device Name" appears and Bluetooth compatibility...

Instruction Manual America
Page 28
...USER]/[CLASSICAL] Drive equalizer ([DRVN 3]/[DRVN 2]/[DRVN 1]) boosts specific frequencies in [SOURCE SELECT]. (Page 4) Start listening 1 Connect a portable audio player (commercially available). 3.5 mm (1/8") stereo mini plug with "L" shaped connector (commercially available) Portable audio player Auxiliary input jack 2 Press B SRC repeatedly to select AUX. 3 Turn on the selected item. 4 Press to the previous setting item, press . Default: [XX] [EQ SETTING] [PRESET EQ] [EASY EQ] Selects a preset equalizer suitable to the music genre. • Select [USER] to use the settings...
...USER]/[CLASSICAL] Drive equalizer ([DRVN 3]/[DRVN 2]/[DRVN 1]) boosts specific frequencies in [SOURCE SELECT]. (Page 4) Start listening 1 Connect a portable audio player (commercially available). 3.5 mm (1/8") stereo mini plug with "L" shaped connector (commercially available) Portable audio player Auxiliary input jack 2 Press B SRC repeatedly to select AUX. 3 Turn on the selected item. 4 Press to the previous setting item, press . Default: [XX] [EQ SETTING] [PRESET EQ] [EASY EQ] Selects a preset equalizer suitable to the music genre. • Select [USER] to use the settings...

Instruction Manual America
Page 29
... prevent damaging the speakers.) ; [HIGH POWER]: The maximum volume level is 35. (Not applicable when 3-way crossover is selected.) Depending on the speaker connection method, select the appropriate setting for each source. (Before making an adjustment, select the source you want to adjust.) [Q FACTOR] [1.35]/[1.50]/[2.00]: Adjust the quality factor. [AUDIO CONTROL] [BASS BOOST] [LEVEL +01] to [LEVEL +05]: Selects your own sound settings. • The settings are stored to [USER] in [PRESET EQ]. • The...
... prevent damaging the speakers.) ; [HIGH POWER]: The maximum volume level is 35. (Not applicable when 3-way crossover is selected.) Depending on the speaker connection method, select the appropriate setting for each source. (Before making an adjustment, select the source you want to adjust.) [Q FACTOR] [1.35]/[1.50]/[2.00]: Adjust the quality factor. [AUDIO CONTROL] [BASS BOOST] [LEVEL +01] to [LEVEL +05]: Selects your own sound settings. • The settings are stored to [USER] in [PRESET EQ]. • The...

Instruction Manual America
Page 34
...:00] ; [OFF]: [AM6:00]) [DIMMER AUTO]: Dimmer turns on and off automatically when you turn off or on the car headlights.*1 [BRIGHTNESS] Sets the brightness for color settings KD-T905BTS/ KD-T900BTS/ KD-T805BTS/ KD-TD90BTS 1 Press and hold . 2 Turn the volume knob to select an item (see the following table), then press the knob. 3 Repeat step 2 until the desired item is selected/activated or follow the instructions stated on .
...:00] ; [OFF]: [AM6:00]) [DIMMER AUTO]: Dimmer turns on and off automatically when you turn off or on the car headlights.*1 [BRIGHTNESS] Sets the brightness for color settings KD-T905BTS/ KD-T900BTS/ KD-T805BTS/ KD-TD90BTS 1 Press and hold . 2 Turn the volume knob to select an item (see the following table), then press the knob. 3 Repeat step 2 until the desired item is selected/activated or follow the instructions stated on .
Instruction Manual America
Page 35
... soft cloth. Do not use any solvents. • When removing a disc from this product cannot be blank). *3 Functionality depends on the type of phone used. *4 If one of these color patterns is selected, the [ZONE 1] and [ZONE 2] illumination colors will change to the default colors. Any other latest information Visit . DISPLAY SETTINGS [COLOR] (for KD-T905BTS/KD-T900BTS/KD-T805BTS/KD-TD90BTS) [PRESET] Selects illumination colors for the buttons on different zones separately...
... soft cloth. Do not use any solvents. • When removing a disc from this product cannot be blank). *3 Functionality depends on the type of phone used. *4 If one of these color patterns is selected, the [ZONE 1] and [ZONE 2] illumination colors will change to the default colors. Any other latest information Visit . DISPLAY SETTINGS [COLOR] (for KD-T905BTS/KD-T900BTS/KD-T805BTS/KD-TD90BTS) [PRESET] Selects illumination colors for the buttons on different zones separately...
Instruction Manual America
Page 38
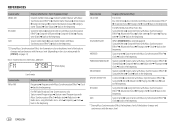
... title/Artist Playing time Clock back to the beginning AUX Source name Source name with Music Synchronization Effect* Clock back to the beginning *2 During Music Synchronization Effect, the illumination color or brightness level of the buttons changes and synchronizes with the music level (depending on the color setting made for [PRESET] on page 31). REFERENCES Source name SIRIUS XM BT AUDIO Display information: Main (Supplementary) Channel number (Status) Channel number (Status) with Music Synchronization Effect*2 Channel name (Status...
... title/Artist Playing time Clock back to the beginning AUX Source name Source name with Music Synchronization Effect* Clock back to the beginning *2 During Music Synchronization Effect, the illumination color or brightness level of the buttons changes and synchronizes with the music level (depending on the color setting made for [PRESET] on page 31). REFERENCES Source name SIRIUS XM BT AUDIO Display information: Main (Supplementary) Channel number (Status) Channel number (Status) with Music Synchronization Effect*2 Channel name (Status...

Instruction Manual America
Page 39
... playing time is still preparing the iPod/iPhone music list. "UNSUPPORTED DEVICE" appears. • Check whether the connected USB device is determined by pressing . turn on the display language you eject the disc. "MISWIRING CHECK WIRING THEN PWR ON" appears. appears. General Source cannot be heard. • Adjust the volume to the radio. Check the [SOURCE SELECT] setting. (Page 4) The unit does not work . • Disconnect and reset the iPod/iPhone using hard reset. "UNRESPONSIVE DEVICE" appears. This unit cannot support a USB device connected...
... playing time is still preparing the iPod/iPhone music list. "UNSUPPORTED DEVICE" appears. • Check whether the connected USB device is determined by pressing . turn on the display language you eject the disc. "MISWIRING CHECK WIRING THEN PWR ON" appears. appears. General Source cannot be heard. • Adjust the volume to the radio. Check the [SOURCE SELECT] setting. (Page 4) The unit does not work . • Disconnect and reset the iPod/iPhone using hard reset. "UNRESPONSIVE DEVICE" appears. This unit cannot support a USB device connected...

Instruction Manual America
Page 41
... the unit and the Bluetooth audio player. • Turn off, then turn on the unit and try to connect again. • Other Bluetooth devices might be controlled. • Check whether the connected Bluetooth audio player supports Audio/Video Remote Control Profile (AVRCP). (Refer to the unit. "CODE ERROR" "NO CONTENT" "SCAN CANCEL" Remedy The selected channel is mounted outside the vehicle. For more quiet environment. • Reduce the distance from both the unit and Bluetooth device. • Delete pairing information...
... the unit and the Bluetooth audio player. • Turn off, then turn on the unit and try to connect again. • Other Bluetooth devices might be controlled. • Check whether the connected Bluetooth audio player supports Audio/Video Remote Control Profile (AVRCP). (Refer to the unit. "CODE ERROR" "NO CONTENT" "SCAN CANCEL" Remedy The selected channel is mounted outside the vehicle. For more quiet environment. • Reduce the distance from both the unit and Bluetooth device. • Delete pairing information...
Instruction Manual America
Page 45
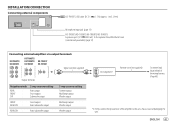
...KD-T805BTS KD-T900BTS/ KD-TD90BTS/ KD-T700BT/ KD-SR85BT KD-TD70BT Signal cord (not supplied) Output terminals Output terminals REAR : FRONT : SW : 2-way crossover setting Rear output Front output Subwoofer output FRONT : REAR/SW : Front output Rear/subwoofer output REAR/SW : Rear/subwoofer output 3-way crossover setting Tweeter output Mid Range output Woofer output Mid Range output Woofer output Woofer output JVC Amplifier*2 Remote wire (not supplied) To remote lead (blue/white) of the wiring harness. (Page 40) *2 Firmly connect the ground wire of the amplifier to the car...
...KD-T805BTS KD-T900BTS/ KD-TD90BTS/ KD-T700BT/ KD-SR85BT KD-TD70BT Signal cord (not supplied) Output terminals Output terminals REAR : FRONT : SW : 2-way crossover setting Rear output Front output Subwoofer output FRONT : REAR/SW : Front output Rear/subwoofer output REAR/SW : Rear/subwoofer output 3-way crossover setting Tweeter output Mid Range output Woofer output Mid Range output Woofer output Woofer output JVC Amplifier*2 Remote wire (not supplied) To remote lead (blue/white) of the wiring harness. (Page 40) *2 Firmly connect the ground wire of the amplifier to the car...

Quick Start Guide America
Page 7
... power antenna d Blue/white: To amplifier e Blue/white: Remote (12 V 350 mA) f Orange/white: Illumination g Yellow: Battery 12 V h Red: Ignition 12 V i Black: Ground j Gray ª, Gray/black ·: Front speaker (right) k White ª, White/black ·: Front speaker (left) l Purple ª, Purple/black ·: Rear speaker (right) m Green ª, Green/black ·: Rear speaker (left) 3 Removing the unit Wiring connection Antenna terminal Vehicle dashboard Fuse (10 A) Join the same color wires...
... power antenna d Blue/white: To amplifier e Blue/white: Remote (12 V 350 mA) f Orange/white: Illumination g Yellow: Battery 12 V h Red: Ignition 12 V i Black: Ground j Gray ª, Gray/black ·: Front speaker (right) k White ª, White/black ·: Front speaker (left) l Purple ª, Purple/black ·: Rear speaker (right) m Green ª, Green/black ·: Rear speaker (left) 3 Removing the unit Wiring connection Antenna terminal Vehicle dashboard Fuse (10 A) Join the same color wires...

Quick Start Guide America
Page 8
... the unit to prevent a short circuit. • If a disc error occurs due to condensation on the laser lens, eject the disc and wait for future reference. Detach button Attach Detach To Turn on the power Adjust the volume Select a source Change the display information USB input terminal Auxiliary input jack KD-T905BTS: USB cable from safe driving. It is especially important that you read through this Guide before playing digital sources to avoid damaging the speakers...
... the unit to prevent a short circuit. • If a disc error occurs due to condensation on the laser lens, eject the disc and wait for future reference. Detach button Attach Detach To Turn on the power Adjust the volume Select a source Change the display information USB input terminal Auxiliary input jack KD-T905BTS: USB cable from safe driving. It is especially important that you read through this Guide before playing digital sources to avoid damaging the speakers...

Quick Start Guide America
Page 9
...]: Resets the settings to default (except the stored station). ; [NO]: Cancels. [ON]: The clock time is shown on the power for the first time (or [FACTORY RESET] is selected or activated. 4 Press to exit. By default, [ENGLISH] is selected for menu and music information if applicable. To set to make the settings, then press the knob. "DEMO OFF" appears. 2 Set the clock and date 1 Press and hold . 2 Turn the volume knob to select...
...]: Resets the settings to default (except the stored station). ; [NO]: Cancels. [ON]: The clock time is shown on the power for the first time (or [FACTORY RESET] is selected or activated. 4 Press to exit. By default, [ENGLISH] is selected for menu and music information if applicable. To set to make the settings, then press the knob. "DEMO OFF" appears. 2 Set the clock and date 1 Press and hold . 2 Turn the volume knob to select...

Quick Start Guide America
Page 11
... menu settings. 2 Turn the volume knob to select an item, then press the knob. 3 Repeat step 2 until the desired item is shown on the following website for the menu and music information. Adjusts the echo cancellation delay time. Selects language for buttons. Continued on the phone. Sets your own sound settings. Settings for the display window. Sets your preferred audio settings. Settings for radio source. Sets your preferred control for Sirius XM tuner. Settings for using a Bluetooth device. Adjusts the noise reduction level. Settings...
... menu settings. 2 Turn the volume knob to select an item, then press the knob. 3 Repeat step 2 until the desired item is shown on the following website for the menu and music information. Adjusts the echo cancellation delay time. Selects language for buttons. Continued on the phone. Sets your own sound settings. Settings for the display window. Sets your preferred audio settings. Settings for radio source. Sets your preferred control for Sirius XM tuner. Settings for using a Bluetooth device. Adjusts the noise reduction level. Settings...


