Instruction Manual
Page 6
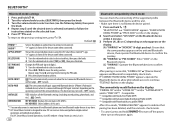
... read this manual • Operations are explained mainly using buttons on the faceplate of explanation. CONTENTS BEFORE USE 2 BASICS 3 GETTING STARTED 4 1 Cancel the demonstration 2 Set the clock 3 Set the basic settings RADIO 5 CD / USB / iPod / ANDROID 7 Pandora® 9 iHeartRadio® 10 SiriusXM® Radio (for KD-R975BTS / KD-R970BTS / KD-R97MBS / KD-R875BTS) 11 BLUETOOTH® 14 AUX 20 AUDIO SETTINGS 20 DISPLAY SETTINGS 24 REFERENCES 26 Maintenance More information TROUBLESHOOTING 28 SPECIFICATIONS 31 INSTALLATION / CONNECTION 32 2 BEFORE...
... read this manual • Operations are explained mainly using buttons on the faceplate of explanation. CONTENTS BEFORE USE 2 BASICS 3 GETTING STARTED 4 1 Cancel the demonstration 2 Set the clock 3 Set the basic settings RADIO 5 CD / USB / iPod / ANDROID 7 Pandora® 9 iHeartRadio® 10 SiriusXM® Radio (for KD-R975BTS / KD-R970BTS / KD-R97MBS / KD-R875BTS) 11 BLUETOOTH® 14 AUX 20 AUDIO SETTINGS 20 DISPLAY SETTINGS 24 REFERENCES 26 Maintenance More information TROUBLESHOOTING 28 SPECIFICATIONS 31 INSTALLATION / CONNECTION 32 2 BEFORE...
Instruction Manual
Page 7
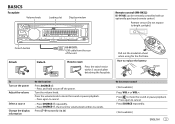
...; Press again to reset Press the switch twice within 2 seconds. Pull out the insulation sheet when using for the first time. Press the volume knob to mute the sound or pause playback. • Press again to turn the volume knob within 5 seconds after detaching the faceplate. How to replace the battery To Turn on the power Adjust the volume Select a source Change the display information On the faceplate Press . • Press...
...; Press again to reset Press the switch twice within 2 seconds. Pull out the insulation sheet when using for the first time. Press the volume knob to mute the sound or pause playback. • Press again to turn the volume knob within 5 seconds after detaching the faceplate. How to replace the battery To Turn on the power Adjust the volume Select a source Change the display information On the faceplate Press . • Press...
Instruction Manual
Page 8
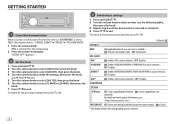
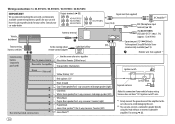
.... OFF: Disables. OFF: Disables. "DEMO OFF" appears. 2 Set the clock 1 Press and hold . 2 Turn the volume knob to select an item (see : . Default: XX SETTINGS BEEP (Not applicable when 3-way crossover is selected. 4 IHEART * ON: Enables IHEARTRADIO/IHEART FRONT/IHEART REAR in source selection. ; F/W UPDATE SYSTEM F/W xxxx YES: Starts upgrading the firmware. ; NO: Cancels. * Not displayed when the corresponding source is selected.) ON: Activates the keypress tone. ; GETTING...
.... OFF: Disables. OFF: Disables. "DEMO OFF" appears. 2 Set the clock 1 Press and hold . 2 Turn the volume knob to select an item (see : . Default: XX SETTINGS BEEP (Not applicable when 3-way crossover is selected. 4 IHEART * ON: Enables IHEARTRADIO/IHEART FRONT/IHEART REAR in source selection. ; F/W UPDATE SYSTEM F/W xxxx YES: Starts upgrading the firmware. ; NO: Cancels. * Not displayed when the corresponding source is selected.) ON: Activates the keypress tone. ; GETTING...
Instruction Manual
Page 11
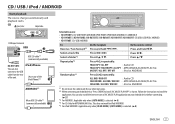
... and hold . This does not work for MP3/WMA/AAC files. CD Eject disc Label side USB input terminal USB USB 2.0 cable*1 (commercially available) KD-R975BTS: You can also install the latest version of JVC MUSIC PLAY application on your Android device before connecting. ( 27) *3 For ANDROID: Applicable only when [AUTO MODE] is selected. ( 8) *4 For CD: Only for iPod/ ANDROID. *5 For iPod/ ANDROID: Applicable only when [HEAD MODE]/ [AUTO MODE] is shown. Press . TRACK...
... and hold . This does not work for MP3/WMA/AAC files. CD Eject disc Label side USB input terminal USB USB 2.0 cable*1 (commercially available) KD-R975BTS: You can also install the latest version of JVC MUSIC PLAY application on your Android device before connecting. ( 27) *3 For ANDROID: Applicable only when [AUTO MODE] is selected. ( 8) *4 For CD: Only for iPod/ ANDROID. *5 For iPod/ ANDROID: Applicable only when [HEAD MODE]/ [AUTO MODE] is shown. Press . TRACK...
Instruction Manual
Page 17
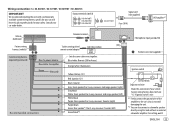
.... TUNE START*2 ON: All qualified music channels in front of the new pass code to enter channel lock settings for next time. NO: Cancels. *1 Displayed only when [USER DEFINED] is selected. *2 Available only if the connected SiriusXM Vehical Tuner is selected/activated or follow the instructions stated on the selected item. 5 Press to exit. OFF: Cancels. 1 Turn the volume knob to select a category, then press the knob. 2 Turn the volume knob...
.... TUNE START*2 ON: All qualified music channels in front of the new pass code to enter channel lock settings for next time. NO: Cancels. *1 Displayed only when [USER DEFINED] is selected. *2 Available only if the connected SiriusXM Vehical Tuner is selected/activated or follow the instructions stated on the selected item. 5 Press to exit. OFF: Cancels. 1 Turn the volume knob to select a category, then press the knob. 2 Turn the volume knob...
Instruction Manual
Page 18
... the microphone input terminal. ( 34) Pair and connect a Bluetooth device for more information. 14 Serial Port Profile (SPP) - Advanced Audio Coding (AAC) Connect the microphone Rear panel Microphone (supplied) Microphone input jack*1 Adjust the microphone angle Secure using cord clamps (not supplied) if necessary. *1 For KD-R975BTS / KD-R970BTS / KD-R97MBS / KD-R875BTS, connect to turn on the unit. 2 Search and select "JVC UNIT" on the display, enter the PIN code "0000" into the Bluetooth device. Press the volume knob...
... the microphone input terminal. ( 34) Pair and connect a Bluetooth device for more information. 14 Serial Port Profile (SPP) - Advanced Audio Coding (AAC) Connect the microphone Rear panel Microphone (supplied) Microphone input jack*1 Adjust the microphone angle Secure using cord clamps (not supplied) if necessary. *1 For KD-R975BTS / KD-R970BTS / KD-R97MBS / KD-R875BTS, connect to turn on the unit. 2 Search and select "JVC UNIT" on the display, enter the PIN code "0000" into the Bluetooth device. Press the volume knob...

Instruction Manual
Page 19
... device Other models: iPhone/ iPod touch/ Android device Press the volume knob to pair once you have selected in [RING COLOR]. ( 16) For KD-R875BTS / KD-R870BT / KD-R770BT / KD-RD87BT: The buttons stop blinking and illuminate in [RING ILLUMI]. ( 16) • The unit answers the call : • For KD-R975BTS / KD-R970BTS / KD-RD97BT / KD-R97MBS: The buttons stop blinking. • If you turn off the unit or detach the faceplate, the Bluetooth connection is set...
... device Other models: iPhone/ iPod touch/ Android device Press the volume knob to pair once you have selected in [RING COLOR]. ( 16) For KD-R875BTS / KD-R870BT / KD-R770BT / KD-RD87BT: The buttons stop blinking and illuminate in [RING ILLUMI]. ( 16) • The unit answers the call : • For KD-R975BTS / KD-R970BTS / KD-RD97BT / KD-R97MBS: The buttons stop blinking. • If you turn off the unit or detach the faceplate, the Bluetooth connection is set...
Instruction Manual
Page 20
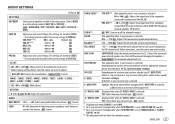
... as the number increased. -5 - +5 (0): Adjust the noise reduction level until the least noise is being heard during a phone conversation. -5 - +5 (0): Adjust the echo cancellation delay time until the desired item is selected or activated. 4 Press to the connected Bluetooth device. Swap between hands-free and private talk modes Press during a call . • Operations may vary according to exit. COLOR 49 (COLOR 08): Selects the notification light color for the buttons when...
... as the number increased. -5 - +5 (0): Adjust the noise reduction level until the least noise is being heard during a phone conversation. -5 - +5 (0): Adjust the echo cancellation delay time until the desired item is selected or activated. 4 Press to the connected Bluetooth device. Swap between hands-free and private talk modes Press during a call . • Operations may vary according to exit. COLOR 49 (COLOR 08): Selects the notification light color for the buttons when...
Instruction Manual
Page 22
... the device name when connected. SET PINCODE (0000) Changes the PIN code (up to 6 digits). 1 Turn the volume knob to select a number. 2 Press to the previous setting item, press . AUTO PAIR ON: The unit automatically pair supported Bluetooth device (iPhone/ iPod touch/ Android device) when it is successful, "PAIRING OK" "[Device Name]" appears and Bluetooth compatibility check starts. OFF: Cancels. INFORMATION MY BT NAME: Displays the unit name (JVC UNIT). ; "BLUETOOTH" "CHECK MODE" appears. The connectivity result flashes on the display. "PAIRING OK" and/or "H.FREE...
... the device name when connected. SET PINCODE (0000) Changes the PIN code (up to 6 digits). 1 Turn the volume knob to select a number. 2 Press to the previous setting item, press . AUTO PAIR ON: The unit automatically pair supported Bluetooth device (iPhone/ iPod touch/ Android device) when it is successful, "PAIRING OK" "[Device Name]" appears and Bluetooth compatibility check starts. OFF: Cancels. INFORMATION MY BT NAME: Displays the unit name (JVC UNIT). ; "BLUETOOTH" "CHECK MODE" appears. The connectivity result flashes on the display. "PAIRING OK" and/or "H.FREE...

Instruction Manual
Page 24
.... Select a preset equalizer Press (or) Press repeatedly. , then turn the volume knob within 5 seconds. Use a 3-core plug head stereo mini plug for [AUX] in [SRC SELECT]. ( 4) 3 Press repeatedly to select AUX. 4 Turn on the selected item. 4 Press to the previous setting item, press . • To exit, press . To return to select an item, then press the knob. AUX Use a portable audio player 1 Connect a portable audio player (commercially available). 3.5 mm (1/8") stereo mini plug with "L" shaped connector (commercially available) AUDIO SETTINGS Auxiliary input jack...
.... Select a preset equalizer Press (or) Press repeatedly. , then turn the volume knob within 5 seconds. Use a 3-core plug head stereo mini plug for [AUX] in [SRC SELECT]. ( 4) 3 Press repeatedly to select AUX. 4 Turn on the selected item. 4 Press to the previous setting item, press . • To exit, press . To return to select an item, then press the knob. AUX Use a portable audio player 1 Connect a portable audio player (commercially available). 3.5 mm (1/8") stereo mini plug with "L" shaped connector (commercially available) AUDIO SETTINGS Auxiliary input jack...
Instruction Manual
Page 25
...-balanced sound at low volume. ; NO: Cancels. X ' OVER 3-WAY (Displayed only when [X ' OVER 2-WAY] is 35. AUDIO SETTINGS Default: XX EQ SETTING EQ PRESET Select a preset equalizer suitable to the music genre. (Select [USER] to use the settings made in [EASY EQ] or [PRO EQ].) FLAT / HARD ROCK / POP / HIP HOP / R&B / JAZZ / CLASSICAL / USER EASY EQ Adjust your preferred bass boost level. ; LOUD 01 / 02: Boosts low or high frequencies to adjust. SUB...
...-balanced sound at low volume. ; NO: Cancels. X ' OVER 3-WAY (Displayed only when [X ' OVER 2-WAY] is 35. AUDIO SETTINGS Default: XX EQ SETTING EQ PRESET Select a preset equalizer suitable to the music genre. (Select [USER] to use the settings made in [EASY EQ] or [PRO EQ].) FLAT / HARD ROCK / POP / HIP HOP / R&B / JAZZ / CLASSICAL / USER EASY EQ Adjust your preferred bass boost level. ; LOUD 01 / 02: Boosts low or high frequencies to adjust. SUB...
Instruction Manual
Page 26
... (For KD-R770BT) Setting on [SPK/PRE OUT] REAR/REAR REAR/SUB.W (default) SUB.W/SUB.W Audio signal through rear speaker lead L (left) R (right) REAR/REAR Rear speakers output Rear speakers output REAR/SUB.W Rear speakers output Rear speakers output SUB.W/SUB.W Subwoofer output (Mute) If [SUB.W/SUB.W] is selected: - [FRQ 120HZ] is selected in [SUB.W LPF] and [THROUGH] is not available. - [R02] is selected in [FADER] and selectable range is [R15] to reduce the noice heard from the speakers. ; Connection via speaker leads For connections without using an external amplifier...
... (For KD-R770BT) Setting on [SPK/PRE OUT] REAR/REAR REAR/SUB.W (default) SUB.W/SUB.W Audio signal through rear speaker lead L (left) R (right) REAR/REAR Rear speakers output Rear speakers output REAR/SUB.W Rear speakers output Rear speakers output SUB.W/SUB.W Subwoofer output (Mute) If [SUB.W/SUB.W] is selected: - [FRQ 120HZ] is selected in [SUB.W LPF] and [THROUGH] is not available. - [R02] is selected in [FADER] and selectable range is [R15] to reduce the noice heard from the speakers. ; Connection via speaker leads For connections without using an external amplifier...
Instruction Manual
Page 28
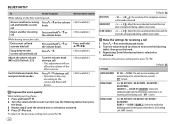
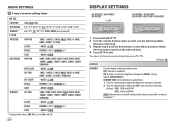
... -08DB to 00DB * Displayed only when [SUB.W] is set to [ON]. ( 21) 24 DISPLAY SETTINGS KD-R975BTS / KD-R970BTS / KD-RD97BT KD-R97MBS / KD-R875BTS / KD-R870BT / KD-R770BT / KD-RD87BT 1 Press and hold . 2 Turn the volume knob to select an item (see the following table), then press the knob. 3 Repeat step 2 until the desired item is selected/activated or follow the instructions stated on the selected item. 4 Press to the...
... -08DB to 00DB * Displayed only when [SUB.W] is set to [ON]. ( 21) 24 DISPLAY SETTINGS KD-R975BTS / KD-R970BTS / KD-RD97BT KD-R97MBS / KD-R875BTS / KD-R870BT / KD-R770BT / KD-RD87BT 1 Press and hold . 2 Turn the volume knob to select an item (see the following table), then press the knob. 3 Repeat step 2 until the desired item is selected/activated or follow the instructions stated on the selected item. 4 Press to the...
Instruction Manual
Page 31
Connector (on it. • Do not use a disc with the "Compact Disc Digital Audio" standard. on the disc, or use any solvents. • When removing discs from this unit. The AAC (.m4a) file in a USB device or a CD encoded by iTunes cannot be played on the "Videos" menu in an online manual on the following website for - Latest firmware updates and latest compatible item list - iPod nano (3rd, 4th, 5th, 6th, and 7th...
Connector (on it. • Do not use a disc with the "Compact Disc Digital Audio" standard. on the disc, or use any solvents. • When removing discs from this unit. The AAC (.m4a) file in a USB device or a CD encoded by iTunes cannot be played on the "Videos" menu in an online manual on the following website for - Latest firmware updates and latest compatible item list - iPod nano (3rd, 4th, 5th, 6th, and 7th...

Instruction Manual
Page 32
... eject the disc. TROUBLESHOOTING Symptom Remedy Sound cannot be heard. • Adjust the volume to be sure the terminals of the speaker wires are subject to change without prior notice. Connect the antenna firmly. Make sure nothing is a third-party service, therefore the specifications are insulated properly. "READING" keeps flashing. • Do not use too many hierarchical levels and folders. • Reload the disc or reattach the USB device. "CANNOT PLAY" flashes...
... eject the disc. TROUBLESHOOTING Symptom Remedy Sound cannot be heard. • Adjust the volume to be sure the terminals of the speaker wires are subject to change without prior notice. Connect the antenna firmly. Make sure nothing is a third-party service, therefore the specifications are insulated properly. "READING" keeps flashing. • Do not use too many hierarchical levels and folders. • Reload the disc or reattach the USB device. "CANNOT PLAY" flashes...
Instruction Manual
Page 33
... selected channel is installed on the Android device. ( 7) • Reconnect the Android device and select the appropriate control mode. ( 8) • If this unit and iPod/iPhone. TROUBLESHOOTING Symptom Remedy The iPod/iPhone does not • Check the connection between this does not solve the problem, the connected Android device does not support [AUTO MODE]. ( 28) "NO DEVICE" or "READING" • Switch off the power saving mode on the display language you enter search mode by pressing . CD / USB / iPod...
... selected channel is installed on the Android device. ( 7) • Reconnect the Android device and select the appropriate control mode. ( 8) • If this unit and iPod/iPhone. TROUBLESHOOTING Symptom Remedy The iPod/iPhone does not • Check the connection between this does not solve the problem, the connected Android device does not support [AUTO MODE]. ( 28) "NO DEVICE" or "READING" • Switch off the power saving mode on the display language you enter search mode by pressing . CD / USB / iPod...
Instruction Manual
Page 34
... TROUBLESHOOTING 2 Reset the unit ( 3) 3 Contact (USA only) Call: 1-800-252-5722 ( or ) visit: http://www.jvc.com 30 Press the volume knob to the instructions of registered devices has reached its connection are in good condition. "PAIRING FULL" "PLEASE WAIT" "BT DEVICE NOT FOUND" "NOT SUPPORT" "ERROR" "H/W ERROR" Remedy • Check whether the connected Bluetooth audio player supports Audio/Video Remote Control Profile (AVRCP). (Refer to PRESS ENTER TO CONTINUE." SiriusXM® Radio...
... TROUBLESHOOTING 2 Reset the unit ( 3) 3 Contact (USA only) Call: 1-800-252-5722 ( or ) visit: http://www.jvc.com 30 Press the volume knob to the instructions of registered devices has reached its connection are in good condition. "PAIRING FULL" "PLEASE WAIT" "BT DEVICE NOT FOUND" "NOT SUPPORT" "ERROR" "H/W ERROR" Remedy • Check whether the connected Bluetooth audio player supports Audio/Video Remote Control Profile (AVRCP). (Refer to PRESS ENTER TO CONTINUE." SiriusXM® Radio...
Instruction Manual
Page 36
... fuse blows, first make sure the wires are not touching car's chassis, then replace the old fuse with one that has the same rating. Consult the car audio dealer. • Install this unit to ground this unit in the console of the car battery. 2 Connect the wires properly. If the maximum power of the speakers is lower than 50 W, change the [AMP GAIN] setting to avoid damaging the speakers. ( 21) • Mount...
... fuse blows, first make sure the wires are not touching car's chassis, then replace the old fuse with one that has the same rating. Consult the car audio dealer. • Install this unit to ground this unit in the console of the car battery. 2 Connect the wires properly. If the maximum power of the speakers is lower than 50 W, change the [AMP GAIN] setting to avoid damaging the speakers. ( 21) • Mount...
Instruction Manual
Page 38
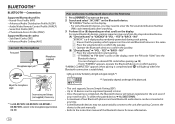
... car's chassis to avoid damaging the unit. *2 You can also connect a subwoofer speaker directly using this job to professionals for your car and leave this lead without an external subwoofer amplifier. For setting, 22. 34 Consult your safety. Output terminals ( 33) Vehicle dashboard Antenna terminal Factory wiring harness (vehicle) To the steering wheel remote control adapter Light blue/yellow STEERING WHEEL REMOTE Signal cord (not supplied) JVC Amplifier*1 Fuse (10 A) MIC (Microphone input terminal) ( 14) (For KD-R975BTS) USB cable...
... car's chassis to avoid damaging the unit. *2 You can also connect a subwoofer speaker directly using this job to professionals for your car and leave this lead without an external subwoofer amplifier. For setting, 22. 34 Consult your safety. Output terminals ( 33) Vehicle dashboard Antenna terminal Factory wiring harness (vehicle) To the steering wheel remote control adapter Light blue/yellow STEERING WHEEL REMOTE Signal cord (not supplied) JVC Amplifier*1 Fuse (10 A) MIC (Microphone input terminal) ( 14) (For KD-R975BTS) USB cable...
Instruction Manual
Page 39
... speaker directly using this lead without an external subwoofer amplifier. Consult your car audio dealer. ENGLISH 35 For setting, 22. Output terminals ( 33) Signal cord (not supplied) Fuse (10 A) JVC Amplifier*1 Vehicle dashboard Antenna terminal Microphone input jack ( 14) Factory wiring harness (vehicle) To the steering wheel remote control adapter Light blue/yellow STEERING WHEEL REMOTE Custom wiring harness (separately purchased) Blue: To power antenna Blue/white: To amplifier Join the same color wires together. Wiring connection (for KD-R870BT / KD-R770BT / KD-RD97BT...
... speaker directly using this lead without an external subwoofer amplifier. Consult your car audio dealer. ENGLISH 35 For setting, 22. Output terminals ( 33) Signal cord (not supplied) Fuse (10 A) JVC Amplifier*1 Vehicle dashboard Antenna terminal Microphone input jack ( 14) Factory wiring harness (vehicle) To the steering wheel remote control adapter Light blue/yellow STEERING WHEEL REMOTE Custom wiring harness (separately purchased) Blue: To power antenna Blue/white: To amplifier Join the same color wires together. Wiring connection (for KD-R870BT / KD-R770BT / KD-RD97BT...


