Instruction Manual America
Page 2
... STARTED 4 1 Cancel the demonstration 2 Set the clock and date 3 Set the basic settings RADIO 5 CD/USB/iPod/ANDROID 8 Pandora® 10 SiriusXM® Radio 11 AUX 14 AUDIO SETTINGS 14 DISPLAY SETTINGS 17 REFERENCES 18 Maintenance More information TROUBLESHOOTING 20 INSTALLATION/ CONNECTION 22 SPECIFICATIONS 25 2 ENGLISH BEFORE USE IMPORTANT • To ensure proper use, please read this manual • Operations are explained mainly using buttons on the faceplate of KD-R690S. • English indications are...
... STARTED 4 1 Cancel the demonstration 2 Set the clock and date 3 Set the basic settings RADIO 5 CD/USB/iPod/ANDROID 8 Pandora® 10 SiriusXM® Radio 11 AUX 14 AUDIO SETTINGS 14 DISPLAY SETTINGS 17 REFERENCES 18 Maintenance More information TROUBLESHOOTING 20 INSTALLATION/ CONNECTION 22 SPECIFICATIONS 25 2 ENGLISH BEFORE USE IMPORTANT • To ensure proper use, please read this manual • Operations are explained mainly using buttons on the faceplate of KD-R690S. • English indications are...
Instruction Manual America
Page 3
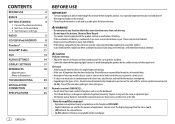
... and hold to replace the battery Detach button Your preset adjustments will be erased except stored radio stations. The volume level returns to reset Pull out the insulation sheet when using for the first time. Turn the volume knob. BASICS Faceplate Volume knob KD-R690S Loading slot Display window Attach Remote control (RM-RK52) Remote sensor (Do not expose to bright sunlight.) Detach KD-R492/ KD-R490 How to the previous level before muting or pause...
... and hold to replace the battery Detach button Your preset adjustments will be erased except stored radio stations. The volume level returns to reset Pull out the insulation sheet when using for the first time. Turn the volume knob. BASICS Faceplate Volume knob KD-R690S Loading slot Display window Attach Remote control (RM-RK52) Remote sensor (Do not expose to bright sunlight.) Detach KD-R492/ KD-R490 How to the previous level before muting or pause...
Instruction Manual America
Page 4
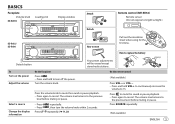
... power (or after you turn on how to update the firmware, visit: . * Not displayed when the corresponding source is selected for the initial setup. 2 Press the volume knob again. "DEMO OFF" appears. 2 Set the clock and date 1 Press and hold . 2 Turn the volume knob to select an item (see the following table), then press the knob. 3 Repeat step 2 until the desired item is not activated). To adjust...
... power (or after you turn on how to update the firmware, visit: . * Not displayed when the corresponding source is selected for the initial setup. 2 Press the volume knob again. "DEMO OFF" appears. 2 Set the clock and date 1 Press and hold . 2 Turn the volume knob to select an item (see the following table), then press the knob. 3 Repeat step 2 until the desired item is not activated). To adjust...
Instruction Manual America
Page 6
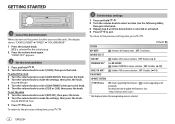
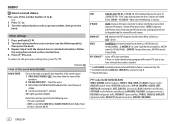
... a program of the same PTY code as you have selected, that station is tuned in. *1 For KD-R690S: Selectable only when SiriusXM Vehicle Tuner is connected. ( 11) *2 Selectable only when [ONCE] or [WEEKLY] is selected/activated or follow the instructions stated on the selected item. 4 Press to select an item (see below). RADIO Select a stored station Press one of the number buttons (1 to 6). (or) 1 Press . 2 Turn the volume knob to the previous setting...
... a program of the same PTY code as you have selected, that station is tuned in. *1 For KD-R690S: Selectable only when SiriusXM Vehicle Tuner is connected. ( 11) *2 Selectable only when [ONCE] or [WEEKLY] is selected/activated or follow the instructions stated on the selected item. 4 Press to select an item (see below). RADIO Select a stored station Press one of the number buttons (1 to 6). (or) 1 Press . 2 Turn the volume knob to the previous setting...

Instruction Manual America
Page 7
... the specific region using the "AF" control. ; MONO SET ON: Improves the FM reception, but sound quality will not be degraded and the stereo effect will remain. OFF: Cancels. REGIONAL*2 ON: Switches to store the following cases. • The unit is turned off. • [OFF] is selected for FM source. "M" lights up to all sources except in [SOURCE SELECT] after Radio Timer for FM. IF BAND AUTO...
... the specific region using the "AF" control. ; MONO SET ON: Improves the FM reception, but sound quality will not be degraded and the stereo effect will remain. OFF: Cancels. REGIONAL*2 ON: Switches to store the following cases. • The unit is turned off. • [OFF] is selected for FM source. "M" lights up to all sources except in [SOURCE SELECT] after Radio Timer for FM. IF BAND AUTO...
Instruction Manual America
Page 8
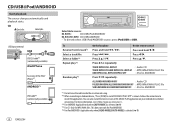
.../RANDOM OFF : Audio CD FOLDER RANDOM/ALL RANDOM/RANDOM OFF : MP3/WMA/WAV/FLAC file SONG RANDOM/ALL RANDOM/RANDOM OFF : iPod or ANDROID *1 Do not leave the cable inside the car when not using. *2 When connecting an Android device, "Press [VIEW] to install the application. CD Eject disc Label side USB input terminal USB USB 2.0 cable*1 (commercially available) iPod/iPhone Accessory of JVC MUSIC PLAY application on your Android device before connecting.
.../RANDOM OFF : Audio CD FOLDER RANDOM/ALL RANDOM/RANDOM OFF : MP3/WMA/WAV/FLAC file SONG RANDOM/ALL RANDOM/RANDOM OFF : iPod or ANDROID *1 Do not leave the cable inside the car when not using. *2 When connecting an Android device, "Press [VIEW] to install the application. CD Eject disc Label side USB input terminal USB USB 2.0 cable*1 (commercially available) iPod/iPhone Accessory of JVC MUSIC PLAY application on your Android device before connecting.
Instruction Manual America
Page 10
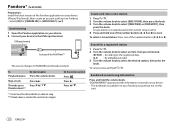
... on your device. 2 Connect your device (iPhone/iPod touch), then create an account and log in to PANDORA and broadcast starts. Press . Create and store a new station 1 Press . 2 Turn the volume knob to select [NEW STATION], then press the knob. 3 Turn the volume knob to select the desired station, then press the knob. Press T. On the remote control Press . USB input terminal Accessory of the iPod/iPhone*1 The source changes to Pandora...
... on your device. 2 Connect your device (iPhone/iPod touch), then create an account and log in to PANDORA and broadcast starts. Press . Create and store a new station 1 Press . 2 Turn the volume knob to select [NEW STATION], then press the knob. 3 Turn the volume knob to select the desired station, then press the knob. Press T. On the remote control Press . USB input terminal Accessory of the iPod/iPhone*1 The source changes to Pandora...

Instruction Manual America
Page 11
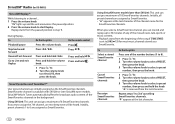
... knob. 4 Turn the volume knob to search for activation. For more of what you love to listen to, all the available channels will be found by tuning to start updating. Store a channel While listening to select SIRIUS XM. 2 Press . Select a stored channel Press one of satellite radio. Preparation: 1 Connect the optional SiriusXM Vehicle Tuner (commercially available). The preset number flashes and "MEMORY" appears. For users in U.S.A.: Online: Go to Phone: Call 1-866...
... knob. 4 Turn the volume knob to search for activation. For more of what you love to listen to, all the available channels will be found by tuning to start updating. Store a channel While listening to select SIRIUS XM. 2 Press . Select a stored channel Press one of satellite radio. Preparation: 1 Connect the optional SiriusXM Vehicle Tuner (commercially available). The preset number flashes and "MEMORY" appears. For users in U.S.A.: Online: Go to Phone: Call 1-866...
Instruction Manual America
Page 12
...; User preset channels are initially assigned as SmartFavorites. " " lights up to 30 minutes of any of the missed news, talk, sports or music content. • Playback starts from the beginning of the song if [TUNE START] is set to select a preset number, then press and hold the knob. Press and hold . SiriusXM Vehicle Tuner automatically buffers the broadcast audio content of 6 SmartFavorites channels...
...; User preset channels are initially assigned as SmartFavorites. " " lights up to 30 minutes of any of the missed news, talk, sports or music content. • Playback starts from the beginning of the song if [TUNE START] is set to select a preset number, then press and hold the knob. Press and hold . SiriusXM Vehicle Tuner automatically buffers the broadcast audio content of 6 SmartFavorites channels...

Instruction Manual America
Page 13
... exit. SIRIUS XM CHANNEL LOCK Default: XX To unlock settings: 1 Turn the volume knob to select a number. 2 Press to move to the entry position. 4 Repeat steps 2 and 3 to enter a new 4-digit pass code. 5 Press the volume knob to confirm. 6 Repeat steps 2 to 5 to reconfirm the pass code. • Make a note of the new pass code to enter channel lock settings for next time. SIGNAL LEVEL Shows...
... exit. SIRIUS XM CHANNEL LOCK Default: XX To unlock settings: 1 Turn the volume knob to select a number. 2 Press to move to the entry position. 4 Repeat steps 2 and 3 to enter a new 4-digit pass code. 5 Press the volume knob to confirm. 6 Repeat steps 2 to 5 to reconfirm the pass code. • Make a note of the new pass code to enter channel lock settings for next time. SIGNAL LEVEL Shows...

Instruction Manual America
Page 14
... volume knob to select an item, then press the knob. Use a 3-core plug head stereo mini plug for optimum audio output. 14 ENGLISH AUDIO SETTINGS Select a preset equalizer directly Press (or) Press repeatedly. , then turn the volume knob within 5 seconds. AUX Use a portable audio player 1 Connect a portable audio player (commercially available). 3.5 mm (1/8") stereo mini plug with "L" shaped connector (commercially available) Portable audio player Auxiliary input jack 2 Select [ON] for [BUILT-IN AUX] in the audio signal to reduce the noise heard from outside the car...
... volume knob to select an item, then press the knob. Use a 3-core plug head stereo mini plug for optimum audio output. 14 ENGLISH AUDIO SETTINGS Select a preset equalizer directly Press (or) Press repeatedly. , then turn the volume knob within 5 seconds. AUX Use a portable audio player 1 Connect a portable audio player (commercially available). 3.5 mm (1/8") stereo mini plug with "L" shaped connector (commercially available) Portable audio player Auxiliary input jack 2 Select [ON] for [BUILT-IN AUX] in the audio signal to reduce the noise heard from outside the car...

Instruction Manual America
Page 15
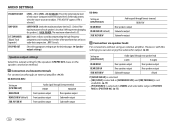
.../USER/VOCAL BOOST/BASS BOOST/CLASSICAL/DANCE EASY EQ Adjust your own sound settings. • The settings are sent to the lineout terminals (REAR/SW) through an external amplifier. ( 24) SUBWOOFER SET*3 ON: Turns on the subwoofer output. ; SUB.W PHASE*4 REVERSE (180°)/NORMAL (0°): Selects the phase of the subwoofer connected to the subwoofer. ; BALANCE *5 POSITION L06 to POSITION R06 (POSITION 00): Adjusts the left and right speaker output balance. *1 Displayed only when [SUBWOOFER SET...
.../USER/VOCAL BOOST/BASS BOOST/CLASSICAL/DANCE EASY EQ Adjust your own sound settings. • The settings are sent to the lineout terminals (REAR/SW) through an external amplifier. ( 24) SUBWOOFER SET*3 ON: Turns on the subwoofer output. ; SUB.W PHASE*4 REVERSE (180°)/NORMAL (0°): Selects the phase of the subwoofer connected to the subwoofer. ; BALANCE *5 POSITION L06 to POSITION R06 (POSITION 00): Adjusts the left and right speaker output balance. *1 Displayed only when [SUBWOOFER SET...
Instruction Manual America
Page 16
... speakers output Subwoofer output Front speakers output Subwoofer output Setting on the speaker connection method. Before adjustment, select the source you can also enjoy the subwoofer output. ( 24) Speaker output settings Select the output setting for the speakers [SPK/PRE OUT], base on [SPK/PRE OUT] Audio signal through lineout terminal REAR/SW Rear speakers output Subwoofer output Subwoofer output Connection via speaker leads For connections without using an external amplifier. AUDIO SETTINGS VOLUME ADJUST AMP GAIN D.T.EXPANDER (Digital Track Expander) SPK/PRE OUT LEVEL...
... speakers output Subwoofer output Front speakers output Subwoofer output Setting on the speaker connection method. Before adjustment, select the source you can also enjoy the subwoofer output. ( 24) Speaker output settings Select the output setting for the speakers [SPK/PRE OUT], base on [SPK/PRE OUT] Audio signal through lineout terminal REAR/SW Rear speakers output Subwoofer output Subwoofer output Connection via speaker leads For connections without using an external amplifier. AUDIO SETTINGS VOLUME ADJUST AMP GAIN D.T.EXPANDER (Digital Track Expander) SPK/PRE OUT LEVEL...
Instruction Manual America
Page 17
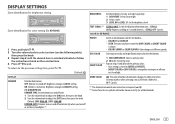
...; COLOR FLOW01 to [USER] in menu mode or when selecting a music file from a folder/list. ; OFF: Cancels. *1 The illumination control wire connection is turned on. ON: Dimmer is required. ( 24) *2 Some characters or symbols will not be shown correctly (or will be blanked). To return to LEVEL 31: Set the brightness level. COLOR (for KD-R690S) PRESET Select an illumination color for the buttons. • COLOR 01 to COLOR 49 • USER: The color...
...; COLOR FLOW01 to [USER] in menu mode or when selecting a music file from a folder/list. ; OFF: Cancels. *1 The illumination control wire connection is turned on. ON: Dimmer is required. ( 24) *2 Some characters or symbols will not be shown correctly (or will be blanked). To return to LEVEL 31: Set the brightness level. COLOR (for KD-R690S) PRESET Select an illumination color for the buttons. • COLOR 01 to COLOR 49 • USER: The color...

Instruction Manual America
Page 18
... "Compact Disc Digital Audio" standard. About iPod/iPhone Made for the disc. • Clean from the center hole and disc edge before inserting a disc. About USB devices • You cannot connect a USB device via a USB hub. • Connecting a cable whose rating is longer than 5 V and exceeds 1 A. Handling discs: • Do not touch the recording surface of the faceplate) • Do not stick tape etc. General • This unit can...
... "Compact Disc Digital Audio" standard. About iPod/iPhone Made for the disc. • Clean from the center hole and disc edge before inserting a disc. About USB devices • You cannot connect a USB device via a USB hub. • Connecting a cable whose rating is longer than 5 V and exceeds 1 A. Handling discs: • Do not touch the recording surface of the faceplate) • Do not stick tape etc. General • This unit can...

Instruction Manual America
Page 20
... Playing time Clock (back to the beginning) AUX Clock (back to the beginning) TROUBLESHOOTING Symptom Remedy Sound cannot be sure the terminals of the speaker wires are in which files were recorded (disc). "NOT SUPPORT" appears and track skips. Disc cannot be selected. REFERENCES Source name FM or AM CD or USB ANDROID AUX Display information (for KD-R492/KD-R490) Frequency Clock (back to the beginning) (For FM Radio Broadcast Data System stations...
... Playing time Clock (back to the beginning) AUX Clock (back to the beginning) TROUBLESHOOTING Symptom Remedy Sound cannot be sure the terminals of the speaker wires are in which files were recorded (disc). "NOT SUPPORT" appears and track skips. Disc cannot be selected. REFERENCES Source name FM or AM CD or USB ANDROID AUX Display information (for KD-R492/KD-R490) Frequency Clock (back to the beginning) (For FM Radio Broadcast Data System stations...

Instruction Manual America
Page 21
... unit. ( 19) ANDROID Cannot playback at [AUTO MODE]. • Make sure JVC MUSIC PLAY APP is installed on the Android device. ( 8) • Reconnect the Android device and select the appropriate control mode. ( 9) • If this does not solve the problem, the connected Android device does not support [AUTO MODE]. ( 19) "NO DEVICE" or "READING" keeps flashing. • Switch off the power saving mode on the Android device. Enter the correct pass code to subscribe. SiriusXM® Radio...
... unit. ( 19) ANDROID Cannot playback at [AUTO MODE]. • Make sure JVC MUSIC PLAY APP is installed on the Android device. ( 8) • Reconnect the Android device and select the appropriate control mode. ( 9) • If this does not solve the problem, the connected Android device does not support [AUTO MODE]. ( 19) "NO DEVICE" or "READING" keeps flashing. • Switch off the power saving mode on the Android device. Enter the correct pass code to subscribe. SiriusXM® Radio...

Instruction Manual America
Page 22
... connect the wires of more information about the SiriusXM channel lineup, visit . Make sure the antenna is updated. Consult the car audio dealer. • Install this unit in the console of the unit. TROUBLESHOOTING SiriusXM® Radio Symptom "CH UNAVAIL" "CHECK ANTENNA" "CHECK TUNER" "NO SIGNAL" "SUBSCRIPTION UPDATED - PRESS ENTER TO CONTINUE." "CODE ERROR" "NO CONTENT" "SCAN CANCEL" Remedy The selected channel is connected to the car chassis or Ground wire (black), or connect...
... connect the wires of more information about the SiriusXM channel lineup, visit . Make sure the antenna is updated. Consult the car audio dealer. • Install this unit in the console of the unit. TROUBLESHOOTING SiriusXM® Radio Symptom "CH UNAVAIL" "CHECK ANTENNA" "CHECK TUNER" "NO SIGNAL" "SUBSCRIPTION UPDATED - PRESS ENTER TO CONTINUE." "CODE ERROR" "NO CONTENT" "SCAN CANCEL" Remedy The selected channel is connected to the car chassis or Ground wire (black), or connect...
Instruction Manual America
Page 24
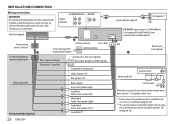
... can also connect a subwoofer speaker directly using this job to professionals for your car and leave this lead without an external subwoofer amplifier. For setting, 16. Vehicle dashboard KD-R690S/KD-R492 KD-R490 Output terminals Factory wiring harness (vehicle) Custom wiring harness (separately purchased) Brown (not used) Recommended connection 24 ENGLISH Antenna terminal Fuse (10 A) To the steering wheel remote control adapter Light blue/yellow Blue: To power antenna Blue/white: To amplifier Join the same color wires together. INSTALLATION/CONNECTION Wiring connection IMPORTANT...
... can also connect a subwoofer speaker directly using this job to professionals for your car and leave this lead without an external subwoofer amplifier. For setting, 16. Vehicle dashboard KD-R690S/KD-R492 KD-R490 Output terminals Factory wiring harness (vehicle) Custom wiring harness (separately purchased) Brown (not used) Recommended connection 24 ENGLISH Antenna terminal Fuse (10 A) To the steering wheel remote control adapter Light blue/yellow Blue: To power antenna Blue/white: To amplifier Join the same color wires together. INSTALLATION/CONNECTION Wiring connection IMPORTANT...
Instruction Manual America
Page 76
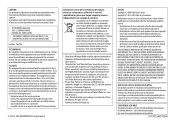
... OF SUCH DAMAGE. CAUTION Use of controls or adjustments or performance of procedures other countries. • "Made for iPod," and "Made for iPhone" mean that an electronic accessory has been designed to connect specifically to iPod, or iPhone, respectively, and has been certified by one or more of the following measures: • Reorient or relocate the receiving antenna. • Increase the...
... OF SUCH DAMAGE. CAUTION Use of controls or adjustments or performance of procedures other countries. • "Made for iPod," and "Made for iPhone" mean that an electronic accessory has been designed to connect specifically to iPod, or iPhone, respectively, and has been certified by one or more of the following measures: • Reorient or relocate the receiving antenna. • Increase the...


