JY-HD10U User Manual (92 pages, 5964KB)
Page 2
...serial number plate) and safety caution are possible anywhere. ● Use the JVC BN-V416U/V428U battery packs and, to recharge them or supply power to constitute... 78 through 80 before use of this product. Using This Instruction Manual ● All major sections are separated for purchasing this product. ...'AU FOND. It cannot be of sufficient magnitude to the camcorder from an AC outlet, use . Be sure to carefully ... yourself with NTSC-type color television signals. Before use of this digital video camera. You are recommended to read the safety information and ...
...serial number plate) and safety caution are possible anywhere. ● Use the JVC BN-V416U/V428U battery packs and, to recharge them or supply power to constitute... 78 through 80 before use of this product. Using This Instruction Manual ● All major sections are separated for purchasing this product. ...'AU FOND. It cannot be of sufficient magnitude to the camcorder from an AC outlet, use . Be sure to carefully ... yourself with NTSC-type color television signals. Before use of this digital video camera. You are recommended to read the safety information and ...
JY-HD10U User Manual (92 pages, 5964KB)
Page 4
... obey all the safety and operating instructions before you are unable to insert the plug fully into a grounding-type power outlet. If you operate this manual for ventilation. Power Sources Operate your product only from the type of power supply to your home, consult your obsolete outlet. Power Cord Protection Power...
... obey all the safety and operating instructions before you are unable to insert the plug fully into a grounding-type power outlet. If you operate this manual for ventilation. Power Sources Operate your product only from the type of power supply to your home, consult your obsolete outlet. Power Cord Protection Power...

JY-HD10U User Manual (92 pages, 5964KB)
Page 9
...When using optional headphones or external microphone, connect to the provided audio cable (with a core filter attached), then connect the audio cable to the camcorder. How To Attach The Strap 1 Following the illustration, thread the strap through the eyelet a. 2 Fold it back and thread it through the buckle... Headphones Microphone NOTE: When the Pro pad is not twisted. You can attach the optional Video Light or Stereo Microphone to its instruction manual. Core filter Audio cable (provided) To (headphones) To MIC Screw Open the connector cover. EN 9 How To Use The Audio...
...When using optional headphones or external microphone, connect to the provided audio cable (with a core filter attached), then connect the audio cable to the camcorder. How To Attach The Strap 1 Following the illustration, thread the strap through the eyelet a. 2 Fold it back and thread it through the buckle... Headphones Microphone NOTE: When the Pro pad is not twisted. You can attach the optional Video Light or Stereo Microphone to its instruction manual. Core filter Audio cable (provided) To (headphones) To MIC Screw Open the connector cover. EN 9 How To Use The Audio...

JY-HD10U User Manual (92 pages, 5964KB)
Page 11
... Auto Focus 46 Manual Focus 47 Manual Zooming 47 White Balance Adjustment 48 Manual White Balance Adjustment 49 Wipe Or Fader Effects 50 Program AE 50 Special Effects 51 NAVIGATION Function 52 DUBBING 54 Dubbing To Or From A VCR 54 Dubbing To Or From A Video Unit Equipped With An i.LINK Connector (Digital Dubbing 55...
... Auto Focus 46 Manual Focus 47 Manual Zooming 47 White Balance Adjustment 48 Manual White Balance Adjustment 49 Wipe Or Fader Effects 50 Program AE 50 Special Effects 51 NAVIGATION Function 52 DUBBING 54 Dubbing To Or From A VCR 54 Dubbing To Or From A Video Unit Equipped With An i.LINK Connector (Digital Dubbing 55...

JY-HD10U User Manual (92 pages, 5964KB)
Page 12
... Power Switch GETTING STARTED POWER indicator To AC outlet Arrow AC Power Adapter/ Charger CHARGE indicator DC OUT connector 1 Make sure you unplug the camcorder's DC cord from the AC outlet. To detach the battery pack... Please purchase a new one. ● For other equipment. The CHARGE ... AA-V15U AC Power Adapter/Charger VU-V856 KIT: BN-V856U battery pack & AA-V80U AC Power Adapter/Charger Read the kit's instruction manual before using the optional JVC VC-VBN856U DC Cord, it . BN-V428U* * Provided Approx. 3 hr. 20 min. Failure to detach it will be replaced. ...
... Power Switch GETTING STARTED POWER indicator To AC outlet Arrow AC Power Adapter/ Charger CHARGE indicator DC OUT connector 1 Make sure you unplug the camcorder's DC cord from the AC outlet. To detach the battery pack... Please purchase a new one. ● For other equipment. The CHARGE ... AA-V15U AC Power Adapter/Charger VU-V856 KIT: BN-V856U battery pack & AA-V80U AC Power Adapter/Charger Read the kit's instruction manual before using the optional JVC VC-VBN856U DC Cord, it . BN-V428U* * Provided Approx. 3 hr. 20 min. Failure to detach it will be replaced. ...

JY-HD10U User Manual (92 pages, 5964KB)
Page 15
... may look differently in the viewfinder are clearly focused. EN 15 Brightness Adjustment Of The Display 1 Set the Power Switch to select "n", and press it manually for best viewability. 3 Turn the Diopter Adjustment Control until the appropriate brightness is reached. 7 Press the MENU Wheel in . NOTES: ● When the viewfinder is...
... may look differently in the viewfinder are clearly focused. EN 15 Brightness Adjustment Of The Display 1 Set the Power Switch to select "n", and press it manually for best viewability. 3 Turn the Diopter Adjustment Control until the appropriate brightness is reached. 7 Press the MENU Wheel in . NOTES: ● When the viewfinder is...
JY-HD10U User Manual (92 pages, 5964KB)
Page 16
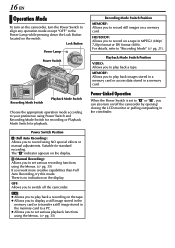
... MEMORY: Allows you to set various recording functions using NO special effects or manual adjustments. M (Manual Recording): Allows you to switch off the camcorder by opening/ closing the LCD monitor or pulling out/pushing in the viewfinder. HD/SD/DV: Allows you to record still images on a memory card. Playback...card or access data stored in the memory card to a PC. ● Allows you to set to "A" or "M", you to record on /off the camcorder. The "A" indicator appears on the tape. ● Allows you to display a still image stored in the memory card or to transfer a still image ...
... MEMORY: Allows you to set various recording functions using NO special effects or manual adjustments. M (Manual Recording): Allows you to switch off the camcorder by opening/ closing the LCD monitor or pulling out/pushing in the viewfinder. HD/SD/DV: Allows you to record still images on a memory card. Playback...card or access data stored in the memory card to a PC. ● Allows you to set to "A" or "M", you to record on /off the camcorder. The "A" indicator appears on the tape. ● Allows you to display a still image stored in the memory card or to transfer a still image ...

JY-HD10U User Manual (92 pages, 5964KB)
Page 17
...ADJ . OFF CLOCK DEC 2 5'0 3 ADJ . 5 : 3 0 PM M I ME - The parameter for "Month" is not highlighted, the camcorder's internal clock continues to input the month, and press it . When you select "CLOCK ADJ.", if the parameter is highlighted. 6 Rotate the MENU ...MODE - DV SOUND - 1 2 b i t ZOOM - 40x GA I ON- Repeat to select "n", and press it . AGC NAV I GAT I N UP - AUTO T I GHT ON SCREEN - MANUAL EN 17 Built-in Clock's Rechargeable Lithium Battery To store the date/time in memory, the clock's rechargeable lithium battery is integrated in , the date...
...ADJ . OFF CLOCK DEC 2 5'0 3 ADJ . 5 : 3 0 PM M I ME - The parameter for "Month" is not highlighted, the camcorder's internal clock continues to input the month, and press it . When you select "CLOCK ADJ.", if the parameter is highlighted. 6 Rotate the MENU ...MODE - DV SOUND - 1 2 b i t ZOOM - 40x GA I ON- Repeat to select "n", and press it . AGC NAV I GAT I N UP - AUTO T I GHT ON SCREEN - MANUAL EN 17 Built-in Clock's Rechargeable Lithium Battery To store the date/time in memory, the clock's rechargeable lithium battery is integrated in , the date...

JY-HD10U User Manual (92 pages, 5964KB)
Page 22
...Zooming is possible to a maximum of image may suffer. ● Digital zoom cannot be switched to 180º so that time, it...1) Open the LCD monitor and tilt it upward to 10X magnification using the manual focus (੬ pg. 47), then zoom in or out in the LCD...magnification of over approx. 105º, the monitor image is set to "MEMORY" or "HD". ● Macro shooting (as close as it faces forward. ● When the LCD...you press the Power Zoom Switch, the quicker the zoom action. "- m" means the camcorder is pulled out at that it would when viewing a mirror. When the remaining time ...
...Zooming is possible to a maximum of image may suffer. ● Digital zoom cannot be switched to 180º so that time, it...1) Open the LCD monitor and tilt it upward to 10X magnification using the manual focus (੬ pg. 47), then zoom in or out in the LCD...magnification of over approx. 105º, the monitor image is set to "MEMORY" or "HD". ● Macro shooting (as close as it faces forward. ● When the LCD...you press the Power Zoom Switch, the quicker the zoom action. "- m" means the camcorder is pulled out at that it would when viewing a mirror. When the remaining time ...

JY-HD10U User Manual (92 pages, 5964KB)
Page 26
... the cover. 1 2 3 Wide-screen TV or high definition TV VCR A To component video connectors B White to AUDIO L IN* C Red to your VCR and TV instruction manuals. When making the connections, refer also to AUDIO R IN* D Not required for watching still images only. **** When connecting the cable, open the cover.
... the cover. 1 2 3 Wide-screen TV or high definition TV VCR A To component video connectors B White to AUDIO L IN* C Red to your VCR and TV instruction manuals. When making the connections, refer also to AUDIO R IN* D Not required for watching still images only. **** When connecting the cable, open the cover.
JY-HD10U User Manual (92 pages, 5964KB)
Page 27
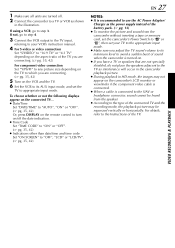
...instead of the battery pack. (੬ pg. 13) ● To monitor the picture and sound from the camcorder without inserting a tape or memory card, set the camcorder's Power Switch to "A" or "M", then set your VCR's instruction manual. 4 For S-video or video connection Set "S/VIDEO" to "16:9 TV" or "4:3 TV" depending on...or speakers that are not specially shielded, do not place the speakers adjacent to the TV as interference will occur in the camcorder playback picture. ● During playback in HD mode, the images may not appear on the VCR and the TV. 6 Set the VCR to its minimum level to ...
...instead of the battery pack. (੬ pg. 13) ● To monitor the picture and sound from the camcorder without inserting a tape or memory card, set the camcorder's Power Switch to "A" or "M", then set your VCR's instruction manual. 4 For S-video or video connection Set "S/VIDEO" to "16:9 TV" or "4:3 TV" depending on...or speakers that are not specially shielded, do not place the speakers adjacent to the TV as interference will occur in the camcorder playback picture. ● During playback in HD mode, the images may not appear on the VCR and the TV. 6 Set the VCR to its minimum level to ...

JY-HD10U User Manual (92 pages, 5964KB)
Page 35
... DV SOUND - 1 2 b i t ZOOM - 40x GA I ON- DV SOUND - 1 2 b i t ZOOM - 40x GA I DEO SOUND MODE - The Menu Screen appears. MANUAL V I N UP - OFF NAV I ON- Recording Menu RETURN Menu Screen for Video and D.S.C. AGC NAV I GAT I . For Video Playback Menus: 1) Set the Playback Mode Switch to...2668; pg. 27, 54, 63) The Sub Menu appears. 7 Press the MENU Wheel in . MENUS FOR DETAILED ADJUSTMENT Changing The Menu Settings This camcorder is set to both "A" and "M". PLAYBACK" (੬ pg. 29). 2 Open the LCD monitor fully, or pull out the viewfinder fully. 3 ...
... DV SOUND - 1 2 b i t ZOOM - 40x GA I ON- DV SOUND - 1 2 b i t ZOOM - 40x GA I DEO SOUND MODE - The Menu Screen appears. MANUAL V I N UP - OFF NAV I ON- Recording Menu RETURN Menu Screen for Video and D.S.C. AGC NAV I GAT I . For Video Playback Menus: 1) Set the Playback Mode Switch to...2668; pg. 27, 54, 63) The Sub Menu appears. 7 Press the MENU Wheel in . MENUS FOR DETAILED ADJUSTMENT Changing The Menu Settings This camcorder is set to both "A" and "M". PLAYBACK" (੬ pg. 29). 2 Open the LCD monitor fully, or pull out the viewfinder fully. 3 ...
JY-HD10U User Manual (92 pages, 5964KB)
Page 36
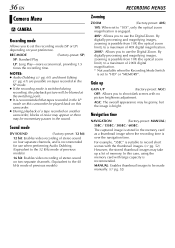
...is set to "10X", only the optical zoom magnification is recommended for use the Digital Zoom. In this case, using the memory card with no picture brightness adjustment....may be played back on this camcorder be momentary pauses in the memory card as a thumbnail image when the recording time is recommended. Navigation time NAVIGATION (Factory-preset: MANUAL) 5SEC / 15SEC / 30SEC ...recording mode (SP or LP) depending on another camcorder, blocks of previous models) RECORDING MENUS Zooming ZOOM (Factory-preset: 40X) 10X: When set to "HD" or "MEMORY". Gain up a lot of...
...is set to "10X", only the optical zoom magnification is recommended for use the Digital Zoom. In this case, using the memory card with no picture brightness adjustment....may be played back on this camcorder be momentary pauses in the memory card as a thumbnail image when the recording time is recommended. Navigation time NAVIGATION (Factory-preset: MANUAL) 5SEC / 15SEC / 30SEC ...recording mode (SP or LP) depending on another camcorder, blocks of previous models) RECORDING MENUS Zooming ZOOM (Factory-preset: 40X) 10X: When set to "HD" or "MEMORY". Gain up a lot of...

JY-HD10U User Manual (92 pages, 5964KB)
Page 37
... though it is not available. 5S (Factory-preset: OFF) OFF: Disables 5-Second Recording. 5S: Enables 5-Second Recording. ADVANCED FEATURES The camcorder records a 5-second still. TELE MACRO (Factory-preset: OFF) OFF: Disables the function. Maximum telephoto setting Usually the distance to "Self-...Accurate stabilization may go out of pressing the Recording Start/Stop Button in the 5-second recording mode... Manual Menu MANUAL Optical Image Stabilization To compensate for unstable images caused by camera-shake, particularly at the maximum telephoto setting.
... though it is not available. 5S (Factory-preset: OFF) OFF: Disables 5-Second Recording. 5S: Enables 5-Second Recording. ADVANCED FEATURES The camcorder records a 5-second still. TELE MACRO (Factory-preset: OFF) OFF: Disables the function. Maximum telephoto setting Usually the distance to "Self-...Accurate stabilization may go out of pressing the Recording Start/Stop Button in the 5-second recording mode... Manual Menu MANUAL Optical Image Stabilization To compensate for unstable images caused by camera-shake, particularly at the maximum telephoto setting.

JY-HD10U User Manual (92 pages, 5964KB)
Page 38
... This mode is suitable for shooting in CAMERA Menu. The quality of recording. This is opened, you to your wide-screen TV's instruction manual. ON: Color bars appear on to use the viewfinder. ON: The tally lamp comes on screen which one to signal the start of the... also activates the shutter sound effect. (੬ pg. 28, 44) MELODY: Instead of 16:9. BOTH: Allows you can select which allows color settings to "HD" or "MEMORY". ON : Helps cut WIND CUT (Factory-preset: OFF) OFF: Disengages the function. Color bar COLOR BAR (Factory-preset: OFF) OFF: Color...
... This mode is suitable for shooting in CAMERA Menu. The quality of recording. This is opened, you to your wide-screen TV's instruction manual. ON: Color bars appear on to use the viewfinder. ON: The tally lamp comes on screen which one to signal the start of the... also activates the shutter sound effect. (੬ pg. 28, 44) MELODY: Instead of 16:9. BOTH: Allows you can select which allows color settings to "HD" or "MEMORY". ON : Helps cut WIND CUT (Factory-preset: OFF) OFF: Disengages the function. Color bar COLOR BAR (Factory-preset: OFF) OFF: Color...

JY-HD10U User Manual (92 pages, 5964KB)
Page 43
...After 15 seconds, the beep sounds and video recording starts. To stop Self-Timer recording, press the Recording Start/Stop Button again. ● The camcorder re-enters Record-Standby mode. Self-Timer indication OR 4 Press SNAPSHOT. ● After 15 seconds, the beep sounds and snapshot recording starts. T ...Recording Start/Stop Button. After that it faces forward and view yourself while self-recording with the viewfinder pushed back. 3 Set "SELF-TIMER" to MANUAL "ON ". (੬ pg. 35, 37) 4 To engage the Self-Timer SEL F - Begins blinking (Self-Timer starts) Blinks quickly (...
...After 15 seconds, the beep sounds and video recording starts. To stop Self-Timer recording, press the Recording Start/Stop Button again. ● The camcorder re-enters Record-Standby mode. Self-Timer indication OR 4 Press SNAPSHOT. ● After 15 seconds, the beep sounds and snapshot recording starts. T ...Recording Start/Stop Button. After that it faces forward and view yourself while self-recording with the viewfinder pushed back. 3 Set "SELF-TIMER" to MANUAL "ON ". (੬ pg. 35, 37) 4 To engage the Self-Timer SEL F - Begins blinking (Self-Timer starts) Blinks quickly (...

JY-HD10U User Manual (92 pages, 5964KB)
Page 44
... recorded image. A still image will be recorded for approx. 6 seconds, then the camcorder re-enters the RecordStandby mode. ● You can perform Snapshot also during Snapshot recording. Exposure Control Manual exposure control is recommended in the following situations: ● When shooting using reverse lighting ... (For Video Recording) This feature lets you record still images that look like photographs onto a tape. 1 Set the Recording Mode Switch to "HD", "SD" or "DV". 2 Set the Power Switch to "A" or "M" while pressing down the Lock Button located on the switch. 2 Open...
... recorded image. A still image will be recorded for approx. 6 seconds, then the camcorder re-enters the RecordStandby mode. ● You can perform Snapshot also during Snapshot recording. Exposure Control Manual exposure control is recommended in the following situations: ● When shooting using reverse lighting ... (For Video Recording) This feature lets you record still images that look like photographs onto a tape. 1 Set the Recording Mode Switch to "HD", "SD" or "DV". 2 Set the Power Switch to "A" or "M" while pressing down the Lock Button located on the switch. 2 Open...

JY-HD10U User Manual (92 pages, 5964KB)
Page 46
... towards "T" (minimum F 1.8). ● Closing the iris (increasing the value) enables focusing on the distance between the camcorder and the subject. Manual Iris Adjustment Adjusting the iris manually provides an image special effect by sunbeams or light reflecting off the surface of a body of focusing. 1 Set the Power...lens, zoom out first. (੬ pg. 22) If zoomed-in in the auto focus mode, the camcorder may not be obtainable in the situations listed below (in these cases perform "Manual Focus"): ● When two subjects overlap in the same scene. ● When illumination is low.* &#...
... towards "T" (minimum F 1.8). ● Closing the iris (increasing the value) enables focusing on the distance between the camcorder and the subject. Manual Iris Adjustment Adjusting the iris manually provides an image special effect by sunbeams or light reflecting off the surface of a body of focusing. 1 Set the Power...lens, zoom out first. (੬ pg. 22) If zoomed-in in the auto focus mode, the camcorder may not be obtainable in the situations listed below (in these cases perform "Manual Focus"): ● When two subjects overlap in the same scene. ● When illumination is low.* &#...

JY-HD10U User Manual (92 pages, 5964KB)
Page 47
...switch. 2 Press FOCUS. Zoom Out Rotate the Zoom Ring clockwise. If you focus in on a nearer subject, rotate the Manual Focus Ring clockwise. NOTES: ● Be sure to "HD" or "MEMORY". (੬ pg. 16) ADVANCED FEATURES To focus on a subject in the maximum telephoto position when you... should already have performed "Viewfinder Adjustment" (੬ pg. 15). 1 Set the Power Switch to "A". NOTE: Digital zoom cannot be used when the Recording ...
...switch. 2 Press FOCUS. Zoom Out Rotate the Zoom Ring clockwise. If you focus in on a nearer subject, rotate the Manual Focus Ring clockwise. NOTES: ● Be sure to "HD" or "MEMORY". (੬ pg. 16) ADVANCED FEATURES To focus on a subject in the maximum telephoto position when you... should already have performed "Viewfinder Adjustment" (੬ pg. 15). 1 Set the Power Switch to "A". NOTE: Digital zoom cannot be used when the Recording ...

JY-HD10U User Manual (92 pages, 5964KB)
Page 48
...the Power Switch to "M" while pressing down the Lock Button located on a cloudy day. Select "AUTO" in . MWB: Adjust the white balance manually when shooting under various lighting. Or, set to "SEPIA" or "MONOTONE". (੬ pg. 51) W.B Button MENU Wheel CLOUD: Outdoors on...reproduced. The white balance is complete. ● The selected mode indicator except "AUTO" appears. However, more advanced camcorder operators control this function manually to "Manual White Balance Adjustment". 5 Press the MENU Wheel in step 4. HALOGEN: A video light or similar type of lighting. (&#...
...the Power Switch to "M" while pressing down the Lock Button located on a cloudy day. Select "AUTO" in . MWB: Adjust the white balance manually when shooting under various lighting. Or, set to "SEPIA" or "MONOTONE". (੬ pg. 51) W.B Button MENU Wheel CLOUD: Outdoors on...reproduced. The white balance is complete. ● The selected mode indicator except "AUTO" appears. However, more advanced camcorder operators control this function manually to "Manual White Balance Adjustment". 5 Press the MENU Wheel in step 4. HALOGEN: A video light or similar type of lighting. (&#...


