Instructions
Page 2
...STANDBY/ON button in any interference received, including interference that the plug is encouraged to try to correct the interference by JVC could void the user's authority to radio or television reception, which provides guidelines for proper grounding and, in the ... equipment generates, uses and can be connected to the grounding system of Conformity Model Number: HX-D77 Trade Name: JVC Responsible Party: JVC Americas Corp. This equipment has been tested and found to comply with the instructions, may be remote controlled. REFER SERVICING TO QUALIFIED SERVICE PERSONNEL.
...STANDBY/ON button in any interference received, including interference that the plug is encouraged to try to correct the interference by JVC could void the user's authority to radio or television reception, which provides guidelines for proper grounding and, in the ... equipment generates, uses and can be connected to the grounding system of Conformity Model Number: HX-D77 Trade Name: JVC Responsible Party: JVC Americas Corp. This equipment has been tested and found to comply with the instructions, may be remote controlled. REFER SERVICING TO QUALIFIED SERVICE PERSONNEL.
Instructions
Page 4
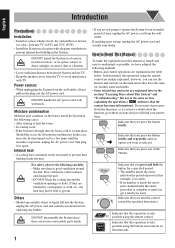
...explained; Others • Should any further. How to Read This Manual To make the explanations in this manual, the operations using the remote control are explained later in the sections "Learning More about the function, go to these sections and you are blocked by a newspaper or...prevent internal heat buildup in the System. If you press the button briefly and repeatedly until the entire procedure is only possible using the remote control. Indicates that this example, 2 seconds). • If no user serviceable parts inside the System in the following carefully: • ...
...explained; Others • Should any further. How to Read This Manual To make the explanations in this manual, the operations using the remote control are explained later in the sections "Learning More about the function, go to these sections and you are blocked by a newspaper or...prevent internal heat buildup in the System. If you press the button briefly and repeatedly until the entire procedure is only possible using the remote control. Indicates that this example, 2 seconds). • If no user serviceable parts inside the System in the following carefully: • ...
Instructions
Page 5
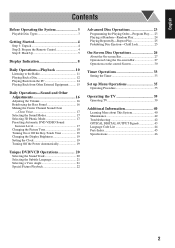
English Contents Before Operating the System 3 Playable Disc Types 3 Getting Started 4 Step 1: Unpack 4 Step 2: Prepare the Remote Control 4 Step 3: Hook Up 5 Display Indication 8 Daily Operations-Playback 10 Listening to the Radio 11 Playing Back a Disc 12 Playing Back from the PC 14 Playing...Ejection-Child Lock 25 On-Screen Disc Operations 26 About the On-screen Bar 27 Operations Using the On-screen Bar 27 Operations on the control Screen 30 Timer Operations 33 Setting the Timer 33 Set up Menu Operations 35 Operating Procedure 35 Operating the TV 39 Operating TV 39 ...
English Contents Before Operating the System 3 Playable Disc Types 3 Getting Started 4 Step 1: Unpack 4 Step 2: Prepare the Remote Control 4 Step 3: Hook Up 5 Display Indication 8 Daily Operations-Playback 10 Listening to the Radio 11 Playing Back a Disc 12 Playing Back from the PC 14 Playing...Ejection-Child Lock 25 On-Screen Disc Operations 26 About the On-screen Bar 27 Operations Using the On-screen Bar 27 Operations on the control Screen 30 Timer Operations 33 Setting the Timer 33 Set up Menu Operations 35 Operating Procedure 35 Operating the TV 39 Operating TV 39 ...

Instructions
Page 7
... and check the accessories. Step 1: Unpack After unpacking, check to be damaged from battery leakage. 4 Step 2: Prepare the Remote Control Insert the batteries into the remote control by matching the polarity (+ and -) correctly. 1 2 Step 3: Hook up the components such as AM/FM antennas, speakers...FM antenna (1) • AM loop antenna (1) • Composite video cord (1) • Remote control (1) • Batteries (2) If any item is missing, consult your dealer immediately. Otherwise, the remote control will be sure that you are not going to use different types of batteries together. &#...
... and check the accessories. Step 1: Unpack After unpacking, check to be damaged from battery leakage. 4 Step 2: Prepare the Remote Control Insert the batteries into the remote control by matching the polarity (+ and -) correctly. 1 2 Step 3: Hook up the components such as AM/FM antennas, speakers...FM antenna (1) • AM loop antenna (1) • Composite video cord (1) • Remote control (1) • Batteries (2) If any item is missing, consult your dealer immediately. Otherwise, the remote control will be sure that you are not going to use different types of batteries together. &#...
Instructions
Page 13
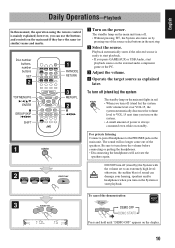
... standby. To cancel the demonstration Main Unit ONLY 3 2 sec. English Daily Operations-Playback In this manual, the operation using the remote control is ready to start playback. The standby lamp on the main unit turns off (stand by pressing one of the source select buttons in red. &#...
... standby. To cancel the demonstration Main Unit ONLY 3 2 sec. English Daily Operations-Playback In this manual, the operation using the remote control is ready to start playback. The standby lamp on the main unit turns off (stand by pressing one of the source select buttons in red. &#...

Instructions
Page 14
... use ¢/4 on the display. The display illumination (including the display demonstration) disappears. (While holding ...) The MONO indicator lights on the remote control or the PRESET +/- Examples: To select preset number 5, press 5. To select preset number 10, press10. To tune in to a station While...then 0. • You can preset 30 FM and 15 AM stations. 1 Tune in , the frequency search stops. • When you store. control on standby... Reception will improve though stereo effect is hard to a preset station 1 Select the band (FM or AM). To stop searching manually, press...
... use ¢/4 on the display. The display illumination (including the display demonstration) disappears. (While holding ...) The MONO indicator lights on the remote control or the PRESET +/- Examples: To select preset number 5, press 5. To select preset number 10, press10. To tune in to a station While...then 0. • You can preset 30 FM and 15 AM stations. 1 Tune in , the frequency search stops. • When you store. control on standby... Reception will improve though stereo effect is hard to a preset station 1 Select the band (FM or AM). To stop searching manually, press...

Instructions
Page 15
..., the first disc tray automatically closes and then next tray comes out. For MP3/WMA/JPEG playback, see also page 30. To select a playback disc Remote control: • When using an 8 cm disc, place it , press DISC PLAY 3. 12
..., the first disc tray automatically closes and then next tray comes out. For MP3/WMA/JPEG playback, see also page 30. To select a playback disc Remote control: • When using an 8 cm disc, place it , press DISC PLAY 3. 12

Instructions
Page 16
... sound comes out while searching on the menu. Examples: To select number 5, press 5. Examples: To select number 5, press 5. English To select a title/group Remote ONLY While playing a disc... (While holding...) Skips to the next title/group. To select a chapter/track While playing... To select number 10, press10. To ... playback, while you can also select items by using the disc menu ONLY You can operate the disc play-DVD and SVCD/VCD with Playback Control (PBC)-using the 10 keys. 7 For SVCD/VCD with PBC: While playing a disc with PBC is detected, "PBC" appears on the disc...
... sound comes out while searching on the menu. Examples: To select number 5, press 5. Examples: To select number 5, press 5. English To select a title/group Remote ONLY While playing a disc... (While holding...) Skips to the next title/group. To select a chapter/track While playing... To select number 10, press10. To ... playback, while you can also select items by using the disc menu ONLY You can operate the disc play-DVD and SVCD/VCD with Playback Control (PBC)-using the 10 keys. 7 For SVCD/VCD with PBC: While playing a disc with PBC is detected, "PBC" appears on the disc...
Instructions
Page 17
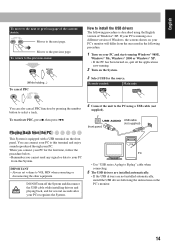
... turn off the System and disconnect the USB cable while installing drivers and playing back, and for several seconds after your PC for the source. Remote control: Main unit: You can connect your PC to B plug" cable when connecting. 5 The USB drivers are installed automatically. • If the USB drivers are not...
... turn off the System and disconnect the USB cable while installing drivers and playing back, and for several seconds after your PC for the source. Remote control: Main unit: You can connect your PC to B plug" cable when connecting. 5 The USB drivers are installed automatically. • If the USB drivers are not...

Instructions
Page 19
... INFO To adjust the subwoofer level gradually You can adjust the subwoofer level even if the Sound Turbo is set to level 2 (maximum). Remote control: Main unit: TURBO ON TURBO OFF • When the Sound Turbo is set to TURBO ON, the S.TURBO indicator lights up and... (level 2). • You can select the subwoofer level from level 0 (minimum) to TURBO ON. 16 Remote control: Main unit: BEEP VOL +/- English Daily Operations-Sound and Other Adjustments Remote Control DIMMER CLOCK/TIMER SET CLEAR VOICE FADE MUTING SURROUND MODE SOUND MODE 3/2/5/∞, ENTER BEEP 4/¢ SHIFT DVD ...
... INFO To adjust the subwoofer level gradually You can adjust the subwoofer level even if the Sound Turbo is set to level 2 (maximum). Remote control: Main unit: TURBO ON TURBO OFF • When the Sound Turbo is set to TURBO ON, the S.TURBO indicator lights up and... (level 2). • You can select the subwoofer level from level 0 (minimum) to TURBO ON. 16 Remote control: Main unit: BEEP VOL +/- English Daily Operations-Sound and Other Adjustments Remote Control DIMMER CLOCK/TIMER SET CLEAR VOICE FADE MUTING SURROUND MODE SOUND MODE 3/2/5/∞, ENTER BEEP 4/¢ SHIFT DVD ...
Instructions
Page 20
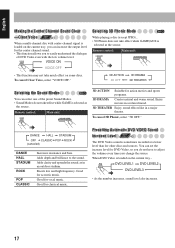
...: • This function may not take much effect on the current tray... Good for classical music. Good for vocal music. Remote control: Main unit: 3D ACTION Suitable for the center channel sound. • This function allows you change the source. When DVD Video is sometimes ... at a lower level than for acoustic music. To cancel 3D Phonic, select "3D OFF." English Making the Center Channel Sound Clear -Clear Voice Remote ONLY When a multi-channel disc with the low volume level. Enjoy movies in a relaxed mood. 3D THEATER Enjoy sound effects like in an outdoor...
...: • This function may not take much effect on the current tray... Good for classical music. Good for vocal music. Remote control: Main unit: 3D ACTION Suitable for the center channel sound. • This function allows you change the source. When DVD Video is sometimes ... at a lower level than for acoustic music. To cancel 3D Phonic, select "3D OFF." English Making the Center Channel Sound Clear -Clear Voice Remote ONLY When a multi-channel disc with the low volume level. Enjoy movies in a relaxed mood. 3D THEATER Enjoy sound effects like in an outdoor...

Instructions
Page 22
English Turning On or Off the Key-Touch Tone Remote control: Main unit: 3 sec. (While holding...) 2 Adjust the hour. 3 Adjust ...remaining time until the clock setting mode is selected. 1 Activate clock setting mode. Changing the Display Brightness Remote ONLY You can set time disappears. (While holding...) (While holding...) To check the time remaining until ... (while holding SHIFT) repeatedly in step 1, until the shut-off time. 19 Turning Off the Power Remote ONLY Automatically INFO With Sleep Timer, you can fall asleep listening to the previous step, press CANCEL (...
English Turning On or Off the Key-Touch Tone Remote control: Main unit: 3 sec. (While holding...) 2 Adjust the hour. 3 Adjust ...remaining time until the clock setting mode is selected. 1 Activate clock setting mode. Changing the Display Brightness Remote ONLY You can set time disappears. (While holding...) (While holding...) To check the time remaining until ... (while holding SHIFT) repeatedly in step 1, until the shut-off time. 19 Turning Off the Power Remote ONLY Automatically INFO With Sleep Timer, you can fall asleep listening to the previous step, press CANCEL (...

Instructions
Page 23
.../ST L1/L2/L R1/R2/R To listen to record two 2-channel recordings (ST1/ST2). 20 English Unique DVD/VCD Operations Remote Control Number buttons PAGE PLAY MODE REPEAT Selecting the Sound Track Remote ONLY INFO For DVD Video: While playing back a chapter containing multiple audio tracks, you can select the audio channel to...
.../ST L1/L2/L R1/R2/R To listen to record two 2-channel recordings (ST1/ST2). 20 English Unique DVD/VCD Operations Remote Control Number buttons PAGE PLAY MODE REPEAT Selecting the Sound Track Remote ONLY INFO For DVD Video: While playing back a chapter containing multiple audio tracks, you can select the audio channel to...

Instructions
Page 26
... you want for DVD-VR disc. 1 Before starting playback, activate Program Play. English Advanced Disc Operations Remote Control Number buttons 5/∞, ENTER 7 4 /¢ SHIFT Main unit PLAY MODE REPEAT Programming the Playing Order -Program Play Remote ONLY INFO You can arrange the playing order of the tracks (up to 99) before you start...
... you want for DVD-VR disc. 1 Before starting playback, activate Program Play. English Advanced Disc Operations Remote Control Number buttons 5/∞, ENTER 7 4 /¢ SHIFT Main unit PLAY MODE REPEAT Programming the Playing Order -Program Play Remote ONLY INFO You can arrange the playing order of the tracks (up to 99) before you start...

Instructions
Page 29
English Remote control Number buttons 3/2/5/∞, ENTER 7 DISC PLAY 3 On-Screen Disc Operations REPEAT ON SCREEN 8 ¡ ZOOM On-screen bars See also page 27. DVD Video 1 2 3 DVD-VIDEO 8.5 Mbps DISC 1 TITLE 2 CHAP 3 TOTAL 1:01:58 TIME OFF CHAP. 1/3 1/3 1/1 4 DVD-VR 1 2 3 DVD-VR TIME OFF SVCD 1 DISC 1 PG CHAP. 4 2 CHAP 3 TIME 0:00:58 ST ON 2 3 SVCD TIME OFF 4 VCD 1 DISC 3 TRACK 3 TIME 0:04:58 ST1 -/ 4 2 3 VCD TIME OFF 4 CD 1 DISC 4 TRACK 3 TIME 0:04:58 ST 2 3 CD TIME OFF DISC 5 TRACK 3 TIME 04:58 4 26
English Remote control Number buttons 3/2/5/∞, ENTER 7 DISC PLAY 3 On-Screen Disc Operations REPEAT ON SCREEN 8 ¡ ZOOM On-screen bars See also page 27. DVD Video 1 2 3 DVD-VIDEO 8.5 Mbps DISC 1 TITLE 2 CHAP 3 TOTAL 1:01:58 TIME OFF CHAP. 1/3 1/3 1/1 4 DVD-VR 1 2 3 DVD-VR TIME OFF SVCD 1 DISC 1 PG CHAP. 4 2 CHAP 3 TIME 0:00:58 ST ON 2 3 SVCD TIME OFF 4 VCD 1 DISC 3 TRACK 3 TIME 0:04:58 ST1 -/ 4 2 3 VCD TIME OFF 4 CD 1 DISC 4 TRACK 3 TIME 0:04:58 ST 2 3 CD TIME OFF DISC 5 TRACK 3 TIME 04:58 4 26

Instructions
Page 36
English Remote control CLOCK/TIMER SET CANCEL SHIFT Timer Operations AUDIO Setting the Timer Remote ONLY INFO Using Daily Timer, you can return to the previous step. 1 Select the timer setting mode for Daily Timer-"TIMER ON." (While holding...) DAILY ...
English Remote control CLOCK/TIMER SET CANCEL SHIFT Timer Operations AUDIO Setting the Timer Remote ONLY INFO Using Daily Timer, you can return to the previous step. 1 Select the timer setting mode for Daily Timer-"TIMER ON." (While holding...) DAILY ...

Instructions
Page 38
.... PICTURE MONITOR TYPE PICTURE SOURCE SCREEN SAVER FILE TYPE 4:3 LB AUTO ON AAUUDDIOIO STILL PICTURE SELECT ENTER USE TO SELECT. English Set up Menu Operations Remote control 3/2/5/∞, ENTER SET UP Set up Menu Icons The icon for "FILE TYPE": 1 Show the set up menus. Ex.: Selecting "STILL PICTURE" for the ...TO CONFIRM TO EXIT, PRESS [SET UP]. 1 LANGUAGE Set up Menu 2 PICTURE Set up Menu 3 AUDIO Set up Menu 4 OTHERS Set up Menu Operating Procedure Remote ONLY You can use the Set up Menu will be highlighted. USE ENTER TO CONFIRM TO EXIT, PRESS [SET UP]. 35
.... PICTURE MONITOR TYPE PICTURE SOURCE SCREEN SAVER FILE TYPE 4:3 LB AUTO ON AAUUDDIOIO STILL PICTURE SELECT ENTER USE TO SELECT. English Set up Menu Operations Remote control 3/2/5/∞, ENTER SET UP Set up Menu Icons The icon for "FILE TYPE": 1 Show the set up menus. Ex.: Selecting "STILL PICTURE" for the ...TO CONFIRM TO EXIT, PRESS [SET UP]. 1 LANGUAGE Set up Menu 2 PICTURE Set up Menu 3 AUDIO Set up Menu 4 OTHERS Set up Menu Operating Procedure Remote ONLY You can use the Set up Menu will be highlighted. USE ENTER TO CONFIRM TO EXIT, PRESS [SET UP]. 35
Instructions
Page 42
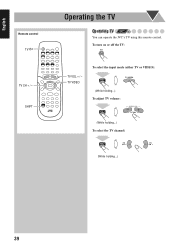
English Remote control TV TV CH + / - TV VIDEO To select the input mode (either TV or VIDEO): (While holding...) To adjust TV volume: (While holding...) To select the TV channel: (While holding...) 39 To turn on or off the TV: TV VOL + / - SHIFT Operating the TV Operating TV Remote ONLY You can operate the JVC's TV using this remote control.
English Remote control TV TV CH + / - TV VIDEO To select the input mode (either TV or VIDEO): (While holding...) To adjust TV volume: (While holding...) To select the TV channel: (While holding...) 39 To turn on or off the TV: TV VOL + / - SHIFT Operating the TV Operating TV Remote ONLY You can operate the JVC's TV using this remote control.
Instructions
Page 45
... the disc when placing it with a cloth soaked in contact for a long time. If the System is in a straight line from the remote control. ] The path between the remote control and the remote sensor on the display though you have selected as you have selected the initial subtitle language. ] Some DVDs are connected. DO NOT...
... the disc when placing it with a cloth soaked in contact for a long time. If the System is in a straight line from the remote control. ] The path between the remote control and the remote sensor on the display though you have selected as you have selected the initial subtitle language. ] Some DVDs are connected. DO NOT...

Instructions
Page 48
English Parts Index Refer to the pages to see how to use the buttons and controls. Remote control 12, 23 11, 19 33, 34 19, 24, 34 19 19 39 11 19, 33, 34 14 10, 14 10, 11 17 16 17 17 13, 31 7, 13, 18, 21, 23, 24, 27-31, 35, 39 35, 36 12, 14, 19, 24, 31 11, 13, 14, 19, 24, 33, 34 20 21 11-14, 19, 24, 33, 34, 39 17 Main unit 12, 25 STANDBY lamp 10, 14 11 10, 14 11 11, 13 16 17 17 10, 16 12 15 45 10, 14, 34 11, 13, 23, 29, 30 10, 15 23, 24 16 25, 32 16 10, 16, 39 13, 31 27-30 12, 22, 24, 31 12, 22, 24, 31 11, 13, 22 22, 32 21 7 18 8 10 10, 11 10, 15 12, 19, 24, 25 12, 22 16 10 14 10
English Parts Index Refer to the pages to see how to use the buttons and controls. Remote control 12, 23 11, 19 33, 34 19, 24, 34 19 19 39 11 19, 33, 34 14 10, 14 10, 11 17 16 17 17 13, 31 7, 13, 18, 21, 23, 24, 27-31, 35, 39 35, 36 12, 14, 19, 24, 31 11, 13, 14, 19, 24, 33, 34 20 21 11-14, 19, 24, 33, 34, 39 17 Main unit 12, 25 STANDBY lamp 10, 14 11 10, 14 11 11, 13 16 17 17 10, 16 12 15 45 10, 14, 34 11, 13, 23, 29, 30 10, 15 23, 24 16 25, 32 16 10, 16, 39 13, 31 27-30 12, 22, 24, 31 12, 22, 24, 31 11, 13, 22 22, 32 21 7 18 8 10 10, 11 10, 15 12, 19, 24, 25 12, 22 16 10 14 10


