

Basic User Guide
Page 1
...001B-M EN SP HD MEMORY CAMERA GZ-HM690U/GZ-HM670U GZ-HM650U/GZ-HM450U GZ-HM440U Basic User Guide Recording Playback Copying Dear Customers Thank you for this product. Detailed User Guide A "Basic User Guide" (this manual) and a "Detailed User Guide" are available for purchasing this JVC product. Further Information For more details... on p. 2 and p. 28 to the "Detailed User Guide" at the following website. Serial No. o http://manual.jvc.co.jp/index.html/ o You can also access the website from the built-in application software of this unit. (p. 22) For...
...001B-M EN SP HD MEMORY CAMERA GZ-HM690U/GZ-HM670U GZ-HM650U/GZ-HM450U GZ-HM440U Basic User Guide Recording Playback Copying Dear Customers Thank you for this product. Detailed User Guide A "Basic User Guide" (this manual) and a "Detailed User Guide" are available for purchasing this JVC product. Further Information For more details... on p. 2 and p. 28 to the "Detailed User Guide" at the following website. Serial No. o http://manual.jvc.co.jp/index.html/ o You can also access the website from the built-in application software of this unit. (p. 22) For...
Basic User Guide
Page 2
...;C (212°F) or incinerate. Also do not dispose of electric shock to this device may be of sufficient magnitude to the Detailed User Guide http://manual.jvc.co.jp/index.html/ The following notes concern possible physical damage to persons. Replace battery with water or liquids (such as cosmetics or medicines, fl...
...;C (212°F) or incinerate. Also do not dispose of electric shock to this device may be of sufficient magnitude to the Detailed User Guide http://manual.jvc.co.jp/index.html/ The following notes concern possible physical damage to persons. Replace battery with water or liquids (such as cosmetics or medicines, fl...

Basic User Guide
Page 3
...; Other product and company names included in the European Union. . 3 For more information, refer to the Detailed User Guide http://manual.jvc.co.jp/index.html/ When a cart is only valid in this unit is intended for private consumer use only. Unplug this apparatus...or exhibition for any way, such as radiators, heat registers, stoves, or other apparatus (including amplifiers) that this instruction manual are trademarks or registered trademarks of Intel Corporation or its subsidiaries in the U.S. If this apparatus near any ventilation openings. Keep these ...
...; Other product and company names included in the European Union. . 3 For more information, refer to the Detailed User Guide http://manual.jvc.co.jp/index.html/ When a cart is only valid in this unit is intended for private consumer use only. Unplug this apparatus...or exhibition for any way, such as radiators, heat registers, stoves, or other apparatus (including amplifiers) that this instruction manual are trademarks or registered trademarks of Intel Corporation or its subsidiaries in the U.S. If this apparatus near any ventilation openings. Keep these ...

Basic User Guide
Page 4
For more information, refer to the "Detailed User Guide" at the following website. o http://manual.jvc.co.jp/index.html/ o You can be used on this unit, refer to p. 10. * When using the AC adapter overseas, please prepare a commercially available ...converter plug for this product, please refer to the Detailed User Guide http://manual.jvc.co.jp/index.html/ Basic User Guide (this unit. (p. 22) Verifying the Accessories AC Adapter AC-V11U* Battery Pack BN-VG114U USB Cable (Type A - ...
For more information, refer to the "Detailed User Guide" at the following website. o http://manual.jvc.co.jp/index.html/ o You can be used on this unit, refer to p. 10. * When using the AC adapter overseas, please prepare a commercially available ...converter plug for this product, please refer to the Detailed User Guide http://manual.jvc.co.jp/index.html/ Basic User Guide (this unit. (p. 22) Verifying the Accessories AC Adapter AC-V11U* Battery Pack BN-VG114U USB Cable (Type A - ...

Basic User Guide
Page 5
.... L AV Connector (p. 18, 20) M M (Power) Button Press and hold to the Detailed User Guide http://manual.jvc.co.jp/index.html/ Playback : Displays file information such as recording date. G POWER/CHARGE (Power/Charge) Lamp (p. 8) H ...) Lamp Lights up/blinks during recording or playback. K INFO (Information) Button Recording : Displays the remaining time (for video only) and battery power. A Lens Cover B Light (GZ-HM690/GZ-HM670/GZ-HM650) C Stereo Microphone D LCD Monitor Turns on /off the power by opening/ closing the LCD monitor. Names of Parts and Functions 5 67 g h 1 i k 2 j...
.... L AV Connector (p. 18, 20) M M (Power) Button Press and hold to the Detailed User Guide http://manual.jvc.co.jp/index.html/ Playback : Displays file information such as recording date. G POWER/CHARGE (Power/Charge) Lamp (p. 8) H ...) Lamp Lights up/blinks during recording or playback. K INFO (Information) Button Recording : Displays the remaining time (for video only) and battery power. A Lens Cover B Light (GZ-HM690/GZ-HM670/GZ-HM650) C Stereo Microphone D LCD Monitor Turns on /off the power by opening/ closing the LCD monitor. Names of Parts and Functions 5 67 g h 1 i k 2 j...

Basic User Guide
Page 6
... disappear after approximately 3 seconds. Press and hold this button to fix the displays. B Zoom Button C Playback Mode Button Switches to the Detailed User Guide http://manual.jvc.co.jp/index.html/ The displays appear for approximately 3 seconds with every press. Press this button to show the displays again. B Index Screen Button C Delete...
... disappear after approximately 3 seconds. Press and hold this button to fix the displays. B Zoom Button C Playback Mode Button Switches to the Detailed User Guide http://manual.jvc.co.jp/index.html/ The displays appear for approximately 3 seconds with every press. Press this button to show the displays again. B Index Screen Button C Delete...

Basic User Guide
Page 7
...D Common/Basic Settings Button D Playback Media Button Switches between SD card and built-in E Close Button memory or slot A and slot B (GZ-HM440). Recording Screen Playback Screen Index Screen 0:01:23 0:12:34 2011 MENU MENU Playback Copying . E Menu Button (p. 24) F Page ...Further Information NOTE 0 The touch screen of an SD card, etc. B Drag the thumbnails on the touch screen to the Detailed User Guide http://manual.jvc.co.jp/index.html/ Getting Started Recording Index Screen 2011 1 Menu Screen 6 VIDEO SCENE SELECT FOCUS BRIGHTNESS ADJUST WHITE BALANCE 5 4 3 ....
...D Common/Basic Settings Button D Playback Media Button Switches between SD card and built-in E Close Button memory or slot A and slot B (GZ-HM440). Recording Screen Playback Screen Index Screen 0:01:23 0:12:34 2011 MENU MENU Playback Copying . E Menu Button (p. 24) F Page ...Further Information NOTE 0 The touch screen of an SD card, etc. B Drag the thumbnails on the touch screen to the Detailed User Guide http://manual.jvc.co.jp/index.html/ Getting Started Recording Index Screen 2011 1 Menu Screen 6 VIDEO SCENE SELECT FOCUS BRIGHTNESS ADJUST WHITE BALANCE 5 4 3 ....

Basic User Guide
Page 8
... of the battery with a USB cable. (Refer to Detailed User Guide.) . 8 For more information, refer to use JVC battery packs. 0 If you use any other battery packs besides JVC battery packs, safety and performance cannot be shortened under some usage conditions such as at 25°C (77°F). To... To AC Outlet (110 V to 240 V) Plug in progress: Blinks Charging finished: Goes out CAUTION Be sure to the Detailed User Guide http://manual.jvc.co.jp/index.html/ Charging Lamp Charging in the power. The recordable and playable time may not start. If the battery pack is also possible...
... of the battery with a USB cable. (Refer to Detailed User Guide.) . 8 For more information, refer to use JVC battery packs. 0 If you use any other battery packs besides JVC battery packs, safety and performance cannot be shortened under some usage conditions such as at 25°C (77°F). To... To AC Outlet (110 V to 240 V) Plug in progress: Blinks Charging finished: Goes out CAUTION Be sure to the Detailed User Guide http://manual.jvc.co.jp/index.html/ Charging Lamp Charging in the power. The recordable and playable time may not start. If the battery pack is also possible...
Basic User Guide
Page 9
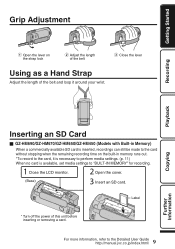
Playback Copying Inserting an SD Card o GZ-HM690/GZ-HM670/GZ-HM650/GZ-HM450 (Models with Built-in memory runs out. *To record to the card, it is necessary to perform media settings. (p. 11) When no card is ... this unit before . Open the cover. (Base) Insert an SD card. inserting or removing a card. 9 For more information, refer to the Detailed User Guide http://manual.jvc.co.jp/index.html/ Further Information Close the lever Recording .. Label Turn off the power of the belt and loop it around your wrist. Close...
Playback Copying Inserting an SD Card o GZ-HM690/GZ-HM670/GZ-HM650/GZ-HM450 (Models with Built-in memory runs out. *To record to the card, it is necessary to perform media settings. (p. 11) When no card is ... this unit before . Open the cover. (Base) Insert an SD card. inserting or removing a card. 9 For more information, refer to the Detailed User Guide http://manual.jvc.co.jp/index.html/ Further Information Close the lever Recording .. Label Turn off the power of the belt and loop it around your wrist. Close...

Basic User Guide
Page 10
... terminals of this unit before recording. NOTE Operations are inserted, recordings can be used. Close the LCD monitor. Refer to the Detailed User Guide http://manual.jvc.co.jp/index.html/ This unit comes with two SD card slots. Slot B o To remove the card Push the card inward once, then pull it...
... terminals of this unit before recording. NOTE Operations are inserted, recordings can be used. Close the LCD monitor. Refer to the Detailed User Guide http://manual.jvc.co.jp/index.html/ This unit comes with two SD card slots. Slot B o To remove the card Push the card inward once, then pull it...

Basic User Guide
Page 11
... MEDIA FOR IMAGE". All data on the card will be performed on the card to format. Perform steps A - E Tap "SD CARD". SD CARD E (GZ-HM440) Tap the slot with the card to a computer before formatting. FORMAT SD CARD REC MEDIA FOR VIDEO REC MEDIA FOR IMAGE . SLOT A SLOT B F... CARD FILE ... . G Tap "YES". Getting Started Recording Playback o To use an SD card (GZ-HM690/GZ-HM670/GZHM650/GZ-HM450) Recording can be deleted when it is set to the Detailed User Guide http://manual.jvc.co.jp/index.html/ A Open the LCD monitor. 0 The unit turns on other devices Format (...
... MEDIA FOR IMAGE". All data on the card will be performed on the card to format. Perform steps A - E Tap "SD CARD". SD CARD E (GZ-HM440) Tap the slot with the card to a computer before formatting. FORMAT SD CARD REC MEDIA FOR VIDEO REC MEDIA FOR IMAGE . SLOT A SLOT B F... CARD FILE ... . G Tap "YES". Getting Started Recording Playback o To use an SD card (GZ-HM690/GZ-HM670/GZHM650/GZ-HM450) Recording can be deleted when it is set to the Detailed User Guide http://manual.jvc.co.jp/index.html/ A Open the LCD monitor. 0 The unit turns on other devices Format (...

Basic User Guide
Page 12
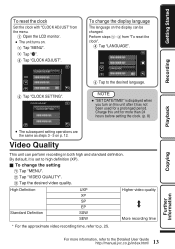
... "SET". 5 Select the region where you live and tap "SAVE". 0 The city name and time difference are displayed. 0 Tap "" to the Detailed User Guide http://manual.jvc.co.jp/index.html/ SET 0 When the year, month, day, hour, or minute item is displayed. When the LCD monitor is closed, the unit turns...
... "SET". 5 Select the region where you live and tap "SAVE". 0 The city name and time difference are displayed. 0 Tap "" to the Detailed User Guide http://manual.jvc.co.jp/index.html/ SET 0 When the year, month, day, hour, or minute item is displayed. When the LCD monitor is closed, the unit turns...
Basic User Guide
Page 13
... for more information, refer to p. 25. Higher video quality More recording time * For the approximate video recording time, refer to the Detailed User Guide http://manual.jvc.co.jp/index.html/ Copying Further Information 13 For more than 24 hours before setting the clock. (p. 8) . 0 The subsequent setting operations are the same as...
... for more information, refer to p. 25. Higher video quality More recording time * For the approximate video recording time, refer to the Detailed User Guide http://manual.jvc.co.jp/index.html/ Copying Further Information 13 For more than 24 hours before setting the clock. (p. 8) . 0 The subsequent setting operations are the same as...

Basic User Guide
Page 14
..., you can record without worrying about the setting details by using the Intelligent Auto mode. Before recording an important scene, it is H Manual, press the S button to switch. Check if the recording mode is lighted. Start recording. To stop . o Indications during video recording... shooting scenes such as backlight (C), night view (B), person (A) etc., its icon is displayed on the touch screen to the Detailed User Guide http://manual.jvc.co.jp/index.html/ Select video mode. Recording Video Recording You can also tap T/W to zoom. Zooming (Wide angle) (Telephoto) .. 0...
..., you can record without worrying about the setting details by using the Intelligent Auto mode. Before recording an important scene, it is H Manual, press the S button to switch. Check if the recording mode is lighted. Start recording. To stop . o Indications during video recording... shooting scenes such as backlight (C), night view (B), person (A) etc., its icon is displayed on the touch screen to the Detailed User Guide http://manual.jvc.co.jp/index.html/ Select video mode. Recording Video Recording You can also tap T/W to zoom. Zooming (Wide angle) (Telephoto) .. 0...

Basic User Guide
Page 15
... Indicator [6630] MENU Focus Recording in green when focused Take a still image. Set the focus on the touch screen to the Detailed User Guide http://manual.jvc.co.jp/index.html/
... Indicator [6630] MENU Focus Recording in green when focused Take a still image. Set the focus on the touch screen to the Detailed User Guide http://manual.jvc.co.jp/index.html/

Basic User Guide
Page 16
DELETE 2011 A delete mark appears on the touch screen to the Detailed User Guide http://manual.jvc.co.jp/index.html/ SEL ALL REL ALL SET Tap e to select the media for playback. to play back the recorded videos or still images ...
DELETE 2011 A delete mark appears on the touch screen to the Detailed User Guide http://manual.jvc.co.jp/index.html/ SEL ALL REL ALL SET Tap e to select the media for playback. to play back the recorded videos or still images ...
Basic User Guide
Page 17
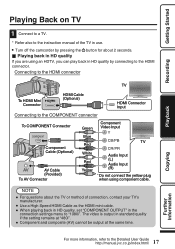
... composite (AV) cannot be output at the same time. Getting Started Recording Playback Playing Back on TV 1 Connect to a TV. * Refer also to the instruction manual of connection, contact your TV's manufacturer. 0 Use a High Speed HDMI Cable as the HDMI mini cable. 0 When playing back in HD quality, set "COMPONENT OUTPUT...
... composite (AV) cannot be output at the same time. Getting Started Recording Playback Playing Back on TV 1 Connect to a TV. * Refer also to the instruction manual of connection, contact your TV's manufacturer. 0 Use a High Speed HDMI Cable as the HDMI mini cable. 0 When playing back in HD quality, set "COMPONENT OUTPUT...
Basic User Guide
Page 18
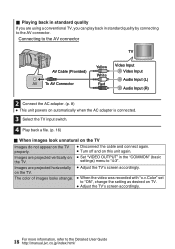
... properly. 0 Disconnect the cable and connect again. 0 Turn off and on 0 Set "VIDEO OUTPUT" in standard quality by connecting to the Detailed User Guide http://manual.jvc.co.jp/index.html/ on TV. 0 Adjust the TV's screen accordingly. 18 For more information, refer to the AV connector. Images are projected vertically on...
... properly. 0 Disconnect the cable and connect again. 0 Turn off and on 0 Set "VIDEO OUTPUT" in standard quality by connecting to the Detailed User Guide http://manual.jvc.co.jp/index.html/ on TV. 0 Adjust the TV's screen accordingly. 18 For more information, refer to the AV connector. Images are projected vertically on...

Basic User Guide
Page 19
... DVD Recorder . (VHS Tape) - . (DVD Disc) . (DVD Disc) X F *1 . (Blu-ray Disc) . (Device's internal HDD) Page X *1 X See manual of recorder. - X F *1 - NOTE 0 It is not possible to connect and record to the Detailed User Guide http://manual.jvc.co.jp/index.html/ Playback Copying Further Information 19 For more information, refer to a DVD writer, external...
... DVD Recorder . (VHS Tape) - . (DVD Disc) . (DVD Disc) X F *1 . (Blu-ray Disc) . (Device's internal HDD) Page X *1 X See manual of recorder. - X F *1 - NOTE 0 It is not possible to connect and record to the Detailed User Guide http://manual.jvc.co.jp/index.html/ Playback Copying Further Information 19 For more information, refer to a DVD writer, external...

Basic User Guide
Page 20
..., DVD recorder, VCR, etc. 1 Connect to a VCR/DVD recorder. 0 Turn off the camcorder by connecting to a DVD recorder or VCR. Refer also to the instruction manuals of the connecting TV. 4 Start recording. 0 Start playback on this unit 0 Set "VIDEO OUTPUT" in standard quality by pressing the M button for about 2 seconds. Preparation...
..., DVD recorder, VCR, etc. 1 Connect to a VCR/DVD recorder. 0 Turn off the camcorder by connecting to a DVD recorder or VCR. Refer also to the instruction manuals of the connecting TV. 4 Start recording. 0 Start playback on this unit 0 Set "VIDEO OUTPUT" in standard quality by pressing the M button for about 2 seconds. Preparation...


