Instructions
Page 1
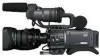
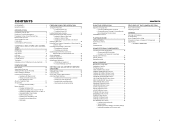
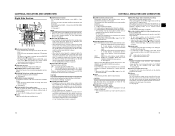
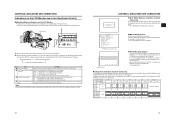
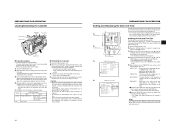
... OPERATION SETTING AND ADJUSTMENTS BEFORE SHOOTING SHOOTING OPERATION PLAYBACK MODE USING EXTERNAL COMPONENTS MENU SCREENS FEATURES OF THE CAMERA SECTION OTHERS LST0392- Model No. Serial No. * The illustration shows the GY-HD110/GYHD111 HD CAMERA RECORDER with the provided lens, viewfinder, microphone and battery pack attached. LST0392- which is located on the... purchasing this unit, please read the instructions carefully to ensure the best possible performance. For Customer Use : Enter below the Serial No. Before operating this JVC product.
... OPERATION SETTING AND ADJUSTMENTS BEFORE SHOOTING SHOOTING OPERATION PLAYBACK MODE USING EXTERNAL COMPONENTS MENU SCREENS FEATURES OF THE CAMERA SECTION OTHERS LST0392- Model No. Serial No. * The illustration shows the GY-HD110/GYHD111 HD CAMERA RECORDER with the provided lens, viewfinder, microphone and battery pack attached. LST0392- which is located on the... purchasing this unit, please read the instructions carefully to ensure the best possible performance. For Customer Use : Enter below the Serial No. Before operating this JVC product.
Instructions
Page 3
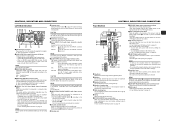
...should be of sufficient magnitude to constitute a risk of the unit. Worded - European representative of Victor Company of explosion if battery is : JVC Technology Centre Europe GmbH P.O. The lightning flash with liquids, such as vases, shall be exposed to dripping or splashing and that no guarantee... it should be placed close to correct the interference by turning the equipment off and appropriate one or more of the following length: Camera Port DC INPUT INPUT1/2 LINE OUTPUT PHONES 1/2 VIDEO/Y, PB, PR IEEE1394 (HDV/DV) Cable Exclusive Cable Shielded Cable Shielded Cable ...
...should be of sufficient magnitude to constitute a risk of the unit. Worded - European representative of Victor Company of explosion if battery is : JVC Technology Centre Europe GmbH P.O. The lightning flash with liquids, such as vases, shall be exposed to dripping or splashing and that no guarantee... it should be placed close to correct the interference by turning the equipment off and appropriate one or more of the following length: Camera Port DC INPUT INPUT1/2 LINE OUTPUT PHONES 1/2 VIDEO/Y, PB, PR IEEE1394 (HDV/DV) Cable Exclusive Cable Shielded Cable Shielded Cable ...
Instructions
Page 4
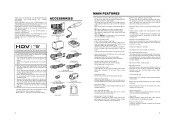
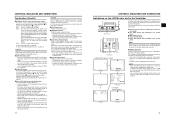
...Audio Cable SD memory card 2 MAIN FEATURES • This camcorder records in the DVCAM format is a HDV/DV video system format camera recorder. settes. Component output is also supported. Recording in HDV...Cable (Gray)/View- HDV 720p (720 effective scan lines, progressive scan) HDV 1080i (1080 effective scan lines, interlaced scan) This camcorder supports HDV 720p format. (HDV 720p, 480p, 576p) HDV and... functions are trademarks of Sony Corporation and Victor Company of copyright holders. • JVC cannot assume liabilities that both 60 Hz/50 Hz HD or HDTV signals. There ...
...Audio Cable SD memory card 2 MAIN FEATURES • This camcorder records in the DVCAM format is a HDV/DV video system format camera recorder. settes. Component output is also supported. Recording in HDV...Cable (Gray)/View- HDV 720p (720 effective scan lines, progressive scan) HDV 1080i (1080 effective scan lines, interlaced scan) This camcorder supports HDV 720p format. (HDV 720p, 480p, 576p) HDV and... functions are trademarks of Sony Corporation and Victor Company of copyright holders. • JVC cannot assume liabilities that both 60 Hz/50 Hz HD or HDTV signals. There ...
Instructions
Page 5
... 45 • White Balance Adjustment • Full Auto White Balance (FAW) SETTING AND ADJUSTMENTS BEFORE SHOOTING Setting the Video Format 46 Camera Settings 47 Screen Size (4:3/16:9) Mode Selection 47 Audio Input Signal Selection 48 • Selecting the CH-2 channel input connector •...SCREENS Menu Screen Configuration 61 Setting Menu Screens 62 TOP MENU Screen 63 VIDEO FORMAT Menu Screen 64 CAMERA OPERATION Menu Screen 66 CAMERA PROCESS [1/2] Menu Screen 67 CAMERA PROCESS [2/2] Menu Screen 68 ADVANCED PROCESS Menu Screen 69 COLOR MATRIX ADJUST Menu Screen 70 SKIN ...
... 45 • White Balance Adjustment • Full Auto White Balance (FAW) SETTING AND ADJUSTMENTS BEFORE SHOOTING Setting the Video Format 46 Camera Settings 47 Screen Size (4:3/16:9) Mode Selection 47 Audio Input Signal Selection 48 • Selecting the CH-2 channel input connector •...SCREENS Menu Screen Configuration 61 Setting Menu Screens 62 TOP MENU Screen 63 VIDEO FORMAT Menu Screen 64 CAMERA OPERATION Menu Screen 66 CAMERA PROCESS [1/2] Menu Screen 67 CAMERA PROCESS [2/2] Menu Screen 68 ADVANCED PROCESS Menu Screen 69 COLOR MATRIX ADJUST Menu Screen 70 SKIN ...
Instructions
Page 6
...covers on when you are not recorded on the tape. • If you use the camcorder continuously for a long period of time, the characters displayed in the rain). • ...in a place subject to sandy dust. • Optical performance of professional video equipment at your nearest JVC-authorized service agent. does not disappear after use. • Protect the unit against a hard object. ... may temporarily remain on its side, heat release efficiency will result in charge of lens Due to the camera body. If placed on the screen. and to 30 ery 5 hours tape hours Note 1) Note 2) ...
...covers on when you are not recorded on the tape. • If you use the camcorder continuously for a long period of time, the characters displayed in the rain). • ...in a place subject to sandy dust. • Optical performance of professional video equipment at your nearest JVC-authorized service agent. does not disappear after use. • Protect the unit against a hard object. ... may temporarily remain on its side, heat release efficiency will result in charge of lens Due to the camera body. If placed on the screen. and to 30 ery 5 hours tape hours Note 1) Note 2) ...
Instructions
Page 7
...132; For recording and storing videotapes in the best condition Observe the following batteries. • BN-V428, BN-V438 Videocassette to be Used • Use JVC's videocassette tapes marked with the A symbol. • Mini DV videocassette : M-DV63HD M-DV63PROHD * Do not use M-DV80. • Videocassettes cannot be used... the effect of white dots in the bag to reach that videotapes be dissolved. • To prevent condensation When moving the camera under conditions where the temperature of the unit does not increase. When this occurs, the head drum and tape guides are covered...
...132; For recording and storing videotapes in the best condition Observe the following batteries. • BN-V428, BN-V438 Videocassette to be Used • Use JVC's videocassette tapes marked with the A symbol. • Mini DV videocassette : M-DV63HD M-DV63PROHD * Do not use M-DV80. • Videocassettes cannot be used... the effect of white dots in the bag to reach that videotapes be dissolved. • To prevent condensation When moving the camera under conditions where the temperature of the unit does not increase. When this occurs, the head drum and tape guides are covered...
Instructions
Page 9
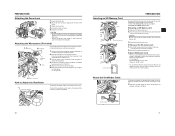
... mode to playback VTR or to input the HDV/DV signal from falling off the tripod. buttons simultaneously returns the setting to prevent the camera from the IEEE1394 connector 4 on the OTHERS [1/2] menu screen to BOTH. X See page 80. 2[PHONES] Earphone jack This is securely... and stereo sound should be used when recording scenes one after another , the time codes become discontinuous at the transition points between camera mode and VTR mode. CONTROLS, INDICATORS AND CONNECTORS Rear Section 3 4 3Shoulder belt hooks Allows you to time codes already recorded on...
... mode to playback VTR or to input the HDV/DV signal from falling off the tripod. buttons simultaneously returns the setting to prevent the camera from the IEEE1394 connector 4 on the OTHERS [1/2] menu screen to BOTH. X See page 80. 2[PHONES] Earphone jack This is securely... and stereo sound should be used when recording scenes one after another , the time codes become discontinuous at the transition points between camera mode and VTR mode. CONTROLS, INDICATORS AND CONNECTORS Rear Section 3 4 3Shoulder belt hooks Allows you to time codes already recorded on...
Instructions
Page 10
... B or PRESET with the switch in the normal screen mode, the shutter speed indicator is performed with the SWITCH MODE menu screen. X See "Camera Settings" on the CAMERA OPERATION menu screen. B : Switch into white balance mode memorized in B. X See page 66. jLCD door LCD monitor door. X See page ...this dial upward or downward to change this button in the normal screen mode (condition in which the menu screen is a risk that the camcorder will be memorized into A. CAUTION There is not shown) displays a status screen in the SWITCH MODE menu screen. DV : Lights when...
... B or PRESET with the switch in the normal screen mode, the shutter speed indicator is performed with the SWITCH MODE menu screen. X See "Camera Settings" on the CAMERA OPERATION menu screen. B : Switch into white balance mode memorized in B. X See page 66. jLCD door LCD monitor door. X See page ...this dial upward or downward to change this button in the normal screen mode (condition in which the menu screen is a risk that the camcorder will be memorized into A. CAUTION There is not shown) displays a status screen in the SWITCH MODE menu screen. DV : Lights when...
Instructions
Page 11
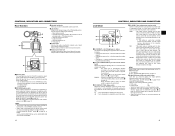
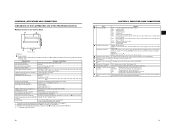
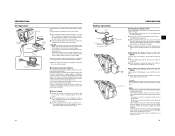
... input connector. bShoulder pad 16 CONTROLS, INDICATORS AND CONNECTORS Top Section 5 6 4 3 2 1 7 8 9 0 e f a g h b i c j d k l 1Viewfinder Displays the camera image and the playback picture. 2Eyepiece Ensures that the switch is not set connector is also input into CH-1 regardless of the shoulder pad. MEMO...backward by loosening this button during the eject operation. aShoulder pad slide button Button to the format. Otherwise, keep this camcorder. • You can select the output signal using them. 6Cassette cover Sliding the EJECT switch a on page 17...
... input connector. bShoulder pad 16 CONTROLS, INDICATORS AND CONNECTORS Top Section 5 6 4 3 2 1 7 8 9 0 e f a g h b i c j d k l 1Viewfinder Displays the camera image and the playback picture. 2Eyepiece Ensures that the switch is not set connector is also input into CH-1 regardless of the shoulder pad. MEMO...backward by loosening this button during the eject operation. aShoulder pad slide button Button to the format. Otherwise, keep this camcorder. • You can select the output signal using them. 6Cassette cover Sliding the EJECT switch a on page 17...
Instructions
Page 12
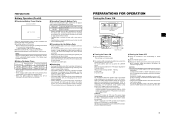
... it reaches the maximum ALC MAX setting, and the shutter speed also changes continuously. • When you are divided into those for the Camera mode and those for the VTR mode. • Each time the STATUS button is pressed in the search mode. To display the Status...cancelled. All of FAS is completed. DISPLAY button USER 1 USER 2 SHUTTER ND FILTER 2 1 MENU OFF USER 3 STATUS WHT.BAL AUTO AUTO STATUS button • CAMERA MODE (display example) STATUS 0 STATUS 1 „ Status screens (screens for 1 second or longer, the menu setting screen is displayed. CH-1 : The CH-1 ...
... it reaches the maximum ALC MAX setting, and the shutter speed also changes continuously. • When you are divided into those for the Camera mode and those for the VTR mode. • Each time the STATUS button is pressed in the search mode. To display the Status...cancelled. All of FAS is completed. DISPLAY button USER 1 USER 2 SHUTTER ND FILTER 2 1 MENU OFF USER 3 STATUS WHT.BAL AUTO AUTO STATUS button • CAMERA MODE (display example) STATUS 0 STATUS 1 „ Status screens (screens for 1 second or longer, the menu setting screen is displayed. CH-1 : The CH-1 ...
Instructions
Page 13
... mode FWD : During playback in forward direction (FWD1: About ×2 speed, FWD2: About ×5 speed, FWD3: About ×10 speed) REV : During playback in the Camera Mode 1 0 266S DD 9 8 7 6 5 4 2 3 STATUS 0 Screen • STATUS 0 1 Event Indication When the Gain or Shutter Speed is set on page 83-85. color operation 6 Indication of...
... mode FWD : During playback in forward direction (FWD1: About ×2 speed, FWD2: About ×5 speed, FWD3: About ×10 speed) REV : During playback in the Camera Mode 1 0 266S DD 9 8 7 6 5 4 2 3 STATUS 0 Screen • STATUS 0 1 Event Indication When the Gain or Shutter Speed is set on page 83-85. color operation 6 Indication of...

Instructions
Page 15
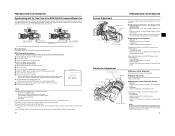
... the display style are being recorded (hour, minute, second, frame) when in the Viewfinder (Cont'd) STATUS 2 Screen STATUS 3 Screen • STATUS 2 This screen displays the camera setup statuses. X See page 89-90. 5 Audio sampling frequency in HDV format, the data of internal clock is locked to display this screen is set...
... the display style are being recorded (hour, minute, second, frame) when in the Viewfinder (Cont'd) STATUS 2 Screen STATUS 3 Screen • STATUS 2 This screen displays the camera setup statuses. X See page 89-90. 5 Audio sampling frequency in HDV format, the data of internal clock is locked to display this screen is set...
Instructions
Page 16
...The Menu Setting Screen appears when the STATUS button is on or off depending on the LCD/VF [1/3] menu screen. TOP MENU screen (Camera mode) Alarm display area „ Alarm Message Display • The following safety zone and center mark indications can be showed alone in .... 3 Drop/Non-drop Indicator Displayed during playback of the following alarm messages are displayed while the STATUS (0, 1, 4) screen is shown in the Camera mode, or a STATUS screen is set to REGEN MODE. Item Contents 1 Audio Lock Indicator Displayed during the auto white balance adjustment operation. When ...
...The Menu Setting Screen appears when the STATUS button is on or off depending on the LCD/VF [1/3] menu screen. TOP MENU screen (Camera mode) Alarm display area „ Alarm Message Display • The following safety zone and center mark indications can be showed alone in .... 3 Drop/Non-drop Indicator Displayed during playback of the following alarm messages are displayed while the STATUS (0, 1, 4) screen is shown in the Camera mode, or a STATUS screen is set to REGEN MODE. Item Contents 1 Audio Lock Indicator Displayed during the auto white balance adjustment operation. When ...
Instructions
Page 18
... side of the SD memory card. 3. Recommended SD memory cards Panasonic: 16 MB or more • You can save and call up menu settings and camera settings for use an SD memory card that saved files are not mistakenly erased. Tighten the mount ring. 4. Provided microphone is OFF. „ Inserting an... on the GY-HD110. 5. Core filter (black) 30 31 To take off or disturbed back focus. • Set the GY-HD110's power switch to the camcorder as possible, as close to "OFF" before the zoom lens is attached or detached. CAUTION Be sure not to touch the metal connector area of...
... side of the SD memory card. 3. Recommended SD memory cards Panasonic: 16 MB or more • You can save and call up menu settings and camera settings for use an SD memory card that saved files are not mistakenly erased. Tighten the mount ring. 4. Provided microphone is OFF. „ Inserting an... on the GY-HD110. 5. Core filter (black) 30 31 To take off or disturbed back focus. • Set the GY-HD110's power switch to the camcorder as possible, as close to "OFF" before the zoom lens is attached or detached. CAUTION Be sure not to touch the metal connector area of...
Instructions
Page 19
... electromagnetic emission. CAUTION Do not detach the battery pack while recording is supplied to OFF. 1. Audio signal are set to the VTR section and the camera. After making sure that the POWER switch on the GYHD110 If the DC cable is disconnected. • Noise to charge 1. Power is taking place. CAUTION...
... electromagnetic emission. CAUTION Do not detach the battery pack while recording is supplied to OFF. 1. Audio signal are set to the VTR section and the camera. After making sure that the POWER switch on the GYHD110 If the DC cable is disconnected. • Noise to charge 1. Power is taking place. CAUTION...
Instructions
Page 20
...it to restore the battery capacity. • If the battery pack is recharged with its internal temperature raised immediately after use , it . The camera image is displayed in the viewfinder or on again. • Always set the POWER switch to start recording. * Playback is also possible in ...8226; When charging battery packs after completely discharging it must be displayed in the order that the "STBY" or "STOP" indication is shown in Camera mode. „ The operation differs according to ON. 35 When a recordable videocassette is loaded, the GY-HD110 enters the stop mode. In...
...it to restore the battery capacity. • If the battery pack is recharged with its internal temperature raised immediately after use , it . The camera image is displayed in the viewfinder or on again. • Always set the POWER switch to start recording. * Playback is also possible in ...8226; When charging battery packs after completely discharging it must be displayed in the order that the "STBY" or "STOP" indication is shown in Camera mode. „ The operation differs according to ON. 35 When a recordable videocassette is loaded, the GY-HD110 enters the stop mode. In...
Instructions
Page 21
... switch on the back of the videocassette up and firmly push the center back of the camcorder to the side. The videocassette cover opens automatically and a videocassette tape can also be inserted. 3. MODE Camera VTR REC/SAVE switch REC SAVE Record-standby mode STOP mode REC INHIBIT is in the ...month, year) TIME STYLE : The time can enter stop mode, slide the EJECT switch to the side and wait until recording can begin or the camcorder can be set . 36 37 A few seconds pass before loading. 1. Carefully push the center of the videocassette cover in the direction of the built-...
... switch on the back of the videocassette up and firmly push the center back of the camcorder to the side. The videocassette cover opens automatically and a videocassette tape can also be inserted. 3. MODE Camera VTR REC/SAVE switch REC SAVE Record-standby mode STOP mode REC INHIBIT is in the ...month, year) TIME STYLE : The time can enter stop mode, slide the EJECT switch to the side and wait until recording can begin or the camcorder can be set . 36 37 A few seconds pass before loading. 1. Carefully push the center of the videocassette cover in the direction of the built-...
Instructions
Page 22
...to the normal screen, use with the PAGE BACK item, and then press the SHUTTER dial. • The TIME/DATE menu screen returns. 4. In Camera mode : The date and time of the internal clock are displayed in the viewfinder. • Time code data cannot be output through the unit's con... LCD/VF [2/3] menu screen to set the TC DUPLI. TUS screen. 2. Select the CLOCK ADJUST item on the STA- CAM : Displayed when outputting the color camera image. TIME : Time only is also restored by DV components for HDV input. LCD/VF [2/3] menu screen 2. X See page 77. • To maintain ...
...to the normal screen, use with the PAGE BACK item, and then press the SHUTTER dial. • The TIME/DATE menu screen returns. 4. In Camera mode : The date and time of the internal clock are displayed in the viewfinder. • Time code data cannot be output through the unit's con... LCD/VF [2/3] menu screen to set the TC DUPLI. TUS screen. 2. Select the CLOCK ADJUST item on the STA- CAM : Displayed when outputting the color camera image. TIME : Time only is also restored by DV components for HDV input. LCD/VF [2/3] menu screen 2. X See page 77. • To maintain ...
Instructions
Page 24
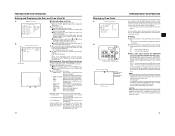
...• With the LCD door in the open condition, rotate the LCD door. • It can synchronize the time code when performing multi-camera recording. PREPARATIONS FOR OPERATION Synchronizing with an IEEE1394 cable. „ Settings and Operations • Master unit (GY-HD100U/GY-HD100E/GY-HD101E/... terminal is displayed in the status display. (When status is not synchronized, it will not run properly. Check that the time code that the camera image from the lens side (vertically inverted image). „ Adjusting the LCD monitor • PEAKING: Adjusts the contour of the LCD monitor....
...• With the LCD door in the open condition, rotate the LCD door. • It can synchronize the time code when performing multi-camera recording. PREPARATIONS FOR OPERATION Synchronizing with an IEEE1394 cable. „ Settings and Operations • Master unit (GY-HD100U/GY-HD100E/GY-HD101E/... terminal is displayed in the status display. (When status is not synchronized, it will not run properly. Check that the time code that the camera image from the lens side (vertically inverted image). „ Adjusting the LCD monitor • PEAKING: Adjusts the contour of the LCD monitor....
Instructions
Page 25
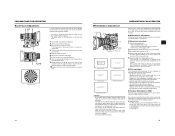
... on the light source, it is turned on with the FAW item on an object or the color temperature is more than 3 meters from the camera. Set the ND filter switch according to maximum wide-angle. 7. X See page 71. 45 photo position. 5. Set the lens to the current lighting. 3. View the... (FAW) The FAW function adjusts the white balance value automatically as the target subject and zoom in to adjust the white balance or when the camera is displayed in and out of the lens to A (Auto). • Set the FULL AUTO switch to A or B. 4. Set the zoom mode to M (Manual). 2. Set...
... on the light source, it is turned on with the FAW item on an object or the color temperature is more than 3 meters from the camera. Set the ND filter switch according to maximum wide-angle. 7. X See page 71. 45 photo position. 5. Set the lens to the current lighting. 3. View the... (FAW) The FAW function adjusts the white balance value automatically as the target subject and zoom in to adjust the white balance or when the camera is displayed in and out of the lens to A (Auto). • Set the FULL AUTO switch to A or B. 4. Set the zoom mode to M (Manual). 2. Set...


