Instructions
Page 1
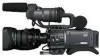
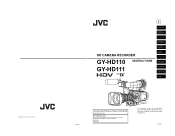
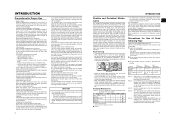
...No. © 2006 Victor Company of Japan, Limited E HD CAMERA RECORDER GY-HD110 INSTRUCTIONS GY-HD111 INTRODUCTION CONTROLS, INDICATORS AND CONNECTORS PREPARATIONS PREPARATIONS FOR OPERATION SETTING AND ADJUSTMENTS BEFORE SHOOTING SHOOTING OPERATION PLAYBACK MODE USING EXTERNAL COMPONENTS MENU SCREENS FEATURES ...OF THE CAMERA SECTION OTHERS LST0392- Before operating this JVC product. Model No. Serial No. * The illustration shows the GY-HD110/GYHD111 HD...
...No. © 2006 Victor Company of Japan, Limited E HD CAMERA RECORDER GY-HD110 INSTRUCTIONS GY-HD111 INTRODUCTION CONTROLS, INDICATORS AND CONNECTORS PREPARATIONS PREPARATIONS FOR OPERATION SETTING AND ADJUSTMENTS BEFORE SHOOTING SHOOTING OPERATION PLAYBACK MODE USING EXTERNAL COMPONENTS MENU SCREENS FEATURES ...OF THE CAMERA SECTION OTHERS LST0392- Before operating this JVC product. Model No. Serial No. * The illustration shows the GY-HD110/GYHD111 HD...
Instructions
Page 4
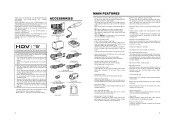
...8226; Digital noise may occur when tapes recorded on other units (including another GY-HD110) are recorded or played back on other equipment provided with shooting conditions which varies...JVC cannot assume liabilities that both 60 Hz/50 Hz HD or HDTV signals. Other use . HDV 720p (720 effective scan lines, progressive scan) HDV 1080i (1080 effective scan lines, interlaced scan) This camcorder supports HDV 720p format. (HDV 720p... are recorded correctly. • Recorded video and audio contents are set off by connecting to 60 frames. finder Cable (Black) Clamp Filters For...
...8226; Digital noise may occur when tapes recorded on other units (including another GY-HD110) are recorded or played back on other equipment provided with shooting conditions which varies...JVC cannot assume liabilities that both 60 Hz/50 Hz HD or HDTV signals. Other use . HDV 720p (720 effective scan lines, progressive scan) HDV 1080i (1080 effective scan lines, interlaced scan) This camcorder supports HDV 720p format. (HDV 720p... are recorded correctly. • Recorded video and audio contents are set off by connecting to 60 frames. finder Cable (Black) Clamp Filters For...
Instructions
Page 5
...Battery Operation 33 • Charging the Battery Pack • Attaching the Battery Pack on the GY-HD110 • Detaching the Battery Pack from the GY-HD110 • Remaining Battery Power Display • Battery Recharge Times • Operating Time with ...Battery Pack • Precautions for the Battery Pack • Recharging PREPARATIONS FOR OPERATION Turning the Power ON 35 • Turning the Power ON • Turning the Power OFF Loading/Unloading the Cassette 36 Setting...
...Battery Operation 33 • Charging the Battery Pack • Attaching the Battery Pack on the GY-HD110 • Detaching the Battery Pack from the GY-HD110 • Remaining Battery Power Display • Battery Recharge Times • Operating Time with ...Battery Pack • Precautions for the Battery Pack • Recharging PREPARATIONS FOR OPERATION Turning the Power ON 35 • Turning the Power ON • Turning the Power OFF Loading/Unloading the Cassette 36 Setting...
Instructions
Page 6
...Please use of professional video equipment at your nearest JVC-authorized service agent. does not disappear after use the camcorder with the hour meter display (which shows the ...power cord other than the one specified or using the video signal output connectors. nance The GY-HD110 incorporates precision mechanical parts, which penetrates the inside the unit and cause damage or a fire..... Block Noise • Please use head cleaning tapes other than the reference input (-60 dBs) setting. • When the unit is not in use the unit within the allowable temperature range of...
...Please use of professional video equipment at your nearest JVC-authorized service agent. does not disappear after use the camcorder with the hour meter display (which shows the ...power cord other than the one specified or using the video signal output connectors. nance The GY-HD110 incorporates precision mechanical parts, which penetrates the inside the unit and cause damage or a fire..... Block Noise • Please use head cleaning tapes other than the reference input (-60 dBs) setting. • When the unit is not in use the unit within the allowable temperature range of...
Instructions
Page 8
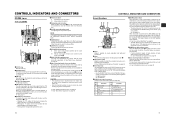
... CAUTION • The back-focus knob is located close -up when the GY-HD110 enters the record mode. It blinks during color bar display when this button, the white balance is automatically adjusted. * It is set the focus ring 1 to the infinite position (f) and the zoom ring 2...M A W T 4 5 6 78 9 0 d MACRO ab c 1FOCUS ring Manual focus ring. 2ZOOM lever/ring This is the manual zoom ring equipped with this lever, set the ZOOM knob b to "S". • Pressing the "W" section of this lever increases the angle of the lens for a wider shooting angle. • Pressing the "T" section...
... CAUTION • The back-focus knob is located close -up when the GY-HD110 enters the record mode. It blinks during color bar display when this button, the white balance is automatically adjusted. * It is set the focus ring 1 to the infinite position (f) and the zoom ring 2...M A W T 4 5 6 78 9 0 d MACRO ab c 1FOCUS ring Manual focus ring. 2ZOOM lever/ring This is the manual zoom ring equipped with this lever, set the ZOOM knob b to "S". • Pressing the "W" section of this lever increases the angle of the lens for a wider shooting angle. • Pressing the "T" section...
Instructions
Page 9
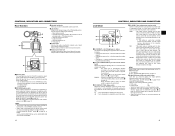
... the brightness of the existing ones. When excessive audio is securely mounted. 6 5 1Back tally lamp This lamp lights up when the GY-HD110 enters the record mode. UB : Set to this hole when mounting the camera onto a tripod. (Use a screw shorter than 8 mm.) Always make sure that the camera...camera from the IEEE1394 connector 4 on , the mode becomes the Camera mode. 13 plays the following : • Menu Setting screens 1 • Characters showing the whether the GY-HD110 is selected, and the time code run mode becomes the FREE run mode when the preset mode is also used when ...
... the brightness of the existing ones. When excessive audio is securely mounted. 6 5 1Back tally lamp This lamp lights up when the GY-HD110 enters the record mode. UB : Set to this hole when mounting the camera onto a tripod. (Use a screw shorter than 8 mm.) Always make sure that the camera...camera from the IEEE1394 connector 4 on , the mode becomes the Camera mode. 13 plays the following : • Menu Setting screens 1 • Characters showing the whether the GY-HD110 is selected, and the time code run mode becomes the FREE run mode when the preset mode is also used when ...
Instructions
Page 16
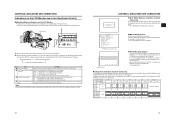
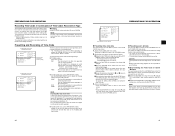
...following alarm messages are displayed during playback of the TC GENE switch on the side section. UB RFRECEE REGEN 2 3 266S DD 4 1. menu is set to display the alarm. DF : During playback of DR-HD100 Oper- When a DR-HD100 (HDD unit by FOCUS enhancements) is connected, its ...26 27 When the DISPLAY button is pressed for 1 second or more. Indicator FREE : TC GENE switch is pressed. (Only when operating the GY-HD110 with the Anton-Bauer or IDX battery). X See page 74. Only image displayed Characters shown enlarged Image and characters displayed No. DUPL : ...
...following alarm messages are displayed during playback of the TC GENE switch on the side section. UB RFRECEE REGEN 2 3 266S DD 4 1. menu is set to display the alarm. DF : During playback of DR-HD100 Oper- When a DR-HD100 (HDD unit by FOCUS enhancements) is connected, its ...26 27 When the DISPLAY button is pressed for 1 second or more. Indicator FREE : TC GENE switch is pressed. (Only when operating the GY-HD110 with the Anton-Bauer or IDX battery). X See page 74. Only image displayed Characters shown enlarged Image and characters displayed No. DUPL : ...

Instructions
Page 17
...inverted operations. • If the LCD monitor is closed inside the camcorder with the screen in the normal display orientation, holding down the DISPLAY...the DISPLAY button for about 2 seconds. • After you set up the function that switches the display between the LCD monitor ...) HZ-FM15 (CANON) 1/3 ZOOM LENS Th13 × 3.5BRMU (FUJINON) MICROPHONE GY-HD110 Bracket MACRO Wide Converter WCV-82SC 1/3 ZOOM LENS Th16 × 5.5BRMU (FUJINON)... battery) X See page 76. For details, please consult your JVC authorized dealer. 28 29 CONTROLS, INDICATORS AND CONNECTORS Indications on the...
...inverted operations. • If the LCD monitor is closed inside the camcorder with the screen in the normal display orientation, holding down the DISPLAY...the DISPLAY button for about 2 seconds. • After you set up the function that switches the display between the LCD monitor ...) HZ-FM15 (CANON) 1/3 ZOOM LENS Th13 × 3.5BRMU (FUJINON) MICROPHONE GY-HD110 Bracket MACRO Wide Converter WCV-82SC 1/3 ZOOM LENS Th16 × 5.5BRMU (FUJINON)... battery) X See page 76. For details, please consult your JVC authorized dealer. 28 29 CONTROLS, INDICATORS AND CONNECTORS Indications on the...
Instructions
Page 18
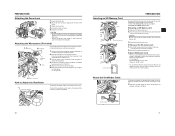
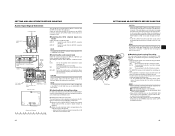
... completely. Turn the knob on the microphone holder anticlockwise to prevent it on the left. To take off or disturbed back focus. • Set the GY-HD110's power switch to the "LOCK" position. Inserting an SD Memory Card Cutout SD memory card cover LOCK switch PREPARATIONS By using an SD memory... the SD memory card cover. „ Taking out the SD memory card 1. Attach the microphone cable to perform the correct setting for this camcorder, format it from interfering with the hole in the lens dropping off the viewfinder, pull the knob in the microphone holder. Make sure...
... completely. Turn the knob on the microphone holder anticlockwise to prevent it on the left. To take off or disturbed back focus. • Set the GY-HD110's power switch to the "LOCK" position. Inserting an SD Memory Card Cutout SD memory card cover LOCK switch PREPARATIONS By using an SD memory... the SD memory card cover. „ Taking out the SD memory card 1. Attach the microphone cable to perform the correct setting for this camcorder, format it from interfering with the hole in the lens dropping off the viewfinder, pull the knob in the microphone holder. Make sure...
Instructions
Page 19
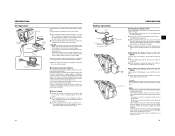
... generating noise, such as possible. „ Charging the Built-in Battery The built-in which case the set the date and time and time code data again. However, it to the GY-HD110. „ Detaching the Battery Pack from the GYHD110 Ensure that the power switches of the arrow to mount...this unit as near as ripples or power sources with the connector side facing the GY-HD110. 2. Attach the supplied core filter (gray) as shown in the opposite direction of the GY-HD110 as shown in battery and then set date and time and time code data are muted. • When operation is connected...
... generating noise, such as possible. „ Charging the Built-in Battery The built-in which case the set the date and time and time code data again. However, it to the GY-HD110. „ Detaching the Battery Pack from the GYHD110 Ensure that the power switches of the arrow to mount...this unit as near as ripples or power sources with the connector side facing the GY-HD110. 2. Attach the supplied core filter (gray) as shown in the opposite direction of the GY-HD110 as shown in battery and then set date and time and time code data are muted. • When operation is connected...
Instructions
Page 20
... mode automatically. HDV/DV input is being switched : Flashing In VTR mode : Lit In Camera mode : Off Camera mode The GY-HD110 enters the Camera mode. Place the GY-HD110 in areas with a cold environment. • Operating time is reduced when the power zoom lens and LCD are attached. „... charging time will be set to OFF during a recording, wait at 25°C (77°F)) BN-V428 Approx. 40 minutes BN-V438 Approx. 60 minutes • Battery operating time may differ depending on the camera is also possible in the viewfinder. VTR mode The GY-HD110 enters the VTR mode....
... mode automatically. HDV/DV input is being switched : Flashing In VTR mode : Lit In Camera mode : Off Camera mode The GY-HD110 enters the Camera mode. Place the GY-HD110 in areas with a cold environment. • Operating time is reduced when the power zoom lens and LCD are attached. „... charging time will be set to OFF during a recording, wait at 25°C (77°F)) BN-V428 Approx. 40 minutes BN-V438 Approx. 60 minutes • Battery operating time may differ depending on the camera is also possible in the viewfinder. VTR mode The GY-HD110 enters the VTR mode....
Instructions
Page 22
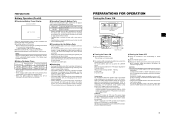
...See page 77. • To maintain the continuity of the following methods. Select the CLOCK ADJUST item on the tape are displayed. When all the settings are completed, rotate the SHUTTER dial to ON. • Time codes or user's bit data are displayed. In VTR playback mode : The date and... Time code indication (Example) Time code indication 00:00:00:00 User's bits indication FF EE DD 20 STATUS 1 screen PREPARATIONS FOR OPERATION The GY-HD110 records SMPTE-standard (NTSC) or EBUstandard (PAL) time codes and user's bits. Whether time codes or user's bit data should be shown on the...
...See page 77. • To maintain the continuity of the following methods. Select the CLOCK ADJUST item on the tape are displayed. When all the settings are completed, rotate the SHUTTER dial to ON. • Time codes or user's bit data are displayed. In VTR playback mode : The date and... Time code indication (Example) Time code indication 00:00:00:00 User's bits indication FF EE DD 20 STATUS 1 screen PREPARATIONS FOR OPERATION The GY-HD110 records SMPTE-standard (NTSC) or EBUstandard (PAL) time codes and user's bits. Whether time codes or user's bit data should be shown on the...
Instructions
Page 23
...DROP : The time code generator's running method is rotated, the value of frames. To compensate for this setting if it is set the UB REC item to the user's bit data recorded on Tape The GY-HD110 also incorporates a time code reader. The "non-drop frame mode" is when no frames are dropped and... the actual time shift neglected. „ TC/UB/CLOCK menu screen (FRAME RATE: 50/25) Whether or not user's bit data should be recorded can be set. 2When the SHUTTER...
...DROP : The time code generator's running method is rotated, the value of frames. To compensate for this setting if it is set the UB REC item to the user's bit data recorded on Tape The GY-HD110 also incorporates a time code reader. The "non-drop frame mode" is when no frames are dropped and... the actual time shift neglected. „ TC/UB/CLOCK menu screen (FRAME RATE: 50/25) Whether or not user's bit data should be recorded can be set. 2When the SHUTTER...
Instructions
Page 27
... monitoring speaker or earphone. • Select the audio channel to audio equipment, etc. When the microphone is +4 dBs. : Set to the CH-1 and CH-2 channels is connected. BOTH : The sound input to this position when using the CH-2 INPUT switch...SETTING AND ADJUSTMENTS BEFORE SHOOTING Audio Input Signal Selection CH-2 INPUT switch AUDIO INPUT switch MONITOR SELECT FULL AUTO switch switch MONITOR volume Monitor speaker CH-1 audio input level volume CH-2 audio input level volume CH-1/CH-2 AUDIO SELECT switch STATUS 1 screen Audio level Indicator level (reference) The GY-HD110...
... monitoring speaker or earphone. • Select the audio channel to audio equipment, etc. When the microphone is +4 dBs. : Set to the CH-1 and CH-2 channels is connected. BOTH : The sound input to this position when using the CH-2 INPUT switch...SETTING AND ADJUSTMENTS BEFORE SHOOTING Audio Input Signal Selection CH-2 INPUT switch AUDIO INPUT switch MONITOR SELECT FULL AUTO switch switch MONITOR volume Monitor speaker CH-1 audio input level volume CH-2 audio input level volume CH-1/CH-2 AUDIO SELECT switch STATUS 1 screen Audio level Indicator level (reference) The GY-HD110...
Instructions
Page 28
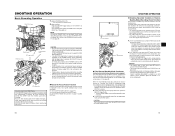
... events to about 3 seconds. „ To return to the record-standby mode from the record-standby mode can also set in the FRONT TALLY and BACK TALLY items on the GY-HD110 to protect the tape. (Tape protect mode) In the tape protect mode, STOP is shown as FOCUS ASSIST button. ... switch is shown on the tape where the RET button was recorded in HDV format is manually moved abruptly during recording. After playback, the camcorder returns to the video signal output connectors. 1. is moved immediately after playback. POWER switch REC trigger button BACK TALLY lamp FOCUS ASSIST button ...
... events to about 3 seconds. „ To return to the record-standby mode from the record-standby mode can also set in the FRONT TALLY and BACK TALLY items on the GY-HD110 to protect the tape. (Tape protect mode) In the tape protect mode, STOP is shown as FOCUS ASSIST button. ... switch is shown on the tape where the RET button was recorded in HDV format is manually moved abruptly during recording. After playback, the camcorder returns to the video signal output connectors. 1. is moved immediately after playback. POWER switch REC trigger button BACK TALLY lamp FOCUS ASSIST button ...
Instructions
Page 30
...menu screen Fast-Forward, Rewind „ Press the FF button in the stop . Pressing the REW button executes search of DV input. (GY-HD110U/GY-HD111E only)) When the GY-HD110 is capable of the unit. Display the AUDIO menu screen. MEMO The DV format is used in a cold environment. Table 1 MONITOR ...* In HDV format, you to the tape protect mode. STOP button PLAY/STILL button REW button FF button MEMO The GY-HD110 can play mode or still mode to the VTR mode. Set the unit to search the tape in the forward direction. rarily. • The unit enters the still mode. 7. Search...
...menu screen Fast-Forward, Rewind „ Press the FF button in the stop . Pressing the REW button executes search of DV input. (GY-HD110U/GY-HD111E only)) When the GY-HD110 is capable of the unit. Display the AUDIO menu screen. MEMO The DV format is used in a cold environment. Table 1 MONITOR ...* In HDV format, you to the tape protect mode. STOP button PLAY/STILL button REW button FF button MEMO The GY-HD110 can play mode or still mode to the VTR mode. Set the unit to search the tape in the forward direction. rarily. • The unit enters the still mode. 7. Search...
Instructions
Page 31
... on the left panel of the camcorder. AUDIO menu screen USING EXTERNAL COMPONENTS By connecting the video signal output terminal and the LINE OUTPUT terminal on the recording unit. GY-HD110 : Insert the recorded videocassette. Set the IEEE1394 switch so it matches the... video format. Output signal when AUTO is completed. Set the camcorder to the video signal output terminal when connecting or disconnecting the...
... on the left panel of the camcorder. AUDIO menu screen USING EXTERNAL COMPONENTS By connecting the video signal output terminal and the LINE OUTPUT terminal on the recording unit. GY-HD110 : Insert the recorded videocassette. Set the IEEE1394 switch so it matches the... video format. Output signal when AUTO is completed. Set the camcorder to the video signal output terminal when connecting or disconnecting the...
Instructions
Page 32
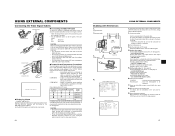
... to another video component equipped with HDV/DV connector (IEEE1394 standard) using a IEEE1394 cable (optional) enables dubbing of the GY-HD110. Set the camcorder to automatically detect the playback tape video format or play back only a particular format. tion. 9. TC/UB Date and ...the units with high picture quality and high-quality sound. „ Using the GY-HD110 as Recording Unit (Dubbing From Another Videocassette) 1. Records the data of operation, set in the camcorder. Insert the videocassettes. Start playback on and off or switch the video input, ...
... to another video component equipped with HDV/DV connector (IEEE1394 standard) using a IEEE1394 cable (optional) enables dubbing of the GY-HD110. Set the camcorder to automatically detect the playback tape video format or play back only a particular format. tion. 9. TC/UB Date and ...the units with high picture quality and high-quality sound. „ Using the GY-HD110 as Recording Unit (Dubbing From Another Videocassette) 1. Records the data of operation, set in the camcorder. Insert the videocassettes. Start playback on and off or switch the video input, ...
Instructions
Page 33
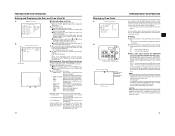
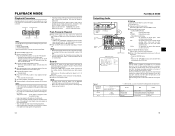
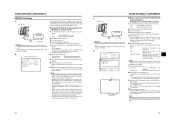
... OFF. • Insert the tape and set to set the Backup Recording func- The FILE MANAGE menu screen can be correctly recorded). Set the 1394 REC TRIGGER item on the menu screens differ with a IEEE1394 cable. „ Settings „ Master unit (GY-HD110) 1. DV HDV : When backup in ...Backup Recording 1. IEEE1394 switch PB VIDEO/Y IEEE 1394 HDV DV PR DC INPUT LINE OUTPUT IEEE1394 Master unit GY-HD110 Backup unit Signal flow IEEE1394 cable CAUTION • Set the IEEE1394 switch on this unit, interrupting the backup recording image. Place in HDV format 2. TOP MENU...
... OFF. • Insert the tape and set to set the Backup Recording func- The FILE MANAGE menu screen can be correctly recorded). Set the 1394 REC TRIGGER item on the menu screens differ with a IEEE1394 cable. „ Settings „ Master unit (GY-HD110) 1. DV HDV : When backup in ...Backup Recording 1. IEEE1394 switch PB VIDEO/Y IEEE 1394 HDV DV PR DC INPUT LINE OUTPUT IEEE1394 Master unit GY-HD110 Backup unit Signal flow IEEE1394 cable CAUTION • Set the IEEE1394 switch on this unit, interrupting the backup recording image. Place in HDV format 2. TOP MENU...
Instructions
Page 34
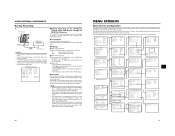
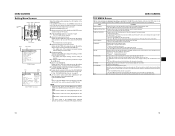
...dial to align the cursor (K) with the menu screen to change the setting, and then press the SHUTTER dial. • The setting area stops blinking and the setting is entered. „ To change settings on whether the GY-HD110 is in FILE, select the FILE MANAGE menu screen and perform the ...the GY-HD110 with the EXIT item, and then press the SHUTTER dial. Displays a menu screen for shooting and playing back video. • The cursor (K) does not move to this item when the camcorder is only displayed when in steps 4. It consists of two screens. Saves the menu screen settings as...
...dial to align the cursor (K) with the menu screen to change the setting, and then press the SHUTTER dial. • The setting area stops blinking and the setting is entered. „ To change settings on whether the GY-HD110 is in FILE, select the FILE MANAGE menu screen and perform the ...the GY-HD110 with the EXIT item, and then press the SHUTTER dial. Displays a menu screen for shooting and playing back video. • The cursor (K) does not move to this item when the camcorder is only displayed when in steps 4. It consists of two screens. Saves the menu screen settings as...


