

Instruction Manual
Page 1
... MEMORY CARD CAMERA RECORDER GY-HM200U/GY-HM200E GY-HM170U/GY-HM170E INSTRUCTIONS . GY-HM170U/GY-HM170E do not come with GY-HM200U/GY-HM200E. Before operating this information for Europe) Only "U" models (GY-HM200U/GY-HM170U) have been evaluated by UL. Retain this unit, please read the following Mobile User Guide. Please check the latest version of this JVC product. GY-HM200U/GY-HM170U Serial No...
... MEMORY CARD CAMERA RECORDER GY-HM200U/GY-HM200E GY-HM170U/GY-HM170E INSTRUCTIONS . GY-HM170U/GY-HM170E do not come with GY-HM200U/GY-HM200E. Before operating this information for Europe) Only "U" models (GY-HM200U/GY-HM170U) have been evaluated by UL. Retain this unit, please read the following Mobile User Guide. Please check the latest version of this JVC product. GY-HM200U/GY-HM170U Serial No...

Instruction Manual
Page 13
...manual 0 All rights reserved by switching the 3position ND filter (OFF, 1/4, 1/16). Memo : Describes reference information, such as ™ and ® have been omitted in with the handle unit. A : Indicates the reference page numbers and reference items. K : Feature available on GY-HM170U/GY-HM170E only. M : Feature available on GY-HM200U/GY... display and 0.24-inch 16:9 LCOS color viewfinder provides support for critical focusing during shooting by JVC KENWOOD Corporation. Professional-style switch layout and diverse video parameters Switches for Gain and White Balance are...
...manual 0 All rights reserved by switching the 3position ND filter (OFF, 1/4, 1/16). Memo : Describes reference information, such as ™ and ® have been omitted in with the handle unit. A : Indicates the reference page numbers and reference items. K : Feature available on GY-HM170U/GY-HM170E only. M : Feature available on GY-HM200U/GY... display and 0.24-inch 16:9 LCOS color viewfinder provides support for critical focusing during shooting by JVC KENWOOD Corporation. Professional-style switch layout and diverse video parameters Switches for Gain and White Balance are...
Instruction Manual
Page 14
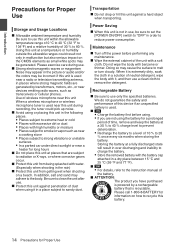
... used near a radio or television transmitting antenna, in a place subject to 80 %. When it in places where strong magnetic fields are subject to the instruction manual of the unit with a soft cloth. Storing the battery at places that is used near devices emitting radio waves, such as transceivers or cellular phones...
... used near a radio or television transmitting antenna, in a place subject to 80 %. When it in places where strong magnetic fields are subject to the instruction manual of the unit with a soft cloth. Storing the battery at places that is used near devices emitting radio waves, such as transceivers or cellular phones...

Instruction Manual
Page 15
... is not completely erased from Panasonic, TOSHIBA or SanDisk may not be easier to as recording, playback, or formatting). Groove . o We are saved from this manual. Do not use oil-based pens. o If you want to static electricity or electrical noise. o If the SD card contains files recorded by completely erasing...
... is not completely erased from Panasonic, TOSHIBA or SanDisk may not be easier to as recording, playback, or formatting). Groove . o We are saved from this manual. Do not use oil-based pens. o If you want to static electricity or electrical noise. o If the SD card contains files recorded by completely erasing...

Instruction Manual
Page 21
... Panel E D C F B A G M L K JIH . Press and hold the button to switch between Automatic Shutter mode and Manual Shutter mode. (A P58 [Setting the Electronic Shutter] ) I [AE LEVEL] Automatic Brightness Adjustment (AE) Level Setting Button Sets the automatic...[WHT BAL B/A/PRST] White Balance Switch (A P60 [Adjusting the White Balance] ) L [GAIN L/M/H] Gain Switch (A P57 [Setting the Gain] ) M [IRIS A/M] Auto Iris/Manual Iris Button (A P55 [Adjusting the Iris] ) Names of Functions to User Buttons] ) F LCD monitor (A P23 [LCD Monitor] ) G J / K Volume Buttons/[+/-] Selection Buttons...
... Panel E D C F B A G M L K JIH . Press and hold the button to switch between Automatic Shutter mode and Manual Shutter mode. (A P58 [Setting the Electronic Shutter] ) I [AE LEVEL] Automatic Brightness Adjustment (AE) Level Setting Button Sets the automatic...[WHT BAL B/A/PRST] White Balance Switch (A P60 [Adjusting the White Balance] ) L [GAIN L/M/H] Gain Switch (A P57 [Setting the Gain] ) M [IRIS A/M] Auto Iris/Manual Iris Button (A P55 [Adjusting the Iris] ) Names of Functions to User Buttons] ) F LCD monitor (A P23 [LCD Monitor] ) G J / K Volume Buttons/[+/-] Selection Buttons...
Instruction Manual
Page 24
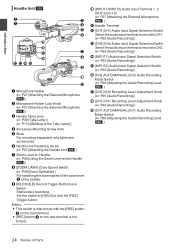
...INPUT1] Audio Input Signal Selection Switch (A P65 [Audio Recording] ) O [INPUT2] Audio Input Signal Selection Switch (A P65 [Audio Recording] ) P [CH2 AUTO/MANUAL] CH2 Audio Recording Mode Switch (A P66 [Adjusting the Audio Recording Level O] ) Q [CH2] CH2 Recording Level Adjustment Knob (A P65 [Audio Recording] ) ...R [CH1] CH1 Recording Level Adjustment Knob (A P65 [Audio Recording] ) S [CH1 AUTO/MANUAL] CH1 Audio Recording Mode Switch (A P66 [Adjusting the Audio Recording Level O] ) 24 Names of the Tally Lamp] ) D Accessory Mounting Screw ...
...INPUT1] Audio Input Signal Selection Switch (A P65 [Audio Recording] ) O [INPUT2] Audio Input Signal Selection Switch (A P65 [Audio Recording] ) P [CH2 AUTO/MANUAL] CH2 Audio Recording Mode Switch (A P66 [Adjusting the Audio Recording Level O] ) Q [CH2] CH2 Recording Level Adjustment Knob (A P65 [Audio Recording] ) ...R [CH1] CH1 Recording Level Adjustment Knob (A P65 [Audio Recording] ) S [CH1 AUTO/MANUAL] CH1 Audio Recording Mode Switch (A P66 [Adjusting the Audio Recording Level O] ) 24 Names of the Tally Lamp] ) D Accessory Mounting Screw ...

Instruction Manual
Page 29
... IN Power)] ) Caution : 0 Set the [POWER ON/OFF] switch to "OFF" before changing the power supply that it in injuries or damages, read the instruction manual of the tripod to be used and make sure that operates this camera recorder, you hear a click. 3 Connect the supplied AC adapter to the [DC...
... IN Power)] ) Caution : 0 Set the [POWER ON/OFF] switch to "OFF" before changing the power supply that it in injuries or damages, read the instruction manual of the tripod to be used and make sure that operates this camera recorder, you hear a click. 3 Connect the supplied AC adapter to the [DC...

Instruction Manual
Page 30
... may not be fully charged or the charging time may be reaching the end of its life. oK 0 For details, refer to the instruction manual of the arrow. Do not expose the battery to high temperatures (such as in your area. Replace the battery with the battery inside will deplete...] button, push up and remove the battery in use . 0 Leaving the camera recorder unused with a new one. 30 Power Supply Preparations Removing the Battery GY-HM200U/GY-HM200E 2 GY-HM170U/GY-HM170E 2 1 . 1 Hold down the lock button (blue) at the center of the [POWER ON/OFF] switch to set to "OFF" Memo : oM 0 If ...
... may not be fully charged or the charging time may be reaching the end of its life. oK 0 For details, refer to the instruction manual of the arrow. Do not expose the battery to high temperatures (such as in your area. Replace the battery with the battery inside will deplete...] button, push up and remove the battery in use . 0 Leaving the camera recorder unused with a new one. 30 Power Supply Preparations Removing the Battery GY-HM200U/GY-HM200E 2 GY-HM170U/GY-HM170E 2 1 . 1 Hold down the lock button (blue) at the center of the [POWER ON/OFF] switch to set to "OFF" Memo : oM 0 If ...
Instruction Manual
Page 45
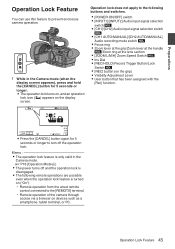
... following buttons and switches. 0 [POWER ON/OFF] switch 0 [INPUT1]/[INPUT2] Audio input signal selection switch O 0 [CH1]/[CH2] Audio input signal selection switch O 0 [CH1 AUTO/MANUAL]/[CH2 AUTO/MANUAL] Audio recording mode switch O 0 Focus ring 0 Zoom lever at the grip/Zoom lever at the handle O/Zoom ring at the lens section 0 [ZOOM L/M/H] Zoom...
... following buttons and switches. 0 [POWER ON/OFF] switch 0 [INPUT1]/[INPUT2] Audio input signal selection switch O 0 [CH1]/[CH2] Audio input signal selection switch O 0 [CH1 AUTO/MANUAL]/[CH2 AUTO/MANUAL] Audio recording mode switch O 0 Focus ring 0 Zoom lever at the grip/Zoom lever at the handle O/Zoom ring at the lens section 0 [ZOOM L/M/H] Zoom...

Instruction Manual
Page 46
Memo : 0 To set each individual video setting item automatically or manually, and to carry out the audio input settings and the audio recording level adjustment, refer to the following video items are automatically adjusted. 0 Iris 0 Gain 0 ...
Memo : 0 To set each individual video setting item automatically or manually, and to carry out the audio input settings and the audio recording level adjustment, refer to the following video items are automatically adjusted. 0 Iris 0 Gain 0 ...
Instruction Manual
Page 50
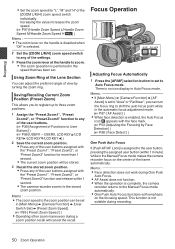
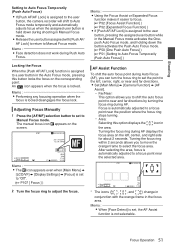
...detection does not work during One Push Auto Focus. 0 AF Assist does not function. 0 When the operation is complete, the camera recorder returns to the Manual Focus mode automatically. 0 One Push Auto Focus functions with the "Preset Zoom1", "Preset Zoom2", or "Preset Zoom3" function and release within 1 minute) ...shift the auto focus point while in the automatic focus adjustment mode. (A P97 [ AF Assist ] ) 0 When face detection is performed in the Manual Focus mode makes the camera recorder focus on the center of the settings. 3 Press the zoom lever at the Lens Section You can adjust the...
...detection does not work during One Push Auto Focus. 0 AF Assist does not function. 0 When the operation is complete, the camera recorder returns to the Manual Focus mode automatically. 0 One Push Auto Focus functions with the "Preset Zoom1", "Preset Zoom2", or "Preset Zoom3" function and release within 1 minute) ...shift the auto focus point while in the automatic focus adjustment mode. (A P97 [ AF Assist ] ) 0 When face detection is performed in the Manual Focus mode makes the camera recorder focus on the center of the settings. 3 Press the zoom lever at the Lens Section You can adjust the...
Instruction Manual
Page 51
... Auto Focus (AF), you can turn the focus ring to set the point to the left , center, and right side for about 2 seconds. Adjusting Focus Manually 1 Press the [AF/MF] selection button to set to focus. (A P52 [Focus Assist Function] ) (A P52 [Expanded Focus Function] ) 0 If [Push AF/AF Lock] is...the [Push AF/AF Lock] function is locked disengages the focus lock. An icon appears when the focus is assigned to a user button in the Manual Focus mode activates the Onepush Auto Focus mode, and holding down during Push Auto Focus. Memo : 0 Using the Focus Assist or Expanded Focus function ...
... Auto Focus (AF), you can turn the focus ring to set the point to the left , center, and right side for about 2 seconds. Adjusting Focus Manually 1 Press the [AF/MF] selection button to set to focus. (A P52 [Focus Assist Function] ) (A P52 [Expanded Focus Function] ) 0 If [Push AF/AF Lock] is...the [Push AF/AF Lock] function is locked disengages the focus lock. An icon appears when the focus is assigned to a user button in the Manual Focus mode activates the Onepush Auto Focus mode, and holding down during Push Auto Focus. Memo : 0 Using the Focus Assist or Expanded Focus function ...
Instruction Manual
Page 55
... and hold the [FULL AUTO] button to set to Full Auto mode, some or all of the items (Iris, Gain and Shutter Speed) can be manually adjusted. 1 Press and hold the [FULL AUTO] button to set in the Auto Iris mode. In this case, the White Balance also enters into Auto.... 2 Adjust the Iris, Gain and Shutter speed. (A P55 [Adjusting the Iris] ) (A P57 [Setting the Gain] ) (A P58 [Setting the Electronic Shutter] ) Memo : 0 The brightness cannot be manually adjusted in the menu. (A P96 [ AE Speed ] ) 0 If one or more of the items (Gain, Iris and Shutter) have been set to Auto mode, the...
... and hold the [FULL AUTO] button to set to Full Auto mode, some or all of the items (Iris, Gain and Shutter Speed) can be manually adjusted. 1 Press and hold the [FULL AUTO] button to set in the Auto Iris mode. In this case, the White Balance also enters into Auto.... 2 Adjust the Iris, Gain and Shutter speed. (A P55 [Adjusting the Iris] ) (A P57 [Setting the Gain] ) (A P58 [Setting the Electronic Shutter] ) Memo : 0 The brightness cannot be manually adjusted in the menu. (A P96 [ AE Speed ] ) 0 If one or more of the items (Gain, Iris and Shutter) have been set to Auto mode, the...
Instruction Manual
Page 56
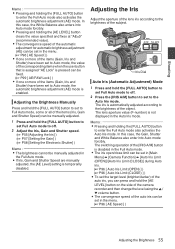
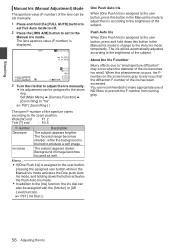
...F-number of the iris has been exceeded. Push Auto Iris When [One Push Iris] is assigned to the user button, press this button in the Manual Iris mode to change to the Auto Iris mode temporarily. Wide [W] end : F1.2 Tele [T] end : F3.5 F-number Decrease Increase Description The subject... image becomes focused as well. The subject appears darker. You are recommended to make appropriate use of the iris becomes too small. Shooting Manual Iris (Manual Adjustment) Mode The aperture value (F-number) of the lens can be assigned to the zoom ring. About the Iris F-number Blurry effects ...
...F-number of the iris has been exceeded. Push Auto Iris When [One Push Iris] is assigned to the user button, press this button in the Manual Iris mode to change to the Auto Iris mode temporarily. Wide [W] end : F1.2 Tele [T] end : F3.5 F-number Decrease Increase Description The subject... image becomes focused as well. The subject appears darker. You are recommended to make appropriate use of the iris becomes too small. Shooting Manual Iris (Manual Adjustment) Mode The aperture value (F-number) of the lens can be assigned to the zoom ring. About the Iris F-number Blurry effects ...
Instruction Manual
Page 57
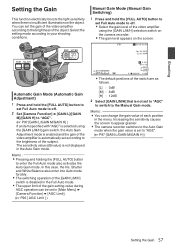
...Memo : 0 Pressing and holding the [FULL AUTO] button to your shooting conditions. Memo : 0 You can set to "AGC" to switch to the Manual Gain mode. Increasing the sensitivity causes the screen to appear grainier. 0 The camera recorder switches to the Auto Gain mode when the gain value is ... the video amplifier using the [GAIN L/M/H] gain switch, the Auto Gain Adjustment mode is enabled and the gain of each position in the menu. Manual Gain Mode (Manual Gain Switching) 1 Press and hold the [FULL AUTO] button to set to the brightness of the object. In this case, the Iris, Shutter ...
...Memo : 0 Pressing and holding the [FULL AUTO] button to your shooting conditions. Memo : 0 You can set to "AGC" to switch to the Manual Gain mode. Increasing the sensitivity causes the screen to appear grainier. 0 The camera recorder switches to the Auto Gain mode when the gain value is ... the video amplifier using the [GAIN L/M/H] gain switch, the Auto Gain Adjustment mode is enabled and the gain of each position in the menu. Manual Gain Mode (Manual Gain Switching) 1 Press and hold the [FULL AUTO] button to set to the brightness of the object. In this case, the Iris, Shutter ...
Instruction Manual
Page 58
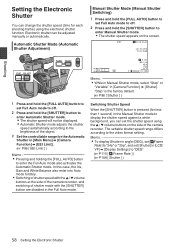
... shutter speed against a white background, you can set [Shutter] in [Camera Function] B [Shutter]. Automatic Shutter Mode (Automatic Shutter Adjustment) Manual Shutter Mode (Manual Shutter Switching) 1 Press and hold the [FULL AUTO] button to set Full Auto mode to off . 2 Press and hold the [SHUTTER...the [SHUTTER] button are disabled in the Full Auto mode. 4030 20 10 0 . 5.6f t ND 1 /16 AE+6 18dB F1. 6 P 15000K 1/ 100 Memo : 0 While in Manual Shutter mode, select "Step" or "Variable" in [LCD/ VF] B [Display Settings] to "DEG". (A P115 [ W Frame Rate ] ) (A P108 [ Shutter ] ) 58 Setting...
... shutter speed against a white background, you can set [Shutter] in [Camera Function] B [Shutter]. Automatic Shutter Mode (Automatic Shutter Adjustment) Manual Shutter Mode (Manual Shutter Switching) 1 Press and hold the [FULL AUTO] button to set Full Auto mode to off . 2 Press and hold the [SHUTTER...the [SHUTTER] button are disabled in the Full Auto mode. 4030 20 10 0 . 5.6f t ND 1 /16 AE+6 18dB F1. 6 P 15000K 1/ 100 Memo : 0 While in Manual Shutter mode, select "Step" or "Variable" in [LCD/ VF] B [Display Settings] to "DEG". (A P115 [ W Frame Rate ] ) (A P108 [ Shutter ] ) 58 Setting...
Instruction Manual
Page 61
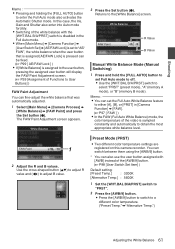
... of the white balance with [AWB] instead of Functions to obtain the most appropriate white balance level. White Balance FAW Paint R Value B Value . Manual White Balance Mode (Manual Switching) 1 Press and hold the [FULL AUTO] button to set to "AE/ FAW", the white balance when the user button that was automatically adjusted...
... of the white balance with [AWB] instead of Functions to obtain the most appropriate white balance level. White Balance FAW Paint R Value B Value . Manual White Balance Mode (Manual Switching) 1 Press and hold the [FULL AUTO] button to set to "AE/ FAW", the white balance when the user button that was automatically adjusted...

Instruction Manual
Page 66
.... Mic Stereo Enhancer] in microphone and the [AUX] input terminal are used, the recording levels of the [CH2] recording level adjustment knob and [CH2 AUTO/MANUAL] selection switch are disabled. 0 When [Main Menu] B [A/V Set] B [Audio Set] B [CH1 INT] and [CH2 INT] are set to "ON" to ...according to the input level. 0 When the [FULL AUTO] button is set to [CH2]. Manual Adjustment Mode (Manual Adjustment) 0 Set the [CH1/CH2 AUTO/MANUAL] switch on the camera recorder to "MANUAL" to enter the manual adjustment mode, and use the [CH1]/ [CH2] recording level adjustment knob to set to "Auto...
.... Mic Stereo Enhancer] in microphone and the [AUX] input terminal are used, the recording levels of the [CH2] recording level adjustment knob and [CH2 AUTO/MANUAL] selection switch are disabled. 0 When [Main Menu] B [A/V Set] B [Audio Set] B [CH1 INT] and [CH2 INT] are set to "ON" to ...according to the input level. 0 When the [FULL AUTO] button is set to [CH2]. Manual Adjustment Mode (Manual Adjustment) 0 Set the [CH1/CH2 AUTO/MANUAL] switch on the camera recorder to "MANUAL" to enter the manual adjustment mode, and use the [CH1]/ [CH2] recording level adjustment knob to set to "Auto...

Instruction Manual
Page 67
...] B [Audio Set] B [Audio On FULL AUTO] is set to "SW Set", you can switch the audio recording mode with the [CH1/CH2 AUTO/MANUAL] selection switch on the camera recorder even if the [FULL AUTO] button is set to adjust the volume. Use the cross-shaped button (H I) to "ON...Main Menu] B [A/V Set] B [Audio Set] B [Audio Level]. 0 The [Audio Level] screen appears. Audio Level Auto Manual Set . * The contents displayed on the screen vary depending on the various settings. 2 Select "Auto" or "Manual" using headphone. Memo : 0 When the [FULL AUTO] button is set to "On" and [Audio On FULL AUTO...
...] B [Audio Set] B [Audio On FULL AUTO] is set to "SW Set", you can switch the audio recording mode with the [CH1/CH2 AUTO/MANUAL] selection switch on the camera recorder even if the [FULL AUTO] button is set to adjust the volume. Use the cross-shaped button (H I) to "ON...Main Menu] B [A/V Set] B [Audio Set] B [Audio Level]. 0 The [Audio Level] screen appears. Audio Level Auto Manual Set . * The contents displayed on the screen vary depending on the various settings. 2 Select "Auto" or "Manual" using headphone. Memo : 0 When the [FULL AUTO] button is set to "On" and [Audio On FULL AUTO...
Instruction Manual
Page 97
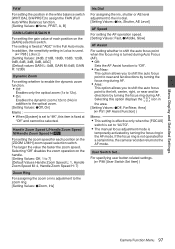
.... [Setting Values: ROff, Far/Near, Area] (A P51 [AF Assist Function] ) Memo : 0 This setting is effective only when the [FOCUS] switch is set to "AUTO". 0 The manual focus adjustment mode is fixed at "AGC" in the Full Auto mode. The larger the value the faster the zoom speed. Selecting this item is...
.... [Setting Values: ROff, Far/Near, Area] (A P51 [AF Assist Function] ) Memo : 0 This setting is effective only when the [FOCUS] switch is set to "AUTO". 0 The manual focus adjustment mode is fixed at "AGC" in the Full Auto mode. The larger the value the faster the zoom speed. Selecting this item is...


