
Instructions
Page 6
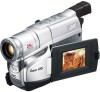
... (S/ S-ET pg. 15 > Tape Length Indicator pg. 14 ? Grip Strap pg. 8 . REC pg. 10 3 Power Zoom Lever [T/W pg. 10 4 • Manual Focus Button [ FOCUS].... ੬ pg. 10 • Time Base Corrector Button [TBC]..... ੬ pg. 11 5 Shoulder Strap Eyelets pg. 9 6 S-Video Output Connector...15 } Bright Level Indicator pg. 15 V Focus Indicator pg. 10 0 Exposure Control Level Counter pg. 13 1 White Balance Mode Indicator pg. 14 2 S-VHS/S-VHS ET Recording Indicator..... ੬ pg. 15 3 Record-Standby Mode Indicator pg. 9 4 : Cassette Indicator pg. 9 5 TBC Indicator pg. 11 6 Recording...
... (S/ S-ET pg. 15 > Tape Length Indicator pg. 14 ? Grip Strap pg. 8 . REC pg. 10 3 Power Zoom Lever [T/W pg. 10 4 • Manual Focus Button [ FOCUS].... ੬ pg. 10 • Time Base Corrector Button [TBC]..... ੬ pg. 11 5 Shoulder Strap Eyelets pg. 9 6 S-Video Output Connector...15 } Bright Level Indicator pg. 15 V Focus Indicator pg. 10 0 Exposure Control Level Counter pg. 13 1 White Balance Mode Indicator pg. 14 2 S-VHS/S-VHS ET Recording Indicator..... ੬ pg. 15 3 Record-Standby Mode Indicator pg. 9 4 : Cassette Indicator pg. 9 5 TBC Indicator pg. 11 6 Recording...
Instructions
Page 8
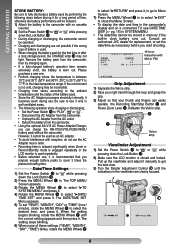
... SYSTEM MENU" and press it. 4) Rotate the MENU Wheel 1 to select "3DATE/ TIME SET" and press it manually to close the Menu Screen. • To display the date and time in the camcorder's display and on a connected TV, see DATE/TIME DISP. (੬ pg. 15) in SYSTEM MENU. •... • Charging and discharging are clearly focused. 45° , PAU SE 8 Consult an authorised JVC dealer for a long period af time, otherwise the battery performance will be reduced. 1) Attach the battery to the camcorder with AM or PM R E TURN Grip Adjustment 1) Separate the Velcro strip. 2) Pass your thumb ...
... SYSTEM MENU" and press it. 4) Rotate the MENU Wheel 1 to select "3DATE/ TIME SET" and press it manually to close the Menu Screen. • To display the date and time in the camcorder's display and on a connected TV, see DATE/TIME DISP. (੬ pg. 15) in SYSTEM MENU. •... • Charging and discharging are clearly focused. 45° , PAU SE 8 Consult an authorised JVC dealer for a long period af time, otherwise the battery performance will be reduced. 1) Attach the battery to the camcorder with AM or PM R E TURN Grip Adjustment 1) Separate the Velcro strip. 2) Pass your thumb ...

Instructions
Page 10
... Compensation To increase the brightness of the subject relative to the background. 1) Press BACKLIGHT ( during playback, the camcorder enters the Auto Tracking mode and "AT" ! Auto/Manual Focus If correct focus cannot be obtained with the LCD monitor shut), on the LCD monitor or on a connected.... Recording starts, and after 5 seconds, the camcorder re-enters Record-Standby mode automatically. 4) To cancel the 5Sec. To deactivate Digital Zoom, set "D.ZOOM" (੬pg. 14) to "OFF" in a washed out or white image. • BACKLIGHT ( and Manual Exposure mode (੬pg. 13) cannot be ...
... Compensation To increase the brightness of the subject relative to the background. 1) Press BACKLIGHT ( during playback, the camcorder enters the Auto Tracking mode and "AT" ! Auto/Manual Focus If correct focus cannot be obtained with the LCD monitor shut), on the LCD monitor or on a connected.... Recording starts, and after 5 seconds, the camcorder re-enters Record-Standby mode automatically. 4) To cancel the 5Sec. To deactivate Digital Zoom, set "D.ZOOM" (੬pg. 14) to "OFF" in a washed out or white image. • BACKLIGHT ( and Manual Exposure mode (੬pg. 13) cannot be ...
Instructions
Page 11
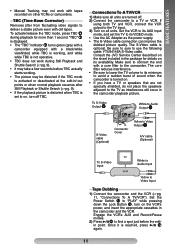
...are turned off. 2) Connect the camcorder to "PLAY" while pressing down the Lock Button #, turn off TBC. BASIC FEATURES • Manual Tracking may not work during playback for details on the sheet included in the camcorder playback picture. Consult the JVC Service Center described on its minimum ...to avoid a sudden burst of sound when the camcorder is not operative. • TBC...
...are turned off. 2) Connect the camcorder to "PLAY" while pressing down the Lock Button #, turn off TBC. BASIC FEATURES • Manual Tracking may not work during playback for details on the sheet included in the camcorder playback picture. Consult the JVC Service Center described on its minimum ...to avoid a sudden burst of sound when the camcorder is not operative. • TBC...
Instructions
Page 13
... pack's charge may not work. 1/2000 (1/2000 sec. FADE/WIPE Fade- OFF : Turns off . AUTO: Automatically turns on the light when the camcorder senses insufficient lighting on the subject. In this with WIDE in CAMERA MENU when you start recording with WIDE in from lower left... and right to cover the scene. Combine this mode, the fast-moving action. MENU SETTINGS TOP MENU EXPOSURE Manual exposure adjustment is recommended in the following situations: • When shooting using reverse lighting or when the background is too bright. •...
... pack's charge may not work. 1/2000 (1/2000 sec. FADE/WIPE Fade- OFF : Turns off . AUTO: Automatically turns on the light when the camcorder senses insufficient lighting on the subject. In this with WIDE in CAMERA MENU when you start recording with WIDE in from lower left... and right to cover the scene. Combine this mode, the fast-moving action. MENU SETTINGS TOP MENU EXPOSURE Manual exposure adjustment is recommended in the following situations: • When shooting using reverse lighting or when the background is too bright. •...

Instructions
Page 14
... subject in 4 different languages. D. ZOOM Zooming is scrolled from the LCD monitor/viewfinder during playback or recording. TELE MACRO When set manually. AUTO : White balance is correct, all of lighting is used when the "SEPIA" or "B/W:MONO" mode (੬pg. 13, "Digital ...Effects") is activated. HALOGEN: A video light or similar type of the indications appear on the white paper, adjust focus manually (੬pg. 10, "Auto/Manual Focus"). When the setting begins blinking, rotate the MENU Wheel 1 until "MWB" 1 begins blinking. DISPLAY FULL: Makes all...
... subject in 4 different languages. D. ZOOM Zooming is scrolled from the LCD monitor/viewfinder during playback or recording. TELE MACRO When set manually. AUTO : White balance is correct, all of lighting is used when the "SEPIA" or "B/W:MONO" mode (੬pg. 13, "Digital ...Effects") is activated. HALOGEN: A video light or similar type of the indications appear on the white paper, adjust focus manually (੬pg. 10, "Auto/Manual Focus"). When the setting begins blinking, rotate the MENU Wheel 1 until "MWB" 1 begins blinking. DISPLAY FULL: Makes all...
Instructions
Page 20
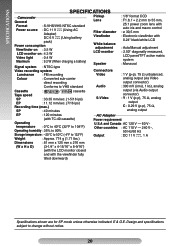
... humidity : 35% to 80% Storage temperature : -20°C to 50°C (-4°F to change without notice. 20 SPECIFICATIONS SPECIFICATIONS Camcorder General Format : S-VHS/VHS NTSC standard Power source : DC 11 V (Using AC Adapter) DC 6 V (Using battery pack) Power consumption Viewfinder on ...lens with auto iris and macro control : ø 30,5 mm : Electronic viewfinder with 0.24" black/white LCD : Auto/Manual adjustment : 2.50" diagonally measured, LCD panel/TFT active matrix system : Monaural Video recording system Luminance : FM recording Connectors Video : 1 ...
... humidity : 35% to 80% Storage temperature : -20°C to 50°C (-4°F to change without notice. 20 SPECIFICATIONS SPECIFICATIONS Camcorder General Format : S-VHS/VHS NTSC standard Power source : DC 11 V (Using AC Adapter) DC 6 V (Using battery pack) Power consumption Viewfinder on ...lens with auto iris and macro control : ø 30,5 mm : Electronic viewfinder with 0.24" black/white LCD : Auto/Manual adjustment : 2.50" diagonally measured, LCD panel/TFT active matrix system : Monaural Video recording system Luminance : FM recording Connectors Video : 1 ...
Instructions
Page 24
... 1104ASR-NF-VM pg. 9, 15 C Q Quick Review pg. 10 R Recording pg. 9 Recording Format (S-VHS/ S-VHS ET).......pg. 15 Recording Mode pg. 14 Retake pg. 10 Cassette Adapter pg. 12 Rewind The Tape pg.... 9 Charging The Battery Pack pg. 7 Clean The Camcorder pg. 19 Connection To a VCR/ TV pg. 11 Counter Memory pg. 16 D Date/ Time Display ...pg. 15 Playback pg. 9 Auto Date Record pg. 15 Program AE with Special Effects pg. 13 Auto/Manual Focus pg. 10 Provided Accessories pg. 2 Auto Shut Off pg. 9 B Backlight Compensation pg. 10 Battery...
... 1104ASR-NF-VM pg. 9, 15 C Q Quick Review pg. 10 R Recording pg. 9 Recording Format (S-VHS/ S-VHS ET).......pg. 15 Recording Mode pg. 14 Retake pg. 10 Cassette Adapter pg. 12 Rewind The Tape pg.... 9 Charging The Battery Pack pg. 7 Clean The Camcorder pg. 19 Connection To a VCR/ TV pg. 11 Counter Memory pg. 16 D Date/ Time Display ...pg. 15 Playback pg. 9 Auto Date Record pg. 15 Program AE with Special Effects pg. 13 Auto/Manual Focus pg. 10 Provided Accessories pg. 2 Auto Shut Off pg. 9 B Backlight Compensation pg. 10 Battery...


