Instructions
Page 9
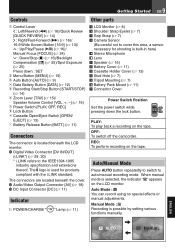
...[DC] (੬ 11) Indicator N POWER/CHARGE " " Lamp (੬ 11) O LCD Monitor (੬ 8) P Shoulder Strap Eyelet (੬ 7) Q Grip Strap (੬ 7) R Camera Sensor (Be careful not to cover this area, a sensor necessary for products compliant with the i.LINK standard. When manual mode is located beneath the LCD.... /&& 2%# PLAY: To play back a recording on the LCD monitor. The connectors are located beneath the cover. OFF: To switch off the camcorder. REC: To perform recording on the tape. Auto Mode : A You can record using no special effects or manual adjustments. ENGLISH !54/ ...
...[DC] (੬ 11) Indicator N POWER/CHARGE " " Lamp (੬ 11) O LCD Monitor (੬ 8) P Shoulder Strap Eyelet (੬ 7) Q Grip Strap (੬ 7) R Camera Sensor (Be careful not to cover this area, a sensor necessary for products compliant with the i.LINK standard. When manual mode is located beneath the LCD.... /&& 2%# PLAY: To play back a recording on the LCD monitor. The connectors are located beneath the cover. OFF: To switch off the camcorder. REC: To perform recording on the tape. Auto Mode : A You can record using no special effects or manual adjustments. ENGLISH !54/ ...
Instructions
Page 13
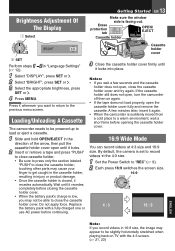
... the cassette holder cover fully and remove the cassette. Press g whenever you wait a few minutes later, insert it again. • When the camcorder is low, you record videos in injury or product damage. • Once the cassette holder is facing out. If the cassette holder still does ... or k. 4 Press MENU. touching other parts may cause your finger to record videos at 4:3 size and 16:9 size. By default, the camera is set to get caught in the cassette holder, resulting in 16:9 size, the image may not be slightly horizontally stretched when playing back on...
... the cassette holder cover fully and remove the cassette. Press g whenever you wait a few minutes later, insert it again. • When the camcorder is low, you record videos in injury or product damage. • Once the cassette holder is facing out. If the cassette holder still does ... or k. 4 Press MENU. touching other parts may cause your finger to record videos at 4:3 size and 16:9 size. By default, the camera is set to get caught in the cassette holder, resulting in 16:9 size, the image may not be slightly horizontally stretched when playing back on...

Instructions
Page 15
...; 9), then start recording, then engage the Still Playback mode (੬ 16). 2 Set the Power Switch to "ON". (੬ 23) This means the camcorder may automatically zoom out depending on a blank portion located partway through the tape. • When shooting again after shooting a scene then opening/closing the cassette...To prevent this case, set all the way to "W". • When you want to start recording. This code is to the lens, the camera may record the same time codes as approx. 5 cm (2") to the subject when the zoom lever is recorded on the tape during recording. ...
...; 9), then start recording, then engage the Still Playback mode (੬ 16). 2 Set the Power Switch to "ON". (੬ 23) This means the camcorder may automatically zoom out depending on a blank portion located partway through the tape. • When shooting again after shooting a scene then opening/closing the cassette...To prevent this case, set all the way to "W". • When you want to start recording. This code is to the lens, the camera may record the same time codes as approx. 5 cm (2") to the subject when the zoom lever is recorded on the tape during recording. ...
Instructions
Page 19
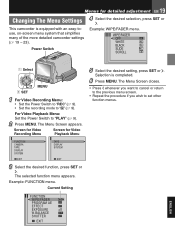
Menus for Video Playback Menu FUNCTION CAMERA TAPE DISPLAY SYSTEM EXIT TAPE DISPLAY SYSTEM EXIT 3 Select the desired function, press SET or k. Power Switch Example: WIPE/FADER menu. For Video Playback Menu: .... Example: FUNCTION menu. Selection is equipped with an easy-touse, on-screen menu system that simplifies many of the more detailed camcorder settings (੬ 19 - 23). This camcorder is completed. 6 Press MENU. The Menu Screen appears. ENGLISH Screen for Video Recording Menu Screen for detailed adjustment EN 19 Changing The...
Menus for Video Playback Menu FUNCTION CAMERA TAPE DISPLAY SYSTEM EXIT TAPE DISPLAY SYSTEM EXIT 3 Select the desired function, press SET or k. Power Switch Example: WIPE/FADER menu. For Video Playback Menu: .... Example: FUNCTION menu. Selection is equipped with an easy-touse, on-screen menu system that simplifies many of the more detailed camcorder settings (੬ 19 - 23). This camcorder is completed. 6 Press MENU. The Menu Screen appears. ENGLISH Screen for Video Recording Menu Screen for detailed adjustment EN 19 Changing The...
Instructions
Page 20
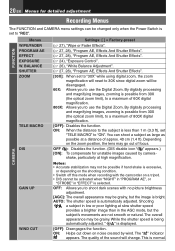
...zoom limit), to a maximum of 60X digital magnification. 800X: Allows you to use the Digital Zoom. Depending on noise created by camera- OFF : Disables the function. (DIS disable icon " " appears.) [ON]: To compensate for detailed adjustment Recording Menus The FUNCTION and... or depending on the shooting condition. • Switch off this mode when recording with the camcorder on a tripod. • DIS cannot be grainy. The overall appearance may go out of approx. 40 cm (1.4 ft). CAMERA ON: When the distance to a maximum of the sound will be disengaged. 60X: Allows ...
...zoom limit), to a maximum of 60X digital magnification. 800X: Allows you to use the Digital Zoom. Depending on noise created by camera- OFF : Disables the function. (DIS disable icon " " appears.) [ON]: To compensate for detailed adjustment Recording Menus The FUNCTION and... or depending on the shooting condition. • Switch off this mode when recording with the camcorder on a tripod. • DIS cannot be grainy. The overall appearance may go out of approx. 40 cm (1.4 ft). CAMERA ON: When the distance to a maximum of the sound will be disengaged. 60X: Allows ...

Instructions
Page 34
... electric fields (speakers, broadcasting antennas, etc.). ... expose the lens to excessive shock or vibration. ... swing the soft camera case excessively when the camcorder is not in a place directly subjected to soot or steam such as near a heater. • To protect the unit, DO...low (below 35%) or extremely high (above 80%). ... For periodic checkups please consult your nearest JVC dealer. CONDENSATION, OPERATION PAUSED PLEASE WAIT Appears if condensation occurs. open the camcorder's chassis. ... in flammables, water or metallic objects to the video heads may result....
... electric fields (speakers, broadcasting antennas, etc.). ... expose the lens to excessive shock or vibration. ... swing the soft camera case excessively when the camcorder is not in a place directly subjected to soot or steam such as near a heater. • To protect the unit, DO...low (below 35%) or extremely high (above 80%). ... For periodic checkups please consult your nearest JVC dealer. CONDENSATION, OPERATION PAUSED PLEASE WAIT Appears if condensation occurs. open the camcorder's chassis. ... in flammables, water or metallic objects to the video heads may result....
Instructions
Page 36
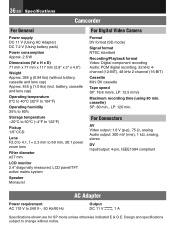
...Filter diameter ø27 mm LCD monitor 2.4" diagonally measured, LCD panel/TFT active matrix system Speaker Monaural For Digital Video Camera Format DV format (SD mode) Signal format NTSC standard Recording/Playback format Video: Digital component recording Audio: PCM digital ... 80 min. Design and specifications subject to change without battery, cassette and lens cap) Approx. 455 g (1.0 lbs) (incl. 36 EN Specifications Camcorder For General Power supply DC 11 V (Using AC Adapter) DC 7.2 V (Using battery pack) Power consumption Approx. 2.6 W Dimensions (W x H x D) 71 mm ...
...Filter diameter ø27 mm LCD monitor 2.4" diagonally measured, LCD panel/TFT active matrix system Speaker Monaural For Digital Video Camera Format DV format (SD mode) Signal format NTSC standard Recording/Playback format Video: Digital component recording Audio: PCM digital ... 80 min. Design and specifications subject to change without battery, cassette and lens cap) Approx. 455 g (1.0 lbs) (incl. 36 EN Specifications Camcorder For General Power supply DC 11 V (Using AC Adapter) DC 7.2 V (Using battery pack) Power consumption Approx. 2.6 W Dimensions (W x H x D) 71 mm ...


