
Installation Manual
Page 7
Double-click the [JVC] folder and then double-click the [Docs] folder. After a moment, the [Found ...1.7. ● When you install ImageMixer 1.7 with Windows® 2000 and Windows® XP, a warning message dialog box on digital signature may appear. After a moment, the [Found New Hardware Wizard] screen appears. 9 Click [Finish]. Open the "Start...succession. NOTE: Click [Continue Anyway] when the message [Has not passed Windows Logo testing] appears. If you connect the camcorder to the PC with a USB cable. ● Refer to 9 until the [Found New Hardware Wizard] screen is cleared...
Double-click the [JVC] folder and then double-click the [Docs] folder. After a moment, the [Found ...1.7. ● When you install ImageMixer 1.7 with Windows® 2000 and Windows® XP, a warning message dialog box on digital signature may appear. After a moment, the [Found New Hardware Wizard] screen appears. 9 Click [Finish]. Open the "Start...succession. NOTE: Click [Continue Anyway] when the message [Has not passed Windows Logo testing] appears. If you connect the camcorder to the PC with a USB cable. ● Refer to 9 until the [Found New Hardware Wizard] screen is cleared...
Installation Manual
Page 8
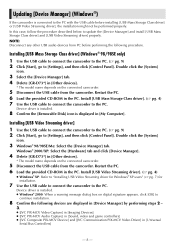
...Device driver is installed. ● Windows® 2000: When a warning message dialog box on digital signature appears, click [OK] to the PC. Installing [USB Video Streaming driver] 1 Use the USB cable to connect the camcorder to the PC. (੬ pg. 9) 2 Click [Start], go to [Settings], and ...[Sound, video and game controllers] ● [JVC Composite PIX-MCV Device] and [JVC Communication PIX-MCV Video Driver] in the PC. NOTE: Disconnect any other USB audio devices from the camcorder. Updating [Device Manager] (Windows®) If the camcorder is connected to the PC. In this case, ...
...Device driver is installed. ● Windows® 2000: When a warning message dialog box on digital signature appears, click [OK] to the PC. Installing [USB Video Streaming driver] 1 Use the USB cable to connect the camcorder to the PC. (੬ pg. 9) 2 Click [Start], go to [Settings], and ...[Sound, video and game controllers] ● [JVC Composite PIX-MCV Device] and [JVC Communication PIX-MCV Video Driver] in the PC. NOTE: Disconnect any other USB audio devices from the camcorder. Updating [Device Manager] (Windows®) If the camcorder is connected to the PC. In this case, ...

Instructions
Page 1
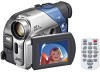
... No. To deactivate the demonstration, set "DEMO MODE" to ensure safe use of the camcorder. which is located on the World Wide Web for Digital Video Camera: http://www.jvc.co.jp/english/cyber/ For Accessories: http://www.jvc.co.jp/english/accessory/ MasterPage: FrontCover Dear Customer, Thank you for future reference. Before use...
... No. To deactivate the demonstration, set "DEMO MODE" to ensure safe use of the camcorder. which is located on the World Wide Web for Digital Video Camera: http://www.jvc.co.jp/english/cyber/ For Accessories: http://www.jvc.co.jp/english/accessory/ MasterPage: FrontCover Dear Customer, Thank you for future reference. Before use...
Instructions
Page 3
... with the manufacturer's instructions. 8. Before recording an important scene... ...make sure you obtain permission beforehand.) MasterPage: Safety_Right EN 3 This camcorder is strongly recommended that produce heat. 9. Do not use only. Servicing is used with dry cloth. 7. GR-D94US.book Page 3... during lightning storms or when unused for the digital video cassette, SD Memory Card and MultiMediaCard. Do not block any way, such as a show, performance or exhibition for private consumer use this camcorder is intended for personal enjoyment, it is designed...
... with the manufacturer's instructions. 8. Before recording an important scene... ...make sure you obtain permission beforehand.) MasterPage: Safety_Right EN 3 This camcorder is strongly recommended that produce heat. 9. Do not use only. Servicing is used with dry cloth. 7. GR-D94US.book Page 3... during lightning storms or when unused for the digital video cassette, SD Memory Card and MultiMediaCard. Do not block any way, such as a show, performance or exhibition for private consumer use this camcorder is intended for personal enjoyment, it is designed...

Instructions
Page 12
... and open the LCD monitor fully. Set "PRIORITY" to "W". m" means the camcorder is calculating the remaining time. m 1 h 0 m (Now calculating) 0h 0m (Blinking) 0 h 5 9 m 0h 1m (Blinking) 0h 3m 0h 2m (Blinking) 10x W T Digital zoom zone 16X (optical) zoom zone Approximate zoom ratio NOTES: ● Focusing ... Power Zoom Lever, the quicker the zoom action. However, this case, set all over 16X is done through Digital image processing, and is therefore called Digital Zoom. ● During Digital zoom, the quality of 700X, or it may be pushed back in SYSTEM Menu. (੬ pg. 25,...
... and open the LCD monitor fully. Set "PRIORITY" to "W". m" means the camcorder is calculating the remaining time. m 1 h 0 m (Now calculating) 0h 0m (Blinking) 0 h 5 9 m 0h 1m (Blinking) 0h 3m 0h 2m (Blinking) 10x W T Digital zoom zone 16X (optical) zoom zone Approximate zoom ratio NOTES: ● Focusing ... Power Zoom Lever, the quicker the zoom action. However, this case, set all over 16X is done through Digital image processing, and is therefore called Digital Zoom. ● During Digital zoom, the quality of 700X, or it may be pushed back in SYSTEM Menu. (੬ pg. 25,...

Instructions
Page 18
... change the Image Size and/or Picture Quality, ੬ pg. 25, 27. 5 Press SNAPSHOT. Still images are recorded in the memory card. RECORDING Basic Shooting (D.S.C. DIGITAL STILL CAMERA (D.S.C.) RECORDING & PLAYBACK GR-D72US_06DSC.fm Page 18 Wednesday, November 19, 2003 10:05 AM MasterPage: Heading0_Left 18 EN D.S.C. Snapshot) You can use your...
... change the Image Size and/or Picture Quality, ੬ pg. 25, 27. 5 Press SNAPSHOT. Still images are recorded in the memory card. RECORDING Basic Shooting (D.S.C. DIGITAL STILL CAMERA (D.S.C.) RECORDING & PLAYBACK GR-D72US_06DSC.fm Page 18 Wednesday, November 19, 2003 10:05 AM MasterPage: Heading0_Left 18 EN D.S.C. Snapshot) You can use your...

Instructions
Page 23
...Each)" or "To Print By Selecting Still Images And Number Of Prints". CAUTION: While performing the above, never disconnect power, as turning off the camcorder) during deletion. The DELETE screen appears. 7 Rotate the MMENU/VOL. Check files before deleting. The RETURN DPOF screen appears. 7 Rotate the MMENU... compatible with DPOF, it will make prints of the 2 print information settings for all files stored in a printer compatible with the DPOF (Digital Print Order Format) standard in order to select "DPOF", and press it . SAVE? EN 23 To Print By Selecting Still Images And ...
...Each)" or "To Print By Selecting Still Images And Number Of Prints". CAUTION: While performing the above, never disconnect power, as turning off the camcorder) during deletion. The DELETE screen appears. 7 Rotate the MMENU/VOL. Check files before deleting. The RETURN DPOF screen appears. 7 Rotate the MMENU... compatible with DPOF, it will make prints of the 2 print information settings for all files stored in a printer compatible with the DPOF (Digital Print Order Format) standard in order to select "DPOF", and press it . SAVE? EN 23 To Print By Selecting Still Images And ...

Instructions
Page 26
... slow shutter speed provides a brighter image than 1 m (3.3 ft) to the subject, the lens is out of the screen. NOTE: Depending on another camcorder, blocks of the screen and the image appears like a letter boxed 16:9 movie. During playback/ recording on a TV with no change in low or... cannot be momentary pauses in the LP mode on this camcorder be played back on this camcorder. ● During playback of 16:9. When set to both "A" and "M". When using digital zoom, the zoom magnification will reset to "16X" since digital zoom will be blurred at the top and bottom of...
... slow shutter speed provides a brighter image than 1 m (3.3 ft) to the subject, the lens is out of the screen. NOTE: Depending on another camcorder, blocks of the screen and the image appears like a letter boxed 16:9 movie. During playback/ recording on a TV with no change in low or... cannot be momentary pauses in the LP mode on this camcorder be played back on this camcorder. ● During playback of 16:9. When set to both "A" and "M". When using digital zoom, the zoom magnification will reset to "16X" since digital zoom will be blurred at the top and bottom of...

Instructions
Page 34
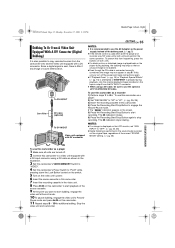
... start dubbing, make sure that the indications do , they do not appear on the screen. 6) Press the Recording Start/Stop Button to dub from another camcorder. This will appear on /off the date indication. • Time code Set "TIME CODE" to "OFF" or "ON". (੬ pg. 25, 28) • Indications... 10 To pause dubbing, engage the VCR's Record- NOTES: ● After dubbing, set "S/AV INPUT" back to "OFF". ● Analog signals can be converted to digital signals with this camcorder as the power supply instead of the source tape. 9 At the point you start recording. Stop the VCR and...
... start dubbing, make sure that the indications do , they do not appear on the screen. 6) Press the Recording Start/Stop Button to dub from another camcorder. This will appear on /off the date indication. • Time code Set "TIME CODE" to "OFF" or "ON". (੬ pg. 25, 28) • Indications... 10 To pause dubbing, engage the VCR's Record- NOTES: ● After dubbing, set "S/AV INPUT" back to "OFF". ● Analog signals can be converted to digital signals with this camcorder as the power supply instead of the source tape. 9 At the point you start recording. Stop the VCR and...
Instructions
Page 35
... another video unit equipped with a DV input connector using a DV cable, be sure to use the optional JVC VC-VDV204U DV cable. If this occurs, turn off . 2 Connect this camcorder to start dubbing, engage the video unit's Record mode. 10 To pause dubbing, engage the video unit's Record-... on both units will perform the same operation. Pause mode and press 4/9 on this camcorder. 4) Press the Recording Start/Stop Button to start recording. Since a digital signal is sent, there is performed in this camcorder to engage the Record-Pause mode. ● The " DV. IN " indication appears...
... another video unit equipped with a DV input connector using a DV cable, be sure to use the optional JVC VC-VDV204U DV cable. If this occurs, turn off . 2 Connect this camcorder to start dubbing, engage the video unit's Record mode. 10 To pause dubbing, engage the video unit's Record-... on both units will perform the same operation. Pause mode and press 4/9 on this camcorder. 4) Press the Recording Start/Stop Button to start recording. Since a digital signal is sent, there is performed in this camcorder to engage the Record-Pause mode. ● The " DV. IN " indication appears...

Instructions
Page 40
...) may occur when the Night-Alive function is activated during recording and is set to "MEMORY". Digital Zoom does not work . ● The Power Switch is open the LCD monitor to return to... VIDEO/MEMORY Switch to "VIDEO". Video and D.S.C. HSet the VIDEO/MEMORY Switch to "MEMORY". The camcorder is normal. External noise and interference (from a TV, a radio, etc.) might prevent it and... TROUBLESHOOTING If the problem still exists after following the steps below, please consult your nearest JVC dealer. The LCD monitor or viewfinder indications blink. ● Certain Wipe/Fader effects, ...
...) may occur when the Night-Alive function is activated during recording and is set to "MEMORY". Digital Zoom does not work . ● The Power Switch is open the LCD monitor to return to... VIDEO/MEMORY Switch to "VIDEO". Video and D.S.C. HSet the VIDEO/MEMORY Switch to "MEMORY". The camcorder is normal. External noise and interference (from a TV, a radio, etc.) might prevent it and... TROUBLESHOOTING If the problem still exists after following the steps below, please consult your nearest JVC dealer. The LCD monitor or viewfinder indications blink. ● Certain Wipe/Fader effects, ...

Instructions
Page 43
When the battery power is exhausted, power turns off automatically. GR-D94US.book Page 43 Monday, November 17, 2003 2:12 PM MasterPage: Ref_Right Warning Indications Displays the battery remaining power. TROUBLESHOOTING EN 43 A. DUB ERROR! Remaining power level High Exhausted As the battery power comes close to nil, the battery indicator blinks.
When the battery power is exhausted, power turns off automatically. GR-D94US.book Page 43 Monday, November 17, 2003 2:12 PM MasterPage: Ref_Right Warning Indications Displays the battery remaining power. TROUBLESHOOTING EN 43 A. DUB ERROR! Remaining power level High Exhausted As the battery power comes close to nil, the battery indicator blinks.

Instructions
Page 44
... indications (E03 or E04) show what type of malfunction has occured. If the indication remains, consult your nearest JVC dealer. If the indication still appears, the memory card is not compatible with this camcorder. Remove the power supply (battery, etc.) and wait a few minutes for the indication to the "LOCK" ... DCF or a file with a size that is corrupted. MasterPage: Left Remove the memory card once and insert it does, you attempt to shoot digital still images when the write protection tab on the SD Memory Card is set to clear. When it again. GR-D94US.book Page 44 Monday...
... indications (E03 or E04) show what type of malfunction has occured. If the indication remains, consult your nearest JVC dealer. If the indication still appears, the memory card is not compatible with this camcorder. Remove the power supply (battery, etc.) and wait a few minutes for the indication to the "LOCK" ... DCF or a file with a size that is corrupted. MasterPage: Left Remove the memory card once and insert it does, you attempt to shoot digital still images when the write protection tab on the SD Memory Card is set to clear. When it again. GR-D94US.book Page 44 Monday...

Instructions
Page 47
..., may cause undesired operation. J. 07470 Telephone Number : 973-317-5000 This device complies with the limits for a Class B digital device, pursuant to provide reasonable protection against harmful interference in a particular installation. These limits are designed to Part 15 of FCC ...or in accordance with Canadian ICES-003. Serious malfunctioning If malfunctioning occurs, stop using the unit immediately and consult your local JVC dealer. The camcorder is no guarantee that pouring a cold liquid into an outlet on the glass' outer surface. This equipment has been ...
..., may cause undesired operation. J. 07470 Telephone Number : 973-317-5000 This device complies with the limits for a Class B digital device, pursuant to provide reasonable protection against harmful interference in a particular installation. These limits are designed to Part 15 of FCC ...or in accordance with Canadian ICES-003. Serious malfunctioning If malfunctioning occurs, stop using the unit immediately and consult your local JVC dealer. The camcorder is no guarantee that pouring a cold liquid into an outlet on the glass' outer surface. This equipment has been ...

Instructions
Page 49
...to 240 Vd, 50 Hz/60 Hz Output DC 11 V G, 1 A Specifications shown are for SP mode unless otherwise indicated. For Digital Still Camera Storage media SD Memory Card/MultiMediaCard Compression system Still image: JPEG (compatible) File size Still image: 2 modes (1024 x 768...viewfinder pushed back in) Weight Approx. 500 g (1.1 lbs) (without notice. GR-D72US_09Spec.fm Page 49 Thursday, November 20, 2003 7:14 PM MasterPage: Ref_Heading0_Right Camcorder For General Power supply DC 11.0 V (Using AC Adapter) DC 7.2 V (Using battery pack) Power consumption Approx. 3.3 W (LCD monitor off, viewfinder...
...to 240 Vd, 50 Hz/60 Hz Output DC 11 V G, 1 A Specifications shown are for SP mode unless otherwise indicated. For Digital Still Camera Storage media SD Memory Card/MultiMediaCard Compression system Still image: JPEG (compatible) File size Still image: 2 modes (1024 x 768...viewfinder pushed back in) Weight Approx. 500 g (1.1 lbs) (without notice. GR-D72US_09Spec.fm Page 49 Thursday, November 20, 2003 7:14 PM MasterPage: Ref_Heading0_Right Camcorder For General Power supply DC 11.0 V (Using AC Adapter) DC 7.2 V (Using battery pack) Power consumption Approx. 3.3 W (LCD monitor off, viewfinder...

Instructions
Page 52
... can be stored during shooting. : Blinks in white when a memory card is not loaded. The number increases or decreases depending on the camcorder.) j Time Code (੬ pg. 27, 28) k Digital Image Stabilizer ("DIS") (੬ pg. 26) During D.S.C. GR-D72US_09Spec.fm Page 52 Wednesday, November 19, 2003 10:24 AM MasterPage: Left 52...
... can be stored during shooting. : Blinks in white when a memory card is not loaded. The number increases or decreases depending on the camcorder.) j Time Code (੬ pg. 27, 28) k Digital Image Stabilizer ("DIS") (੬ pg. 26) During D.S.C. GR-D72US_09Spec.fm Page 52 Wednesday, November 19, 2003 10:24 AM MasterPage: Left 52...

Instructions
Page 54
...45 Beep (BEEP 27 Blank search 14 Brightness Adjustment Of The Display (BRIGHT) .........9 C Changing The Menu Settings 25 Charging The Battery Pack 6 Cleaning The Camcorder 48 Clock adjustment (CLOCK ADJ 8 Connections Charging 6 Dubbing 34, 35 To A PC 36 To A TV Or VCR 17 D Date/Time Display (DATE...Settings 8 DCF (Design rule for Camera File system 20, 39 Deleting Files (DELETE 22 Demonstration Mode (DEMO MODE 27 Digital Image Stabilization (DIS 26 DPOF Setting (Digital Print Order Format 23 Dubbing 19, 34, 35 Dubbing from tape to memory card 19 E Erase Protection 10 Exposure ...
...45 Beep (BEEP 27 Blank search 14 Brightness Adjustment Of The Display (BRIGHT) .........9 C Changing The Menu Settings 25 Charging The Battery Pack 6 Cleaning The Camcorder 48 Clock adjustment (CLOCK ADJ 8 Connections Charging 6 Dubbing 34, 35 To A PC 36 To A TV Or VCR 17 D Date/Time Display (DATE...Settings 8 DCF (Design rule for Camera File system 20, 39 Deleting Files (DELETE 22 Demonstration Mode (DEMO MODE 27 Digital Image Stabilization (DIS 26 DPOF Setting (Digital Print Order Format 23 Dubbing 19, 34, 35 Dubbing from tape to memory card 19 E Erase Protection 10 Exposure ...


