User Manual
Page 1
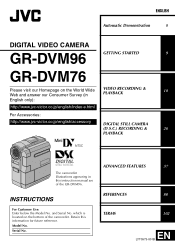
... No. and Serial No. Retain this instruction manual are of the camcorder. which is located on the World Wide Web and answer our Consumer Survey (in VIDEO RECORDING & PLAYBACK 18 English only): http://www.jvc-victor.co.jp/english/index-e.html For Accessories: http://www.jvc-victor.co.jp/english/accessory DIGITAL STILL CAMERA...
... No. and Serial No. Retain this instruction manual are of the camcorder. which is located on the World Wide Web and answer our Consumer Survey (in VIDEO RECORDING & PLAYBACK 18 English only): http://www.jvc-victor.co.jp/english/index-e.html For Accessories: http://www.jvc-victor.co.jp/english/accessory DIGITAL STILL CAMERA...
User Manual
Page 2
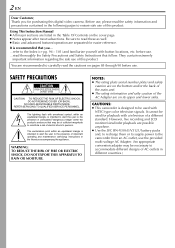
... use of a different standard. REFER SERVICING TO QUALIFIED SERVICE PERSONNEL. It cannot be used for easier reference. Using This Instruction Manual ● All major sections are listed in the following pages to read thoroughly the Safety Precautions and Safety Instructions that follow. NO...The rating information and safty caution of the AC Adapter are possible anywhere. ● Use the JVC BN-V306U/V312U battery packs and, to recharge them or to supply power to the camcorder from an AC outlet, use the provided multi-voltage AC Adapter. (An appropriate conversion adapter may ...
... use of a different standard. REFER SERVICING TO QUALIFIED SERVICE PERSONNEL. It cannot be used for easier reference. Using This Instruction Manual ● All major sections are listed in the following pages to read thoroughly the Safety Precautions and Safety Instructions that follow. NO...The rating information and safty caution of the AC Adapter are possible anywhere. ● Use the JVC BN-V306U/V312U battery packs and, to recharge them or to supply power to the camcorder from an AC outlet, use the provided multi-voltage AC Adapter. (An appropriate conversion adapter may ...
User Manual
Page 11
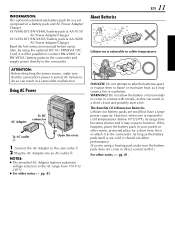
... AA-V80U AC Power Adapter/Charger Read the kit's instruction manual before using the optional JVC VC-VBN856U DC Cord, it will be possible to connect BN-V840U or BN-V856U battery packs to the camcorder and supply power directly to the camcorder. Using AC Power AC Adapter To DC connector a To...do so can result in contact with it may cause a fire or explosion. NOTES: ● The provided AC Adapter features automatic voltage selection in a camcorder malfunction. If this can result in the AC range from 110 V to 240 V. ● For other warm, protected place for a short time, then...
... AA-V80U AC Power Adapter/Charger Read the kit's instruction manual before using the optional JVC VC-VBN856U DC Cord, it will be possible to connect BN-V840U or BN-V856U battery packs to the camcorder and supply power directly to the camcorder. Using AC Power AC Adapter To DC connector a To...do so can result in contact with it may cause a fire or explosion. NOTES: ● The provided AC Adapter features automatic voltage selection in a camcorder malfunction. If this can result in the AC range from 110 V to 240 V. ● For other warm, protected place for a short time, then...
User Manual
Page 14
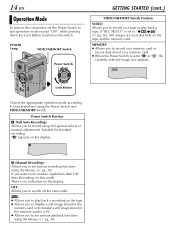
... playback functions using the Power Switch and VIDEO/MEMORY Switch. 14 EN Operation Mode To turn on the camcorder, set the Power Switch to record using NO special effects or manual adjustments. OFF: Allows you to record on a memory card or access data stored on a tape or... you to set to "A" or "M", the currently selected image size appears. 1024 Lock Button Choose the appropriate operation mode according to switch off the camcorder. POWER Lamp VIDEO/MEMORY Switch Power Switch PLAY OFF A M GETTING STARTED (cont.) VIDEO/MEMORY Switch Position VIDEO: Allows you to record on ...
... playback functions using the Power Switch and VIDEO/MEMORY Switch. 14 EN Operation Mode To turn on the camcorder, set the Power Switch to record using NO special effects or manual adjustments. OFF: Allows you to record on a memory card or access data stored on a tape or... you to set to "A" or "M", the currently selected image size appears. 1024 Lock Button Choose the appropriate operation mode according to switch off the camcorder. POWER Lamp VIDEO/MEMORY Switch Power Switch PLAY OFF A M GETTING STARTED (cont.) VIDEO/MEMORY Switch Position VIDEO: Allows you to record on ...

User Manual
Page 15
... time begin operation from the date and time you finish setting the minute and press the MENU Wheel in the camcorder. When you have just set. The Menu Screen appears. BALANCE CAMERA MANUAL S Y S T EM D I ME CODE CLOCK ADJ . - ON SCREEN DATE / T I ME T I SPLAY DSC END 4 Rotate the MENU... Wheel to charge the clock's rechargeable lithium battery. AUTO - When this occurs, first connect the camcorder to an AC outlet using the AC Adapter for...
... time begin operation from the date and time you finish setting the minute and press the MENU Wheel in the camcorder. When you have just set. The Menu Screen appears. BALANCE CAMERA MANUAL S Y S T EM D I ME CODE CLOCK ADJ . - ON SCREEN DATE / T I ME T I SPLAY DSC END 4 Rotate the MENU... Wheel to charge the clock's rechargeable lithium battery. AUTO - When this occurs, first connect the camcorder to an AC outlet using the AC Adapter for...
User Manual
Page 20
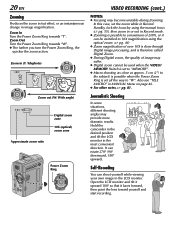
... when the Power Zoom Ring is set the zoom while in RecordStandby, lock the focus by using the manual focus (੬ pg. 55), then zoom in or out in image magnification. Hold the camcorder in the desired position and tilt the LCD monitor in (T: Telephoto) 1 xW T 1 0 xW T 20xW T 40xW T Zoom out (W: Wide..., or it faces forward, then point the lens toward yourself and start recording. Self-Recording You can shoot yourself while viewing your own image in MANUAL Menu on page 46. ● For other notes, ੬ pg. 81. Also see "TELE MACRO" in the LCD monitor. Open the LCD monitor and ...
... when the Power Zoom Ring is set the zoom while in RecordStandby, lock the focus by using the manual focus (੬ pg. 55), then zoom in or out in image magnification. Hold the camcorder in the desired position and tilt the LCD monitor in (T: Telephoto) 1 xW T 1 0 xW T 20xW T 40xW T Zoom out (W: Wide..., or it faces forward, then point the lens toward yourself and start recording. Self-Recording You can shoot yourself while viewing your own image in MANUAL Menu on page 46. ● For other notes, ੬ pg. 81. Also see "TELE MACRO" in the LCD monitor. Open the LCD monitor and ...

User Manual
Page 24
... or VCR TV White to AUDIO L IN* Connector Cover** VCR Red to AUDIO R IN* Audio/Video cable (provided) Yellow to your VCR and TV instruction manuals. To S-VIDEO When making the connections, refer also to VIDEO IN * The Audio cable is not required for watching still images only. ** When connecting the...
... or VCR TV White to AUDIO L IN* Connector Cover** VCR Red to AUDIO R IN* Audio/Video cable (provided) Yellow to your VCR and TV instruction manuals. To S-VIDEO When making the connections, refer also to VIDEO IN * The Audio cable is not required for watching still images only. ** When connecting the...
User Manual
Page 25
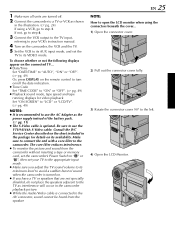
... pg. 49) ● Playback sound mode, tape speed and tape running displays for details on the camcorder, the VCR and the TV. 5 Set the VCR to its AUX input mode, and set your VCR's instruction manual. 4 Turn on its minimum level to avoid a sudden burst of the battery pack. (੬ pg.... 11) ● The S-Video cable is optional. Be sure to the camcorder. Consult the JVC Service Center described on the sheet included in the package for...
... pg. 49) ● Playback sound mode, tape speed and tape running displays for details on the camcorder, the VCR and the TV. 5 Set the VCR to its AUX input mode, and set your VCR's instruction manual. 4 Turn on its minimum level to avoid a sudden burst of the battery pack. (੬ pg.... 11) ● The S-Video cable is optional. Be sure to the camcorder. Consult the JVC Service Center described on the sheet included in the package for...
User Manual
Page 37
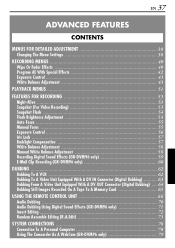
... 55 Exposure Control 56 Iris Lock 57 Backlight Compensation 57 White Balance Adjustment 58 Manual White Balance Adjustment 58 Recording Digital Sound Effects (GR-DVM96 only 59 E-Mail Clip Recording (GR-DVM96 only 60 DUBBING 62 Dubbing To A VCR 62 Dubbing To A Video Unit Equipped With A DV IN Connector (...Recorded On A Tape To A Memory Card 65 USING THE REMOTE CONTROL UNIT 66 Audio Dubbing 70 Audio Dubbing Using Digital Sound Effects (GR-DVM96 only 71 Insert Editing 72 Random Assemble Editing [R.A.Edit 73 SYSTEM CONNECTIONS 78 Connection To A Personal Computer 78 Using The...
... 55 Exposure Control 56 Iris Lock 57 Backlight Compensation 57 White Balance Adjustment 58 Manual White Balance Adjustment 58 Recording Digital Sound Effects (GR-DVM96 only 59 E-Mail Clip Recording (GR-DVM96 only 60 DUBBING 62 Dubbing To A VCR 62 Dubbing To A Video Unit Equipped With A DV IN Connector (...Recorded On A Tape To A Memory Card 65 USING THE REMOTE CONTROL UNIT 66 Audio Dubbing 70 Audio Dubbing Using Digital Sound Effects (GR-DVM96 only 71 Insert Editing 72 Random Assemble Editing [R.A.Edit 73 SYSTEM CONNECTIONS 78 Connection To A Personal Computer 78 Using The...

User Manual
Page 38
... Switch to -use, onscreen menu system that simplifies many of the more detailed camcorder settings. (੬ pg. 40 - 52) VIDEO/MEMORY Switch Power Switch PLAY OFF A M Lock Button MENU Wheel 1 For Video and D.S.C. BALANCE CAMERA MANUAL S Y S T EM D I SPLAY DSC END Menu Screen for Video ...Playback Menu END 38 EN Changing The Menu Settings This camcorder is complete. Recording Menu MENUS FOR DETAILED ADJUSTMENT 4 Rotate the MENU Wheel to set...
... Switch to -use, onscreen menu system that simplifies many of the more detailed camcorder settings. (੬ pg. 40 - 52) VIDEO/MEMORY Switch Power Switch PLAY OFF A M Lock Button MENU Wheel 1 For Video and D.S.C. BALANCE CAMERA MANUAL S Y S T EM D I SPLAY DSC END Menu Screen for Video ...Playback Menu END 38 EN Changing The Menu Settings This camcorder is complete. Recording Menu MENUS FOR DETAILED ADJUSTMENT 4 Rotate the MENU Wheel to set...

User Manual
Page 39
...the Power Switch is displayed in again. However, the menu settings can be changed only when the Power Switch is set to "M". ● The "q MANUAL" settings are effective only when the Power Switch is set to "M". ● The "s SYSTEM" and "n DISPLAY" functions which are set when the ...Power Switch is set to both "A" and "M". BALANCE CAMERA MANUAL S Y S T EM D I SPLAY DSC END 5) Press the MENU Wheel in reverse. FUL L GA I N UP - AGC RETURN 2) Rotate the MENU Wheel to select ...
...the Power Switch is displayed in again. However, the menu settings can be changed only when the Power Switch is set to "M". ● The "q MANUAL" settings are effective only when the Power Switch is set to "M". ● The "s SYSTEM" and "n DISPLAY" functions which are set when the ...Power Switch is set to both "A" and "M". BALANCE CAMERA MANUAL S Y S T EM D I SPLAY DSC END 5) Press the MENU Wheel in reverse. FUL L GA I N UP - AGC RETURN 2) Rotate the MENU Wheel to select ...

User Manual
Page 42
...may otherwise appear too dark when shooting in extremely bright surroundings such as in this mode. From less than 10 m (32 ft), adjust the focus manually. Like classic black and white films, your desired setting. PROGRAM AE RECORDING MENUS (cont.) 3 Set "r PROGRAM AE" to infinity. NOTES: ●...pressing down the Lock Button located on the switch. 2 Open the LCD monitor fully, or pull out the viewfinder fully. When Twilight is chosen, the camcorder automatically adjusts the focus from approx. 10 m (32 ft) to the desired mode. (੬ pg. 38) ● The selected mode indicator appears...
...may otherwise appear too dark when shooting in extremely bright surroundings such as in this mode. From less than 10 m (32 ft), adjust the focus manually. Like classic black and white films, your desired setting. PROGRAM AE RECORDING MENUS (cont.) 3 Set "r PROGRAM AE" to infinity. NOTES: ●...pressing down the Lock Button located on the switch. 2 Open the LCD monitor fully, or pull out the viewfinder fully. When Twilight is chosen, the camcorder automatically adjusts the focus from approx. 10 m (32 ft) to the desired mode. (੬ pg. 38) ● The selected mode indicator appears...
User Manual
Page 43
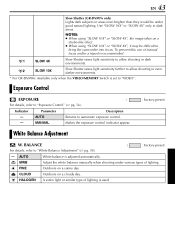
... (੬ pg. 56). MWB Adjust the white balance manually when shooting under good natural lighting. Indicator Parameter Description - White Balance Adjustment : Factory-preset) W. EN 43 Slow Shutter (GR-DVM76 only) Lights dark subjects or areas even brighter than...to automatic exposure control. - Use "SLOW 10X" or "SLOW 4X" only in even darker environments. * For GR-DVM96: Available only when the VIDEO/MEMORY Switch is adjusted automatically. FINE Outdoors on a cloudy day. SLOW 4X ... shooting in dark areas. AUTO Returns to bring the camcorder into focus.
... (੬ pg. 56). MWB Adjust the white balance manually when shooting under good natural lighting. Indicator Parameter Description - White Balance Adjustment : Factory-preset) W. EN 43 Slow Shutter (GR-DVM76 only) Lights dark subjects or areas even brighter than...to automatic exposure control. - Use "SLOW 10X" or "SLOW 4X" only in even darker environments. * For GR-DVM96: Available only when the VIDEO/MEMORY Switch is adjusted automatically. FINE Outdoors on a cloudy day. SLOW 4X ... shooting in dark areas. AUTO Returns to bring the camcorder into focus.
User Manual
Page 46
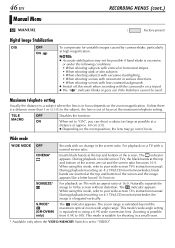
Wide mode WIDE MODE OFF CINEMA* SQUEEZE* S.WIDE* (GR-DVM96 only) Records with a normal screen ratio. During playback/recording on 4:3...lens is elongated vertically. The indicator appears. The zoom range is possible from 0.9X to your wide-screen TV's instruction manual. This mode is suitable for unstable images caused by camera-shake, particularly at a distance of approx. 60 cm (2 ... zoom position, the lens may not be used. The indicator appears. For playback on TVs with the camcorder on wide-screen TVs, the black bands at the top and bottom of the screen are inserted at ...
Wide mode WIDE MODE OFF CINEMA* SQUEEZE* S.WIDE* (GR-DVM96 only) Records with a normal screen ratio. During playback/recording on 4:3...lens is elongated vertically. The indicator appears. The zoom range is possible from 0.9X to your wide-screen TV's instruction manual. This mode is suitable for unstable images caused by camera-shake, particularly at a distance of approx. 60 cm (2 ... zoom position, the lens may not be used. The indicator appears. For playback on TVs with the camcorder on wide-screen TVs, the black bands at the top and bottom of the screen are inserted at ...

User Manual
Page 53
... "OFF" in VIDEO Menu. (੬ pg. 51) However, the shutter sound is not heard. ● During Snapshot recording, the image displayed in MANUAL Menu. (੬ pg. 46) ● During Night-Alive, it is engaged, certain modes of "Program AE With Special Effects" (੬ pg. ...appears beside " " while the shutter speed is not heard from the speaker, however it may be recorded for approx. 6 seconds, then the camcorder re-enters the RecordStandby mode. ● You can perform Snapshot also during Snapshot recording. Snapshot (For Video Recording) This feature lets you record ...
... "OFF" in VIDEO Menu. (੬ pg. 51) However, the shutter sound is not heard. ● During Snapshot recording, the image displayed in MANUAL Menu. (੬ pg. 46) ● During Night-Alive, it is engaged, certain modes of "Program AE With Special Effects" (੬ pg. ...appears beside " " while the shutter speed is not heard from the speaker, however it may be recorded for approx. 6 seconds, then the camcorder re-enters the RecordStandby mode. ● You can perform Snapshot also during Snapshot recording. Snapshot (For Video Recording) This feature lets you record ...

User Manual
Page 54
...not fire. Press SNAPSHOT. The first flash is for reduction of the human eye's red reflection and the second flash is for this the camcorder automatically darkens the picture when using the flash. Moreover, the flash does not fire when it twice to close the Menu Screen. When ...2668; pg. 42) ● Although images shot with special effects set to +3. 3 Press the MENU Wheel in the dark the camcorder fires the flash and adjusts the brightness automatically. in MANUAL Menu, and press the MENU Wheel in. ● The parameter appears. 2 To intensify the flash, rotate the MENU Wheel towards...
...not fire. Press SNAPSHOT. The first flash is for reduction of the human eye's red reflection and the second flash is for this the camcorder automatically darkens the picture when using the flash. Moreover, the flash does not fire when it twice to close the Menu Screen. When ...2668; pg. 42) ● Although images shot with special effects set to +3. 3 Press the MENU Wheel in the dark the camcorder fires the flash and adjusts the brightness automatically. in MANUAL Menu, and press the MENU Wheel in. ● The parameter appears. 2 To intensify the flash, rotate the MENU Wheel towards...

User Manual
Page 55
... MENU Wheel towards "-". The " " indicator appears and blinks. If you use the Manual Focus mode. While focusing on the distance between the camcorder and the subject. Focus adjustment is pressed once, the camcorder will blink. Focus detection zone However, correct focus may automatically zoom out depending on a..., zoom out first. (੬ pg. 20) If zoomed-in in the auto focus mode, the camcorder may not be obtainable in the situations listed below (in these cases perform "Manual Focus"): ● When two subjects overlap in the same scene. ● When illumination is low.* ...
... MENU Wheel towards "-". The " " indicator appears and blinks. If you use the Manual Focus mode. While focusing on the distance between the camcorder and the subject. Focus adjustment is pressed once, the camcorder will blink. Focus detection zone However, correct focus may automatically zoom out depending on a..., zoom out first. (੬ pg. 20) If zoomed-in in the auto focus mode, the camcorder may not be obtainable in the situations listed below (in these cases perform "Manual Focus"): ● When two subjects overlap in the same scene. ● When illumination is low.* ...

User Manual
Page 56
... effect as the backlight compensation. (੬ pg. 57) ● -3 exposure has the same effect as at the same time when "r PROGRAM AE" is set to "MANUAL". (੬ pg. 43) ● The exposure control indicator appears. 2 To brighten the image, rotate the MENU Wheel towards "+". Exposure adjustment is complete. Before starting, perform...... 56 EN MENU Wheel VIDEO/MEMORY Switch Power Switch PLAY OFF A M FEATURES FOR RECORDING (cont.) To return to "A". ● If EXPOSURE is pressed once, the camcorder will enter the exposure control mode again.
... effect as the backlight compensation. (੬ pg. 57) ● -3 exposure has the same effect as at the same time when "r PROGRAM AE" is set to "MANUAL". (੬ pg. 43) ● The exposure control indicator appears. 2 To brighten the image, rotate the MENU Wheel towards "+". Exposure adjustment is complete. Before starting, perform...... 56 EN MENU Wheel VIDEO/MEMORY Switch Power Switch PLAY OFF A M FEATURES FOR RECORDING (cont.) To return to "A". ● If EXPOSURE is pressed once, the camcorder will enter the exposure control mode again.

User Manual
Page 57
Use this function in the following situations: ● When shooting a moving subject. ● When the distance to "MANUAL". (੬ pg. 43) ● The exposure control indicator appears. For automatic locking, select "AUTO" in the LCD monitor or the viewfinder changes), such as when ...
Use this function in the following situations: ● When shooting a moving subject. ● When the distance to "MANUAL". (੬ pg. 43) ● The exposure control indicator appears. For automatic locking, select "AUTO" in the LCD monitor or the viewfinder changes), such as when ...

User Manual
Page 58
...9679; Set the Power Switch to focus on a cloudy day. Because the colour temperature is adjusted automatically. In such a case, adjust focus manually. (੬ pg. 55) ● A subject can be difficult to "M" while pressing down the Lock Button located on a sunny day. ...NOTE: White balance cannot be accurately reproduced. However, more advanced camcorder operators control this function for a more professional colour/tint reproduction. - The white balance is set the Power Switch to achieve a more natural...
...9679; Set the Power Switch to focus on a cloudy day. Because the colour temperature is adjusted automatically. In such a case, adjust focus manually. (੬ pg. 55) ● A subject can be difficult to "M" while pressing down the Lock Button located on a sunny day. ...NOTE: White balance cannot be accurately reproduced. However, more advanced camcorder operators control this function for a more professional colour/tint reproduction. - The white balance is set the Power Switch to achieve a more natural...


