

Instruction Manual
Page 1
Serial No. Retain this information for future reference. which is located on the World Wide Web and answer our Consumer Survey (in English only): http://www.jvc-victor.co.jp/english/index-e.html INSTRUCTIONS For Customer Use: Enter below the Model No. EN LYT0384-001A Model No. DIGITAL VIDEO CAMERA GR-DVM70 ENGLISH Please visit our CyberCam Homepage on the bottom of cabinet. and Serial No.
Serial No. Retain this information for future reference. which is located on the World Wide Web and answer our Consumer Survey (in English only): http://www.jvc-victor.co.jp/english/index-e.html INSTRUCTIONS For Customer Use: Enter below the Model No. EN LYT0384-001A Model No. DIGITAL VIDEO CAMERA GR-DVM70 ENGLISH Please visit our CyberCam Homepage on the bottom of cabinet. and Serial No.
Instruction Manual
Page 2
...the following pages to persons. This camcorder is intended to alert the user to the presence of electric shock to ensure safe use , please read the cautions on its bottom. ● The rating plate (serial number plate) of this digital video camera. read these as well. &#...anywhere. The AA-V50U AC Power Adapter/Charger should be used with arrowhead symbol, within the product's enclosure that follow. This Class B digital apparatus complies with Maxell, Panasonic (Matsushita Electric), Sanyo or Sony CR2025; The lightning flash with NTSC-type color television signals. 2 EN...
...the following pages to persons. This camcorder is intended to alert the user to the presence of electric shock to ensure safe use , please read the cautions on its bottom. ● The rating plate (serial number plate) of this digital video camera. read these as well. &#...anywhere. The AA-V50U AC Power Adapter/Charger should be used with arrowhead symbol, within the product's enclosure that follow. This Class B digital apparatus complies with Maxell, Panasonic (Matsushita Electric), Sanyo or Sony CR2025; The lightning flash with NTSC-type color television signals. 2 EN...

Instruction Manual
Page 8
... Unloading A MultiMediaCard 16 Picture Quality Mode Setting 17 Tripod Mounting 18 Operation Mode 19 RECORDING 20 - 51 Basic Recording For Video 20 Basic Recording For Digital Still Camera (D.S.C 24 Basic Recording For Video And D.S.C 26 Advanced Features For Video And D.S.C 28 PLAYBACK 52 - 73 Basic Playback For Video 52 Advanced Features For...
... Unloading A MultiMediaCard 16 Picture Quality Mode Setting 17 Tripod Mounting 18 Operation Mode 19 RECORDING 20 - 51 Basic Recording For Video 20 Basic Recording For Digital Still Camera (D.S.C 24 Basic Recording For Video And D.S.C 26 Advanced Features For Video And D.S.C 28 PLAYBACK 52 - 73 Basic Playback For Video 52 Advanced Features For...

Instruction Manual
Page 18
CAUTION: When using a tripod, be sure to open and extend its legs fully to the unit caused by falling over, do not use a small-sized tripod. To prevent damage to stabilize the camcorder. Then tighten the screw. 18 EN GETTING STARTED (cont.) Tripod Mounting 1 ALIGN AND TIGHTEN Align the screw on the tripod with the camera's mounting socket.
CAUTION: When using a tripod, be sure to open and extend its legs fully to the unit caused by falling over, do not use a small-sized tripod. To prevent damage to stabilize the camcorder. Then tighten the screw. 18 EN GETTING STARTED (cont.) Tripod Mounting 1 ALIGN AND TIGHTEN Align the screw on the tripod with the camera's mounting socket.

Instruction Manual
Page 19
... Manual Focus and Exposure Control are the same as in the upper left corner. Allows you to a computer. Suitable for standard recording on the camcorder, first set to "5S", "MANUAL" blinks.) Operation Switch Position OFF Full Auto: Manual: Allows you to " " or " ", these... CAME Power lamp Power Switch/ Operation Switch Position 5 second recording mode: 5S Digital Still Camera: Function Suitable for standard recording. Enables shooting in Manual mode. Allows you to set to switch off the camcorder. Allows you to record using the Menus. If the Power Switch is set...
... Manual Focus and Exposure Control are the same as in the upper left corner. Allows you to a computer. Suitable for standard recording on the camcorder, first set to "5S", "MANUAL" blinks.) Operation Switch Position OFF Full Auto: Manual: Allows you to " " or " ", these... CAME Power lamp Power Switch/ Operation Switch Position 5 second recording mode: 5S Digital Still Camera: Function Suitable for standard recording. Enables shooting in Manual mode. Allows you to set to switch off the camcorder. Allows you to record using the Menus. If the Power Switch is set...

Instruction Manual
Page 24
... Camera (D.S.C.) for taking snapshots. Snapshot mode Card icon Appears when a MultiMediaCard is not loaded. Shooting icon Appears and blinks during shooting. There are recorded in order of images that can use your camcorder as necessary until the desired snapshot mode indicator is displayed....mode Displays the Picture Quality mode of shots that have performed the procedures listed below. 24 EN RECORDING Basic Recording For Digital Still Camera (D.S.C.) Basic Shooting (Snapshot) You can be stored, including those already taken. Total number of shots Displays the approximate ...
... Camera (D.S.C.) for taking snapshots. Snapshot mode Card icon Appears when a MultiMediaCard is not loaded. Shooting icon Appears and blinks during shooting. There are recorded in order of images that can use your camcorder as necessary until the desired snapshot mode indicator is displayed....mode Displays the Picture Quality mode of shots that have performed the procedures listed below. 24 EN RECORDING Basic Recording For Digital Still Camera (D.S.C.) Basic Shooting (Snapshot) You can be stored, including those already taken. Total number of shots Displays the approximate ...

Instruction Manual
Page 30
... special effects (੬ pg. 45) cannot be lost. If you record the next clip within 5 seconds after 5 seconds the camcorder enters Record-Standby mode. •If you press START/STOP again within 5 minutes, the previous scene dissolves as necessary until START/STOP...MODE Set the Power Switch to "ANIM." PHOTO (SNAPSHOT) Button Lock Button FF CAMERA 5S Power lamp PLAY/PC O DSC DSCPLA Y Display Power Switch •"5S MODE" appears. 2 ENGAGE 5S MODE Press START/STOP. The camcorder records a 5- START/STOP Button 1 SELECT OPERATION MODE Set the Operation Switch to...
... special effects (੬ pg. 45) cannot be lost. If you record the next clip within 5 seconds after 5 seconds the camcorder enters Record-Standby mode. •If you press START/STOP again within 5 minutes, the previous scene dissolves as necessary until START/STOP...MODE Set the Power Switch to "ANIM." PHOTO (SNAPSHOT) Button Lock Button FF CAMERA 5S Power lamp PLAY/PC O DSC DSCPLA Y Display Power Switch •"5S MODE" appears. 2 ENGAGE 5S MODE Press START/STOP. The camcorder records a 5- START/STOP Button 1 SELECT OPERATION MODE Set the Operation Switch to...

Instruction Manual
Page 32
... snapshot mode indicator is displayed, the flash fires. 32 EN RECORDING Advanced Features For Video And D.S.C. (cont.) Snapshot (For Video Recording) Use your camcorder like photographs onto a tape. Then, set to "OFF" in the System Menu (੬ pg. 39), the Motor Drive Mode does not take ...a snapshot, or several of them in succession. If you record still images that look like a regular camera and take place. This feature lets you press during Record-Standby PHOTO" appears and a still image will be recorded for approx. 5 seconds, ...
... snapshot mode indicator is displayed, the flash fires. 32 EN RECORDING Advanced Features For Video And D.S.C. (cont.) Snapshot (For Video Recording) Use your camcorder like photographs onto a tape. Then, set to "OFF" in the System Menu (੬ pg. 39), the Motor Drive Mode does not take ...a snapshot, or several of them in succession. If you record still images that look like a regular camera and take place. This feature lets you press during Record-Standby PHOTO" appears and a still image will be recorded for approx. 5 seconds, ...
Instruction Manual
Page 38
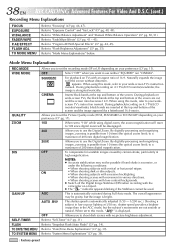
...directions. • When shooting scenes with low-contrast backgrounds. ● Switch off the Digital Image Stabilizer (DIS) when recording with vertical or horizontal stripes. AUTO The shutter speed ...the image is excessive, or under the following conditions: • When shooting subjects with the camcorder on TVs with no picture brightness adjustment. Refer to "White Balance Adjustment" and "Manual White... (੬ pg. 50, 51). DIS OFF To compensate for unstable images caused by camera-shake, particularly at the top and bottom of the screen are cut and the screen ...
...directions. • When shooting scenes with low-contrast backgrounds. ● Switch off the Digital Image Stabilizer (DIS) when recording with vertical or horizontal stripes. AUTO The shutter speed ...the image is excessive, or under the following conditions: • When shooting subjects with the camcorder on TVs with no picture brightness adjustment. Refer to "White Balance Adjustment" and "Manual White... (੬ pg. 50, 51). DIS OFF To compensate for unstable images caused by camera-shake, particularly at the top and bottom of the screen are cut and the screen ...

Instruction Manual
Page 51
..., the tint of the subject. BALANCE AUTO AUTO AUTO Power Switch Recording Menu MANUAL Manual White Balance Adjustment EN51 Manual White Balance Operation If the camera is adjusted based on the white balance settings. orange; yellow paper - deeper purple. The indication "W.BAL." Because the color temperature is displayed. NOTES: ● In...
..., the tint of the subject. BALANCE AUTO AUTO AUTO Power Switch Recording Menu MANUAL Manual White Balance Adjustment EN51 Manual White Balance Operation If the camera is adjusted based on the white balance settings. orange; yellow paper - deeper purple. The indication "W.BAL." Because the color temperature is displayed. NOTES: ● In...
Instruction Manual
Page 71
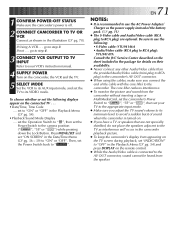
If Using A VCR . . . go to the camera position (" ", "5S" or " ") while pressing down the Lock Button. Be sure to use the AC Power Adapter/ Charger as the power supply instead of sound when the camcorder is turned on. ● If you adjust the TV sound volume to its VIDEO mode...to RCA plug): YTU94147A Consult the JVC Service Center described on the sheet included in the package for details on their availability. ● Never connect any other Audio/Video cable than the provided Audio/Video cable (mini-plug to RCA plug) to the camcorder's AV OUT connector. ● ...
If Using A VCR . . . go to the camera position (" ", "5S" or " ") while pressing down the Lock Button. Be sure to use the AC Power Adapter/ Charger as the power supply instead of sound when the camcorder is turned on. ● If you adjust the TV sound volume to its VIDEO mode...to RCA plug): YTU94147A Consult the JVC Service Center described on the sheet included in the package for details on their availability. ● Never connect any other Audio/Video cable than the provided Audio/Video cable (mini-plug to RCA plug) to the camcorder's AV OUT connector. ● ...

Instruction Manual
Page 81
... DUB Button % Up Button ^ FF Button & PLAY Button * PAUSE Button ( STOP Button ) R.A.EDIT Buttons Functions With the camcorder's Power Switch set to the camera position (" ", "5S" or ") . - With the camcorder's Power Switch set to " " or " ". ੬ pg. 85 Zoom in/out (੬ pg. 82) ੬ ...Left/Right Buttons 6 FADE/WIPE Button 7 REW Button 8 EFFECT Button 9 EFFECT ON/OFF Button 0 Infrared beam transmitting window ! Functions same as START/STOP on the camcorder. - ੬ pg. 55 - ੬ pg. 84 - - ੬ pg. 82 ੬ pg. 90 - ੬ pg. 82 - •...
... DUB Button % Up Button ^ FF Button & PLAY Button * PAUSE Button ( STOP Button ) R.A.EDIT Buttons Functions With the camcorder's Power Switch set to the camera position (" ", "5S" or ") . - With the camcorder's Power Switch set to " " or " ". ੬ pg. 85 Zoom in/out (੬ pg. 82) ੬ ...Left/Right Buttons 6 FADE/WIPE Button 7 REW Button 8 EFFECT Button 9 EFFECT ON/OFF Button 0 Infrared beam transmitting window ! Functions same as START/STOP on the camcorder. - ੬ pg. 55 - ੬ pg. 84 - - ੬ pg. 82 ੬ pg. 90 - ੬ pg. 82 - •...

Instruction Manual
Page 101
... [5 pg. 52 ^ Fast-Forward Button [3 pg. 52 & Lock Button pg. 19 * Diopter Adjustment Control pg. 12 Connectors The connectors ( to ) are located beneath the cover. ( Digital Video Connector [DV IN/OUT] (i.link pg. 72, 73, 75 *i.Link refers to the Docking Station, this part is connected. EN101 Indicators w Tally Lamp pg... pg. 20, 79 7 SNAPSHOT/PHOTO Button pg. 24, 32 8 Back Light Button [BACK LIGHT pg. 48 9 OPEN/EJECT Switch pg. 14 0 Battery Release Switch [BATT. y Camera Sensor Be careful not to cover this area; The logo is used for shooting is opened fully.
... [5 pg. 52 ^ Fast-Forward Button [3 pg. 52 & Lock Button pg. 19 * Diopter Adjustment Control pg. 12 Connectors The connectors ( to ) are located beneath the cover. ( Digital Video Connector [DV IN/OUT] (i.link pg. 72, 73, 75 *i.Link refers to the Docking Station, this part is connected. EN101 Indicators w Tally Lamp pg... pg. 20, 79 7 SNAPSHOT/PHOTO Button pg. 24, 32 8 Back Light Button [BACK LIGHT pg. 48 9 OPEN/EJECT Switch pg. 14 0 Battery Release Switch [BATT. y Camera Sensor Be careful not to cover this area; The logo is used for shooting is opened fully.

Instruction Manual
Page 108
... (over time. If, after using the Cleaning Cassette, the problems still exist, consult your nearest JVC dealer. For periodic check-ups please consult your nearest JVC dealer. Keep it away from metallic objects when not in use conventional disc cleaners or cleaning spray.... .... in use the optional Cleaning Cassette. in summer. .... swing the soft camera case excessively when the camcorder is not in places of the battery pack. leave the battery pack attached when the camcorder is inside it against hard objects. .... Dirty heads can cause the following problems:...
... (over time. If, after using the Cleaning Cassette, the problems still exist, consult your nearest JVC dealer. For periodic check-ups please consult your nearest JVC dealer. Keep it away from metallic objects when not in use conventional disc cleaners or cleaning spray.... .... in use the optional Cleaning Cassette. in summer. .... swing the soft camera case excessively when the camcorder is not in places of the battery pack. leave the battery pack attached when the camcorder is inside it against hard objects. .... Dirty heads can cause the following problems:...

Instruction Manual
Page 110
... Specifications shown are for SP mode unless otherwise indicated. E & O.E. LP: 90 min. (using M-DV60ME cassette) For Digital Still Camera Storage media : MultiMediaCard Compression system : JPEG (compatible) Picture quality : 3 modes (FINE/STANDARD/ECONOMY) Number of storable images...Lens : F 1.8, f = 3.6 to change without grip strap, cassette, MultiMediaCard and battery) Approx. 525 g (1.2 lbs) (incl. 110 EN Camcorder SPECIFICATIONS For General Power supply : DC 6.3 V DC 7.2 V (Using the AC Power Adapter/Charger) (Using battery pack) Power consumption LCD monitor ...
... Specifications shown are for SP mode unless otherwise indicated. E & O.E. LP: 90 min. (using M-DV60ME cassette) For Digital Still Camera Storage media : MultiMediaCard Compression system : JPEG (compatible) Picture quality : 3 modes (FINE/STANDARD/ECONOMY) Number of storable images...Lens : F 1.8, f = 3.6 to change without grip strap, cassette, MultiMediaCard and battery) Approx. 525 g (1.2 lbs) (incl. 110 EN Camcorder SPECIFICATIONS For General Power supply : DC 6.3 V DC 7.2 V (Using the AC Power Adapter/Charger) (Using battery pack) Power consumption LCD monitor ...


