
Instruction Manual
Page 2
.... Do not recharge, disassemble, heat above 100°C (212°F) or incinerate. This camcorder is recommended that follow. It is designed to accommodate different designs of this digital video camera. They contain extremely important information regarding the safe use . ..... refer to carefully ...etc. Cet appareil numérique de la classe B est conforme à la norme NMB-003 du Canada. This Class B digital apparatus complies with Maxell, Panasonic (Matsushita Electric), Sanyo or Sony CR2025; read the cautions on lithium cell battery (for purchasing this product...
.... Do not recharge, disassemble, heat above 100°C (212°F) or incinerate. This camcorder is recommended that follow. It is designed to accommodate different designs of this digital video camera. They contain extremely important information regarding the safe use . ..... refer to carefully ...etc. Cet appareil numérique de la classe B est conforme à la norme NMB-003 du Canada. This Class B digital apparatus complies with Maxell, Panasonic (Matsushita Electric), Sanyo or Sony CR2025; read the cautions on lithium cell battery (for purchasing this product...
Instruction Manual
Page 3
... source indicated on or pinched by the manufacturer. Ventilation Slots and openings in potential electrical shock or fire hazards. Lightning For added protection for this manual for long periods of time, unplug it is grounded so as recommended by items placed upon or against voltage surges and built-up static charges...
... source indicated on or pinched by the manufacturer. Ventilation Slots and openings in potential electrical shock or fire hazards. Lightning For added protection for this manual for long periods of time, unplug it is grounded so as recommended by items placed upon or against voltage surges and built-up static charges...

Instruction Manual
Page 11
...AC range from 110 V to cover 3 times the planned shooting time. while sliding down BATT. Also read thoroughly the VU-V856KIT's instruction manuals. Use the optional AA-V80U AC Power Adapter/Charger. USING AC POWER Use the AC Power Adapter/Charger (connect as shown in the illustration.... •If the battery pack is attached in a camcorder malfunction. Before extended use, it is recommended that the camcorder's power is impossible to do so can result in the wrong position, a malfunction may occur. To Detach The...
...AC range from 110 V to cover 3 times the planned shooting time. while sliding down BATT. Also read thoroughly the VU-V856KIT's instruction manuals. Use the optional AA-V80U AC Power Adapter/Charger. USING AC POWER Use the AC Power Adapter/Charger (connect as shown in the illustration.... •If the battery pack is attached in a camcorder malfunction. Before extended use, it is recommended that the camcorder's power is impossible to do so can result in the wrong position, a malfunction may occur. To Detach The...

Instruction Manual
Page 19
...the Operation Switch position you to a computer. Allows you to set to "5S", "MANUAL" blinks.) Operation Switch Position OFF Full Auto: Manual: Allows you to switch off the camcorder. Allows you to record using the Menus. Suitable for standard recording in the MultiMediaCard. .../PCOFF CAME Power lamp Power Switch/ Operation Switch Position 5 second recording mode: 5S Digital Still Camera: Function Suitable for standard recording. To turn on a tape. Suitable for standard recording on the camcorder, first set to " " (When the Power Switch is set the Power Switch to...
...the Operation Switch position you to a computer. Allows you to set to "5S", "MANUAL" blinks.) Operation Switch Position OFF Full Auto: Manual: Allows you to switch off the camcorder. Allows you to record using the Menus. Suitable for standard recording in the MultiMediaCard. .../PCOFF CAME Power lamp Power Switch/ Operation Switch Position 5 second recording mode: 5S Digital Still Camera: Function Suitable for standard recording. To turn on a tape. Suitable for standard recording on the camcorder, first set to " " (When the Power Switch is set the Power Switch to...

Instruction Manual
Page 26
...Zoom In Slide the Power Zoom Lever towards "W". Ⅲ The further you slide the Power Zoom Lever, the quicker the zoom action. In Manual mode (when the Operation Switch is set all the way to 40X is possible to a maximum of 200X or can be switched to 10X...when the Power Zoom Lever is set to " "), zooming is possible. Zoom in (T: Telephoto) D T 1X W T D T 10X W D T 20X W T W D T 40X W W Zoom out (W: Wide angle) Digital zoom zone 10X (optical) zoom zone Zoom display D T 10X W Approximate zoom ratio Power Zoom Lever FEATURE: Zooming PURPOSE: To produce the zoom in/out effect...
...Zoom In Slide the Power Zoom Lever towards "W". Ⅲ The further you slide the Power Zoom Lever, the quicker the zoom action. In Manual mode (when the Operation Switch is set all the way to 40X is possible to a maximum of 200X or can be switched to 10X...when the Power Zoom Lever is set to " "), zooming is possible. Zoom in (T: Telephoto) D T 1X W T D T 10X W D T 20X W T W D T 40X W W Zoom out (W: Wide angle) Digital zoom zone 10X (optical) zoom zone Zoom display D T 10X W Approximate zoom ratio Power Zoom Lever FEATURE: Zooming PURPOSE: To produce the zoom in/out effect...

Instruction Manual
Page 30
... 3 END 5S MODE Set the Power Switch to "5SD" in step 1. If you record the next clip within 5 seconds after 5 seconds the camcorder enters Record-Standby mode. •If you press START/STOP again within 5 minutes, the previous scene dissolves as necessary until START/STOP is activated, ...Fade/ Wipe effects (੬ pg. 43) and Program AE with special effects (੬ pg. 45) cannot be lost. MANUAL PAUSE REC 444 5S MODE MANUAL After 5 sec. Dissolves during 5 second recording mode Set "SCENE" to " " or "OFF". Pull out the viewfinder fully or open the...
... 3 END 5S MODE Set the Power Switch to "5SD" in step 1. If you record the next clip within 5 seconds after 5 seconds the camcorder enters Record-Standby mode. •If you press START/STOP again within 5 minutes, the previous scene dissolves as necessary until START/STOP is activated, ...Fade/ Wipe effects (੬ pg. 43) and Program AE with special effects (੬ pg. 45) cannot be lost. MANUAL PAUSE REC 444 5S MODE MANUAL After 5 sec. Dissolves during 5 second recording mode Set "SCENE" to " " or "OFF". Pull out the viewfinder fully or open the...
Instruction Manual
Page 31
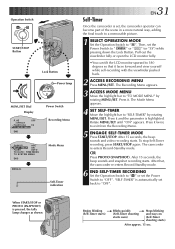
...is highlighted. Then, set back to " " or " " (or "5S") while pressing down the Lock Button. The camcorder re-enters Record-Standby mode. Pull out the viewfinder fully or open the LCD monitor fully. •You can become part of...it and the parameter is automatically set the Power Switch to "OFF". Self-Timer indication Self-Timer EN31 Once the camcorder is pressed, the tally lamp changes as shown: ¥ Begins blinking Blinks quickly ¥ Stops blinking (Self-Timer... MENU Move the highlight bar to "SELF-TIMER" by rotating MENU/SET. Mode Menu MANUAL PAUSE - - -
...is highlighted. Then, set back to " " or " " (or "5S") while pressing down the Lock Button. The camcorder re-enters Record-Standby mode. Pull out the viewfinder fully or open the LCD monitor fully. •You can become part of...it and the parameter is automatically set the Power Switch to "OFF". Self-Timer indication Self-Timer EN31 Once the camcorder is pressed, the tally lamp changes as shown: ¥ Begins blinking Blinks quickly ¥ Stops blinking (Self-Timer... MENU Move the highlight bar to "SELF-TIMER" by rotating MENU/SET. Mode Menu MANUAL PAUSE - - -

Instruction Manual
Page 34
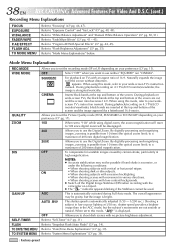
...activated or deactivated on the Mode Menu and also when the battery remaining power is low. The flash automatically fires using this the camcorder automatically darkens the picture when using the flash. If the Operation Switch is set to "Flash Brightness Adjustment" (੬ pg. 35... 6 TAKE SNAPSHOT Press PHOTO (SNAPSHOT). 34 EN RECORDING Advanced Features For Video And D.S.C. (cont.) Operation Switch Snapshot Flash (Auto Flash) A M In Full Auto or Manual mode, when "FLASH" is set to "FLASH", then press it. 4 FLASH AUTO TO DATE / TIME MENU TO SYSTEM MENU END - - - - -6- - ...
...activated or deactivated on the Mode Menu and also when the battery remaining power is low. The flash automatically fires using this the camcorder automatically darkens the picture when using the flash. If the Operation Switch is set to "Flash Brightness Adjustment" (੬ pg. 35... 6 TAKE SNAPSHOT Press PHOTO (SNAPSHOT). 34 EN RECORDING Advanced Features For Video And D.S.C. (cont.) Operation Switch Snapshot Flash (Auto Flash) A M In Full Auto or Manual mode, when "FLASH" is set to "FLASH", then press it. 4 FLASH AUTO TO DATE / TIME MENU TO SYSTEM MENU END - - - - -6- - ...

Instruction Manual
Page 35
...took look too bright or too dark, adjust it back to ±0 as described in step 4 and take a snapshot to "OFF" in the dark the camcorder fires the flash (੬ pg. 34) and adjusts the brightness automatically. After doing this adjust to " ", "5S" or " " while pressing down the...check the flash brightness. NOTES: ● When the battery power is low or when "FLASH" is from -3 to "FLASH ADJ.", then press it. MANUAL 2 EN35 Flash Brightness Adjustment When a snapshot (੬ pg. 24, 32) is complete and the normal screen reappears. The flash brightness adjustment is taken in...
...took look too bright or too dark, adjust it back to ±0 as described in step 4 and take a snapshot to "OFF" in the dark the camcorder fires the flash (੬ pg. 34) and adjusts the brightness automatically. After doing this adjust to " ", "5S" or " " while pressing down the...check the flash brightness. NOTES: ● When the battery power is low or when "FLASH" is from -3 to "FLASH ADJ.", then press it. MANUAL 2 EN35 Flash Brightness Adjustment When a snapshot (੬ pg. 24, 32) is complete and the normal screen reappears. The flash brightness adjustment is taken in...

Instruction Manual
Page 37
... OFFC DSC PLAY RA5S DSC DS [Power Switch: ] EN37 Power lamp AMERA 5SDSC Display 4 FOCUS MANUAL EXPOSURE AUTO W. MODE OFF ON 06 OFF RETURN System Menu FOCUS MANUAL EXPOSURE AUTO W. Normal Screen Normal Screen NOTES: ● "FADER/WIPE" appears in the Recording Menu...FLASH AUTO TO DATE / TIME MENU TO SYSTEM MENU END - - - - -6- - - - - FOCUS MANUAL EXPOSURE AUTO W. [Power Switch: or 5S] Power lamp /PCOFF CAME C PLAY Display 4 FOCUS MANUAL EXPOSURE AUTO W. Mode Menu DATE/TIME INDICATION 4 ON SCREEN DISPLAY DATE / TIME ON OFF ON DEC 25 '...
... OFFC DSC PLAY RA5S DSC DS [Power Switch: ] EN37 Power lamp AMERA 5SDSC Display 4 FOCUS MANUAL EXPOSURE AUTO W. MODE OFF ON 06 OFF RETURN System Menu FOCUS MANUAL EXPOSURE AUTO W. Normal Screen Normal Screen NOTES: ● "FADER/WIPE" appears in the Recording Menu...FLASH AUTO TO DATE / TIME MENU TO SYSTEM MENU END - - - - -6- - - - - FOCUS MANUAL EXPOSURE AUTO W. [Power Switch: or 5S] Power lamp /PCOFF CAME C PLAY Display 4 FOCUS MANUAL EXPOSURE AUTO W. Mode Menu DATE/TIME INDICATION 4 ON SCREEN DISPLAY DATE / TIME ON OFF ON DEC 25 '...
Instruction Manual
Page 38
... adjustment. When set the recording mode (SP or LP) depending on your wide-screen TV's instruction manual. Refer to "Fade/Wipe Effects" (੬ pg. 41 - 43). By digitally processing and magnifying images, zooming is elongated vertically. Refer to "Program AE With Special Effects" (੬... is possible from 10 times (the optical zoom limit), to your preference (੬ pg. 17). During playback/recording on TVs with the camcorder on 4:3 TVs/LCD monitor/viewfinder, black bands are not smooth or natural. During playback/recording on a tripod. ● The " ...
... adjustment. When set the recording mode (SP or LP) depending on your wide-screen TV's instruction manual. Refer to "Fade/Wipe Effects" (੬ pg. 41 - 43). By digitally processing and magnifying images, zooming is elongated vertically. Refer to "Program AE With Special Effects" (੬... is possible from 10 times (the optical zoom limit), to your preference (੬ pg. 17). During playback/recording on TVs with the camcorder on 4:3 TVs/LCD monitor/viewfinder, black bands are not smooth or natural. During playback/recording on a tripod. ● The " ...

Instruction Manual
Page 41
... Power Switch is started or when you make pro-style scene transitions. NOTE: ੬ pg. 42. These effects let you stop recording. B.W FADER/WIPE Menu MANUAL WH PAUSE [Ex.: FADER -
... Power Switch is started or when you make pro-style scene transitions. NOTE: ੬ pg. 42. These effects let you stop recording. B.W FADER/WIPE Menu MANUAL WH PAUSE [Ex.: FADER -

Instruction Manual
Page 45
... a classic look more natural. It is also recommended that you use . ● If the image is out of focus, adjust manually. When Twilight is chosen, the camcorder automatically adjusts the focus from approx. 10 m (33 ft) to provide 10 times the sensitivity. SLOW 10X The Shutter Speed is .... NOTES: ● When using "SLOW", the image takes on a strobe-like effect. ● Use "SLOW" only in dark areas. ● The Manual Focus indication may appear and flash when "SLOW" is in B/W. Used together with the Cinema mode for vivid, stable slow-motion playback. Gives recorded scenes...
... a classic look more natural. It is also recommended that you use . ● If the image is out of focus, adjust manually. When Twilight is chosen, the camcorder automatically adjusts the focus from approx. 10 m (33 ft) to provide 10 times the sensitivity. SLOW 10X The Shutter Speed is .... NOTES: ● When using "SLOW", the image takes on a strobe-like effect. ● Use "SLOW" only in dark areas. ● The Manual Focus indication may appear and flash when "SLOW" is in B/W. Used together with the Cinema mode for vivid, stable slow-motion playback. Gives recorded scenes...

Instruction Manual
Page 46
However, correct focus may not be obtainable in the situations listed below (in these cases use manual focusing): •When two subjects overlap in the same scene. •When illumination is affected by sunbeams or light reflecting off the surface of a.... •When the scene is low.* •When the subject has no contrast (difference in the auto focus mode, the camcorder could automatically zoom out depending on the distance between the camcorder and the subject. When condensation occurs, wipe with a high-contrast background. * The following low-contrast warnings appear blinking: , , ...
However, correct focus may not be obtainable in the situations listed below (in these cases use manual focusing): •When two subjects overlap in the same scene. •When illumination is affected by sunbeams or light reflecting off the surface of a.... •When the scene is low.* •When the subject has no contrast (difference in the auto focus mode, the camcorder could automatically zoom out depending on the distance between the camcorder and the subject. When condensation occurs, wipe with a high-contrast background. * The following low-contrast warnings appear blinking: , , ...
Instruction Manual
Page 47
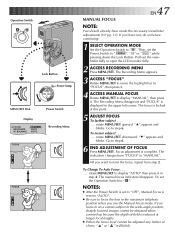
...M Lock Button /PCOFF CAME Power lamp PLAY RA5S DSC DS C PLAY MENU/SET Dial Power Switch Display 4 FOCUS EXPOSURE W. BALANCE MANUAL AUTO AUTO Recording Menu FOCUS FOCUS EN47 MANUAL FOCUS NOTE: You should already have not, do so before continuing. 1 SELECT OPERATION MODE Set the Operation Switch to step 6. Then,... set to "OFF", Manual Focus is reset to "AUTO". ● Be sure to focus the lens in the upper left corner. Pull out the view- finder fully or...
...M Lock Button /PCOFF CAME Power lamp PLAY RA5S DSC DS C PLAY MENU/SET Dial Power Switch Display 4 FOCUS EXPOSURE W. BALANCE MANUAL AUTO AUTO Recording Menu FOCUS FOCUS EN47 MANUAL FOCUS NOTE: You should already have not, do so before continuing. 1 SELECT OPERATION MODE Set the Operation Switch to step 6. Then,... set to "OFF", Manual Focus is reset to "AUTO". ● Be sure to focus the lens in the upper left corner. Pull out the view- finder fully or...

Instruction Manual
Page 48
... 3 ACCESS "EXPOSURE" Rotate MENU/SET to move the highlight bar to " ". MENU/SET Dial Power Switch Display FOCUS 4 EXPOSURE W. BALANCE AUTO MANUAL AUTO Recording Menu 5 ADJUST EXPOSURE To brighten the image . . . .... Exposure adjustment is the back light compensation level. The exposure control indicator decreases... 2 ACCESS RECORDING MENU Press MENU/SET. finder fully or open the LCD monitor fully. press BACK LIGHT. Go to display "MANUAL", then press it . The Recording Menu disappears. rotate MENU/SET upward. PLAY C PLAY RA5S DSC DS /PCOFF CAME Power lamp...
... 3 ACCESS "EXPOSURE" Rotate MENU/SET to move the highlight bar to " ". MENU/SET Dial Power Switch Display FOCUS 4 EXPOSURE W. BALANCE AUTO MANUAL AUTO Recording Menu 5 ADJUST EXPOSURE To brighten the image . . . .... Exposure adjustment is the back light compensation level. The exposure control indicator decreases... 2 ACCESS RECORDING MENU Press MENU/SET. finder fully or open the LCD monitor fully. press BACK LIGHT. Go to display "MANUAL", then press it . The Recording Menu disappears. rotate MENU/SET upward. PLAY C PLAY RA5S DSC DS /PCOFF CAME Power lamp...

Instruction Manual
Page 49
...monitor or the viewfinder), or when you , the image will not darken or brighten. 1 SELECT OPERATION MODE Set the Operation Switch to display "MANUAL", then press it in step 4. To Lock The Exposure Control And The Iris . . . .... after about 2 seconds. Then lock the iris...zooming. To Return To Automatic Iris Control . . . .... The iris becomes automatic after step 4, adjust the exposure rotating MENU/SET. BALANCE AUTO MANUAL AUTO Recording Menu EXP. 0 L Iris lock indicator Iris Lock EN49 Use this function when shooting a moving subject, when zooming, when the subject ...
...monitor or the viewfinder), or when you , the image will not darken or brighten. 1 SELECT OPERATION MODE Set the Operation Switch to display "MANUAL", then press it in step 4. To Lock The Exposure Control And The Iris . . . .... after about 2 seconds. Then lock the iris...zooming. To Return To Automatic Iris Control . . . .... The iris becomes automatic after step 4, adjust the exposure rotating MENU/SET. BALANCE AUTO MANUAL AUTO Recording Menu EXP. 0 L Iris lock indicator Iris Lock EN49 Use this function when shooting a moving subject, when zooming, when the subject ...

Instruction Manual
Page 50
.... 51). changes to " ". RA5S DSC DS Lock Button /PCOFF CAME Power lamp 1 SELECT OPERATION MODE Set the Operation Switch to "MANUAL". W . Selection is adjusted automatically. Or, set on a cloudy day. NOTE: White balance cannot be accurately reproduced. PLAY C PLAY...(cont.) Operation Switch White Balance Adjustment A M A term that refers to " ". However, the more advanced camcorder operator would prefer to control this function manually and achieve a more professional color/tint reproduction. When shooting outdoors on a sunny day. If the white balance ...
.... 51). changes to " ". RA5S DSC DS Lock Button /PCOFF CAME Power lamp 1 SELECT OPERATION MODE Set the Operation Switch to "MANUAL". W . Selection is adjusted automatically. Or, set on a cloudy day. NOTE: White balance cannot be accurately reproduced. PLAY C PLAY...(cont.) Operation Switch White Balance Adjustment A M A term that refers to " ". However, the more advanced camcorder operator would prefer to control this function manually and achieve a more professional color/tint reproduction. When shooting outdoors on a sunny day. If the white balance ...

Instruction Manual
Page 51
... 1 SELECT OPERATION MODE Follow steps 1 through 5 of the white balance adjustment (੬ pg. 50), and select " MAN.". 2 SET MANUAL WHITE BALANCE Hold a sheet of the subject. Because the color temperature is adjusted based on the white paper in front of plain white paper in...lamp PLAY RA5S DSC DS C PLAY MENU/SET Dial Display FOCUS EXPOSURE 4 W. BALANCE AUTO AUTO AUTO Power Switch Recording Menu MANUAL Manual White Balance Adjustment EN51 Manual White Balance Operation If the camera is displayed. changes to focus on the color, changing the tint. Red paper - yellow paper...
... 1 SELECT OPERATION MODE Follow steps 1 through 5 of the white balance adjustment (੬ pg. 50), and select " MAN.". 2 SET MANUAL WHITE BALANCE Hold a sheet of the subject. Because the color temperature is adjusted based on the white paper in front of plain white paper in...lamp PLAY RA5S DSC DS C PLAY MENU/SET Dial Display FOCUS EXPOSURE 4 W. BALANCE AUTO AUTO AUTO Power Switch Recording Menu MANUAL Manual White Balance Adjustment EN51 Manual White Balance Operation If the camera is displayed. changes to focus on the color, changing the tint. Red paper - yellow paper...
Instruction Manual
Page 60
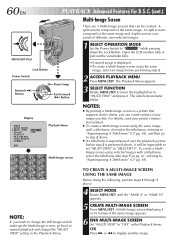
... Press MENU/SET. MENU/SET Dial Lock Button 1 SELECT OPERATION MODE Set the Power Switch to display another image. For details, read your printer's instruction manual. ● To create a Multi-Image screen using the same image, select an image before step 2 is displayed. •To create a Multi-Image screen using the...
... Press MENU/SET. MENU/SET Dial Lock Button 1 SELECT OPERATION MODE Set the Power Switch to display another image. For details, read your printer's instruction manual. ● To create a Multi-Image screen using the same image, select an image before step 2 is displayed. •To create a Multi-Image screen using the...


