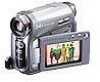
Instructions
Page 6
... A Cassette 16 Loading/Unloading A Memory Card 17 16:9 Wide Mode 17 RECORDING & PLAYBACK 18 VIDEO RECORDING 18 Basic Recording 18 Tape Remaining Time 18 Quick Review 18 Zooming 19 Journalistic Shooting 19 Interface Shooting 19 Time Code 20 Recording From The Middle Of A Tape...20 Dual Rec 20 Auto/Manual Mode...
... A Cassette 16 Loading/Unloading A Memory Card 17 16:9 Wide Mode 17 RECORDING & PLAYBACK 18 VIDEO RECORDING 18 Basic Recording 18 Tape Remaining Time 18 Quick Review 18 Zooming 19 Journalistic Shooting 19 Interface Shooting 19 Time Code 20 Recording From The Middle Of A Tape...20 Dual Rec 20 Auto/Manual Mode...
Instructions
Page 7
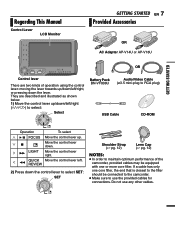
... towards up . 47 Move the control lever down. 2 ¡ LIGHT Move the control lever right. 1 1 QUICK REVIEW Move the control lever left /right, or pressing down the lever. They are two kinds of the camcorder, provided cables may be equipped with one core filter, the end that is closest to the... filter should be connected to the camcorder. ● Make sure to use any other cables. If a cable has only ...
... towards up . 47 Move the control lever down. 2 ¡ LIGHT Move the control lever right. 1 1 QUICK REVIEW Move the control lever left /right, or pressing down the lever. They are two kinds of the camcorder, provided cables may be equipped with one core filter, the end that is closest to the... filter should be connected to the camcorder. ● Make sure to use any other cables. If a cable has only ...

Instructions
Page 9
OFF: To switch off the camcorder. GETTING STARTED PLAY: ● To play back a tape. MEMORY: To record in a memory card or access data stored in the memory card. The logo is ... in the memory card to cover this area, a sensor necessary for products compliant with the i.LINK standard. Controls 11 : Left/Rewind (1) (੬ pg. 21)/ Quick Review [QUICK REVIEW] (੬ pg. 18) 2 : Right/Fast-Forward (¡) (੬ pg. 21)/ LED Light [LIGHT] (੬ pg. 34) 3 : Up/Play/Pause (6) (੬ pg. 21)/ Manual Focus...
OFF: To switch off the camcorder. GETTING STARTED PLAY: ● To play back a tape. MEMORY: To record in a memory card or access data stored in the memory card. The logo is ... in the memory card to cover this area, a sensor necessary for products compliant with the i.LINK standard. Controls 11 : Left/Rewind (1) (੬ pg. 21)/ Quick Review [QUICK REVIEW] (੬ pg. 18) 2 : Right/Fast-Forward (¡) (੬ pg. 21)/ LED Light [LIGHT] (੬ pg. 34) 3 : Up/Play/Pause (6) (੬ pg. 21)/ Manual Focus...
Instructions
Page 18
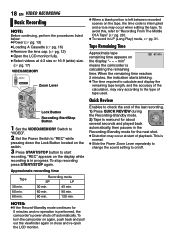
...To record in LP (Long Play) mode, ੬ pg. 31. Approximate recording time Enables to the type of tape used. "- - - min" means the camcorder is in the Recording-Standby mode for the next shot. ● Distortion may occur when editing the tape. "REC" appears on the tape, the time...and played back automatically, then pauses in progress. To avoid this, refer to on the display. To stop recording press START/STOP again. Quick Review Lock Button Recording Start/Stop Button 1 Set the VIDEO/MEMORY Switch to "VIDEO". 2 Set the Power Switch to "REC" while pressing down...
...To record in LP (Long Play) mode, ੬ pg. 31. Approximate recording time Enables to the type of tape used. "- - - min" means the camcorder is in the Recording-Standby mode for the next shot. ● Distortion may occur when editing the tape. "REC" appears on the tape, the time...and played back automatically, then pauses in progress. To avoid this, refer to on the display. To stop recording press START/STOP again. Quick Review Lock Button Recording Start/Stop Button 1 Set the VIDEO/MEMORY Switch to "VIDEO". 2 Set the Power Switch to "REC" while pressing down...
Instructions
Page 19
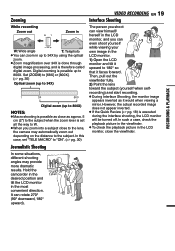
...this case, set all the way to W. ● When you can even shoot yourself while viewing your own image in up to 800X. Hold the camcorder in the desired position and tilt the LCD monitor in the LCD monitor, close the viewfinder. VIDEO RECORDING EN 19 Interface Shooting The...the interface shooting, the LCD monitor will be turned off. RECORDING & PLAYBACK However, the actual recorded image does not appear inverted. ● If the Quick Review (੬ pg. 18) is possible up to 34X by using the optical zoom. ● Zoom magnification over 34X is done through digital image...
...this case, set all the way to W. ● When you can even shoot yourself while viewing your own image in up to 800X. Hold the camcorder in the desired position and tilt the LCD monitor in the LCD monitor, close the viewfinder. VIDEO RECORDING EN 19 Interface Shooting The...the interface shooting, the LCD monitor will be turned off. RECORDING & PLAYBACK However, the actual recorded image does not appear inverted. ● If the Quick Review (੬ pg. 18) is possible up to 34X by using the optical zoom. ● Zoom magnification over 34X is done through digital image...
Instructions
Page 48
... .......... 34 N Narration 33 Night Alive 38 O On Screen 32, 33 P Playback Sound 33 Power-linked operation ... 8 Priority 32 Program AE 38 Protecting Files 26 Q Quick Review 18 R Rec Mode 31, 33 Recording Capacity Memory Card .......... 24 Tape 18 Recording Media Selection 31 Resetting The File Name 26 S Shutter Effects 38 Sound... Troubleshooting ...... 42, 43 V Video/Memory Switch .. 9, 31 W White Balance 37 Wind Cut 31 Wipe Or Fader Effects .. 38 Z Zooming 19, 30 16:9 Output 32, 33 GR-D770U © 2006 Victor Company of Japan, Limited UC Printed in Malaysia 1206ASR-NF-MP
... .......... 34 N Narration 33 Night Alive 38 O On Screen 32, 33 P Playback Sound 33 Power-linked operation ... 8 Priority 32 Program AE 38 Protecting Files 26 Q Quick Review 18 R Rec Mode 31, 33 Recording Capacity Memory Card .......... 24 Tape 18 Recording Media Selection 31 Resetting The File Name 26 S Shutter Effects 38 Sound... Troubleshooting ...... 42, 43 V Video/Memory Switch .. 9, 31 W White Balance 37 Wind Cut 31 Wipe Or Fader Effects .. 38 Z Zooming 19, 30 16:9 Output 32, 33 GR-D770U © 2006 Victor Company of Japan, Limited UC Printed in Malaysia 1206ASR-NF-MP