Instructions
Page 3
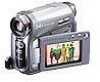
...; Do not leave the battery pack attached when the camcorder is not in cassette cases. in a closed car in direct sunlight. - Using generic non-JVC batteries can be used with this unit. ● SDHC Memory Card cannot be sure to maximize the performance of your trial... recording to the internal charging circuitry. ● This camcorder is designed exclusively for awhile, the heads may ...
...; Do not leave the battery pack attached when the camcorder is not in cassette cases. in a closed car in direct sunlight. - Using generic non-JVC batteries can be used with this unit. ● SDHC Memory Card cannot be sure to maximize the performance of your trial... recording to the internal charging circuitry. ● This camcorder is designed exclusively for awhile, the heads may ...
Instructions
Page 6
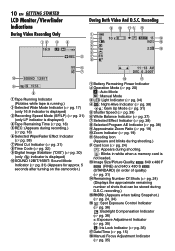
...FOR D.S.C. 26 Resetting The File Name 26 Protecting Files 26 Deleting Files 27 Setting Print Information (DPOF Setting) ....27 Initializing A Memory Card 28 RECORDING 24 Basic Shooting (D.S.C. Snapshot 24 D.S.C. 6 EN CONTENTS GETTING STARTED 7 ADVANCED FEATURES 29 Regarding This Manual 7 Provided Accessories...Viewfinder Adjustment 15 Brightness Adjustment Of The Display........15 Tripod Mounting 15 Loading/Unloading A Cassette 16 Loading/Unloading A Memory Card 17 16:9 Wide Mode 17 RECORDING & PLAYBACK 18 VIDEO RECORDING 18 Basic Recording 18 Tape Remaining Time 18 ...
...FOR D.S.C. 26 Resetting The File Name 26 Protecting Files 26 Deleting Files 27 Setting Print Information (DPOF Setting) ....27 Initializing A Memory Card 28 RECORDING 24 Basic Shooting (D.S.C. Snapshot 24 D.S.C. 6 EN CONTENTS GETTING STARTED 7 ADVANCED FEATURES 29 Regarding This Manual 7 Provided Accessories...Viewfinder Adjustment 15 Brightness Adjustment Of The Display........15 Tripod Mounting 15 Loading/Unloading A Cassette 16 Loading/Unloading A Memory Card 17 16:9 Wide Mode 17 RECORDING & PLAYBACK 18 VIDEO RECORDING 18 Basic Recording 18 Tape Remaining Time 18 ...

Instructions
Page 9
...243;Cassette Holder Cover (੬ pg. 16) òMemory Card Slot ôConnector Cover Power Switch Position REC: To perform recording on the tape or in the memory card. MEMORY: To record in a memory card or access data stored in the memory card to cover this area, a sensor necessary for products ... (Be careful not to a PC. GETTING STARTED OFF: To switch off the camcorder. VIDEO/MEMORY Switch Position VIDEO: To record on the tape. ● To display a still image stored in the memory card or to the IEEE1394-1995 industry specification and extensions thereof. Controls 11 ...
...243;Cassette Holder Cover (੬ pg. 16) òMemory Card Slot ôConnector Cover Power Switch Position REC: To perform recording on the tape or in the memory card. MEMORY: To record in a memory card or access data stored in the memory card to cover this area, a sensor necessary for products ... (Be careful not to a PC. GETTING STARTED OFF: To switch off the camcorder. VIDEO/MEMORY Switch Position VIDEO: To record on the tape. ● To display a still image stored in the memory card or to the IEEE1394-1995 industry specification and extensions thereof. Controls 11 ...
Instructions
Page 10
...(੬ pg. 30) (only indicator is displayed) !SOUND 12BIT/16BIT: Sound Mode Indicator (੬ pg. 31) (Appears for approx. 5 seconds after turning on the camcorder.) 11 : 13 AM DEC . 6 . 2007 ~ ) 1Battery Remaining Power Indicator 2Operation Mode (੬ pg. 20) A : Auto Mode M : Manual Mode 3LED ... (੬ pg. 19) !Zoom Indicator (੬ pg. 19) "Shooting Icon (Appears and blinks during shooting.) #Card Icon (੬ pg. 24) : Appears during shooting. : Blinks in white when a memory card is not loaded. $Image Size/Picture Quality: 640F 640 x 480 F 640F (FINE) and 640 x 480 S ...
...(੬ pg. 30) (only indicator is displayed) !SOUND 12BIT/16BIT: Sound Mode Indicator (੬ pg. 31) (Appears for approx. 5 seconds after turning on the camcorder.) 11 : 13 AM DEC . 6 . 2007 ~ ) 1Battery Remaining Power Indicator 2Operation Mode (੬ pg. 20) A : Auto Mode M : Manual Mode 3LED ... (੬ pg. 19) !Zoom Indicator (੬ pg. 19) "Shooting Icon (Appears and blinks during shooting.) #Card Icon (੬ pg. 24) : Appears during shooting. : Blinks in white when a memory card is not loaded. $Image Size/Picture Quality: 640F 640 x 480 F 640F (FINE) and 640 x 480 S ...
Instructions
Page 17
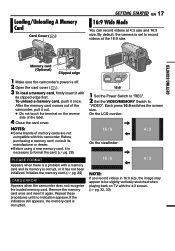
...; pg. 28) PLEASE FORMAT Appears when there is a problem with a memory card and its memory is necessary to be slightly vertically stretched when playing back on the reverse side of memory cards are not compatible with this camcorder. To unload a memory card, push it again. Before purchasing a memory card, consult its clipped edge first. Each press 16:9 switches the...
...; pg. 28) PLEASE FORMAT Appears when there is a problem with a memory card and its memory is necessary to be slightly vertically stretched when playing back on the reverse side of memory cards are not compatible with this camcorder. To unload a memory card, push it again. Before purchasing a memory card, consult its clipped edge first. Each press 16:9 switches the...
Instructions
Page 20
... the time code begins counting from the last time code number. This means the camcorder may record the same time codes as those existing in progress. A sub screen will...nd the spot at which you the snapshot image. ● The Still image is saved into the memory card while video is possible by setting various functions. NOTES: ● The time code cannot be set to...From The Middle Of A Tape 1) Play back a tape or use Blank Search (੬ pg. 22) to " (CARD)" only. A Auto Mode : You can capture still images without disturbing the recording in a previously recorded scene. 20 EN ...
... the time code begins counting from the last time code number. This means the camcorder may record the same time codes as those existing in progress. A sub screen will...nd the spot at which you the snapshot image. ● The Still image is saved into the memory card while video is possible by setting various functions. NOTES: ● The time code cannot be set to...From The Middle Of A Tape 1) Play back a tape or use Blank Search (੬ pg. 22) to " (CARD)" only. A Auto Mode : You can capture still images without disturbing the recording in a previously recorded scene. 20 EN ...
Instructions
Page 23
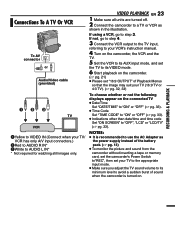
... "ON SCREEN" to avoid a sudden burst of the battery pack. (੬ pg. 13) ● To monitor the picture and sound from the camcorder without inserting a tape or memory card, set the camcorder's Power Switch to"REC", then set your TV/ VCR has only A/V input connectors.) 2Red to AUDIO R IN* 3White to AUDIO L IN* *... minimum level to "OFF", "LCD" or "LCD/TV" (੬ pg. 33). VIDEO PLAYBACK EN 23 1 Make sure all units are turned off. 2 Connect the camcorder to step 3. Connections To A TV Or VCR To AV connector or Audio/Video cable (provided) TV VCR 1Yellow to VIDEO IN (Connect when your TV...
... "ON SCREEN" to avoid a sudden burst of the battery pack. (੬ pg. 13) ● To monitor the picture and sound from the camcorder without inserting a tape or memory card, set the camcorder's Power Switch to"REC", then set your TV/ VCR has only A/V input connectors.) 2Red to AUDIO R IN* 3White to AUDIO L IN* *... minimum level to "OFF", "LCD" or "LCD/TV" (੬ pg. 33). VIDEO PLAYBACK EN 23 1 Make sure all units are turned off. 2 Connect the camcorder to step 3. Connections To A TV Or VCR To AV connector or Audio/Video cable (provided) TV VCR 1Yellow to VIDEO IN (Connect when your TV...
Instructions
Page 24
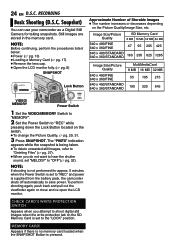
... on the switch. ● To change the Picture Quality, ੬ pg. 29, 31. 3 Press SNAPSHOT. MEMORY CARD! Still images are stored in the memory card. Image Size/Picture SD Memory Card Quality 8 MB 16 MB 32 MB 64 MB 640 x 480/FINE 640 x 360/FINE 47 95 205 425...320 645 VIDEO/ MEMORY Power Switch 1 Set the VIDEO/MEMORY Switch to "MEMORY". 2 Set the Power Switch to the "LOCK" position. RECORDING Basic Shooting (D.S.C. NOTE: If shooting is supplied from the battery pack, the camcorder shuts off automatically to "OFF"(੬ pg. 32). CHECK CARD'S WRITE PROTECTION SWITCH...
... on the switch. ● To change the Picture Quality, ੬ pg. 29, 31. 3 Press SNAPSHOT. MEMORY CARD! Still images are stored in the memory card. Image Size/Picture SD Memory Card Quality 8 MB 16 MB 32 MB 64 MB 640 x 480/FINE 640 x 360/FINE 47 95 205 425...320 645 VIDEO/ MEMORY Power Switch 1 Set the VIDEO/MEMORY Switch to "MEMORY". 2 Set the Power Switch to the "LOCK" position. RECORDING Basic Shooting (D.S.C. NOTE: If shooting is supplied from the battery pack, the camcorder shuts off automatically to "OFF"(੬ pg. 32). CHECK CARD'S WRITE PROTECTION SWITCH...

Instructions
Page 25
... Button [PLAY] 3, 3 2 Power Switch 1 SET [STOP] 7, 4 MENU INDEX 1 Load a memory card. (੬ pg. 17) 2 Set the VIDEO/MEMORY Switch to "MEMORY". 3 Set the Power Switch to display the previous file. Normal Playback Of Images Images shot with the camcorder are automatically numbered, then stored in numerical order in "Normal Playback Of Images" (੬ pg...
... Button [PLAY] 3, 3 2 Power Switch 1 SET [STOP] 7, 4 MENU INDEX 1 Load a memory card. (੬ pg. 17) 2 Set the VIDEO/MEMORY Switch to "MEMORY". 3 Set the Power Switch to display the previous file. Normal Playback Of Images Images shot with the camcorder are automatically numbered, then stored in numerical order in "Normal Playback Of Images" (੬ pg...

Instructions
Page 26
... erasure of the next shot starts from previously made and the file name of files. 1 Perform steps 1 - 3 in the memory card 4 Select "PROT.ALL", press SET or 2. The PROTECT screen appears. The PROTECT screen appears. 5 Select "EXECUTE", press SET. ● To... cancel protection, select "RETURN". To Remove Protection Before doing the following, perform steps 1 - 3 in the memory card 4 Select "CANC.ALL", press SET or 2. The PROTECT screen appears. 5 Select "EXECUTE", press SET. ● To cancel selection, select "RETURN". 5 Press...
... erasure of the next shot starts from previously made and the file name of files. 1 Perform steps 1 - 3 in the memory card 4 Select "PROT.ALL", press SET or 2. The PROTECT screen appears. The PROTECT screen appears. 5 Select "EXECUTE", press SET. ● To... cancel protection, select "RETURN". To Remove Protection Before doing the following, perform steps 1 - 3 in the memory card 4 Select "CANC.ALL", press SET or 2. The PROTECT screen appears. 5 Select "EXECUTE", press SET. ● To cancel selection, select "RETURN". 5 Press...
Instructions
Page 27
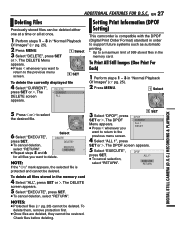
EN 27 Deleting Files Previously stored files can be deleted. Setting Print Information (DPOF Setting) This camcorder is protected and cannot be restored. To delete all files stored in "Normal Playback Of Images" (੬ pg. 25). 2 Press MENU...select the desired file. 6 Select "EXECUTE", Select DELETE press SET. To Print All Still Images (One Print For Each) 1 Perform steps 1 - 3 in the memory card 4 Select "ALL", press SET or 2. The DELETE screen appears. 5 Select "EXECUTE", press SET. ● To cancel deletion, select "RETURN". Check files before ...
EN 27 Deleting Files Previously stored files can be deleted. Setting Print Information (DPOF Setting) This camcorder is protected and cannot be restored. To delete all files stored in "Normal Playback Of Images" (੬ pg. 25). 2 Press MENU...select the desired file. 6 Select "EXECUTE", Select DELETE press SET. To Print All Still Images (One Print For Each) 1 Perform steps 1 - 3 in the memory card 4 Select "ALL", press SET or 2. The DELETE screen appears. 5 Select "EXECUTE", press SET. ● To cancel deletion, select "RETURN". Check files before ...

Instructions
Page 28
...● To cancel initialization, select "CANCEL". SAVE? ● If you want to return to decrease the number, and press SET. Initializing A Memory Card 2 SET ● Repeat steps 3 through 5, the DPOF EXECUTE CANCEL Menu reappears. 7 Select "EXECUTE", press SET. ● To cancel selection..., select "CANCEL". CAUTION: While performing the above, never disconnect power, as this can initialize a memory card any settings in "Normal Playback Of Images" (੬ pg. 25). 2 Press MENU. 3 Select "FORMAT", press SET 1 Select or 2. You ...
...● To cancel initialization, select "CANCEL". SAVE? ● If you want to return to decrease the number, and press SET. Initializing A Memory Card 2 SET ● Repeat steps 3 through 5, the DPOF EXECUTE CANCEL Menu reappears. 7 Select "EXECUTE", press SET. ● To cancel selection..., select "CANCEL". CAUTION: While performing the above, never disconnect power, as this can initialize a memory card any settings in "Normal Playback Of Images" (੬ pg. 25). 2 Press MENU. 3 Select "FORMAT", press SET 1 Select or 2. You ...

Instructions
Page 31
...AGC]: The overall appearance may be grainy. Two Picture Quality modes are available: FINE ( 640F ) and STANDARD ( 640S ) (in order of memory card being automatically adjusted, " " is displayed. REC MODE [SP]*: To record in the AGC mode, but the subject's movements are recorded not ...16BIT: Enables video recording of stereo sound on another camcorder, blocks of previous models) REC SELECT (TAPE): When Snapshot recording is performed with the VIDEO/MEMORY Switch set to "VIDEO", still images are recorded into the Memory Card only. The overall appearance may be blurred at slow ...
...AGC]: The overall appearance may be grainy. Two Picture Quality modes are available: FINE ( 640F ) and STANDARD ( 640S ) (in order of memory card being automatically adjusted, " " is displayed. REC MODE [SP]*: To record in the AGC mode, but the subject's movements are recorded not ...16BIT: Enables video recording of stereo sound on another camcorder, blocks of previous models) REC SELECT (TAPE): When Snapshot recording is performed with the VIDEO/MEMORY Switch set to "VIDEO", still images are recorded into the Memory Card only. The overall appearance may be blurred at slow ...
Instructions
Page 33
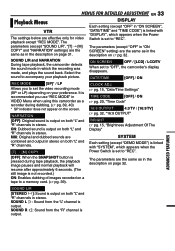
... from the "R" channel is output. The parameters (except "SOUND L/R", "[T] ➝ [M] COPY" and "NARRATION" settings) are the same as in VIDEO Menu when using this camcorder as a recorder during tape playback, the playback image pauses and normal playback will resume after approximately 6 seconds. (The still image is set the video recording...to accompany your preference. MIX: Original and dubbed sounds are the same as in which appears when the Power Switch is set to a memory card. (੬ pg. 39). The parameters are effective only for video playback except "REC MODE".
... from the "R" channel is output. The parameters (except "SOUND L/R", "[T] ➝ [M] COPY" and "NARRATION" settings) are the same as in VIDEO Menu when using this camcorder as a recorder during tape playback, the playback image pauses and normal playback will resume after approximately 6 seconds. (The still image is set the video recording...to accompany your preference. MIX: Original and dubbed sounds are the same as in which appears when the Power Switch is set to a memory card. (੬ pg. 39). The parameters are effective only for video playback except "REC MODE".
Instructions
Page 39
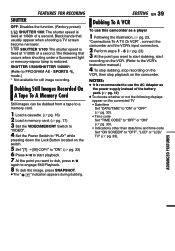
...A VCR To use the AC Adapter as a player 1 Following the illustration, ੬ pg. 23, "Connections To A TV Or VCR" , connect the camcorder and the VCR's input connectors. 2 Perform steps 1 - 6 (੬ pg. 23) 3 At the point you want to start dubbing, start recording on...available for still image recording. Dubbing Still Images Recorded On A Tape To A Memory Card Still images can be dubbed from a tape to a memory card. 1 Load a cassette. (੬ pg. 16) 2 Load a memory card. (੬ pg. 17) 3 Set the VIDEO/MEMORY Switch to "VIDEO". 4 Set the Power Switch to PROGRAM AE - The ...
...A VCR To use the AC Adapter as a player 1 Following the illustration, ੬ pg. 23, "Connections To A TV Or VCR" , connect the camcorder and the VCR's input connectors. 2 Perform steps 1 - 6 (੬ pg. 23) 3 At the point you want to start dubbing, start recording on...available for still image recording. Dubbing Still Images Recorded On A Tape To A Memory Card Still images can be dubbed from a tape to a memory card. 1 Load a cassette. (੬ pg. 16) 2 Load a memory card. (੬ pg. 17) 3 Set the VIDEO/MEMORY Switch to "VIDEO". 4 Set the Power Switch to PROGRAM AE - The ...
Instructions
Page 41
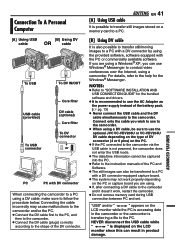
...and Software. ● The still images can result in the camcorder or the camcorder is transferring a file to the shape of DV connector (4 or 6 pins) on a memory card to a PC. [B] Using DV cable It is not powered, the camcorder does not enter the USB mode. ● The date/... PC using a camcorder. For details, refer to the camcorder. NOTES: ● Refer to "SOFTWARE INSTALLATION AND USB CONNECTION GUIDE" for the Windows® Messenger. Connecting the cable incorrectly may not work properly depending on the PC or capture board you can use the optional JVC VC-VDV206U or...
...and Software. ● The still images can result in the camcorder or the camcorder is transferring a file to the shape of DV connector (4 or 6 pins) on a memory card to a PC. [B] Using DV cable It is not powered, the camcorder does not enter the USB mode. ● The date/... PC using a camcorder. For details, refer to the camcorder. NOTES: ● Refer to "SOFTWARE INSTALLATION AND USB CONNECTION GUIDE" for the Windows® Messenger. Connecting the cable incorrectly may not work properly depending on the PC or capture board you can use the optional JVC VC-VDV206U or...
Instructions
Page 43
... Aspect ratio is strange If the aspect ratio of the video you can resume using the camcorder. When the battery power is exhausted, power turns off automatically. TAPE END Appears when the...; pg. 32, 33) Displays the battery remaining power. If the indication remains, consult your nearest JVC dealer for 5 seconds after power is turned on the LCD monitor. ● The viewfinder... previously set "PRIORITY" to nil, the battery remaining power indicator blinks. MEMORY IS FULL Appears when the memory card's memory is full and shooting is dark. Remedy: Remove and reattach the power ...
... Aspect ratio is strange If the aspect ratio of the video you can resume using the camcorder. When the battery power is exhausted, power turns off automatically. TAPE END Appears when the...; pg. 32, 33) Displays the battery remaining power. If the indication remains, consult your nearest JVC dealer for 5 seconds after power is turned on the LCD monitor. ● The viewfinder... previously set "PRIORITY" to nil, the battery remaining power indicator blinks. MEMORY IS FULL Appears when the memory card's memory is full and shooting is dark. Remedy: Remove and reattach the power ...
Instructions
Page 45
... (speakers, broadcasting antennas, etc.). ... in places subject to become wet. ... near a cooking stove. ... Memory Cards To properly use and store your nearest JVC dealer. where they won 't be performed properly. remove the battery pack or disconnect the power supply while the power... low (under 0°C or 32°F) temperatures. ● DO NOT leave the unit ... REFERENCES never unload the memory card and never turn off the camcorder. ● Store memory cards ... in summer. ... In such cases, use . ... Keep it strongly or apply any shocks. ... in use an...
... (speakers, broadcasting antennas, etc.). ... in places subject to become wet. ... near a cooking stove. ... Memory Cards To properly use and store your nearest JVC dealer. where they won 't be performed properly. remove the battery pack or disconnect the power supply while the power... low (under 0°C or 32°F) temperatures. ● DO NOT leave the unit ... REFERENCES never unload the memory card and never turn off the camcorder. ● Store memory cards ... in summer. ... In such cases, use . ... Keep it strongly or apply any shocks. ... in use an...
Instructions
Page 47
...DC 11 V =, 1 A Specifications shown are for SP mode unless otherwise indicated. For Digital Still Camera Storage media SD Memory Card/MultiMediaCard Compression system JPEG (compatible) File size Still image: 640 x 480 pixels Picture quality 2 modes (FINE/STANDARD) Approximate number of ...kHz 2-channel (16-BIT) Cassette Mini DV cassette Tape speed SP: 18.8 mm/s, LP: 12.5 mm/s Maximum recording time (using 80 min. REFERENCES E & O.E. Camcorder For General Power supply DC 11 V (Using AC Adapter) DC 7.2 V (Using battery pack) Power consumption Approx. 2.2 W (2.3 W*) (LCD monitor off, view&#...
...DC 11 V =, 1 A Specifications shown are for SP mode unless otherwise indicated. For Digital Still Camera Storage media SD Memory Card/MultiMediaCard Compression system JPEG (compatible) File size Still image: 640 x 480 pixels Picture quality 2 modes (FINE/STANDARD) Approximate number of ...kHz 2-channel (16-BIT) Cassette Mini DV cassette Tape speed SP: 18.8 mm/s, LP: 12.5 mm/s Maximum recording time (using 80 min. REFERENCES E & O.E. Camcorder For General Power supply DC 11 V (Using AC Adapter) DC 7.2 V (Using battery pack) Power consumption Approx. 2.2 W (2.3 W*) (LCD monitor off, view&#...
Instructions
Page 48
...G Gain Up 31 I Image Size 31 Index Playback 25 Initializing A Memory Card 28 Interface Shooting .........19 Iris Lock 36 J Journalistic Shooting ..... 19 L... 15 LED Light 34 Loading A Cassette ....... 16 Loading A Memory Card 17 M Manual Focus 35 Melody 32 Memory Card .......... 17, 45 Motor Drive Mode .......... 34 N Narration 33... Quick Review 18 R Rec Mode 31, 33 Recording Capacity Memory Card .......... 24 Tape 18 Recording Media Selection 31 Resetting The File ... Mounting 15 Troubleshooting ...... 42, 43 V Video/Memory Switch .. 9, 31 W White Balance 37 Wind Cut 31 Wipe Or Fader...
...G Gain Up 31 I Image Size 31 Index Playback 25 Initializing A Memory Card 28 Interface Shooting .........19 Iris Lock 36 J Journalistic Shooting ..... 19 L... 15 LED Light 34 Loading A Cassette ....... 16 Loading A Memory Card 17 M Manual Focus 35 Melody 32 Memory Card .......... 17, 45 Motor Drive Mode .......... 34 N Narration 33... Quick Review 18 R Rec Mode 31, 33 Recording Capacity Memory Card .......... 24 Tape 18 Recording Media Selection 31 Resetting The File ... Mounting 15 Troubleshooting ...... 42, 43 V Video/Memory Switch .. 9, 31 W White Balance 37 Wind Cut 31 Wipe Or Fader...


