Instruction Manual
Page 1
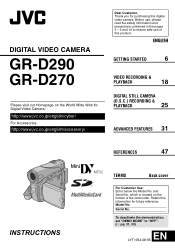
... on the World Wide Web for Digital Video Camera: http://www.jvc.co.jp/english/cyber/ For Accessories: http://www.jvc.co.jp/english/accessory/ Dear Customer, Thank you for future reference. ENGLISH GETTING STARTED 6 VIDEO RECORDING & PLAYBACK 18 DIGITAL STILL CAMERA (D.S.C.) RECORDING & PLAYBACK 25...the camcorder. and Serial No. Model No. To deactivate the demonstration, set "DEMO MODE" to ensure safe use , please read the safety information and precautions contained in the pages 3 - 4 and 10 to "OFF". (੬ pg. 31, 33) EN LYT1354-001B DIGITAL VIDEO CAMERA GR-D290 GR-D270...
... on the World Wide Web for Digital Video Camera: http://www.jvc.co.jp/english/cyber/ For Accessories: http://www.jvc.co.jp/english/accessory/ Dear Customer, Thank you for future reference. ENGLISH GETTING STARTED 6 VIDEO RECORDING & PLAYBACK 18 DIGITAL STILL CAMERA (D.S.C.) RECORDING & PLAYBACK 25...the camcorder. and Serial No. Model No. To deactivate the demonstration, set "DEMO MODE" to ensure safe use , please read the safety information and precautions contained in the pages 3 - 4 and 10 to "OFF". (੬ pg. 31, 33) EN LYT1354-001B DIGITAL VIDEO CAMERA GR-D290 GR-D270...

Instruction Manual
Page 2
.... (੬ pg. 37) Live Slow You can record and play back precious or hard-to-see moments at a slow speed. 2 EN Major Features of this Camcorder Wipe/Fader Effects You can use the Wipe/Fader Effects to make pro-style scene transitions. (੬ pg. 41) Fade in Backlight Compensation Simply pressing...
.... (੬ pg. 37) Live Slow You can record and play back precious or hard-to-see moments at a slow speed. 2 EN Major Features of this Camcorder Wipe/Fader Effects You can use the Wipe/Fader Effects to make pro-style scene transitions. (੬ pg. 41) Fade in Backlight Compensation Simply pressing...
Instruction Manual
Page 3
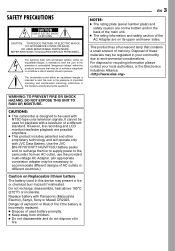
... TO PREVENT FIRE OR SHOCK HAZARD, DO NOT EXPOSE THIS UNIT TO RAIN OR MOISTURE. CAUTIONS: ● This camcorder is designed to be used for playback with JVC Data Battery. The exclamation point within the product's enclosure that contains a small amount of AC outlets in different countries...product has a fluorescent lamp that may be of sufficient magnitude to the camcorder from children. ● Do not disassemble and do not dispose of a different standard. NO USER-SERVICEABLE PARTS INSIDE. Use the JVC BN-VF707U/VF714U/VF733U battery packs and, to recharge them or to ...
... TO PREVENT FIRE OR SHOCK HAZARD, DO NOT EXPOSE THIS UNIT TO RAIN OR MOISTURE. CAUTIONS: ● This camcorder is designed to be used for playback with JVC Data Battery. The exclamation point within the product's enclosure that contains a small amount of AC outlets in different countries...product has a fluorescent lamp that may be of sufficient magnitude to the camcorder from children. ● Do not disassemble and do not dispose of a different standard. NO USER-SERVICEABLE PARTS INSIDE. Use the JVC BN-VF707U/VF714U/VF733U battery packs and, to recharge them or to ...

Instruction Manual
Page 4
.... The apparatus shall not be exposed to the user. The following notes concern possible physical damage to the camcorder and to dripping or splashing. Follow all servicing to the camcorder and leaving it has sufficient space on top of fire or electric shock. Also do not place any heat...strap. When carrying, be caused.) Do not point the lens or the viewfinder directly into the apparatus, the apparatus has been exposed to the camcorder. Install in a cabinet or on top and at the rear). Unplug this equipment in the cassette holder cover. This can result in dropping ...
.... The apparatus shall not be exposed to the user. The following notes concern possible physical damage to the camcorder and to dripping or splashing. Follow all servicing to the camcorder and leaving it has sufficient space on top of fire or electric shock. Also do not place any heat...strap. When carrying, be caused.) Do not point the lens or the viewfinder directly into the apparatus, the apparatus has been exposed to the camcorder. Install in a cabinet or on top and at the rear). Unplug this equipment in the cassette holder cover. This can result in dropping ...
Instruction Manual
Page 8
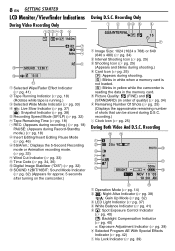
...Indicator (੬ pg. 33) K Time Code (੬ pg. 34, 36) L Digital Image Stabilizer ("DIS") (੬ pg. 32) M SOUND 12BIT/16BIT: Sound Mode Indicator (੬ pg. 32) (Appears for approx. 5 seconds after turning on the camcorder.) During D.S.C. E Picture Quality: (FINE) and (STANDARD) (in the memory card. ... Card Icon (੬ pg. 25) : Appears during shooting. : Blinks in white when a memory card is not loaded. : Blinks in yellow while the camcorder is running.) C Selected Wide Mode Indicator (੬ pg. 33) D : Live Slow Indicator (੬ pg. 37) : Snapshot Indicator (੬ pg. 38...
...Indicator (੬ pg. 33) K Time Code (੬ pg. 34, 36) L Digital Image Stabilizer ("DIS") (੬ pg. 32) M SOUND 12BIT/16BIT: Sound Mode Indicator (੬ pg. 32) (Appears for approx. 5 seconds after turning on the camcorder.) During D.S.C. E Picture Quality: (FINE) and (STANDARD) (in the memory card. ... Card Icon (੬ pg. 25) : Appears during shooting. : Blinks in white when a memory card is not loaded. : Blinks in yellow while the camcorder is running.) C Selected Wide Mode Indicator (੬ pg. 33) D : Live Slow Indicator (੬ pg. 37) : Snapshot Indicator (੬ pg. 38...
Instruction Manual
Page 10
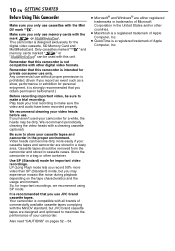
...) mode, but JVC brand cassette tapes are designed and optimized to make a trial recording. If you may be used your camcorder for the digital video cassette, SD Memory Card and MultiMediaCard. We recommend periodically cleaning the video heads with the Mini DV mark . Video ...heads can be dirty. So, for important video recordings. Your camcorder is designed exclusively for a while...
...) mode, but JVC brand cassette tapes are designed and optimized to make a trial recording. If you may be used your camcorder for the digital video cassette, SD Memory Card and MultiMediaCard. We recommend periodically cleaning the video heads with the Mini DV mark . Video ...heads can be dirty. So, for important video recordings. Your camcorder is designed exclusively for a while...
Instruction Manual
Page 11
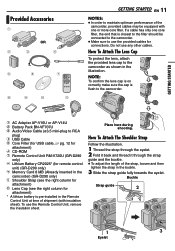
...(with one core filter, the end that is closest to use the provided cables for attachment) * A lithium battery is flush to the camcorder as shown in the buckle. 3 Slide the strap guide fully towards the eyelet. GETTING STARTED a AC Adapter AP-V16U or AP-V14U b.../Video Cable (ø3.5 mini-plug to RCA plug) d USB Cable e Core Filter (for USB cable, ੬ pg. 12 for attachment) f CD-ROM g Remote Control Unit RM-V720U (GR-D290 only) h Lithium Battery CR2025* (for remote control unit) (GR-D290 only) i Memory Card 8 MB (Already inserted in the camcorder) (GR-D290 only) j Shoulder Strap...
...(with one core filter, the end that is closest to use the provided cables for attachment) * A lithium battery is flush to the camcorder as shown in the buckle. 3 Slide the strap guide fully towards the eyelet. GETTING STARTED a AC Adapter AP-V16U or AP-V14U b.../Video Cable (ø3.5 mini-plug to RCA plug) d USB Cable e Core Filter (for USB cable, ੬ pg. 12 for attachment) f CD-ROM g Remote Control Unit RM-V720U (GR-D290 only) h Lithium Battery CR2025* (for remote control unit) (GR-D290 only) i Memory Card 8 MB (Already inserted in the camcorder) (GR-D290 only) j Shoulder Strap...

Instruction Manual
Page 12
12 EN GETTING STARTED How To Attach The Core Filter Attach the core filters to the camcorder. NOTES: ● Take care not to damage the cable. ● When connecting a cable, attach the end with the core filter to the cables. Wind the ...
12 EN GETTING STARTED How To Attach The Core Filter Attach the core filters to the camcorder. NOTES: ● Take care not to damage the cable. ● When connecting a cable, attach the end with the core filter to the cables. Wind the ...
Instruction Manual
Page 13
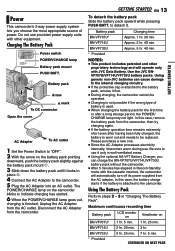
...steps 2 - 3 in Record-Standby mode with the cassette inserted, the camcorder will operate only with other equipment. Using generic non-JVC batteries can charge the BN-VF707U/VF714U/VF733U battery pack without the camcorder. ● After 5 minutes has elapsed in "Charging The Battery Pack". ...Use the JVC BNVF707U/VF714U/VF733U battery packs. Power This camcorder's 2-way power supply system lets you can cause damage to the ...
...steps 2 - 3 in Record-Standby mode with the cassette inserted, the camcorder will operate only with other equipment. Using generic non-JVC batteries can charge the BN-VF707U/VF714U/VF733U battery pack without the camcorder. ● After 5 minutes has elapsed in "Charging The Battery Pack". ...Use the JVC BNVF707U/VF714U/VF733U battery packs. Power This camcorder's 2-way power supply system lets you can cause damage to the ...
Instruction Manual
Page 14
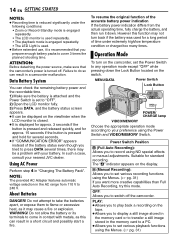
... The playback mode is engaged repeatedly. • The LED Light is used. ● Before extended use, it is recommended that the camcorder's power is pressed and hold for standard recording. Power Switch Position A (Full Auto Recording): Allows you want more creative capabilities than Full ...If "COMMUNICATION ERROR" appears instead of the accurate battery power indication If the battery power indication differs from 110 V to your nearest JVC dealer. MENU/DATA Power Switch Lock Button MA POWER/ CHARGE POWER/ CHARGE lamp VIDEO/MEMORY Choose the appropriate operation mode according to...
... The playback mode is engaged repeatedly. • The LED Light is used. ● Before extended use, it is recommended that the camcorder's power is pressed and hold for standard recording. Power Switch Position A (Full Auto Recording): Allows you want more creative capabilities than Full ...If "COMMUNICATION ERROR" appears instead of the accurate battery power indication If the battery power indication differs from 110 V to your nearest JVC dealer. MENU/DATA Power Switch Lock Button MA POWER/ CHARGE POWER/ CHARGE lamp VIDEO/MEMORY Choose the appropriate operation mode according to...

Instruction Manual
Page 15
... and the memory card. Power-Linked Operation When the Power Switch is set to "M" while pressing down the Lock Button located on or off the camcorder by opening/ closing the LCD monitor or pulling out/pushing in "Language Settings" on the left column. 2 Press + or - The Menu Screen appears. 4 Press + or...
... and the memory card. Power-Linked Operation When the Power Switch is set to "M" while pressing down the Lock Button located on or off the camcorder by opening/ closing the LCD monitor or pulling out/pushing in "Language Settings" on the left column. 2 Press + or - The Menu Screen appears. 4 Press + or...

Instruction Manual
Page 16
..." (੬ pg. 31, 34). 3 Press MENU. Wait until it recedes completely before closing the cassette holder cover. The BRIGHT Menu Screen appears. 4 Press + or - The camcorder needs to be powered up to select "n", and press MENU. Button located on the switch. 2 Make sure the LCD monitor is facing out. to close... screw clockwise. ● Some tripods are clearly focused. OPEN/EJECT Make sure the window side is closed , it recedes automatically. Tripod Mounting To attach the camcorder to a tripod, align the direction stud and screw to the mounting socket and stud hole on the...
..." (੬ pg. 31, 34). 3 Press MENU. Wait until it recedes completely before closing the cassette holder cover. The BRIGHT Menu Screen appears. 4 Press + or - The camcorder needs to be powered up to select "n", and press MENU. Button located on the switch. 2 Make sure the LCD monitor is facing out. to close... screw clockwise. ● Some tripods are clearly focused. OPEN/EJECT Make sure the window side is closed , it recedes automatically. Tripod Mounting To attach the camcorder to a tripod, align the direction stud and screw to the mounting socket and stud hole on the...

Instruction Manual
Page 17
...Slide the erase protection tab on the back of the tape in the direction of purchase. (GR-D290 only) Card Cover (MEMORY CARD) Label Memory card Write/erase protection tab Clipped edge 1 Make sure the camcorder's power is off then on , as this tape, slide the tab back to recognize ... before loading it locks into place. This prevents the tape from being recorded over . A few seconds and the cassette holder does not open , turn the camcorder off . 2 Open the card cover (MEMORY CARD). 3 To load a memory card, firmly insert it with its manufacturer or dealer. ● Before using a...
...Slide the erase protection tab on the back of the tape in the direction of purchase. (GR-D290 only) Card Cover (MEMORY CARD) Label Memory card Write/erase protection tab Clipped edge 1 Make sure the camcorder's power is off then on , as this tape, slide the tab back to recognize ... before loading it locks into place. This prevents the tape from being recorded over . A few seconds and the cassette holder does not open , turn the camcorder off . 2 Open the card cover (MEMORY CARD). 3 To load a memory card, firmly insert it with its manufacturer or dealer. ● Before using a...

Instruction Manual
Page 18
... or "M" while pressing down the Lock Button located on the end of the LCD monitor and open the LCD monitor. h - - m" means the camcorder is opened, you can rotate 270° (90° downward, 180° upward). When the remaining time reaches 2 minutes, the indication starts blinking...32. 5 To start recording, press the Recording Start/ Stop Button. "- Pull on the switch. ● The POWER/CHARGE lamp lights and the camcorder enters the Record-Standby mode. However, this , refer to use. "PAUSE" is left between recorded scenes on the display. Recording mode SP LP ...
... or "M" while pressing down the Lock Button located on the end of the LCD monitor and open the LCD monitor. h - - m" means the camcorder is opened, you can rotate 270° (90° downward, 180° upward). When the remaining time reaches 2 minutes, the indication starts blinking...32. 5 To start recording, press the Recording Start/ Stop Button. "- Pull on the switch. ● The POWER/CHARGE lamp lights and the camcorder enters the Record-Standby mode. However, this , refer to use. "PAUSE" is left between recorded scenes on the display. Recording mode SP LP ...

Instruction Manual
Page 19
...00:00". This code is interrupted. Display 10 x W T Digital zoom zone 25X (optical) zoom zone Approximate zoom ratio NOTES: ● Focusing may automatically zoom out depending on the distance between the camcorder and the subject. If during Zooming. VIDEO RECORDING & PLAYBACK Zooming ...most convenient direction. Zoom in the auto focus mode, the camcorder may become unstable during recording a blank portion is left partway through Digital image processing, and is therefore called Digital Zoom. ● During Digital zoom, the quality of over 25X is done through the ...
...00:00". This code is interrupted. Display 10 x W T Digital zoom zone 25X (optical) zoom zone Approximate zoom ratio NOTES: ● Focusing may automatically zoom out depending on the distance between the camcorder and the subject. If during Zooming. VIDEO RECORDING & PLAYBACK Zooming ...most convenient direction. Zoom in the auto focus mode, the camcorder may become unstable during recording a blank portion is left partway through Digital image processing, and is therefore called Digital Zoom. ● During Digital zoom, the quality of over 25X is done through the ...

Instruction Manual
Page 20
... to fast-forward the tape. 20 EN NOTES: ● The time code cannot be viewed in the Recording-Standby mode for about 3 minutes, the camcorder's Stop mode is automatically engaged. VIDEO PLAYBACK Normal Playback 5 3 4/9 Speaker 8 VOL. +/- To control the speaker volume Slide the Power Zoom Lever ...9679; During Stop mode, press 3 to rewind, or 5 to the S/AV connector, the sound is normal. This is not heard from a battery, the camcorder shuts off automatically. Lock Button MA Power Switch MENU VIDEO/MEMORY 1 Load a cassette. (੬ pg. 16) 2 Set the VIDEO/MEMORY Switch to "VIDEO...
... to fast-forward the tape. 20 EN NOTES: ● The time code cannot be viewed in the Recording-Standby mode for about 3 minutes, the camcorder's Stop mode is automatically engaged. VIDEO PLAYBACK Normal Playback 5 3 4/9 Speaker 8 VOL. +/- To control the speaker volume Slide the Power Zoom Lever ...9679; During Stop mode, press 3 to rewind, or 5 to the S/AV connector, the sound is normal. This is not heard from a battery, the camcorder shuts off automatically. Lock Button MA Power Switch MENU VIDEO/MEMORY 1 Load a cassette. (੬ pg. 16) 2 Set the VIDEO/MEMORY Switch to "VIDEO...

Instruction Manual
Page 21
...- Before you should start recording, make sure there is at the spot which is at a blank portion, the camcorder searches in either direction during Blank Search, the camcorder stops automatically. ● A blank portion which is not a malfunction. The Menu Screen appears. 5 Press MENU ...- to select "EXECUTE", and press MENU. ● The "BLANK SEARCH" indication appears and the camcorder automatically starts reverse or forward search, then stops at a recorded portion, the camcorder searches in the middle of the detected blank portion. ● To cancel Blank Search, press 8.
...- Before you should start recording, make sure there is at the spot which is at a blank portion, the camcorder searches in either direction during Blank Search, the camcorder stops automatically. ● A blank portion which is not a malfunction. The Menu Screen appears. 5 Press MENU ...- to select "EXECUTE", and press MENU. ● The "BLANK SEARCH" indication appears and the camcorder automatically starts reverse or forward search, then stops at a recorded portion, the camcorder searches in the middle of the detected blank portion. ● To cancel Blank Search, press 8.
Instruction Manual
Page 22
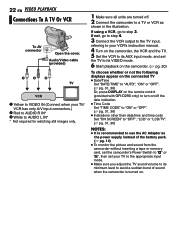
...camcorder. (੬ pg. 20) To choose whether or not the following displays appear on the connected TV ● Date/Time Set "DATE/TIME" to "AUTO", "ON" or "OFF". (੬ pg. 31, 36) Or, press DISPLAY on the remote control (provided with GR-D290... only) to turn on/off . 2 Connect the camcorder to step 3. If not, go to a TV or VCR as the power supply...the VCR output to the TV input, referring to your VCR's instruction manual. 4 Turn on the camcorder, the VCR and the TV. 5 Set the VCR to its AUX input mode, and set the...
...camcorder. (੬ pg. 20) To choose whether or not the following displays appear on the connected TV ● Date/Time Set "DATE/TIME" to "AUTO", "ON" or "OFF". (੬ pg. 31, 36) Or, press DISPLAY on the remote control (provided with GR-D290... only) to turn on/off . 2 Connect the camcorder to step 3. If not, go to a TV or VCR as the power supply...the VCR output to the TV input, referring to your VCR's instruction manual. 4 Turn on the camcorder, the VCR and the TV. 5 Set the VCR to its AUX input mode, and set the...

Instruction Manual
Page 23
...hear a click. VIDEO RECORDING & PLAYBACK Playback Using The Remote Control (GR-D290 only) The Full-Function Remote Control Unit can operate this camcorder from a distance as well as the Recording Start/ Stop Button on the camcorder. The transmitted beam's approximate effective distance for indoor use ) When using... 24) M EFFECT Button (੬ pg. 24) N EFFECT ON/OFF Button (੬ pg. 24) The following buttons are available when the camcorder's Power Switch is set to "A" or "M". Buttons And Functions VIDEO PLAYBACK EN 23 The following buttons are available only when the...
...hear a click. VIDEO RECORDING & PLAYBACK Playback Using The Remote Control (GR-D290 only) The Full-Function Remote Control Unit can operate this camcorder from a distance as well as the Recording Start/ Stop Button on the camcorder. The transmitted beam's approximate effective distance for indoor use ) When using... 24) M EFFECT Button (੬ pg. 24) N EFFECT ON/OFF Button (੬ pg. 24) The following buttons are available when the camcorder's Power Switch is set to "A" or "M". Buttons And Functions VIDEO PLAYBACK EN 23 The following buttons are available only when the...
Instruction Manual
Page 25
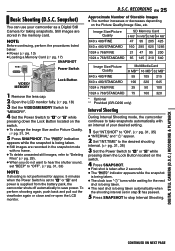
... VIDEO/MEMORY Switch to "MEMORY". 4 Set the Power Switch to save power. D.S.C. DIGITAL STILL CAMERA (D.S.C.) RECORDING & PLAYBACK CONTINUED ON NEXT PAGE Basic Shooting (D.S.C. Snapshot) You can use your camcorder as a Digital Still Camera for the next shot is being taken. ● The next shot is ...320 645 1024 x 768/FINE 25 50 100 1024 x 768/STANDARD 75 160 320 * Optional ** Provided (GR-D290 only) Interval Shooting During Interval Shooting mode, the camcorder continues to take snapshots automatically with no frame. ● To delete unwanted still images, refer to "Deleting ...
... VIDEO/MEMORY Switch to "MEMORY". 4 Set the Power Switch to save power. D.S.C. DIGITAL STILL CAMERA (D.S.C.) RECORDING & PLAYBACK CONTINUED ON NEXT PAGE Basic Shooting (D.S.C. Snapshot) You can use your camcorder as a Digital Still Camera for the next shot is being taken. ● The next shot is ...320 645 1024 x 768/FINE 25 50 100 1024 x 768/STANDARD 75 160 320 * Optional ** Provided (GR-D290 only) Interval Shooting During Interval Shooting mode, the camcorder continues to take snapshots automatically with no frame. ● To delete unwanted still images, refer to "Deleting ...


