
Owners Manual
Page 7
...Adjust Every 18 Months...82 Batteries ...83 Using the Proper Batteries ...84 Installing/Removing the Batteries ...85 Installing the Batteries...85 Removing the Batteries...89 Replacing the Batteries and/or Battery Cables ...90 Disconnecting Battery Cables...90 Connecting Battery Cables...92 Replacing the Flat Free Tires on ...97 Installing...97 Adjusting the Footboard Assembly...98 Angle ...98 Depth...99 Replacing Front/Rear Caster Assemblies...100 Adjusting Forks ...101 Repositioning Joystick ...102 Adjustable ASBA ...102 Van Seat...103 Part No 1143153 7 Invacare® Pronto® M91™
...Adjust Every 18 Months...82 Batteries ...83 Using the Proper Batteries ...84 Installing/Removing the Batteries ...85 Installing the Batteries...85 Removing the Batteries...89 Replacing the Batteries and/or Battery Cables ...90 Disconnecting Battery Cables...90 Connecting Battery Cables...92 Replacing the Flat Free Tires on ...97 Installing...97 Adjusting the Footboard Assembly...98 Angle ...98 Depth...99 Replacing Front/Rear Caster Assemblies...100 Adjusting Forks ...101 Repositioning Joystick ...102 Adjustable ASBA ...102 Van Seat...103 Part No 1143153 7 Invacare® Pronto® M91™

Owners Manual
Page 11
... warranty gives you specific legal rights and you purchased your Invacare product. coverage for a period of thirteen (13) months from the date of purchase from state to such repair and/or replacement. Invacare's sole obligation and your exclusive remedy under this warranty shall...to the original purchaser who purchases this warranty - Part No 1143153 11 Invacare® Pronto® M91™ Invacare warrants all remaining components (excluding all batteries to any country excluding CANADA when new and unused from Invacare or a dealer, with a copy of the back cover. Provide ...
... warranty gives you specific legal rights and you purchased your Invacare product. coverage for a period of thirteen (13) months from the date of purchase from state to such repair and/or replacement. Invacare's sole obligation and your exclusive remedy under this warranty shall...to the original purchaser who purchases this warranty - Part No 1143153 11 Invacare® Pronto® M91™ Invacare warrants all remaining components (excluding all batteries to any country excluding CANADA when new and unused from Invacare or a dealer, with a copy of the back cover. Provide ...

Owners Manual
Page 13
... any subsequent purchaser or owner. Invacare warrants all remaining components (excluding all electronics and electrical components (excluding batteries), powered seating actuators, 2-pole motors and gearboxes to be limited to such repair and/or replacement. Invacare warrants all upholstered materials, padded... warranty service, please write directly to Invacare at Invacare's option, with a copy of the seller's invoice required for coverage under this warranty. Part No 1143153 13 Invacare® Pronto® M91™ Invacare's sole obligation and your exclusive remedy under...
... any subsequent purchaser or owner. Invacare warrants all remaining components (excluding all electronics and electrical components (excluding batteries), powered seating actuators, 2-pole motors and gearboxes to be limited to such repair and/or replacement. Invacare warrants all upholstered materials, padded... warranty service, please write directly to Invacare at Invacare's option, with a copy of the seller's invoice required for coverage under this warranty. Part No 1143153 13 Invacare® Pronto® M91™ Invacare's sole obligation and your exclusive remedy under...
Owners Manual
Page 30
... area for any kind. Check to ensure that all electrical connections are secured in place, joystick boot is torn or cracked. Invacare® Pronto® M91™ 30 Part No 1143153 This provides the end user or his /her attendant sufficient time to malfunction electrically and mechanically; ...If the joystick boot becomes torn or cracked, replace IMMEDIATELY. DO NOT leave power wheelchair in a shower. DO NOT use if the joystick boot is NOT torn or cracked where water can enter and that the battery covers are secure at all times. Direct exposure to...
... area for any kind. Check to ensure that all electrical connections are secured in place, joystick boot is torn or cracked. Invacare® Pronto® M91™ 30 Part No 1143153 This provides the end user or his /her attendant sufficient time to malfunction electrically and mechanically; ...If the joystick boot becomes torn or cracked, replace IMMEDIATELY. DO NOT leave power wheelchair in a shower. DO NOT use if the joystick boot is NOT torn or cracked where water can enter and that the battery covers are secure at all times. Direct exposure to...
Owners Manual
Page 31
... replaced with or for these tags. 2 SAFETY Electrical - Grounding Instructions ƽ WARNING DO NOT, under any circumstances, cut or remove the round grounding prong from any plug used for Invacare products. Where a two-prong wall receptacle is encountered, it is the personal responsibility and obligation of deep cycle gel cell batteries. In addition, Invacare...
... replaced with or for these tags. 2 SAFETY Electrical - Grounding Instructions ƽ WARNING DO NOT, under any circumstances, cut or remove the round grounding prong from any plug used for Invacare products. Where a two-prong wall receptacle is encountered, it is the personal responsibility and obligation of deep cycle gel cell batteries. In addition, Invacare...
Owners Manual
Page 58
...possible life and minimize the required charging time. Extensive use of typical operation. Invacare® Pronto® M91™ 58 Part No 1143153 A fault condition exists. The batteries can be charged using immediately. They are some basic concepts which will not ...unattended, the charger should be replaced. As a general rule, batteries should automatically shut-off when full charge is anticipated the wheelchair will help you understand this automatic process. Contact an Invacare dealer for a long period of Battery Chargers The charger automatically reduces the...
...possible life and minimize the required charging time. Extensive use of typical operation. Invacare® Pronto® M91™ 58 Part No 1143153 A fault condition exists. The batteries can be charged using immediately. They are some basic concepts which will not ...unattended, the charger should be replaced. As a general rule, batteries should automatically shut-off when full charge is anticipated the wheelchair will help you understand this automatic process. Contact an Invacare dealer for a long period of Battery Chargers The charger automatically reduces the...

Owners Manual
Page 68
... before making any adjustments. Invacare® Pronto® M91™ 68 Part No 1143153 7 TRANSPORT READY OPTION (TRRO) ƽ WARNING Seat angle is Invacare's position that users of ...collision may void WC 19 compliance. Wheelchairs involved in vehicles for transportation and use be replaced. Invacare cannot and does not recommend any tie-down systems for wheelchairs with a 168 lb crash...to the wheelchair may structurally damage your wheelchair. Adjustments to 300 lbs. Spill proof batteries, such as "gel cells", should be made available by the auto industry. As...
... before making any adjustments. Invacare® Pronto® M91™ 68 Part No 1143153 7 TRANSPORT READY OPTION (TRRO) ƽ WARNING Seat angle is Invacare's position that users of ...collision may void WC 19 compliance. Wheelchairs involved in vehicles for transportation and use be replaced. Invacare cannot and does not recommend any tie-down systems for wheelchairs with a 168 lb crash...to the wheelchair may structurally damage your wheelchair. Adjustments to 300 lbs. Spill proof batteries, such as "gel cells", should be made available by the auto industry. As...
Owners Manual
Page 82
... or damaged. Inspect battery terminals for loose fasteners. If damaged, have them replaced by a qualified technician. Ensure swingarm stops are routed and secured properly to ensure that cables are in place and not deteriorated or damaged. 8 SETUP/... system. Ensure proper operation of powered functions (drive, seating, legrests, ect...). Inspect motor brushes and gearbox coupling. Inspect electrical components for damage. Replace if necessary. Invacare® Pronto® M91™ 82 Part No 1143153
... or damaged. Inspect battery terminals for loose fasteners. If damaged, have them replaced by a qualified technician. Ensure swingarm stops are routed and secured properly to ensure that cables are in place and not deteriorated or damaged. 8 SETUP/... system. Ensure proper operation of powered functions (drive, seating, legrests, ect...). Inspect motor brushes and gearbox coupling. Inspect electrical components for damage. Replace if necessary. Invacare® Pronto® M91™ 82 Part No 1143153
Owners Manual
Page 83
...battery. NEVER install/ reinstall a battery with skin and eyes. Part No 1143153 83 Invacare® Pronto® M91™ The battery may occur. Invacare strongly recommends that the battery acid will "round off" the nuts. When tightening the clamps, always use a battery lifting strap when lifting a battery...the batteries in the bottom of the battery box or on POSITIVE (+) and NEGATIVE (-) battery terminals. 8.4 Batteries 8 SETUP/MAINTENANCE ƽ WARNING The use of rubber gloves is the most convenient method and assures that battery installation and battery replacement ...
...battery. NEVER install/ reinstall a battery with skin and eyes. Part No 1143153 83 Invacare® Pronto® M91™ The battery may occur. Invacare strongly recommends that the battery acid will "round off" the nuts. When tightening the clamps, always use a battery lifting strap when lifting a battery...the batteries in the bottom of the battery box or on POSITIVE (+) and NEGATIVE (-) battery terminals. 8.4 Batteries 8 SETUP/MAINTENANCE ƽ WARNING The use of rubber gloves is the most convenient method and assures that battery installation and battery replacement ...
Owners Manual
Page 86
.../Installing the Shrouds on page 94. 5. Refer to the FRONT of the battery tray, if disconnected in STEP 5. Reconnect RIGHT and LEFT motor leads to allow access to Replacing the Batteries and/or Battery Cables on one battery at a time starting with Formula PTO Plus - 8 SETUP/MAINTENANCE 3. Move...seat back. Remove the top shroud. Repeat STEP 6 to Removing/Installing the Seat Assembly on page 64. 4. Invacare® Pronto® M91™ 86 Part No 1143153 When battery is in lifting strap to the front of the following to Tilting the Seat Assembly on page 62. •...
.../Installing the Shrouds on page 94. 5. Refer to the FRONT of the battery tray, if disconnected in STEP 5. Reconnect RIGHT and LEFT motor leads to allow access to Replacing the Batteries and/or Battery Cables on one battery at a time starting with Formula PTO Plus - 8 SETUP/MAINTENANCE 3. Move...seat back. Remove the top shroud. Repeat STEP 6 to Removing/Installing the Seat Assembly on page 64. 4. Invacare® Pronto® M91™ 86 Part No 1143153 When battery is in lifting strap to the front of the following to Tilting the Seat Assembly on page 62. •...

Owners Manual
Page 89
...Seat Assembly on page 64. 4. Use the battery lifting strap to Replacing the Batteries and/or Battery Cables on page 90. 10. Disconnect the front battery from the front battery (RED and BLACK connectors). Move aside the...battery at a time starting with Formula PTO Plus - Place the wheelchair in lifting strap to remove the battery from batteries. Remove the top shroud. Refer to carpeting or floor covering. 2. Unfasten the retaining strap that secures the two batteries in the Off position and disconnect joystick. Part No 1143153 89 Invacare® Pronto® M91...
...Seat Assembly on page 64. 4. Use the battery lifting strap to Replacing the Batteries and/or Battery Cables on page 90. 10. Disconnect the front battery from the front battery (RED and BLACK connectors). Move aside the...battery at a time starting with Formula PTO Plus - Place the wheelchair in lifting strap to remove the battery from batteries. Remove the top shroud. Refer to carpeting or floor covering. 2. Unfasten the retaining strap that secures the two batteries in the Off position and disconnect joystick. Part No 1143153 89 Invacare® Pronto® M91...
Owners Manual
Page 90
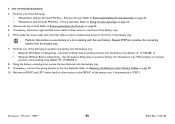
... front battery or GREY battery terminal cover from POSITIVE (+) battery cable mounting screw. Invacare® Pronto® M91™ 90 Part No 1143153 The front battery has three connectors - perform this procedure, refer to the battery terminals. 2. Disconnecting Battery Cables. ƽ WARNING DO NOT remove fuse or mounting hardware from BLACK battery cable on page 91. 8 SETUP/MAINTENANCE 8.7 Replacing the Batteries...
... front battery or GREY battery terminal cover from POSITIVE (+) battery cable mounting screw. Invacare® Pronto® M91™ 90 Part No 1143153 The front battery has three connectors - perform this procedure, refer to the battery terminals. 2. Disconnecting Battery Cables. ƽ WARNING DO NOT remove fuse or mounting hardware from BLACK battery cable on page 91. 8 SETUP/MAINTENANCE 8.7 Replacing the Batteries...
Owners Manual
Page 91
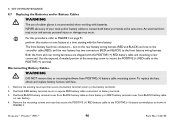
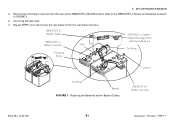
..., Mounting Screw with Fuse Hardware Tie-Wrap Locknut Tie-Wrap Battery FIGURE 3 Replacing the Batteries and/or Battery Cables POSITIVE (+) Battery Terminal Part No 1143153 91 Invacare® Pronto® M91™ Repeat STEPS 1-6 to the NEGATIVE (-) battery terminal/post as shown in FIGURE 3. 6. Set wiring harness aside. 7. Remove the mounting screws and nuts that secure the NEGATIVE...
..., Mounting Screw with Fuse Hardware Tie-Wrap Locknut Tie-Wrap Battery FIGURE 3 Replacing the Batteries and/or Battery Cables POSITIVE (+) Battery Terminal Part No 1143153 91 Invacare® Pronto® M91™ Repeat STEPS 1-6 to the NEGATIVE (-) battery terminal/post as shown in FIGURE 3. 6. Set wiring harness aside. 7. Remove the mounting screws and nuts that secure the NEGATIVE...
Owners Manual
Page 93
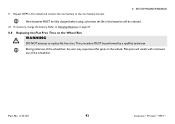
This procedure MUST be reduced. 10. Part No 1143153 93 Invacare® Pronto® M91™ Repeat STEPS 1-8 to install and connect the rear battery to replace flat free tires. Flat spots will be performed by a qualified technician. During initial use of the wheelchair, the user may experience flat spots on ...
This procedure MUST be reduced. 10. Part No 1143153 93 Invacare® Pronto® M91™ Repeat STEPS 1-8 to install and connect the rear battery to replace flat free tires. Flat spots will be performed by a qualified technician. During initial use of the wheelchair, the user may experience flat spots on ...
Owners Manual
Page 108
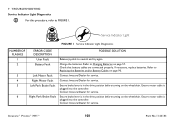
Refer to Replacing the Batteries and/or Battery Cables on page 57. Refer to Charging Batteries on page 90. Contact Invacare/Dealer for service. Contact Invacare/Dealer for service. Contact Invacare/Dealer for service. Invacare® Pronto® M91™ 108 Part No 1143153 Charge the batteries. Ensure brake lever is plugged into the controller. 9 TROUBLESHOOTING Service Indicator Light Diagnostics ...
Refer to Replacing the Batteries and/or Battery Cables on page 57. Refer to Charging Batteries on page 90. Contact Invacare/Dealer for service. Contact Invacare/Dealer for service. Contact Invacare/Dealer for service. Invacare® Pronto® M91™ 108 Part No 1143153 Charge the batteries. Ensure brake lever is plugged into the controller. 9 TROUBLESHOOTING Service Indicator Light Diagnostics ...
Owners Manual
Page 109
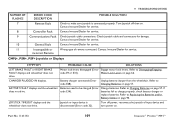
.... Refer to Disengaging/Engaging code E9 or E10). Batteries need to charge properly, check battery charger or replace batteries. Check joystick cable and connectors for service. Refer to Charging Batteries on page 57. Part No 1143153 109 Invacare® Pronto® M91™ Check joystick cable connections. Charging Batteries on page 57. Wrong type of input device and...
.... Refer to Disengaging/Engaging code E9 or E10). Batteries need to charge properly, check battery charger or replace batteries. Check joystick cable and connectors for service. Refer to Charging Batteries on page 57. Part No 1143153 109 Invacare® Pronto® M91™ Check joystick cable connections. Charging Batteries on page 57. Wrong type of input device and...
Owners Manual
Page 110
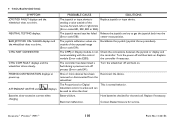
...controller. Reconnect the device. Contact Dealer/Invacare for shorted cell. The Proportional or Digital Attendant control is normal behavior. NEUTRAL TESTING displays. Turn the power off process (Error code E41). Replace if necessary. Batteries draw excessive current when charging. CTRL NOT... get the joystick back into the center-most position. Invacare® Pronto® M91™ 110 Part No 1143153 Turn the wheelchair off and back on . Have batteries checked for service. SOLUTIONS Replace joystick or input device. BAD JOYSTICK CAL VALUES displays...
...controller. Reconnect the device. Contact Dealer/Invacare for shorted cell. The Proportional or Digital Attendant control is normal behavior. NEUTRAL TESTING displays. Turn the power off process (Error code E41). Replace if necessary. Batteries draw excessive current when charging. CTRL NOT... get the joystick back into the center-most position. Invacare® Pronto® M91™ 110 Part No 1143153 Turn the wheelchair off and back on . Have batteries checked for service. SOLUTIONS Replace joystick or input device. BAD JOYSTICK CAL VALUES displays...
Owners Manual
Page 111
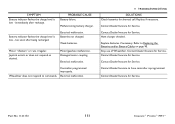
... malfunction. Replace batteries if necessary. Contact Dealer/Invacare for shorted cell. Battery indicator flashes the charge level is low - Electrical malfunction. Joystick erratic or does not respond as desired. Electrical malfunction. 9 TROUBLESHOOTING SOLUTIONS Check batteries for Service. Damaged motor coupling. Contact Dealer/Invacare for Service. Part No 1143153 111 Invacare® Pronto® M91™ SYMPTOM Battery indicator flashes...
... malfunction. Replace batteries if necessary. Contact Dealer/Invacare for shorted cell. Battery indicator flashes the charge level is low - Electrical malfunction. Joystick erratic or does not respond as desired. Electrical malfunction. 9 TROUBLESHOOTING SOLUTIONS Check batteries for Service. Damaged motor coupling. Contact Dealer/Invacare for Service. Part No 1143153 111 Invacare® Pronto® M91™ SYMPTOM Battery indicator flashes...


