
Owners Manual
Page 35
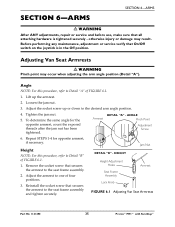
... Assembly Lock Knob Armrest FIGURE 6.1 Adjusting Van Seat Armrests Part No 1141450 35 Pronto® M91™ with SureStep® Before performing any maintenance, adjustment or service verify that secures the armrest...SECTION 6-ARMS SECTION 6-ARMS ƽ WARNING After ANY adjustments, repair or service and before use, make sure that secures the armrest to the seat frame assembly and tighten securely. Adjusting Van Seat Armrests ƽ WARNING...is in the Off position. Repeat STEPS 1‐4 for the opposite armrest, count the exposed threads after the jam nut has been tightened....
... Assembly Lock Knob Armrest FIGURE 6.1 Adjusting Van Seat Armrests Part No 1141450 35 Pronto® M91™ with SureStep® Before performing any maintenance, adjustment or service verify that secures the armrest...SECTION 6-ARMS SECTION 6-ARMS ƽ WARNING After ANY adjustments, repair or service and before use, make sure that secures the armrest to the seat frame assembly and tighten securely. Adjusting Van Seat Armrests ƽ WARNING...is in the Off position. Repeat STEPS 1‐4 for the opposite armrest, count the exposed threads after the jam nut has been tightened....
Owners Manual
Page 45
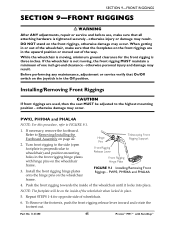
... RIGGINGS SECTION 9-FRONT RIGGINGS ƽ WARNING After ANY adjustments, repair or service and before use, make sure that On/Off switch on the joystick is three inches. Installing/Removing Front Riggings CAUTION If front riggings ... ground clearance for opposite side of wheelchair. 6. Part No 1141450 45 Pronto® M91™ with hinge pins on the wheelchair frame. Push the front rigging towards the ...174; otherwise injury or damage may occur. otherwise damage may result. Repeat STEPS 1‐4 for the front rigging is in the upward position or moved out of the wheelchair ...
... RIGGINGS SECTION 9-FRONT RIGGINGS ƽ WARNING After ANY adjustments, repair or service and before use, make sure that On/Off switch on the joystick is three inches. Installing/Removing Front Riggings CAUTION If front riggings ... ground clearance for opposite side of wheelchair. 6. Part No 1141450 45 Pronto® M91™ with hinge pins on the wheelchair frame. Push the front rigging towards the ...174; otherwise injury or damage may occur. otherwise damage may result. Repeat STEPS 1‐4 for the front rigging is in the upward position or moved out of the wheelchair ...
Owners Manual
Page 47
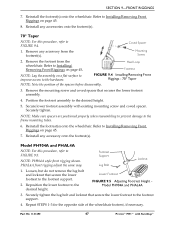
... and locknut that secures the lower footrest assembly. 4. Part No 1141450 47 Pronto® M91™ with existing mounting screw and coved spacer. Refer to Installing/Removing Front Riggings on page.... Model PH904A and PHAL4A NOTE: For this procedure, refer to the footrest support. 4. Repeat STEPS 1‐3 for the opposite side of the spacers before disassembly. 3. Coved Spacer Mounting Screw 2....footrest to the frame mounting tubes. 6. NOTE: Make sure spacers are positioned properly when reassembling to prevent damage to the footrest support. 2. PHAL4A front ...
... and locknut that secures the lower footrest assembly. 4. Part No 1141450 47 Pronto® M91™ with existing mounting screw and coved spacer. Refer to Installing/Removing Front Riggings on page.... Model PH904A and PHAL4A NOTE: For this procedure, refer to the footrest support. 4. Repeat STEPS 1‐3 for the opposite side of the spacers before disassembly. 3. Coved Spacer Mounting Screw 2....footrest to the frame mounting tubes. 6. NOTE: Make sure spacers are positioned properly when reassembling to prevent damage to the footrest support. 2. PHAL4A front ...


