
Product Guide
Page 3
Contents 1 Description Server Board Features ...7 Server Board Connector and Component Locations 8 Back Panel Connectors 9 Processor ...10 Memory ...10 PCI Riser Slots ...10 Video ...11 SCSI Controller ...11 ATA-100 ...45 Serial Port ...14 ACPI...16 Security ...17 Intrusion Switch Monitoring 17 Software Locks ...17 2 Installation Procedures Install the I/O Shield ...21 Rearrange the Standoffs ...22 Server Board Bumpers ...23 Install the Server Board ...24 Installing Processors ...25 Install the Processor Terminator 28 Memory ...29 Connect Cables...30 3 Upgrading Tools and Supplies Needed 31...
Contents 1 Description Server Board Features ...7 Server Board Connector and Component Locations 8 Back Panel Connectors 9 Processor ...10 Memory ...10 PCI Riser Slots ...10 Video ...11 SCSI Controller ...11 ATA-100 ...45 Serial Port ...14 ACPI...16 Security ...17 Intrusion Switch Monitoring 17 Software Locks ...17 2 Installation Procedures Install the I/O Shield ...21 Rearrange the Standoffs ...22 Server Board Bumpers ...23 Install the Server Board ...24 Installing Processors ...25 Install the Processor Terminator 28 Memory ...29 Connect Cables...30 3 Upgrading Tools and Supplies Needed 31...

Product Guide
Page 6
... DSR Signal 15 5. Rearrange the Standoffs 22 7. Platform Event Manager Main Window 66 26. Platform Event Action Dialogs 71 29. Server Board Features 7 3. Installing the I/O Shield 21 6. Closing the Locking Lever 27 13. Attach the Heat Sink...36 21. Configuration Jumper ...91 11. Post Codes...92 12... Fan 27 14. Insert the Processor and Lower the Locking Bar 34 19. Power Usage Worksheet 2 103 vi Intel Server Board SCB2 Product Guide Figures 1. Installing Processors...25 11. Installing the Processor Terminator 28 15. System Setup Utility Main Window 59 25...
... DSR Signal 15 5. Rearrange the Standoffs 22 7. Platform Event Manager Main Window 66 26. Platform Event Action Dialogs 71 29. Server Board Features 7 3. Installing the I/O Shield 21 6. Closing the Locking Lever 27 13. Attach the Heat Sink...36 21. Configuration Jumper ...91 11. Post Codes...92 12... Fan 27 14. Insert the Processor and Lower the Locking Bar 34 19. Power Usage Worksheet 2 103 vi Intel Server Board SCB2 Product Guide Figures 1. Installing Processors...25 11. Installing the Processor Terminator 28 15. System Setup Utility Main Window 59 25...

Product Guide
Page 12
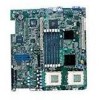
...with a shielded LAN cable. NIC Connector and Status LEDs The 82550 controller drives LEDs on the network interface connector that indicate link/activity on and TX/RX activity when blinking. It creates an identical drive backup to a second drive located on -board NICs in ...channel. Whenever a disk write is performed, the controller sends data simultaneously to a secondary drive. With 4 drives attached to NIC 2. 12 Intel Server Board SCB2 Product Guide The yellow LED indicates 100-Mbps operation when lit. To support both 10 Mbps and 100 Mbps operation • Low power +3.3...
...with a shielded LAN cable. NIC Connector and Status LEDs The 82550 controller drives LEDs on the network interface connector that indicate link/activity on and TX/RX activity when blinking. It creates an identical drive backup to a second drive located on -board NICs in ...channel. Whenever a disk write is performed, the controller sends data simultaneously to a secondary drive. With 4 drives attached to NIC 2. 12 Intel Server Board SCB2 Product Guide The yellow LED indicates 100-Mbps operation when lit. To support both 10 Mbps and 100 Mbps operation • Low power +3.3...

Product Guide
Page 21
... required by Electromagnetic Interference (EMI) regulations to minimize EMI. The I /O connectors on the server board. Hold the shield in the back of the shield rests on the inside the chassis. A B Figure 5. If the shield does not fit the chassis, obtain a properly sized shield from inside of the USB 2 connector. Make sure the metal fingers are on...
... required by Electromagnetic Interference (EMI) regulations to minimize EMI. The I /O connectors on the server board. Hold the shield in the back of the shield rests on the inside the chassis. A B Figure 5. If the shield does not fit the chassis, obtain a properly sized shield from inside of the USB 2 connector. Make sure the metal fingers are on...