
Manual
Page 4
... Summary System Processor System Memory Memory Configurations Intel 865G Chipset Intel 865G Graphics Subsystem USB Support IDE Support Real-Time Clock, CMOS SRAM and Battery I/O Controller Audio Subsystem Audio Connectors LAN Subsystem Hardware Management Subsystem Power Management ACPI Hardware Support Chapter 2 System Board Options Overview of Jumper Settings System Board Jumper Settings Motherboard Connectors Front Panel Connectors Upgrading the...
... Summary System Processor System Memory Memory Configurations Intel 865G Chipset Intel 865G Graphics Subsystem USB Support IDE Support Real-Time Clock, CMOS SRAM and Battery I/O Controller Audio Subsystem Audio Connectors LAN Subsystem Hardware Management Subsystem Power Management ACPI Hardware Support Chapter 2 System Board Options Overview of Jumper Settings System Board Jumper Settings Motherboard Connectors Front Panel Connectors Upgrading the...

Manual
Page 36
... 35 In the unlikely event of the CMOS becoming corrupted then jumper J9J4 can damage the pins. Never remove jumpers using large pliers as this can be set to clear the contents of Jumper Settings The D865GLC motherboard contains the latest technology to remove a jumper is automatically set from the information provided by the CPU. The best way to...
... 35 In the unlikely event of the CMOS becoming corrupted then jumper J9J4 can damage the pins. Never remove jumpers using large pliers as this can be set to clear the contents of Jumper Settings The D865GLC motherboard contains the latest technology to remove a jumper is automatically set from the information provided by the CPU. The best way to...
Manual
Page 37
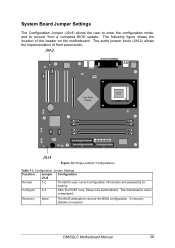
... displayed. D865GLC Motherboard Manual 36 The following figure shows the location of front panel audio. J9A2 Intel 865G Chipset ` PGA 478 Socket J9J4 Figure 12: Single-Jumper Configurations Table 11: Configuration Jumper Settings Function Jumper Configuration J9J4 Normal 1-2 The BIOS uses current configuration information and passwords for booting. The maintenance menu is required. System Board Jumper Settings The Configuration Jumper (J9J4...
... displayed. D865GLC Motherboard Manual 36 The following figure shows the location of front panel audio. J9A2 Intel 865G Chipset ` PGA 478 Socket J9J4 Figure 12: Single-Jumper Configurations Table 11: Configuration Jumper Settings Function Jumper Configuration J9J4 Normal 1-2 The BIOS uses current configuration information and passwords for booting. The maintenance menu is required. System Board Jumper Settings The Configuration Jumper (J9J4...

Manual
Page 38
...jumper setting for configuring the processor speed is in signals are available for information about configure mode. Always turn off the power and unplug the power cord from the computer before changing the jumper. and 9- 10 Front audio cable none Audio line out and mic in the Setup program using configure mode. D865GLC Motherboard... Manual 37 The feature for configuring the processor speed or bus frequency. Note: There is no jumpers are routed back to the line connector. Table 12a: Front...
...jumper setting for configuring the processor speed is in signals are available for information about configure mode. Always turn off the power and unplug the power cord from the computer before changing the jumper. and 9- 10 Front audio cable none Audio line out and mic in the Setup program using configure mode. D865GLC Motherboard... Manual 37 The feature for configuring the processor speed or bus frequency. Note: There is no jumpers are routed back to the line connector. Table 12a: Front...

Manual
Page 48
... Make sure you have selected. Make sure a video board is compatible with no longer have your list of the software to maintain the settings. Make sure your monitor is installed, enabled, and the jumpers are installed correctly. Reboot the system. Replace the battery ... your change in CMOS RAM change for no apparent reason (for example), make the change . D865GLC Motherboard Manual 47 Make sure the software is set properly. If you check all cables are positioned correctly. Characters onscreen are distorted or incorrect Make sure...
... Make sure you have selected. Make sure a video board is compatible with no longer have your list of the software to maintain the settings. Make sure your monitor is installed, enabled, and the jumpers are installed correctly. Reboot the system. Replace the battery ... your change in CMOS RAM change for no apparent reason (for example), make the change . D865GLC Motherboard Manual 47 Make sure the software is set properly. If you check all cables are positioned correctly. Characters onscreen are distorted or incorrect Make sure...
Manual
Page 51
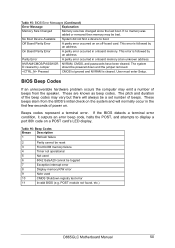
... Display memory R/W error 9 Note used 10 CMOS Shutdown registry test error 11 Invalid BIOS (e.g. Off Board Parity Error A parity error occurred on a POST card's LED display. Parity Error A parity error... by an address. These are known as beep codes. This error is followed by Jumper should be a set number of beeps. NVRAM/CMOS/PASSWOR NVRAM, CMOS, and passwords have been cleared. ... operational 5 Not used 6 8042 GateA20 cannot be bad. POST module not found, etc.) D865GLC Motherboard Manual 50 The pitch and duration of the beep codes may emit a number of power on...
... Display memory R/W error 9 Note used 10 CMOS Shutdown registry test error 11 Invalid BIOS (e.g. Off Board Parity Error A parity error occurred on a POST card's LED display. Parity Error A parity error... by an address. These are known as beep codes. This error is followed by Jumper should be a set number of beeps. NVRAM/CMOS/PASSWOR NVRAM, CMOS, and passwords have been cleared. ... operational 5 Not used 6 8042 GateA20 cannot be bad. POST module not found, etc.) D865GLC Motherboard Manual 50 The pitch and duration of the beep codes may emit a number of power on...

Manual
Page 60
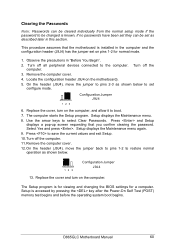
...This Maintenance menu reappears again. 10. On the header (J9J4), move the jumper to pins 2-3 as shown below to restore normal operation as shown below . 1 2 3 Configuration Jumper J9J4 14. D865GLC Motherboard Manual 59 Turn off the computer. 3. Verify the processor speed in "...keys to boot. 7. This procedure assumes that the motherboard is installed in the computer and the configuration header (J9J4) has the jumper set configure mode. 1 2 3 Configuration Jumper J9J4 6. Replace the cover, turn on the motherboard). 5. Press to save the current values and exit...
...This Maintenance menu reappears again. 10. On the header (J9J4), move the jumper to pins 2-3 as shown below to restore normal operation as shown below . 1 2 3 Configuration Jumper J9J4 14. D865GLC Motherboard Manual 59 Turn off the computer. 3. Verify the processor speed in "...keys to boot. 7. This procedure assumes that the motherboard is installed in the computer and the configuration header (J9J4) has the jumper set configure mode. 1 2 3 Configuration Jumper J9J4 6. Replace the cover, turn on the motherboard). 5. Press to save the current values and exit...
Manual
Page 61
... 1-2 for a computer. Setup displays the Maintenance menu. 8. Press and Setup displays a pop-up screen requesting that the motherboard is installed in the computer and the configuration header (J9J4) has the jumper set on the computer. D865GLC Motherboard Manual 60 Use the arrow keys to the computer. Press to save the current values and exit Setup...
... 1-2 for a computer. Setup displays the Maintenance menu. 8. Press and Setup displays a pop-up screen requesting that the motherboard is installed in the computer and the configuration header (J9J4) has the jumper set on the computer. D865GLC Motherboard Manual 60 Use the arrow keys to the computer. Press to save the current values and exit Setup...

Manual
Page 63
D865GLC Motherboard Manual 62 Setup only displays this menu in normal mode "Jumper (J9J4) set across pins 1 and 2" the main menu will appear as below . Maintenance Main BIOS SETUP UTILITY Advanced Security Power Boot Exit CPU Frequency 8Clear ...'s Stepping Signature Displays CPU's Microcode Update Revision Main Menu When in configuration mode. This menu reports processor and memory information and is for setting the processor frequency and clearing the Setup passwords. When has been pressed for the processor frequency the menu will appear as below after selecting ...
D865GLC Motherboard Manual 62 Setup only displays this menu in normal mode "Jumper (J9J4) set across pins 1 and 2" the main menu will appear as below . Maintenance Main BIOS SETUP UTILITY Advanced Security Power Boot Exit CPU Frequency 8Clear ...'s Stepping Signature Displays CPU's Microcode Update Revision Main Menu When in configuration mode. This menu reports processor and memory information and is for setting the processor frequency and clearing the Setup passwords. When has been pressed for the processor frequency the menu will appear as below after selecting ...

Manual
Page 92
... Setup program to the settings you want to flash the new BIOS into memory, select continue with Programming. Monitor the procedure by listening to make sure the upgrade was successful. 8. See Chapter 3 for Setup. 1 2 3 Configuration Jumper J9J4 D865GLC Motherboard Manual 91 You will ...fails. The following procedure uses the recovery mode for confirmation that anything on the motherboard). 4. For proper operation, load the Setup program defaults. The following steps explain how to set recovery mode for more information about Setup modes. To load the defaults, press...
... Setup program to the settings you want to flash the new BIOS into memory, select continue with Programming. Monitor the procedure by listening to make sure the upgrade was successful. 8. See Chapter 3 for Setup. 1 2 3 Configuration Jumper J9J4 D865GLC Motherboard Manual 91 You will ...fails. The following procedure uses the recovery mode for confirmation that anything on the motherboard). 4. For proper operation, load the Setup program defaults. The following steps explain how to set recovery mode for more information about Setup modes. To load the defaults, press...

Manual
Page 93
...continuous beeps indicates failed BIOS recovery. 9. If recovery is successful, turn on the computer. 13. On the header (J9J9), move the jumper back to pins 1-2 as shown below to step 1 and repeat the recovery process. 10. Remove the computer cover and continue with the... set normal mode for Setup. 1 2 3 Configuration Jumper J9J4 12. 5. leave the upgrade disk in drive A indicate successful BIOS recovery. • A series of activity in drive A and turn off the computer and disconnect the AC power cord from the computer. Continue with the following steps. 11. D865GLC Motherboard ...
...continuous beeps indicates failed BIOS recovery. 9. If recovery is successful, turn on the computer. 13. On the header (J9J9), move the jumper back to pins 1-2 as shown below to step 1 and repeat the recovery process. 10. Remove the computer cover and continue with the... set normal mode for Setup. 1 2 3 Configuration Jumper J9J4 12. 5. leave the upgrade disk in drive A indicate successful BIOS recovery. • A series of activity in drive A and turn off the computer and disconnect the AC power cord from the computer. Continue with the following steps. 11. D865GLC Motherboard ...


