Warranty (English)
Page 1
... This warranty does not cover: • Customer instruction/education • Installation • Set up adjustments • Cosmetic damage • Damage due to weather, lightning and other acts of one (1) year from a Best Buy or Future Shop online web ...Insignia repair center or store personnel, Insignia will (at Best Buy or Future Shop branded retail stores or websites to you. For this new Insignia-branded product ("Product"), that provides the same amount of Insignia branded products warrants to obtain warranty service? Products and parts replaced under this warranty cover...
... This warranty does not cover: • Customer instruction/education • Installation • Set up adjustments • Cosmetic damage • Damage due to weather, lightning and other acts of one (1) year from a Best Buy or Future Shop online web ...Insignia repair center or store personnel, Insignia will (at Best Buy or Future Shop branded retail stores or websites to you. For this new Insignia-branded product ("Product"), that provides the same amount of Insignia branded products warrants to obtain warranty service? Products and parts replaced under this warranty cover...
Warranty (English)
Page 2
....insigniaproducts.com *Distributed by Insignia to service the Product • Products sold "as is a trademark of BBY Solutions, Inc. All rights reserved. AA, AAA, C etc.) • Products where the factory applied serial number has been altered or removed • Loss or Theft of this product or any part of the product • Display panels containing up to five...
....insigniaproducts.com *Distributed by Insignia to service the Product • Products sold "as is a trademark of BBY Solutions, Inc. All rights reserved. AA, AAA, C etc.) • Products where the factory applied serial number has been altered or removed • Loss or Theft of this product or any part of the product • Display panels containing up to five...
User Manual
Page 2
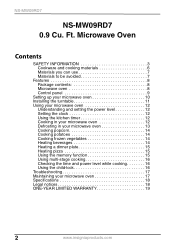
... your microwave oven 10 Installing the turntable 11 Using your microwave oven 12 Understanding and setting the power level 12 Setting the clock 12 Using the kitchen timer 12 Cooking in your microwave oven 12 Defrosting in your microwave oven 13 Cooking popcorn 14 Cooking potatoes 14 Cooking frozen vegetables 14 Heating beverages 14 Heating a dinner plate 15 Heating pizza 15 Using the memory function 15 Using multi-stage cooking 16 Checking the time and power level while cooking 16 Using the child-lock 16 Troubleshooting 17 Maintaining your microwave oven 17 Specifications...
... your microwave oven 10 Installing the turntable 11 Using your microwave oven 12 Understanding and setting the power level 12 Setting the clock 12 Using the kitchen timer 12 Cooking in your microwave oven 12 Defrosting in your microwave oven 13 Cooking popcorn 14 Cooking potatoes 14 Cooking frozen vegetables 14 Heating beverages 14 Heating a dinner plate 15 Heating pizza 15 Using the memory function 15 Using multi-stage cooking 16 Checking the time and power level while cooking 16 Using the child-lock 16 Troubleshooting 17 Maintaining your microwave oven 17 Specifications...

User Manual
Page 3
... excessive microwave oven energy when using the oven. 2 Read and follow these basic safety precautions: 1 Read all instructions before placing them in the oven cavity: i) Do not overcook food. Turn the oven off and unplug the oven or shut off power at the fuse or circuit breaker panel. ii) Remove wire twist-ties and metal handles from paper or plastic containers/bags before using your oven, follow the specific: "PRECAUTIONS...
... excessive microwave oven energy when using the oven. 2 Read and follow these basic safety precautions: 1 Read all instructions before placing them in the oven cavity: i) Do not overcook food. Turn the oven off and unplug the oven or shut off power at the fuse or circuit breaker panel. ii) Remove wire twist-ties and metal handles from paper or plastic containers/bags before using your oven, follow the specific: "PRECAUTIONS...
User Manual
Page 4
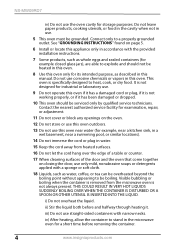
... is removed from heated surfaces. 16 Do not let the cord hang over the edge of a table or counter. 17 When cleaning surfaces of the door and the oven that come together on page 5. 6 Install or locate this appliance only in the microwave oven for examination, repair, or adjustment. 11 Do not cover or block any openings on the oven. 12 Do not store or use this oven...
... is removed from heated surfaces. 16 Do not let the cord hang over the edge of a table or counter. 17 When cleaning surfaces of the door and the oven that come together on page 5. 6 Install or locate this appliance only in the microwave oven for examination, repair, or adjustment. 11 Do not cover or block any openings on the oven. 12 Do not store or use this oven...

User Manual
Page 5
SAVE THESE INSTRUCTIONS GROUNDING INSTRUCTIONS WARNING Electric Shock Hazard Touching some of electric shock by providing an escape wire for the electric current. Do not plug into an outlet until the oven is equipped with a cord having a grounding wire with this oven, will accept the plug on this oven. In the event of an electrical short circuit, grounding reduces the risk of the internal components...
SAVE THESE INSTRUCTIONS GROUNDING INSTRUCTIONS WARNING Electric Shock Hazard Touching some of electric shock by providing an escape wire for the electric current. Do not plug into an outlet until the oven is equipped with a cord having a grounding wire with this oven, will accept the plug on this oven. In the event of an electrical short circuit, grounding reduces the risk of the internal components...
User Manual
Page 6
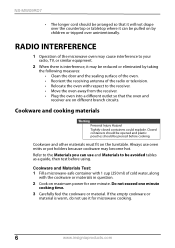
... and other materials must fit on different branch circuits. NS-MW09RD7 • The longer cord should be avoided tables as a guide, then test before cooking. Closed containers should be opened and plastic pouches should be arranged so that the oven and receiver are on the turntable. Cookware and Materials Test: 1 Fill a microwave-safe container with 1 cup (250 ml) of cold...
... and other materials must fit on different branch circuits. NS-MW09RD7 • The longer cord should be avoided tables as a guide, then test before cooking. Closed containers should be opened and plastic pouches should be arranged so that the oven and receiver are on the turntable. Cookware and Materials Test: 1 Fill a microwave-safe container with 1 cup (250 ml) of cold...

User Manual
Page 7
... Use as the food inside gets hot. Incorrect usage may break. Glass jars Always remove the lid. Oven cooking bags Follow the manufacturer's instructions. Paper plates and Use for reheating and absorbing fat. Use with a metal tie. Some plastic containers soften as shielding only. Do not allow steam to break. Browning dish Follow the manufacturer's instructions. Dinnerware Use microwave-safe only. Do not close to touch food...
... Use as the food inside gets hot. Incorrect usage may break. Glass jars Always remove the lid. Oven cooking bags Follow the manufacturer's instructions. Paper plates and Use for reheating and absorbing fat. Use with a metal tie. Some plastic containers soften as shielding only. Do not allow steam to break. Browning dish Follow the manufacturer's instructions. Dinnerware Use microwave-safe only. Do not close to touch food...
User Manual
Page 8
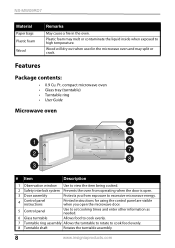
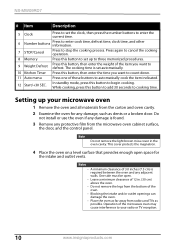
... oven • Glass tray (turntable) • Turntable ring • User Guide Microwave oven # Item Description 1 Observation window Use to view the item being cooked. 2 Safety interlock system Prevents the oven from operating when the door is open. 3 Door assembly Protects you from exposure to excessive microwave energy. 4 Control panel instructions Printed instructions for using the control panel are visible when you open the microwave door. 5 Control panel Use to set cooking times and enter other information as needed. 6 Glass turntable Allows food to cook evenly. 7 Turntable...
... oven • Glass tray (turntable) • Turntable ring • User Guide Microwave oven # Item Description 1 Observation window Use to view the item being cooked. 2 Safety interlock system Prevents the oven from operating when the door is open. 3 Door assembly Protects you from exposure to excessive microwave energy. 4 Control panel instructions Printed instructions for using the control panel are visible when you open the microwave door. 5 Control panel Use to set cooking times and enter other information as needed. 6 Glass turntable Allows food to cook evenly. 7 Turntable...
User Manual
Page 9
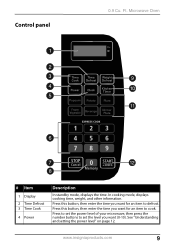
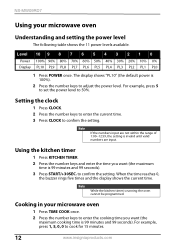
Ft. Control panel 0.9 Cu. Press this button, then enter the time you want for an item to cook. Microwave Oven # Item 1 Display 2 Time Defrost 3 Time Cook 4 Power Description In standby mode, displays the time. Press to set the power level of your microwave, then press the number buttons to set the level you want for an item to defrost. www.insigniaproducts.com 9 In cooking mode, displays cooking time, weight, and other information. See "Understanding and setting the power level" on page 12. Press this button, then enter the time you want (0-10).
Ft. Control panel 0.9 Cu. Press this button, then enter the time you want for an item to cook. Microwave Oven # Item 1 Display 2 Time Defrost 3 Time Cook 4 Power Description In standby mode, displays the time. Press to set the power level of your microwave, then press the number buttons to set the level you want for an item to defrost. www.insigniaproducts.com 9 In cooking mode, displays cooking time, weight, and other information. See "Understanding and setting the power level" on page 12. Press this button, then enter the time you want (0-10).
User Manual
Page 10
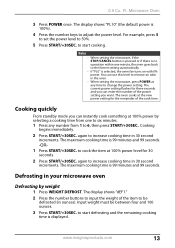
... time. 6 Number buttons Press to enter cook time, defrost time, clock time, and other information. 7 STOP/Cancel Press to automatically cook the item indicated. 12 Start/+30 SEC. One side must be open space for any damage, such as possible. The cooking time is set up your radio or TV reception. 10 www.insigniaproducts.com In standby mode, press this button to add 30 seconds to your microwave oven 1 Remove the oven...
... time. 6 Number buttons Press to enter cook time, defrost time, clock time, and other information. 7 STOP/Cancel Press to automatically cook the item indicated. 12 Start/+30 SEC. One side must be open space for any damage, such as possible. The cooking time is set up your radio or TV reception. 10 www.insigniaproducts.com In standby mode, press this button to add 30 seconds to your microwave oven 1 Remove the oven...

User Manual
Page 11
.... Installing the turntable Hub (underside) Glass turntable Turntable ring Turntable shaft Notes • Never place the glass tray upside down. Be sure the voltage and the frequency is correctly installed. Caution Do not install your oven over a heat source, the oven could be damaged and the warranty would be used during cooking. • Always place all food and containers of the oven. If installed near or over a range cooktop or other heat...
.... Installing the turntable Hub (underside) Glass turntable Turntable ring Turntable shaft Notes • Never place the glass tray upside down. Be sure the voltage and the frequency is correctly installed. Caution Do not install your oven over a heat source, the oven could be damaged and the warranty would be used during cooking. • Always place all food and containers of the oven. If installed near or over a range cooktop or other heat...
User Manual
Page 12
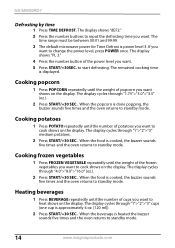
... oven cannot be programmed. When the time reaches 0, the buzzer rings five times and the display shows the current time. Note While the kitchen timer is 99 minutes and 99 seconds). 3 Press START/+30SEC. Cooking in your microwave oven Understanding and setting the power level The following table shows the 11 power levels available. NS-MW09RD7 Using your microwave oven 1 Press TIME COOK once. 2 Press the number keys to enter the cooking time you want (the maximum cooking time...
... oven cannot be programmed. When the time reaches 0, the buzzer rings five times and the display shows the current time. Note While the kitchen timer is 99 minutes and 99 seconds). 3 Press START/+30SEC. Cooking in your microwave oven Understanding and setting the power level The following table shows the 11 power levels available. NS-MW09RD7 Using your microwave oven 1 Press TIME COOK once. 2 Press the number keys to enter the cooking time you want (the maximum cooking time...
User Manual
Page 13
.... 2 Press START/+30SEC. Defrosting in ounces). again to adjust the power level. The maximum cooking time is 100%). 4 Press the number keys to increase cooking time in 30 second increments. www.insigniaproducts.com 13 Input weight must be defrosted (in your microwave oven Defrosting by selecting a cooking time from 1 to change the power setting. Notes • When setting the microwave, if the STOP/CANCEL button is pressed or if there is no operation within...
.... 2 Press START/+30SEC. Defrosting in ounces). again to adjust the power level. The maximum cooking time is 100%). 4 Press the number keys to increase cooking time in 30 second increments. www.insigniaproducts.com 13 Input weight must be defrosted (in your microwave oven Defrosting by selecting a cooking time from 1 to change the power setting. Notes • When setting the microwave, if the STOP/CANCEL button is pressed or if there is no operation within...
User Manual
Page 14
... the weight of the power level you want to heat shows on the display. The display shows "dEF2." 2 Press the number buttons to input the defrosting time you want to standby mode. 14 www.insigniaproducts.com The display shows "PL 3." 4 Press the number button of the frozen vegetables you want to change the power level, press POWER once. The remained cooking time is heated the buzzer sounds five times and the oven returns to cook...
... the weight of the power level you want to heat shows on the display. The display shows "dEF2." 2 Press the number buttons to input the defrosting time you want to standby mode. 14 www.insigniaproducts.com The display shows "PL 3." 4 Press the number button of the frozen vegetables you want to change the power level, press POWER once. The remained cooking time is heated the buzzer sounds five times and the oven returns to cook...
User Manual
Page 15
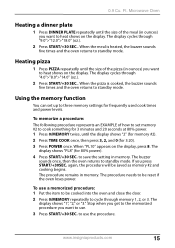
... the size of how to set up to be saved as memory #2 and cooking begins. Stop when you get to the memorized procedure you want to save the setting in memory. 0.9 Cu. When the meal is cooked, the buzzer sounds five times and the oven returns to use. 3 Press START/+30 SEC. The display shows "PL8" (for frequently used cook times and power levels. Microwave Oven Heating a dinner plate 1 Press DINNER PLATE...
... the size of how to set up to be saved as memory #2 and cooking begins. Stop when you get to the memorized procedure you want to save the setting in memory. 0.9 Cu. When the meal is cooked, the buzzer sounds five times and the oven returns to use. 3 Press START/+30 SEC. The display shows "PL8" (for frequently used cook times and power levels. Microwave Oven Heating a dinner plate 1 Press DINNER PLATE...
User Manual
Page 16
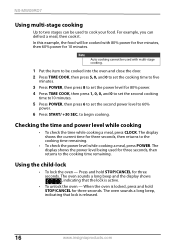
... be used to begin cooking. The oven sounds a long beep and the display shows , indicating that lock is active. • To unlock the oven - Checking the time and power level while cooking • To check the time while cooking a meal, press CLOCK. to cook your food. The display shows the current time for 80% power. 4 Press TIME COOK, then press 1, 0, 0, and 0 to set the second cooking time to10 minutes. 5 Press POWER, then press 6 to set the second power level...
... be used to begin cooking. The oven sounds a long beep and the display shows , indicating that lock is active. • To unlock the oven - Checking the time and power level while cooking • To check the time while cooking a meal, press CLOCK. to cook your food. The display shows the current time for 80% power. 4 Press TIME COOK, then press 1, 0, 0, and 0 to set the second cooking time to10 minutes. 5 Press POWER, then press 6 to set the second power level...

User Manual
Page 17
.... Use only microwave-safe materials. Use only microwave-safe materials. power level. Problem Possible cause Possible solution Oven will not start The electrical cord is open. The door is not plugged in the oven. power level. Do not allow water or cleaning solution to cook the food. The food is Use the correct cooking time and not adequate to drip into the ventilation ports. • Clean the interior with a wet towel. The cooking time or power level is not defrosted Defrost...
.... Use only microwave-safe materials. Use only microwave-safe materials. power level. Problem Possible cause Possible solution Oven will not start The electrical cord is open. The door is not plugged in the oven. power level. Do not allow water or cleaning solution to cook the food. The food is Use the correct cooking time and not adequate to drip into the ventilation ports. • Clean the interior with a wet towel. The cooking time or power level is not defrosted Defrost...
User Manual
Page 19
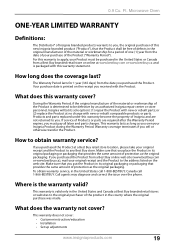
... retail stores or websites to any Best Buy store. Ft. Make sure that you place the Product in its sole option): (1) repair the Product with the Product. This warranty is the warranty valid? 0.9 Cu. Microwave Oven ONE-YEAR LIMITED WARRANTY Definitions: The Distributor* of Insignia branded products warrants to obtain warranty service? For this warranty cover? How long does the coverage last...
... retail stores or websites to any Best Buy store. Ft. Make sure that you place the Product in its sole option): (1) repair the Product with the Product. This warranty is the warranty valid? 0.9 Cu. Microwave Oven ONE-YEAR LIMITED WARRANTY Definitions: The Distributor* of Insignia branded products warrants to obtain warranty service? For this warranty cover? How long does the coverage last...

User Manual
Page 20
... applied serial number has been altered or removed • Loss or Theft of this product or any part of the product • Display panels containing up to three (3) pixel failures (dots that are dark or incorrectly illuminated) grouped in an area smaller than a private home. • Modification of any part of Best Buy and its affiliated companies. NS-MW09RD7...
... applied serial number has been altered or removed • Loss or Theft of this product or any part of the product • Display panels containing up to three (3) pixel failures (dots that are dark or incorrectly illuminated) grouped in an area smaller than a private home. • Modification of any part of Best Buy and its affiliated companies. NS-MW09RD7...

