User Manual (English)
Page 1
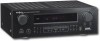
IS-HC040918 AM/FM STEREO RECEIVER STEREO RECEIVER AMPLIFIER IS-HC040918 VCR AUX POWER CD DVD TUNER A 1 2 B 3 4 C 5 6 D SLEEP 7 8 AM/FM MEMORY BALANCE MUTE AUTO BASS VOL SCAN TREBLE IS-HC040918 User's Manual
IS-HC040918 AM/FM STEREO RECEIVER STEREO RECEIVER AMPLIFIER IS-HC040918 VCR AUX POWER CD DVD TUNER A 1 2 B 3 4 C 5 6 D SLEEP 7 8 AM/FM MEMORY BALANCE MUTE AUTO BASS VOL SCAN TREBLE IS-HC040918 User's Manual

User Manual (English)
Page 2
...-type plug. No user-serviceable parts inside. WARNING To reduce the risk of time. 14.Refer all servicing to the following two conditions: (1)this device may cause undesired operation. A polarized plug has two blades with dry cloth. 7. If the provided plug does not fit into the apparatus, the apparatus has been exposed to alert you for your outlet. Protect the power cord...
...-type plug. No user-serviceable parts inside. WARNING To reduce the risk of time. 14.Refer all servicing to the following two conditions: (1)this device may cause undesired operation. A polarized plug has two blades with dry cloth. 7. If the provided plug does not fit into the apparatus, the apparatus has been exposed to alert you for your outlet. Protect the power cord...
User Manual (English)
Page 3
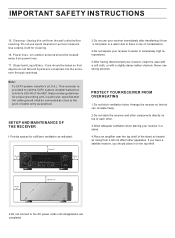
... the NEC that provides guidelines for cleaning. 16. Power lines - Object and Liquid Entry - IMPORTANT SAFETY INSTRUCTIONS 15. Note: To CATV system installer's (U.S.A.): This reminder is risk of cable entry as indicated: 10cm/ 4" STEREO RECEIVER AMPLIFIER IS-HC040918 15cm/6" 10cm/ 4" 3.Do not use your receiver immediately after transferring it from power lines. 17. PROTECT YOUR RECEIVER FROM OVERHEATING 1.Do not block ventilation holes...
... the NEC that provides guidelines for cleaning. 16. Power lines - Object and Liquid Entry - IMPORTANT SAFETY INSTRUCTIONS 15. Note: To CATV system installer's (U.S.A.): This reminder is risk of cable entry as indicated: 10cm/ 4" STEREO RECEIVER AMPLIFIER IS-HC040918 15cm/6" 10cm/ 4" 3.Do not use your receiver immediately after transferring it from power lines. 17. PROTECT YOUR RECEIVER FROM OVERHEATING 1.Do not block ventilation holes...
User Manual (English)
Page 4
... THE WIRES 5 CONNECTING THE MAIN SPEAKERS 5 CONNECTING THE ANTENNAS 5 CONNECTING FOR POWER 6 USING HEADPHONES 6 RECEIVER CONTROLS & OPERATIONS 7 PANEL INTRODUCTION 7 DISPLAY MESSAGES 8 TUNING THE RECEIVER 8 SELECT THE AM/FM BAND 8 MANUAL TUNING 8 AUTO TUNING 8 STORING STATIONS IN MEMORY 9 TO STORE STATION 9 MANUAL PRESET 9 RETRIEVING PRESET STATIONS 9 CONNECTING AUXILIARY COMPONENTS 10 BACK PANEL INTRODUCTION 10 BEFORE YOU CONNECT 11 CONNECTING A COMPACT DISC PLAYER 11 REMOTE CONTROL 12 CARE AND MAINTENANCE 13 TROUBLESHOOTING TIPS 13 RECEIVER/TUNER...
... THE WIRES 5 CONNECTING THE MAIN SPEAKERS 5 CONNECTING THE ANTENNAS 5 CONNECTING FOR POWER 6 USING HEADPHONES 6 RECEIVER CONTROLS & OPERATIONS 7 PANEL INTRODUCTION 7 DISPLAY MESSAGES 8 TUNING THE RECEIVER 8 SELECT THE AM/FM BAND 8 MANUAL TUNING 8 AUTO TUNING 8 STORING STATIONS IN MEMORY 9 TO STORE STATION 9 MANUAL PRESET 9 RETRIEVING PRESET STATIONS 9 CONNECTING AUXILIARY COMPONENTS 10 BACK PANEL INTRODUCTION 10 BEFORE YOU CONNECT 11 CONNECTING A COMPACT DISC PLAYER 11 REMOTE CONTROL 12 CARE AND MAINTENANCE 13 TROUBLESHOOTING TIPS 13 RECEIVER/TUNER...
User Manual (English)
Page 5
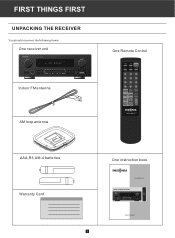
... THE RECEIVER You should receiver the following items: One receiver unit STEREO RECEIVER AMPLIFIER IS-HC040918 Indoor FM antenna AM loop antenna One Remote Control VCR AUX POWER CD DVD TUNER A 1 2 B 3 4 C 5 6 D SLEEP 7 8 AM/FM MEMORY BALANCE MUTE AUTO BASS VOL SCAN TREBLE IS-HC040918 AAA,R3,UM-4 batteries Warranty Card One instruction book IS-HC040918 AM/FM STEREO RECEIVER STEREO RECEIVER AMPLIFIER IS-HC040918 VCR AUX POWER CD DVD TUNER A 1 2 B 3 4 C 5 6 D SLEEP 7 8 AM/FM MEMORY BALANCE MUTE AUTO BASS VOL SCAN TREBLE IS-HC040918 User's Manual...
... THE RECEIVER You should receiver the following items: One receiver unit STEREO RECEIVER AMPLIFIER IS-HC040918 Indoor FM antenna AM loop antenna One Remote Control VCR AUX POWER CD DVD TUNER A 1 2 B 3 4 C 5 6 D SLEEP 7 8 AM/FM MEMORY BALANCE MUTE AUTO BASS VOL SCAN TREBLE IS-HC040918 AAA,R3,UM-4 batteries Warranty Card One instruction book IS-HC040918 AM/FM STEREO RECEIVER STEREO RECEIVER AMPLIFIER IS-HC040918 VCR AUX POWER CD DVD TUNER A 1 2 B 3 4 C 5 6 D SLEEP 7 8 AM/FM MEMORY BALANCE MUTE AUTO BASS VOL SCAN TREBLE IS-HC040918 User's Manual...

User Manual (English)
Page 6
... REMOTE CONTROL INSTALLING BATTERIES IN THE REMOTE CONTROL Since the remote controller will be used for an extended period of time. Insert the batteries(AAA,R03,UM-4 TYPE) according to the main unit, the batteries are correct.(See the illustration inside of the battery compartment. 3.Close the battery compartment cover. VCR AUX POWER CD DVD TUNER A 1 2 B 3 4 C 5 6 D SLEEP 7 AM/FM 8 MEMORY BALANCE MUTE AUTO BASS VOL SCAN TREBLE...
... REMOTE CONTROL INSTALLING BATTERIES IN THE REMOTE CONTROL Since the remote controller will be used for an extended period of time. Insert the batteries(AAA,R03,UM-4 TYPE) according to the main unit, the batteries are correct.(See the illustration inside of the battery compartment. 3.Close the battery compartment cover. VCR AUX POWER CD DVD TUNER A 1 2 B 3 4 C 5 6 D SLEEP 7 AM/FM 8 MEMORY BALANCE MUTE AUTO BASS VOL SCAN TREBLE...
User Manual (English)
Page 7
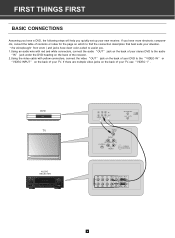
DVD 199 TV AUDIO RECEIVER STEREO RECEIVER AMPLIFIER IS-HC040918 VIDEO R IN OUT L IN FROM ANT Ch3 Ch4 OUT TO TV VIDEO INPUT RIGHT OUT AUDIO IN S-VIDEO L/ MONO CABLE/ ANTENNA 4 If you have more electronic components, consult the table of contents or index for the page on which to the VIDEO IN or VIDEO INPUT on the back of your new receiver. If there are multiple video jacks on the back...
DVD 199 TV AUDIO RECEIVER STEREO RECEIVER AMPLIFIER IS-HC040918 VIDEO R IN OUT L IN FROM ANT Ch3 Ch4 OUT TO TV VIDEO INPUT RIGHT OUT AUDIO IN S-VIDEO L/ MONO CABLE/ ANTENNA 4 If you have more electronic components, consult the table of contents or index for the page on which to the VIDEO IN or VIDEO INPUT on the back of your new receiver. If there are multiple video jacks on the back...

User Manual (English)
Page 8
... be distorted and will lack bass("out of speaker wires and terminals are matched. Press down on the system's back panel. Or you to "+" on the receiver) of phase"effect). Speaker Polarity When connecting the speakers, make sure the polarities ("+" speaker wire to receive clear reception. CONNECTING THE ANTENNAS Method 1 Method 2 RIGHT SPEAKER RIGHT LEFT SPEAKER LEFT The AM and FM antennas connect to the AM and...
... be distorted and will lack bass("out of speaker wires and terminals are matched. Press down on the system's back panel. Or you to "+" on the receiver) of phase"effect). Speaker Polarity When connecting the speakers, make sure the polarities ("+" speaker wire to receive clear reception. CONNECTING THE ANTENNAS Method 1 Method 2 RIGHT SPEAKER RIGHT LEFT SPEAKER LEFT The AM and FM antennas connect to the AM and...
User Manual (English)
Page 9
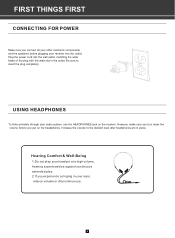
... to the desired level after headphones are in place. Hearing Comfort & Well-Being 1.Do not play . 2.If you put on the receiver. FIRST THINGS FIRST CONNECTING FOR POWER Make sure you connect all your other electronic components and the speakers before you experience a ringing in your ears, reduce volume or discontinue use the HEADPHONES jack on the headphones. Plug the power cord into the...
... to the desired level after headphones are in place. Hearing Comfort & Well-Being 1.Do not play . 2.If you put on the receiver. FIRST THINGS FIRST CONNECTING FOR POWER Make sure you connect all your other electronic components and the speakers before you experience a ringing in your ears, reduce volume or discontinue use the HEADPHONES jack on the headphones. Plug the power cord into the...
User Manual (English)
Page 10
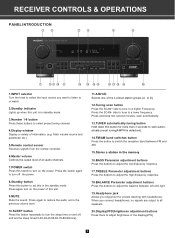
... low-frequency response. 17.TREBLE Parameter adjustment buttons Press the buttons to adjust the high-frequency response. 18.BALANCE Parameter adjustment buttons Press the buttons to adjust the balance between left and right. 19.Headphone jack Allows you want to listen to or watch. 2.Standby indicator Lights up when this unit is in the standby mode. When you connect headphones, no signals are output to all audio channels. 7.POWER switch Press this in standby mode. 3.Number 1-8 button Press these buttons to select preset tuning channel. 4.Display...
... low-frequency response. 17.TREBLE Parameter adjustment buttons Press the buttons to adjust the high-frequency response. 18.BALANCE Parameter adjustment buttons Press the buttons to adjust the balance between left and right. 19.Headphone jack Allows you want to listen to or watch. 2.Standby indicator Lights up when this unit is in the standby mode. When you connect headphones, no signals are output to all audio channels. 7.POWER switch Press this in standby mode. 3.Number 1-8 button Press these buttons to select preset tuning channel. 4.Display...
User Manual (English)
Page 11
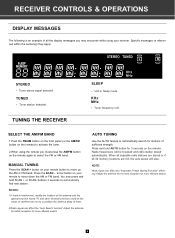
... button on your remote button to position the antenna away of them. 2.Weak signal can affect the "Automatic Preset Storing Function" efficiency. Radio frequencies will stop. Press the SCAN - RECEIVER CONTROLS & OPERATIONS DISPLAY MESSAGES The following is heard. buttons 3 seconds to automatically search for more efficient search. Specific messages re referenced within the section(s) they apply. SLEEP MEMORY STEREO Tuner stereo signal detected. TUNED Tuner station detected. MANUAL TUNING Press the SCAN + button on the remote. AUTO TUNING Use...
... button on your remote button to position the antenna away of them. 2.Weak signal can affect the "Automatic Preset Storing Function" efficiency. Radio frequencies will stop. Press the SCAN - RECEIVER CONTROLS & OPERATIONS DISPLAY MESSAGES The following is heard. buttons 3 seconds to automatically search for more efficient search. Specific messages re referenced within the section(s) they apply. SLEEP MEMORY STEREO Tuner stereo signal detected. TUNED Tuner station detected. MANUAL TUNING Press the SCAN + button on the remote. AUTO TUNING Use...
User Manual (English)
Page 12
... panel display. For example: "A". 4. RETRIEVING PRESET STATIONS 1.Turn the INPUT knob on the front panel or press TUNER button on the remote control to select TUNER as the input source. 2.Press A/B/C/D button on the panel or the remote control to select the group of preset stations that you are desire. MANUAL PRESET 1. TO STORE A STATION 1.Press the FM/AM button on the front panel display. 4.In the same way, You can be stored in place of preset stations. Station selected is blinking, press number buttons...
... panel display. For example: "A". 4. RETRIEVING PRESET STATIONS 1.Turn the INPUT knob on the front panel or press TUNER button on the remote control to select TUNER as the input source. 2.Press A/B/C/D button on the panel or the remote control to select the group of preset stations that you are desire. MANUAL PRESET 1. TO STORE A STATION 1.Press the FM/AM button on the front panel display. 4.In the same way, You can be stored in place of preset stations. Station selected is blinking, press number buttons...

User Manual (English)
Page 13
CONNECTING AUXILIARY COMPONENTS BACK PANEL INTRODUCTION 12 34 5 6 7 8 9 10 11 1.FM antenna input 2.AM antenna input 3.Right channel speaker output 4.Left channel speaker output 5.VCR audio input jacks 6.AUX audio input jacks 7.CD audio input jacks 8.DVD audio input jacks 12 9.REC audio output jacks NOTE: The level is controlled by master volume. 10.Pre out jacks NOTE: A short plug is used between 10 and 11 jacks. 11.Amplifier input jacks NOTE: A short plug is used between 10 and 11 jacks. 12.AC 120V/60Hz power input plug 10
CONNECTING AUXILIARY COMPONENTS BACK PANEL INTRODUCTION 12 34 5 6 7 8 9 10 11 1.FM antenna input 2.AM antenna input 3.Right channel speaker output 4.Left channel speaker output 5.VCR audio input jacks 6.AUX audio input jacks 7.CD audio input jacks 8.DVD audio input jacks 12 9.REC audio output jacks NOTE: The level is controlled by master volume. 10.Pre out jacks NOTE: A short plug is used between 10 and 11 jacks. 11.Amplifier input jacks NOTE: A short plug is used between 10 and 11 jacks. 12.AC 120V/60Hz power input plug 10

User Manual (English)
Page 14
... audio/video cables to the right. CONNECTING A COMPACT DISC PLAYER Using one paired (red/white) stereo cable, connect your new receiver to coil any power cables and keep them away from power surges. - Insert all cable plugs firmly into the wall outlet. - Always turn off the receiver and/or components before plugging power cords into their jacks. - The connection cable plugs and jacks are color-coded red and black instead of the terminals in CD mode and press PLAY. CONNECTING AUXILIARY COMPONENTS BEFORE YOU CONNECT..... Connect all antennas...
... audio/video cables to the right. CONNECTING A COMPACT DISC PLAYER Using one paired (red/white) stereo cable, connect your new receiver to coil any power cables and keep them away from power surges. - Insert all cable plugs firmly into the wall outlet. - Always turn off the receiver and/or components before plugging power cords into their jacks. - The connection cable plugs and jacks are color-coded red and black instead of the terminals in CD mode and press PLAY. CONNECTING AUXILIARY COMPONENTS BEFORE YOU CONNECT..... Connect all antennas...
User Manual (English)
Page 15
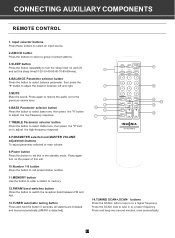
... to tune in to a lower frequency. CONNECTING AUXILIARY COMPONENTS REMOTE CONTROL 1. side to tune in the standby mode. Input selector buttons Press these buttons to select an input source. 2.A/B/C/D button Press the buttons to select a group of preset stations. 3.SLEEP button Press the button repeatedly to turn on and off, and set this unit. 10.Number 1-8 button Press the button to call preset station number. 11.MEMORY button Use the button to enter a station to memory. 12.FM/AM band switches button Press the button to switch the...
... to tune in to a lower frequency. CONNECTING AUXILIARY COMPONENTS REMOTE CONTROL 1. side to tune in the standby mode. Input selector buttons Press these buttons to select an input source. 2.A/B/C/D button Press the buttons to select a group of preset stations. 3.SLEEP button Press the button repeatedly to turn on and off, and set this unit. 10.Number 1-8 button Press the button to call preset station number. 11.MEMORY button Use the button to enter a station to memory. 12.FM/AM band switches button Press the button to switch the...

User Manual (English)
Page 16
... the speaker wire connection or connecting cable. - Install the batteries before cleaning the exterior of each battery to the unit. NOTE: Be sure to operate the remote. - CLEANING THE EXTERIOR CLEANING THE EXTERIOR - Check the short plug between the receiver and the speaker. Adjust the antenna. - Check the connections. - Sever hum or noise. - Move closer. Check the connection between PRE OUT jacks and AMP IN on the rear panel is selected...
... the speaker wire connection or connecting cable. - Install the batteries before cleaning the exterior of each battery to the unit. NOTE: Be sure to operate the remote. - CLEANING THE EXTERIOR CLEANING THE EXTERIOR - Check the short plug between the receiver and the speaker. Adjust the antenna. - Check the connections. - Sever hum or noise. - Move closer. Check the connection between PRE OUT jacks and AMP IN on the rear panel is selected...
User Manual (English)
Page 17
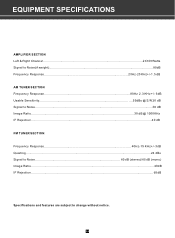
EQUIPMENT SPECIFICATIONS AMPLIFIER SECTION Left & Right Channel...2X100Watts Signal to Noise(A weight)...85dB Frequency Response 20Hz-20 KHz+/-1.5 dB AM TUNER SECTION Frequency Response 80Hz 2.3 KHz +/- 6dB Usable Sensitivity 55dBu @ S/N 20 dB Signal to Noise...38 dB Image Ratio...30 dB @ 1000KHz IF Rejection ...40 dB FM TUNER SECTION Frequency Response 40Hz-15 KHz+/- 3dB Quieting...24 dBu Signal to Noise 60 dB (stereo)/65 dB (mono) Image Ratio...40dB IF Rejection...65dB Specifications and features are subject to change without notice. 14
EQUIPMENT SPECIFICATIONS AMPLIFIER SECTION Left & Right Channel...2X100Watts Signal to Noise(A weight)...85dB Frequency Response 20Hz-20 KHz+/-1.5 dB AM TUNER SECTION Frequency Response 80Hz 2.3 KHz +/- 6dB Usable Sensitivity 55dBu @ S/N 20 dB Signal to Noise...38 dB Image Ratio...30 dB @ 1000KHz IF Rejection ...40 dB FM TUNER SECTION Frequency Response 40Hz-15 KHz+/- 3dB Quieting...24 dBu Signal to Noise 60 dB (stereo)/65 dB (mono) Image Ratio...40dB IF Rejection...65dB Specifications and features are subject to change without notice. 14

User Manual (English)
Page 18
Richfield, MN 55423 USA STEREO RECEIVER AMPLIFIER IS-HC040918 Manufactured for Insignia Products 7601 Penn Ave S.
Richfield, MN 55423 USA STEREO RECEIVER AMPLIFIER IS-HC040918 Manufactured for Insignia Products 7601 Penn Ave S.


