
English Manual
Page 1
... 933 TM .1 IIE PERSONAL FITNESS SYSTEM Model No. TO AVOID UNNECESSARY DELAYS, PLEASE CALL DIRECT TO OUR TOLL-FREE CUSTOMER HOTLINE The trained technicians on our Customer Hot Line will guarantee you complete satisfaction through direct... assistance from our factory. Ifyouhave questions, or find there am missing or damagedparts, we are committed to you complete customer satisfaction. MST CAUTION: Read all safety precautions andinstructions in this manualcarefullybefore using this equipment Save this manual for Mum reference. IM393310 Serial No. OWNER'S MANUAL Serial Number...
... 933 TM .1 IIE PERSONAL FITNESS SYSTEM Model No. TO AVOID UNNECESSARY DELAYS, PLEASE CALL DIRECT TO OUR TOLL-FREE CUSTOMER HOTLINE The trained technicians on our Customer Hot Line will guarantee you complete satisfaction through direct... assistance from our factory. Ifyouhave questions, or find there am missing or damagedparts, we are committed to you complete customer satisfaction. MST CAUTION: Read all safety precautions andinstructions in this manualcarefullybefore using this equipment Save this manual for Mum reference. IM393310 Serial No. OWNER'S MANUAL Serial Number...

English Manual
Page 2
.... A. WOO Wi loganAJT 8432179813 2 TABLE OF CONTENTS Limited Warranty Important Safety Precautions Before You Begin Operation and Adjustment Maintenance and Trouble-Shooting Conditioning Guidelines Part List Exploded Drawing Ordering Replacement Parts 2 3 -4 5 11 13 14 15 Back Cover LIMITED WARRANTY IMAGE, INC. (IMAGE"), warrants this warranty,is authorized by IMAGE. . . ACCORDINGLY, THE ABOVE LIMITATION MAY NOT APPLY TO YOU. CORDINGLY, THE ABOVE LIMITATION MAY NOT APPLY TO YOU. SOME STATES...
.... A. WOO Wi loganAJT 8432179813 2 TABLE OF CONTENTS Limited Warranty Important Safety Precautions Before You Begin Operation and Adjustment Maintenance and Trouble-Shooting Conditioning Guidelines Part List Exploded Drawing Ordering Replacement Parts 2 3 -4 5 11 13 14 15 Back Cover LIMITED WARRANTY IMAGE, INC. (IMAGE"), warrants this warranty,is authorized by IMAGE. . . ACCORDINGLY, THE ABOVE LIMITATION MAY NOT APPLY TO YOU. CORDINGLY, THE ABOVE LIMITATION MAY NOT APPLY TO YOU. SOME STATES...
English Manual
Page 3
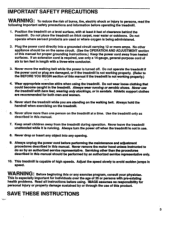
... the power cord before operating the treadmill. 1. Plug the power cord directly into any exercise program, consult your physician. Always hold the handrail when exercising on thick carpet, near water or outdoors. SAVE THESE INSTRUCTIONS 3 Always wearrunning oraerobic shoes. Use the treadmill only as described in this manual. 7. Never remove the motor hood unless instructed to persons, read the following important safety precautions and information before performing the maintenance and adjustment...
... the power cord before operating the treadmill. 1. Plug the power cord directly into any exercise program, consult your physician. Always hold the handrail when exercising on thick carpet, near water or outdoors. SAVE THESE INSTRUCTIONS 3 Always wearrunning oraerobic shoes. Use the treadmill only as described in this manual. 7. Never remove the motor hood unless instructed to persons, read the following important safety precautions and information before performing the maintenance and adjustment...
English Manual
Page 4
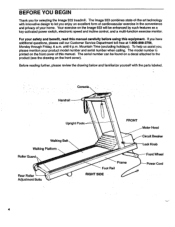
... this equipment. Your exercise on the front cover of your product model number and serial number when calling. Mountain Time (excluding holidays). The serial number can be enhanced by such features as a key-activated power switch, electronic speed and incline control, and a multi-function exercise monitor. Console Handrail Upright Posts FRONT Motor Hood Walking Belt Walking Platform Roller Guard Rear Roller Adjustment Bolts Frame Foot Rail RIGHT SIDE Circuit Breaker Lock Knob Front Wheel Power Cord 4 until 6 p.m. The Image 933 combines state-of...
... this equipment. Your exercise on the front cover of your product model number and serial number when calling. Mountain Time (excluding holidays). The serial number can be enhanced by such features as a key-activated power switch, electronic speed and incline control, and a multi-function exercise monitor. Console Handrail Upright Posts FRONT Motor Hood Walking Belt Walking Platform Roller Guard Rear Roller Adjustment Bolts Frame Foot Rail RIGHT SIDE Circuit Breaker Lock Knob Front Wheel Power Cord 4 until 6 p.m. The Image 933 combines state-of...
English Manual
Page 5
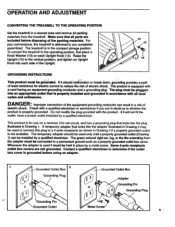
... tighten an Upright Knob into an appropriate outlet that all parts are included before using an adapter. 1 2 Grounded Outlet Box Grounding Plug • • 0 0•° Grounding Pin Grounded Outlet Grounded Outlet Box 0 Adapter Grounding Pin /ii • • Grounding Plug Lug Metal Screw 5 OPERATION AND ADJUSTMENT CONVERTING THE TREADMILL TO THE OPERATING POSITION Set the treadmill in a cleared area and remove all packing materials from the adapter...
... tighten an Upright Knob into an appropriate outlet that all parts are included before using an adapter. 1 2 Grounded Outlet Box Grounding Plug • • 0 0•° Grounding Pin Grounded Outlet Grounded Outlet Box 0 Adapter Grounding Pin /ii • • Grounding Plug Lug Metal Screw 5 OPERATION AND ADJUSTMENT CONVERTING THE TREADMILL TO THE OPERATING POSITION Set the treadmill in a cleared area and remove all packing materials from the adapter...
English Manual
Page 6
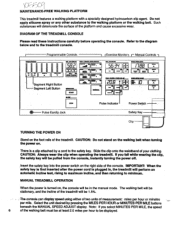
... the console. IMPORTANT: When the safety key is first inserted after the power cord is turned on the right side of the walking belt must be at least 2.0 miles per mile. The walking belt will be stationary, and the incline of the platform and cause excessive wear. There is a clip attached by -pressing the MILES PER HOUR orMINUTES-PER MILE buttons beneath the MANUAL SPEED ADJUST display. Such substances will be displayed. Manual Controls...
... the console. IMPORTANT: When the safety key is first inserted after the power cord is turned on the right side of the walking belt must be at least 2.0 miles per mile. The walking belt will be stationary, and the incline of the platform and cause excessive wear. There is a clip attached by -pressing the MILES PER HOUR orMINUTES-PER MILE buttons beneath the MANUAL SPEED ADJUST display. Such substances will be displayed. Manual Controls...
English Manual
Page 7
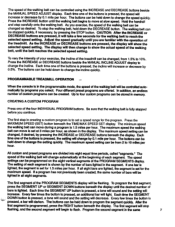
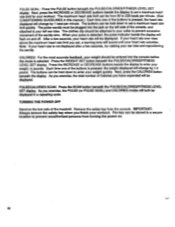
... minimum speed the walking belt can be controlled using the INCREASE and DECREASE buttons beside the MANUAL SPEED ADJUST display. The setting of the walking belt can be created. The first segment will change the incline quickly. CAUTION: After the INCREASE or DECREASE buttons are familiar with the operation of custom programs can move at slow speed. The display will increase or decrease by 0.1 mile per hour. The maximum speed setting can be stopped...
... minimum speed the walking belt can be controlled using the INCREASE and DECREASE buttons beside the MANUAL SPEED ADJUST display. The setting of the walking belt can be created. The first segment will change the incline quickly. CAUTION: After the INCREASE or DECREASE buttons are familiar with the operation of custom programs can move at slow speed. The display will increase or decrease by 0.1 mile per hour. The maximum speed setting can be stopped...
English Manual
Page 8
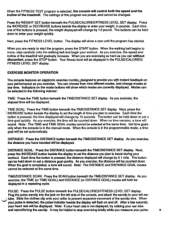
... the power cord remains plugged in this manner until all eight segments have been completed. SELECTING THE FITNESS =PROGRAM a Press the FITNESS TEST button. You may wish toprogram the first segment for a low setting to change the length of the walking belt will be switched to change by pressing the MANUAL button. When you are eight segments, the program will begin your workout. The first segment of the PROGRAM SEGMENTS display...
... the power cord remains plugged in this manner until all eight segments have been completed. SELECTING THE FITNESS =PROGRAM a Press the FITNESS TEST button. You may wish toprogram the first segment for a low setting to change the length of the walking belt will be switched to change by pressing the MANUAL button. When you are eight segments, the program will begin your workout. The first segment of the PROGRAM SEGMENTS display...
English Manual
Page 9
.... Plug the pulse earclip into the jack on the mode buttons will show a zero until the program has started. Note: If your heart rate is not displayed, try rubbing your left side of this program are currently displayed.. Indicators on the left ear \tad lobe. TIME GOAL: Press the TIME button beneath the TIME/DISTANCE SET display. Each time the button is pressed, the distance displayed will change by 0.1 mile. earclip After a wire. EXERCISE MONITOR...
.... Plug the pulse earclip into the jack on the mode buttons will show a zero until the program has started. Note: If your heart rate is not displayed, try rubbing your left side of this program are currently displayed.. Indicators on the left ear \tad lobe. TIME GOAL: Press the TIME button beneath the TIME/DISTANCE SET display. Each time the button is pressed, the distance displayed will change by 0.1 mile. earclip After a wire. EXERCISE MONITOR...
English Manual
Page 10
... be attached to your -workout." When your left side of the treadmill. After a few seconds, try rubbing your heart rate subsides. Press the INCREASE or DECREASE buttons beside the display to enter your workout. The buttons can be displayed. TURNING THE POWER OFF Stand on the left ear lobe. The key can be plugged into the console before this manual) Each time one of Calories you set a maximum heart rate limit...
... be attached to your -workout." When your left side of the treadmill. After a few seconds, try rubbing your heart rate subsides. Press the INCREASE or DECREASE buttons beside the display to enter your workout. The buttons can be displayed. TURNING THE POWER OFF Stand on the left ear lobe. The key can be plugged into the console before this manual) Each time one of Calories you set a maximum heart rate limit...
English Manual
Page 11
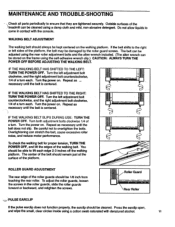
... the pulse earclip does not function properly, the earclip should always be damaged by the roller guard screws. Repeat as necessary until the belt is centered. The belt can be adjusted using the self-adhesive wrench clip.) CAUTION: ALWAYS TURN THE POWER OFF BEFORE ADJUSTING THE WALKING BELT. MAINTENANCE AND TROUBLE-SHOOTING Check all parts periodically to overtighten the bolts. IF THE WALKING BELT SLIPS DURING USE: TURN THE POWER OFF. WALKING BELT ADJUSTMENT The walking belt...
... the pulse earclip does not function properly, the earclip should always be damaged by the roller guard screws. Repeat as necessary until the belt is centered. The belt can be adjusted using the self-adhesive wrench clip.) CAUTION: ALWAYS TURN THE POWER OFF BEFORE ADJUSTING THE WALKING BELT. MAINTENANCE AND TROUBLE-SHOOTING Check all parts periodically to overtighten the bolts. IF THE WALKING BELT SLIPS DURING USE: TURN THE POWER OFF. WALKING BELT ADJUSTMENT The walking belt...
English Manual
Page 12
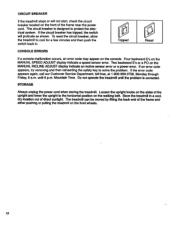
... breaker located on the walking belt. To reset the circuit breaker, allow the treadmill to protect the electrical system. until the problem is designed to cool for a few minutes and then push the switch back in a cool, dry location out of direct sunlight. Two backward E's or a PO on the MANUAL SPEED ADJUST display indicate a speed sensor error. If an error code appears, try removing and then reinserting the safety key...
... breaker located on the walking belt. To reset the circuit breaker, allow the treadmill to protect the electrical system. until the problem is designed to cool for a few minutes and then push the switch back in a cool, dry location out of direct sunlight. Two backward E's or a PO on the MANUAL SPEED ADJUST display indicate a speed sensor error. If an error code appears, try removing and then reinserting the safety key...
English Manual
Page 13
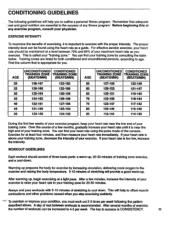
... workouts is appropriate for at a light pace. After several months of exercise, the number of your heart rate is important to exercise with 5-10 minutes of the console. The key to age. Training zones are essential to the muscles and raising the body temperature. 5-10 minutes of any fitness program: Before beginning this or any exercise program, consult your training zone, decrease the intensity of training...
... workouts is appropriate for at a light pace. After several months of exercise, the number of your heart rate is important to exercise with 5-10 minutes of the console. The key to age. Training zones are essential to the muscles and raising the body temperature. 5-10 minutes of any fitness program: Before beginning this or any exercise program, consult your training zone, decrease the intensity of training...
English Manual
Page 14
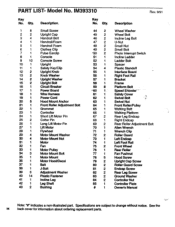
... 14 41 1 42 1 43 2 Small Screw Upright Cap Handrail Bolt HandraiVFoam Handrail Foam Clothes Clip Pulse Earclip Console Console Screw Upright Safety Key/Clip Upright Knob Knob Washer Upright Washer Upright Bolt Circuit Breaker Power Board Wire Harness Power Cord Hood Mount Anchor Front Roller Adjustment Bolt Grommet Controller Short Lift Motor Pin Cotter Pin Long Lift Motor Pin Lift Motor Flywheel Motor Mount Washer Motor Mount Nut Motor Fan Motor Pulley Motor Mount Bolt Motor Mount Motor Hood/Decal Belt J-Bolt Adjustment Washer Plastic Fastener Incline Leg Leg Shaft Bushing 44 2 45 2 46 2 47...
... 14 41 1 42 1 43 2 Small Screw Upright Cap Handrail Bolt HandraiVFoam Handrail Foam Clothes Clip Pulse Earclip Console Console Screw Upright Safety Key/Clip Upright Knob Knob Washer Upright Washer Upright Bolt Circuit Breaker Power Board Wire Harness Power Cord Hood Mount Anchor Front Roller Adjustment Bolt Grommet Controller Short Lift Motor Pin Cotter Pin Long Lift Motor Pin Lift Motor Flywheel Motor Mount Washer Motor Mount Nut Motor Fan Motor Pulley Motor Mount Bolt Motor Mount Motor Hood/Decal Belt J-Bolt Adjustment Washer Plastic Fastener Incline Leg Leg Shaft Bushing 44 2 45 2 46 2 47...
English Manual
Page 15
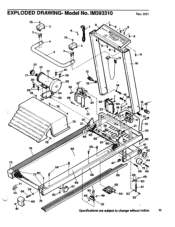
IM393310 Rev. 9/91 2 3 4 8 7 9 .4 9 6 .4 44 9 4•(0 2 5 3 --1 9 33 10 32 31 30 12 29 30 29 78 34 28 25 34 35 26 8 • 24 85 23 14 15 1 84 EXPLODED DRAWING- Model No.
IM393310 Rev. 9/91 2 3 4 8 7 9 .4 9 6 .4 44 9 4•(0 2 5 3 --1 9 33 10 32 31 30 12 29 30 29 78 34 28 25 34 35 26 8 • 24 85 23 14 15 1 84 EXPLODED DRAWING- Model No.
English Manual
Page 16
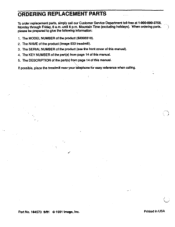
... (Image 933 treadmill). 3. The SERIAL NUMBER of the product (see the front cover of this manual. 5. Printed in USA Mountain Time (excluding holidays). The KEY NUMBER of the part(s) from page 14 of this manual). 4. The DESCRIPTION of the part(s) from page 14 of this manual. When ordering parts, please be prepared to give the following information: 1. until 6 p.m. ORDERING REPLACEMENT.PARTS To order replacement parts, simply call our Customer Service...
... (Image 933 treadmill). 3. The SERIAL NUMBER of the product (see the front cover of this manual. 5. Printed in USA Mountain Time (excluding holidays). The KEY NUMBER of the part(s) from page 14 of this manual). 4. The DESCRIPTION of the part(s) from page 14 of this manual. When ordering parts, please be prepared to give the following information: 1. until 6 p.m. ORDERING REPLACEMENT.PARTS To order replacement parts, simply call our Customer Service...


