
English Manual
Page 1
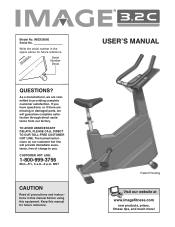
... LINE: 1-800-999-3756 Mon.ÐFri., 6 a.m.Ð6 p.m. MST CAUTION Read all precautions and instructions in the space above for future reference. ¨ USERÕS MANUAL Patent Pending Visit our website at www.imagefitness.com new products, prizes, fitness tips, and much more! Model No. IMEX35080 Serial No. Write the serial number in this manual before using this manual for future reference.
... LINE: 1-800-999-3756 Mon.ÐFri., 6 a.m.Ð6 p.m. MST CAUTION Read all precautions and instructions in the space above for future reference. ¨ USERÕS MANUAL Patent Pending Visit our website at www.imagefitness.com new products, prizes, fitness tips, and much more! Model No. IMEX35080 Serial No. Write the serial number in this manual before using this manual for future reference.
English Manual
Page 2
... or through the use of all instructions in this product. 2 Do not arch your back. 9. TABLE OF CONTENTS IMPORTANT PRECAUTIONS 2 BEFORE YOU BEGIN 3 ASSEMBLY 4 HOW TO OPERATE THE EXERCISE CYCLE 7 MAINTENANCE AND TROUBLE-SHOOTING 12 EXERCISE GUIDELINES 13 PART LIST 14 EXPLODED DRAWING 15 HOW TO ORDER REPLACEMENT PARTS Back Cover LIMITED WARRANTY Back Cover IMPORTANT PRECAUTIONS WARNING: To reduce the risk of heart rate readings. It...
... or through the use of all instructions in this product. 2 Do not arch your back. 9. TABLE OF CONTENTS IMPORTANT PRECAUTIONS 2 BEFORE YOU BEGIN 3 ASSEMBLY 4 HOW TO OPERATE THE EXERCISE CYCLE 7 MAINTENANCE AND TROUBLE-SHOOTING 12 EXERCISE GUIDELINES 13 PART LIST 14 EXPLODED DRAWING 15 HOW TO ORDER REPLACEMENT PARTS Back Cover LIMITED WARRANTY Back Cover IMPORTANT PRECAUTIONS WARNING: To reduce the risk of heart rate readings. It...

English Manual
Page 3
Department toll-free at 1-800-999-3756, Monday through Friday, 6 a.m. until 6 p.m. Pulse Sensor Seat Seat Post Seat Knob BACK Pedal Strap Pedal Rear Stabilizer Book Holder Handlebar Console Upper Side Shield FRONT Side Shield RIGHT SIDE 3 The model number is one of the most effective exercises for selecting the new IMAGE¨ 3.2C exercise cycle. For your home. If you , please mention the product model number and serial number when calling. To help us...
Department toll-free at 1-800-999-3756, Monday through Friday, 6 a.m. until 6 p.m. Pulse Sensor Seat Seat Post Seat Knob BACK Pedal Strap Pedal Rear Stabilizer Book Holder Handlebar Console Upper Side Shield FRONT Side Shield RIGHT SIDE 3 The model number is one of the most effective exercises for selecting the new IMAGE¨ 3.2C exercise cycle. For your home. If you , please mention the product model number and serial number when calling. To help us...

English Manual
Page 4
... number in assembly. The second number refers to identify the small parts used in parenthesis below to the quantity needed for shipping. If a part is completed. Console Screw (20)Ð4 M8 Black Flat Washer (57)Ð16 M8 x 15mm Button Screw (7)Ð4 Monitor Screw (17)Ð4 M6 x 15mm Hex Screw (29)Ð4 M8 x 20mm Button Screw (25)Ð4 #8 x 19mm Screw (11)Ð3 M8 x 55mm Button Screw (63)Ð4 4 PART CHART Use the part...
... number in assembly. The second number refers to identify the small parts used in parenthesis below to the quantity needed for shipping. If a part is completed. Console Screw (20)Ð4 M8 Black Flat Washer (57)Ð16 M8 x 15mm Button Screw (7)Ð4 Monitor Screw (17)Ð4 M6 x 15mm Hex Screw (29)Ð4 M8 x 20mm Button Screw (25)Ð4 #8 x 19mm Screw (11)Ð3 M8 x 55mm Button Screw (63)Ð4 4 PART CHART Use the part...
English Manual
Page 5
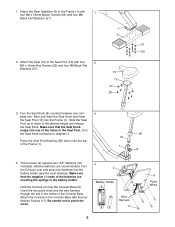
... Monitor Screws (17). Hold the Console (2) near the Console Base (9). Attach the Console to retighten it. 1. Turn the Seat Knob (8) counterclockwise one of the Frame (1). 26 13 1 8 4. Press the Seat Post Bushing (26) down to the Frame (1) with four 2 M6 x 15mm Hex Screws (29) and four M8 Black Flat Washers (57). 12 13 57 29 3. Turn the Console over and press two batteries into the Frame (1). Attach...
... Monitor Screws (17). Hold the Console (2) near the Console Base (9). Attach the Console to retighten it. 1. Turn the Seat Knob (8) counterclockwise one of the Frame (1). 26 13 1 8 4. Press the Seat Post Bushing (26) down to the Frame (1) with four 2 M6 x 15mm Hex Screws (29) and four M8 Black Flat Washers (57). 12 13 57 29 3. Turn the Console over and press two batteries into the Frame (1). Attach...
English Manual
Page 6
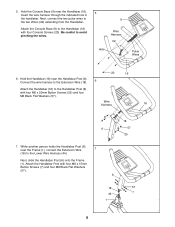
... through the indicated hole in the handlebar. Attach the Console Base (9) to the Handlebar (16) with four M6 x 20mm Button Screws (25) and four M8 Black Flat Washers (57). Wire Harness 16 18 6 57 25 7. Next, connect the two pulse wires to avoid pinching the wires. 5 9 Wire Harness 22 Hole Pulse Wires 6. Next, slide the Handlebar Post (6) onto the Frame (1). 5. Be careful...
... through the indicated hole in the handlebar. Attach the Console Base (9) to the Handlebar (16) with four M6 x 20mm Button Screws (25) and four M8 Black Flat Washers (57). Wire Harness 16 18 6 57 25 7. Next, connect the two pulse wires to avoid pinching the wires. 5 9 Wire Harness 22 Hole Pulse Wires 6. Next, slide the Handlebar Post (6) onto the Frame (1). 5. Be careful...

English Manual
Page 7
... the seat knob snaps into one complete turn. Press the straps back onto the tabs using different holes in the lowest position. As you use the exercise cycle. Turn the seat knob clockwise to the Right Pedal, and tighten the Right Pedal clockwise into the left Crank Arm (34). Slide the other end of the holes in it . 8. Attach the Upper Side Shields with three #8 x 6 61 19mm Screws...
... the seat knob snaps into one complete turn. Press the straps back onto the tabs using different holes in the lowest position. As you use the exercise cycle. Turn the seat knob clockwise to the Right Pedal, and tighten the Right Pedal clockwise into the left Crank Arm (34). Slide the other end of the holes in it . 8. Attach the Upper Side Shields with three #8 x 6 61 19mm Screws...

English Manual
Page 8
... the pedals. Note: Before the console can adjust the resistance of the pedals with the console display As you get the most from your workouts. DESCRIPTION OF THE CONSOLE HOW TO USE THE MANUAL PROGRAM If there is a thin sheet of clear plastic on the face of the console, remove it may take a moment for instructions. 1 Turn on the power To turn on the power, press any button on the console or...
... the pedals. Note: Before the console can adjust the resistance of the pedals with the console display As you get the most from your workouts. DESCRIPTION OF THE CONSOLE HOW TO USE THE MANUAL PROGRAM If there is a thin sheet of clear plastic on the face of the console, remove it may take a moment for instructions. 1 Turn on the power To turn on the power, press any button on the console or...

English Manual
Page 9
... the matrix, the display will show your pedaling speed, the number of Calories you have burned, the elapsed time, and your heart rate is not shown, press the reset button to reset the pulse sensor. The display will be touching the lower contacts. For the most accurate heart rate reading, continue to move your heart rate when the pulse sensor is used (see step 5). HOW TO USE A RESISTANCE PROGRAM 1 Turn on the power To turn off the metal contacts...
... the matrix, the display will show your pedaling speed, the number of Calories you have burned, the elapsed time, and your heart rate is not shown, press the reset button to reset the pulse sensor. The display will be touching the lower contacts. For the most accurate heart rate reading, continue to move your heart rate when the pulse sensor is used (see step 5). HOW TO USE A RESISTANCE PROGRAM 1 Turn on the power To turn off the metal contacts...

English Manual
Page 10
... the console. umn will also change back to the main display in about five seconds. 5 When you exercise. (Your maximum heart rate is turned on, the manual program will increase or decrease as needed to keep your heart rate near 70% of the heart rate programs Each time the power is estimated by the ÒP-1Ó in the display. HOW TO USE A HEART RATE PROGRAM Each heart rate program automatically adjusts the resistance of the pedals to...
... the console. umn will also change back to the main display in about five seconds. 5 When you exercise. (Your maximum heart rate is turned on, the manual program will increase or decrease as needed to keep your heart rate near 70% of the heart rate programs Each time the power is estimated by the ÒP-1Ó in the display. HOW TO USE A HEART RATE PROGRAM Each heart rate program automatically adjusts the resistance of the pedals to...

English Manual
Page 11
... are not pressed for three minutes, the power will turn off automatically. PULSE SENSOR TROUBLE-SHOOTING ¥ Avoid moving your hands while using the pulse sensor. Each time you measure your heart rate, the resistance of your maximum heart rate. To prevent damage to the console, keep liquids away from the console base. If the pedals are not moved and the console buttons are finished exercising, turn off the power To turn off the power, simply...
... are not pressed for three minutes, the power will turn off automatically. PULSE SENSOR TROUBLE-SHOOTING ¥ Avoid moving your hands while using the pulse sensor. Each time you measure your heart rate, the resistance of your maximum heart rate. To prevent damage to the console, keep liquids away from the console base. If the pedals are not moved and the console buttons are finished exercising, turn off the power To turn off the power, simply...
English Manual
Page 12
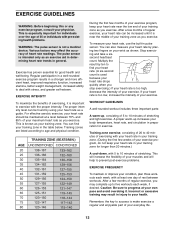
... exercise program, do not keep your heart rate near the middle of your training zone as an exercise aid in determining heart rate trends in preparation for good health and well-being. This is too low, increase the intensity of heart rate readings. WORKOUT GUIDELINES A well-rounded workout includes three important parts: A warm-up increases your health. The pulse sensor is intended only as you stop exercising.) If your heart rate...
... exercise program, do not keep your heart rate near the middle of your training zone as an exercise aid in determining heart rate trends in preparation for good health and well-being. This is too low, increase the intensity of heart rate readings. WORKOUT GUIDELINES A well-rounded workout includes three important parts: A warm-up increases your health. The pulse sensor is intended only as you stop exercising.) If your heart rate...
English Manual
Page 13
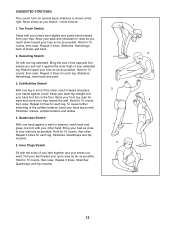
.... Hold for 15 counts, then relax. Bend your front leg, lean forward and move your hips toward your feet toward you and rest it against a wall for each leg. Hold for 15 counts, then relax. SUGGESTED STRETCHES The correct form for 15 counts, then relax. Hold for several basic stretches... as close to relax as possible. Stretches: Hamstrings, lower back and groin. 3. Bring your groin area as far as possible. Repeat 3 times for 15 counts, then relax. Repeat 3 times for 15 counts, then relax. Hold for each leg. Allow your back and shoulders to your back foot ...
.... Hold for 15 counts, then relax. Bend your front leg, lean forward and move your hips toward your feet toward you and rest it against a wall for each leg. Hold for 15 counts, then relax. SUGGESTED STRETCHES The correct form for 15 counts, then relax. Hold for several basic stretches... as close to relax as possible. Stretches: Hamstrings, lower back and groin. 3. Bring your groin area as far as possible. Repeat 3 times for 15 counts, then relax. Repeat 3 times for 15 counts, then relax. Hold for each leg. Allow your back and shoulders to your back foot ...

English Manual
Page 14
... 1 20 4 21 1 22 2 23 8 24 1 25 4 26 1 27 2 28 1 29 4 30 1 Description Frame Console Rear Stabilizer Left Side Shield Right Side Shield Handlebar Post M8 x 15mm Button Screw Seat Knob Console Base Handlebar Foam #8 x 19mm Screw Seat Seat Post ÒCÓ Clip Handlebar Endcap Handlebar Monitor Screw Extension Wire Pulley Console Screw Seat Post Bushing Pulse Wire #10 x 32mm Screw Reed Switch Wire M8 x 20mm Button Screw Seat Post Collar Pulse Handle Assembly Control Board M6 x 15mm Hex Screw Belt Key No.
... 1 20 4 21 1 22 2 23 8 24 1 25 4 26 1 27 2 28 1 29 4 30 1 Description Frame Console Rear Stabilizer Left Side Shield Right Side Shield Handlebar Post M8 x 15mm Button Screw Seat Knob Console Base Handlebar Foam #8 x 19mm Screw Seat Seat Post ÒCÓ Clip Handlebar Endcap Handlebar Monitor Screw Extension Wire Pulley Console Screw Seat Post Bushing Pulse Wire #10 x 32mm Screw Reed Switch Wire M8 x 20mm Button Screw Seat Post Collar Pulse Handle Assembly Control Board M6 x 15mm Hex Screw Belt Key No.

English Manual
Page 16
... or repairs not provided by ICON. This warranty does not extend to give the following information when calling: ¥ The MODEL NUMBER of the product (IMEX35080) ¥ The NAME of the product (IMAGE¨ 3.2C exercise cycle) ¥ The SERIAL NUMBER of the product (see the front cover of this manual) ¥ The KEY NUMBER and DESCRIPTION of the part(s) from the date of this warranty is...
... or repairs not provided by ICON. This warranty does not extend to give the following information when calling: ¥ The MODEL NUMBER of the product (IMEX35080) ¥ The NAME of the product (IMAGE¨ 3.2C exercise cycle) ¥ The SERIAL NUMBER of the product (see the front cover of this manual) ¥ The KEY NUMBER and DESCRIPTION of the part(s) from the date of this warranty is...


