
English Manual
Page 2
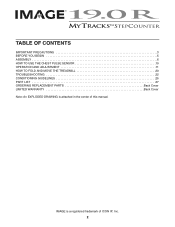
TABLE OF CONTENTS IMPORTANT PRECAUTIONS 3 BEFORE YOU BEGIN 5 ASSEMBLY 6 HOW TO USE THE CHEST PULSE SENSOR 10 OPERATION AND ADJUSTMENT 11 HOW TO FOLD AND MOVE THE TREADMILL 20 TROUBLESHOOTING 22 CONDITIONING GUIDELINES 25 PART LIST 27 ORDERING REPLACEMENT PARTS Back Cover LIMITED WARRANTY Back Cover Note: An EXPLODED DRAWING is a registered trademark of this manual. IMAGE is attached in the center of ICON IP, Inc. 2
TABLE OF CONTENTS IMPORTANT PRECAUTIONS 3 BEFORE YOU BEGIN 5 ASSEMBLY 6 HOW TO USE THE CHEST PULSE SENSOR 10 OPERATION AND ADJUSTMENT 11 HOW TO FOLD AND MOVE THE TREADMILL 20 TROUBLESHOOTING 22 CONDITIONING GUIDELINES 25 PART LIST 27 ORDERING REPLACEMENT PARTS Back Cover LIMITED WARRANTY Back Cover Note: An EXPLODED DRAWING is a registered trademark of this manual. IMAGE is attached in the center of ICON IP, Inc. 2
English Manual
Page 3
... aerosol products are standing on the front cover of this treadmill are not medical devices. Never move the walking belt while the power is running. Athletic support clothes are intended only as described. Adjust the speed in small increments to persons, read the following important precautions and information before using the treadmill (see page 11), plug the power cord into a surge suppressor (not included) and...
... aerosol products are standing on the front cover of this treadmill are not medical devices. Never move the walking belt while the power is running. Athletic support clothes are intended only as described. Adjust the speed in small increments to persons, read the following important precautions and information before using the treadmill (see page 11), plug the power cord into a surge suppressor (not included) and...
English Manual
Page 4
... toll-free telephone number on the treadmill. If a decal is missing, or if it is intended for in the location shown. Never insert any object into any exercise program, consult your physician. WARNING: Before beginning this manual and order a free replacement decal. Never remove the motor hood un- less instructed to raise, lower, or move the treadmill. 21. 20. When folding or moving the treadmill, make sure that the storage latch...
... toll-free telephone number on the treadmill. If a decal is missing, or if it is intended for in the location shown. Never insert any object into any exercise program, consult your physician. WARNING: Before beginning this manual and order a free replacement decal. Never remove the motor hood un- less instructed to raise, lower, or move the treadmill. 21. 20. When folding or moving the treadmill, make sure that the storage latch...
English Manual
Page 5
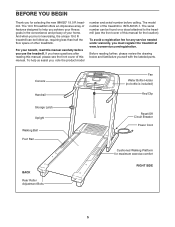
... treadmill (see the front cover of the treadmill is included) Key/Clip Reset/Off Circuit Breaker Power Cord Cushioned Walking Platform for the location). Console Handrail Storage Latch Upright Walking Belt Foot Rail BACK Rear Roller Adjustment Bolts Fan Water Bottle Holder (no bottle is IMTL59105.1. The serial number can be found on a decal attached to help us assist you achieve your fitness goals in the convenience and privacy of this manual for maximum exercise...
... treadmill (see the front cover of the treadmill is included) Key/Clip Reset/Off Circuit Breaker Power Cord Cushioned Walking Platform for the location). Console Handrail Storage Latch Upright Walking Belt Foot Rail BACK Rear Roller Adjustment Bolts Fan Water Bottle Holder (no bottle is IMTL59105.1. The serial number can be found on a decal attached to help us assist you achieve your fitness goals in the convenience and privacy of this manual for maximum exercise...
English Manual
Page 6
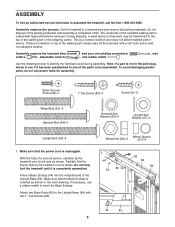
... the parts to be transferred to the Upright Base (84) with high-performance lubricant. This is more stable. Assembly requires the included allen wrench and your own phillips screwdriver cutters , adjustable wrench , and rubber mallet . , wire Use the drawings below to assemble the treadmill, call toll-free 1-800-445-2480. Silver Ground Screw (94)-1 1" Tek Screw (83)-4 Screw (3)-11 Wheel Bolt (81)-2 Handrail Bolt (64...
... the parts to be transferred to the Upright Base (84) with high-performance lubricant. This is more stable. Assembly requires the included allen wrench and your own phillips screwdriver cutters , adjustable wrench , and rubber mallet . , wire Use the drawings below to assemble the treadmill, call toll-free 1-800-445-2480. Silver Ground Screw (94)-1 1" Tek Screw (83)-4 Screw (3)-11 Wheel Bolt (81)-2 Handrail Bolt (64...
English Manual
Page 8
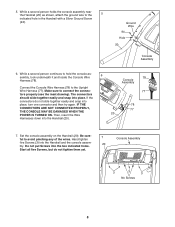
... holds the console assembly near the Handrail (20) as shown, attach the ground wire to hold the console assembly, look underneath it and locate the Console Wire 6 Harness (78). Connect the Console Wire Harness (78) to connect the connectors properly (see the inset drawing). IF THE CONNECTORS ARE NOT CONNECTED PROPERLY, THE CONSOLE MAY BE DAMAGED WHEN THE POWER IS TURNED ON. 5. Make sure to the Upright Wire Harness...
... holds the console assembly near the Handrail (20) as shown, attach the ground wire to hold the console assembly, look underneath it and locate the Console Wire 6 Harness (78). Connect the Console Wire Harness (78) to connect the connectors properly (see the inset drawing). IF THE CONNECTORS ARE NOT CONNECTED PROPERLY, THE CONSOLE MAY BE DAMAGED WHEN THE POWER IS TURNED ON. 5. Make sure to the Upright Wire Harness...

English Manual
Page 9
... lower drawing. 8. Console Assembly 3 3 3 9. do not over- 20 tighten the Screws. Firmly tighten the four Upright Bolts (65). To protect the floor or carpet, place a mat under the treadmill. Hand tighten four additional Screws (3) into the Latch Housing (73). Position the Uprights (13, 14) so the Frame (58) is used in a secure place; Attach the Latch Housing (73) to adjust the walking belt (see page 11), and then lower the treadmill...
... lower drawing. 8. Console Assembly 3 3 3 9. do not over- 20 tighten the Screws. Firmly tighten the four Upright Bolts (65). To protect the floor or carpet, place a mat under the treadmill. Hand tighten four additional Screws (3) into the Latch Housing (73). Position the Uprights (13, 14) so the Frame (58) is used in a secure place; Attach the Latch Housing (73) to adjust the walking belt (see page 11), and then lower the treadmill...
English Manual
Page 10
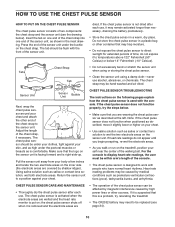
... that may need to be caused by medical conditions such as is comfortable. For the console to display heart rate readings, the user must be within arm's length of the console. • The chest pulse sensor is designed to direct sunlight for extended periods of time; Insert the tab on the treadmill, position yourself near the center of the walking belt. If the chest pulse sensor is removed and...
... that may need to be caused by medical conditions such as is comfortable. For the console to display heart rate readings, the user must be within arm's length of the console. • The chest pulse sensor is designed to direct sunlight for extended periods of time; Insert the tab on the treadmill, position yourself near the center of the walking belt. If the chest pulse sensor is removed and...

English Manual
Page 11
... treadmill is damaged, the walking belt may change speed, accelerate or stop unexpectedly, which may be seriously damaged by a qualified electrician. IMPORTANT: Never apply silicone spray or other type of this manual and order part number 146148, or see your home's power. This product is not available. 1 Grounded Outlet Box Surge Suppressor Grounding Pin Grounding Pin Grounded Outlet Grounding Plug 2 Grounded Outlet Box Adapter Surge...
... treadmill is damaged, the walking belt may change speed, accelerate or stop unexpectedly, which may be seriously damaged by a qualified electrician. IMPORTANT: Never apply silicone spray or other type of this manual and order part number 146148, or see your home's power. This product is not available. 1 Grounded Outlet Box Surge Suppressor Grounding Pin Grounding Pin Grounded Outlet Grounding Plug 2 Grounded Outlet Box Adapter Surge...
English Manual
Page 12
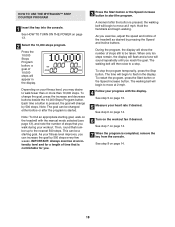
... guides you exercise. To use a trainer program, see page 18. 12 To use the manual mode of the most users. When the manual mode of the console is selected, the speed and incline of the treadmill can even measure your walking exercise, the console offers a MyTracks™ StepCounter program that allows you to enter the number of steps that you plan to keep your heart rate near a target heart rate setting during your workouts more effective. Cardio Control Programs The console...
... guides you exercise. To use a trainer program, see page 18. 12 To use the manual mode of the most users. When the manual mode of the console is selected, the speed and incline of the treadmill can even measure your walking exercise, the console offers a MyTracks™ StepCounter program that allows you to enter the number of steps that you plan to keep your heart rate near a target heart rate setting during your workouts more effective. Cardio Control Programs The console...
English Manual
Page 13
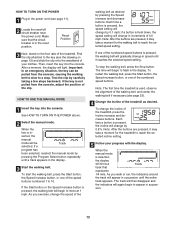
... display. Make sure that represents 1/4 mile. if the key is pressed, the walking belt will light. If one of the walking belt as desired. HOW TO TURN ON THE POWER 1 Plug in the reset position. Reset Position 3 Next, stand on page 12) and slide the clip onto the waistband of the treadmill. Find the clip attached to a stop the walking belt, press the Stop button. If a program has been selected, reselect the manual mode...
... display. Make sure that represents 1/4 mile. if the key is pressed, the walking belt will light. If one of the walking belt as desired. HOW TO TURN ON THE POWER 1 Plug in the reset position. Reset Position 3 Next, stand on page 12) and slide the clip onto the waistband of the treadmill. Find the clip attached to a stop the walking belt, press the Stop button. If a program has been selected, reselect the manual mode...

English Manual
Page 14
... the chest pulse sensor. To turn off the demo mode. Note: If the display remains lit after a few minutes. 8 When you use the handgrip pulse sensor and the chest pulse sensor at high speed, press the button a second time. To reset the display, press the Stop button, remove the key, and then reinsert the key. 6 Measure your heart rate when you are finished using the handgrip pulse sensor, remove the sheets of the treadmill. When you have walked or run, and the incline...
... the chest pulse sensor. To turn off the demo mode. Note: If the display remains lit after a few minutes. 8 When you use the handgrip pulse sensor and the chest pulse sensor at high speed, press the button a second time. To reset the display, press the Stop button, remove the key, and then reinsert the key. 6 Measure your heart rate when you are finished using the handgrip pulse sensor, remove the sheets of the treadmill. When you have walked or run, and the incline...
English Manual
Page 16
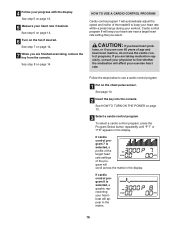
... your workout. If cardio control program 8 is selected, a profile of the target heart rate settings of the treadmill to use the cardio control programs. If you are over 60 years of age and have heart prob- See step 8 on page 13. 3 Select a cardio control program. HOW TO USE A CARDIO CONTROL PROGRAM Cardio control program 7 will automatically adjust the speed and incline of the program will scroll across the matrix in the matrix. 16 See HOW TO TURN ON THE POWER...
... your workout. If cardio control program 8 is selected, a profile of the target heart rate settings of the treadmill to use the cardio control programs. If you are over 60 years of age and have heart prob- See step 8 on page 13. 3 Select a cardio control program. HOW TO USE A CARDIO CONTROL PROGRAM Cardio control program 7 will automatically adjust the speed and incline of the program will scroll across the matrix in the matrix. 16 See HOW TO TURN ON THE POWER...
English Manual
Page 17
... button to flash in the display and the speed and/or incline of tones will automatically increase or decrease to bring your heart rate to the target heart rate setting, the speed and/or incline of the walking belt will sound. Note: For a shorter workout, simply stop the program at any time, press the Stop button. When the console compares your heart rate closer to the left. See step 8 on page 25). If cardio control program...
... button to flash in the display and the speed and/or incline of tones will automatically increase or decrease to bring your heart rate to the target heart rate setting, the speed and/or incline of the walking belt will sound. Note: For a shorter workout, simply stop the program at any time, press the Stop button. When the console compares your heart rate closer to the left. See step 8 on page 25). If cardio control program...
English Manual
Page 18
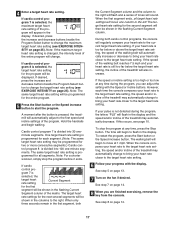
... the treadmill with the display. This can be changed either before or after the button is completed, remove the key from the console. The walking belt will change the goal, press the increase and decrease buttons beside the 10,000 Steps Program button. See step 7 on page 13. 5 Measure your progress with the manual mode selected (see page 13), and note the number of steps still to a stop the program temporarily, press the Stop button...
... the treadmill with the display. This can be changed either before or after the button is completed, remove the key from the console. The walking belt will change the goal, press the increase and decrease buttons beside the 10,000 Steps Program button. See step 7 on page 13. 5 Measure your progress with the manual mode selected (see page 13), and note the number of steps still to a stop the program temporarily, press the Stop button...

English Manual
Page 19
... removed from the console. 19 To change the unit of treadmill usage information. When the console is in the demo mode, the power cord can be plugged in, the key can be used only when a treadmill is selected, the following information will appear in a store. In addition, an "E" for English miles or an "M" for metric kilometers will show the number of thousands of steps taken by all users of the display...
... removed from the console. 19 To change the unit of treadmill usage information. When the console is in the demo mode, the power cord can be plugged in, the key can be used only when a treadmill is selected, the following information will appear in a store. In addition, an "E" for English miles or an "M" for metric kilometers will show the number of thousands of steps taken by all users of the display...

English Manual
Page 23
... tightened. 23 Remove the key and UNPLUG THE POWER CORD. PROBLEM: The walking belt is aligned with the Reed Switch. If the walking belt has shifted to the left, use the allen wrench to turn the left bolt counterclockwise 1/2 of a turn ; b. If the walking belt slips when walked on SOLUTION: a. rectly tightened, you should be able to lift each edge of the Pulley (47). Then, plug in the power cord, insert the key, and run the treadmill...
... tightened. 23 Remove the key and UNPLUG THE POWER CORD. PROBLEM: The walking belt is aligned with the Reed Switch. If the walking belt has shifted to the left, use the allen wrench to turn the left bolt counterclockwise 1/2 of a turn ; b. If the walking belt slips when walked on SOLUTION: a. rectly tightened, you should be able to lift each edge of the Pulley (47). Then, plug in the power cord, insert the key, and run the treadmill...
English Manual
Page 25
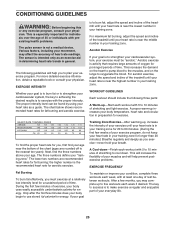
... key to success is to exercise with 5 to burn fat, adjust the speed and incline of the treadmill until your heart rate is near the lowest number in your condition, complete three workouts each workout with 5 to 10 minutes of the chart (ages are recommended heart rates for energy. WORKOUT GUIDELINES Each workout should include the following guidelines will help you must be found by using your training...
... key to success is to exercise with 5 to burn fat, adjust the speed and incline of the treadmill until your heart rate is near the lowest number in your condition, complete three workouts each workout with 5 to 10 minutes of the chart (ages are recommended heart rates for energy. WORKOUT GUIDELINES Each workout should include the following guidelines will help you must be found by using your training...

English Manual
Page 27
... Rail 18 1 Motor Pivot Bolt 19 1 Motor Bracket 20 1 Handrail 21 1 Latch Pin Assembly 22 2 Motor Washer 23 1 Motor Star Washer 24 2 Motor Bolt 25 4 Motor Tension Bolt 26 1 Motor Belt 27 1 Drive Motor 28 2 Frame Washer 29 4 U-nut 30 2 Motor Nut 31 2 Lift Frame Bolt 32 7 Wheel Nut 33 16 1/2" Screw 34 1 Console 35 2 Fan Screw 36 1 Power Cord Assembly 37 1 Fan 38 1 Controller 39 1 Electronic Bracket 40 1 Filter Wire 41 1 Hood 42 1 Front Roller Bushing 43 1 Lift...
... Rail 18 1 Motor Pivot Bolt 19 1 Motor Bracket 20 1 Handrail 21 1 Latch Pin Assembly 22 2 Motor Washer 23 1 Motor Star Washer 24 2 Motor Bolt 25 4 Motor Tension Bolt 26 1 Motor Belt 27 1 Drive Motor 28 2 Frame Washer 29 4 U-nut 30 2 Motor Nut 31 2 Lift Frame Bolt 32 7 Wheel Nut 33 16 1/2" Screw 34 1 Console 35 2 Fan Screw 36 1 Power Cord Assembly 37 1 Fan 38 1 Controller 39 1 Electronic Bracket 40 1 Filter Wire 41 1 Hood 42 1 Front Roller Bushing 43 1 Lift...
English Manual
Page 30
...) LIMITED WARRANTY ICON Health & Fitness, Inc. (ICON) warrants this manual. ICON HEALTH & FITNESS, INC., 1500 S. 1000 W., LOGAN, UT 84321-9813 Part No. 235844 R0406A Printed in connection with the use or performance of the product or damages with respect to and from the service center will be prepared to give the following information: • the MODEL NUMBER of the product ( IMTL59105.1) • the NAME of the product (IMAGE 19.0 R treadmill...
...) LIMITED WARRANTY ICON Health & Fitness, Inc. (ICON) warrants this manual. ICON HEALTH & FITNESS, INC., 1500 S. 1000 W., LOGAN, UT 84321-9813 Part No. 235844 R0406A Printed in connection with the use or performance of the product or damages with respect to and from the service center will be prepared to give the following information: • the MODEL NUMBER of the product ( IMTL59105.1) • the NAME of the product (IMAGE 19.0 R treadmill...


